When professional decorators renovate a room, they select materials that are most suitable for the conditions where they will be used. The bathroom is the most difficult room in the house due to the humid microclimate with temperature changes and insufficient air circulation.
The bathroom finishing is made from moisture-resistant materials that are resistant to fungal and mold microorganisms, for example, tiles or plastic panels. In this article we will tell you whether moisture-resistant cardboard can be used in the bathroom, and also what it is used for.
Types of material
Plasterboard building material is produced in the form of rectangular sheets with a standard width of 1.2 m and a thickness of 9.5-12.5 mm. Finishing from it is used when leveling walls, arranging ceilings, and creating various interior elements.
There are the following types of drywall:
- GCR - ordinary, gray, used for finishing rooms with normal temperature and humidity.
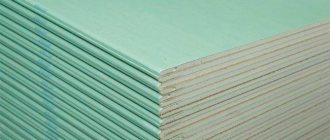
- GKLV - moisture resistant, marked in green or blue, used for repairing rooms with high amounts of moisture. Waterproof plasterboard is excellent for the bathroom; it is in demand when constructing partitions, making shelves, and leveling walls for laying tiles.
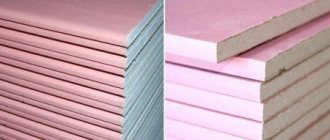
- GKLO is pink, highly resistant to fire, and is used to decorate walls near fireplaces and other sources of open fire.
- GVL is characterized by increased impact strength, which is achieved by adding special fibers to the gypsum material.
Important! Drywall in the bathroom must be moisture resistant. This material is available in two types: better quality is marked with the letter “A”, less resistant to moisture – “B”.
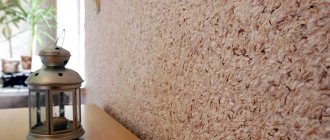
There are several types of drywall, but for bathroom renovations only moisture-resistant material can be used Source zhk-akvapolis.rf
Water-based paints for gypsum boards
We prime the drywall and prepare it for painting
In the interior for painting gypsum boards, it is better to choose harmless water-based compositions:
The peculiarity of painting walls with water-based compositions is to apply the next layer of paint on top of the wet previous one. The finishing order is as follows:
- Thin the thick paint with water immediately before use.
- Use a brush to paint corners, edges and areas around switches and outlets.
- Apply the first coat of paint with a roller in a horizontal direction.
- The second layer is applied with vertical movements.
Each coat of paint requires a 90-degree change in roller or brush motion. Given the hygroscopic nature of gypsum, it is necessary to ensure uniform drying. There should be no drafts or air flows from the heater and fan.
After the water evaporates, the paints form a film that can be washed with ordinary substances up to 5 times. Wipe regularly with a damp cloth. The walls breathe. The ability of gypsum materials to maintain an optimal microclimate in the room is preserved.
You can remove the paint to change color with warm water and a hard sponge. Then you need to prime the surface and after drying you can paint it and give the room a new look.
Which drywall to choose for the bathroom
In rooms with high humidity levels it is allowed to use the following types of plasterboard products:
- GKLV. The height and width of the sheet depends on the manufacturer, thickness - 12.5 mm. This material is used to create a suspended ceiling, hide pipes, and level walls.
- GKLVO (moisture and fire resistant). It is used for finishing wall surfaces in places where there is a high risk of old wiring catching fire, as well as in areas close to the stove.
Attention! You cannot use plain gray drywall in the bathroom. Otherwise, over time, it will swell and quickly deform, which will subsequently render the finishing unusable.
Fire-moisture resistant drywall is used in places where there is a high probability of old wiring catching fire, near the stove or other sources of fire Source cdvor.ru
Tools
The entire list is divided into devices for surface preparation and painting. You will need:
- Plastering set: spatulas 50 and 500 mm, mixer for kneading the mixture, grater with mesh or sandpaper;
- Auxiliary equipment: electric drill, mixer attachment;
- Painting tools: roller 200-300 mm, brushes 50-80 mm, paint tray, masking tape.
Do-it-yourself paint can be applied using a spray gun, which allows you to get a more uniform layer and also reduce material consumption, but such equipment is not always available.
The list is adjusted as necessary.
Using drywall in the bathroom
Waterproof plasterboard sheets have proven their effectiveness when installed in areas with excessive moisture levels. They are often used to decorate wall surfaces, ceilings, and to hide pipes and communications.
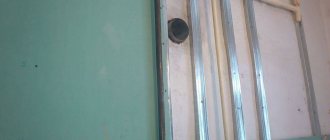
Wall cladding in the bathroom can be done by attaching drywall to a frame (metal, wood) or using a frameless method using mounting adhesive Source samstroy.com
Wall decoration
Moisture-resistant plasterboard in the bathroom is often used to level the walls. It is carried out in two ways:
- Creating a supporting frame from a metal profile or wooden blocks.
- Gluing plasterboard sheets to walls using mounting adhesive.
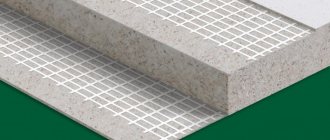
The frame method involves the obligatory laying of a layer of insulating material between the gypsum board and the wall. Eliminating empty space prevents the formation of condensation and the development of fungi and bacteria.
Finishing a bathroom with plasterboard by gluing requires perfectly smooth walls. But at the same time it provides significant space savings.
Important! Before gluing plasterboard sheets, their surfaces must be treated with a special waterproofing impregnation. This will prevent the properties of the adhesive from weakening and, as a result, the gypsum board from falling behind the wall and condensation subsequently appearing on the material.
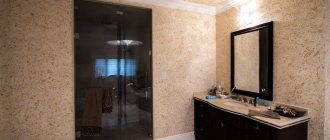
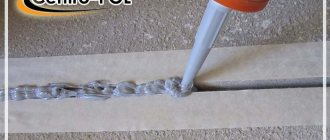
Moisture-resistant plasterboard sheets are mounted close to each other; for additional protection from moisture, all joints and corners can be treated with sealant Source st5.stblizko.ru
Preparing for work
The bathroom is covered with plasterboard after replacing all old communications with new ones. The room is cleared of all unnecessary things. The walls are being cleared. All loose paint and putty are removed.
The cleaned walls of the bathtub are covered with a primer in 2-3 layers. If there are holes or deep holes left from old systems, they must be repaired along with the cracks.
An ideal microclimate is formed between the wall and the cladding for the existence of various parasitic insects and rodents. All cracks must be carefully sealed with plaster and sealant before creating the box, so that pests cannot penetrate there.
Video description
Why you can't use drywall in the bathroom.
Ceiling decoration
If ordinary plasterboard for a bathroom is carefully treated with liquid waterproofing and antiseptics, then it can be used to level the walls. It is often in demand in large rooms and only where the wall is not in contact with water at all. Non-moisture-resistant plasterboard sheets cannot be used to create a ceiling, since moisture will rise and condense on them.
How to correctly calculate the required amount of tiles?
To clearly answer the question of how many tiles are needed for tiling your bathroom, you need to perform simple calculations. For this:
- You need to measure each wall in the room separately;
- Transfer data to scale onto paper;
- Count how many whole tiles will lie in one horizontal row. To do this, divide the width of the wall in cm by the length of the tile in cm. For example, divide a wall 2.5 meters wide by the length of the tile, say 40 cm: 250cm/40cm=6.25 pcs. We see that there will be 6 whole tiles and ¼ of the seventh tile in a row. In this way, the trim can be positioned so that the most visible corner consists of only whole elements. This way the masonry will look more aesthetically pleasing. If the seventh tile lay more than half its length in a row, it would be possible to trim symmetrically on both edges. This method will require purchasing tiles with a large supply, but we will look better;
- In the same way, it is necessary to count the number of tiles that the vertical row contains. To do this, divide the height of the wall by the width of the tile. For example: 250cm/25cm=10 pcs. In this example we were lucky, but this happens extremely rarely. If there is not a whole number of elements in a row, the trim should be at the very bottom, that is, the first whole tile should be placed from the ceiling;
- To find out the total number of tiles for one wall, you need to multiply the whole number of tiles in a horizontal row by their number in a vertical row. In our case, we will need 6pcs*10pcs=60 pcs. Please note that the remainder of the trimmed tiles can be used again if the tiles are plain. Accordingly, the number of tiles for trimming will be halved. And instead of 10 tiles, we can get by with five. Total: 60pcs+5pcs=65. At first glance it seems that saving is insignificant, but do not forget that this is just one wall;
- Such calculations must be made for each surface, taking into account the size of the frieze, if any. To make the task easier, you can draw a tile layout diagram on paper.
Please note that it is more convenient to calculate in pieces rather than in square meters. To the resulting value, you need to add from 5 to 15% in reserve, because a fight or crooked pruning cannot be ruled out.
sovety-vannoy.ru
Often, plasterboard walls in the bathroom are created on the basis of a frame made of galvanized profiles. To get a high-quality result, it is recommended to follow the following sequence of actions:
- Prepare the base thoroughly: clean, dry, coat with a waterproofing agent.
- Take measurements to calculate the required number of building material elements.
- Using plumb lines, a cord, a laser level, and a marker, mark the surfaces.
- Fix the profiles: attach the guides to the floor and ceiling using dowel nails. Screw hangers to the wall in 40 cm increments, on which to secure the rack and transverse elements. Crabs are used to fix the latter.
- Check the created frame for strength and rigidity.
- Attach sheets of drywall to the metal base in a checkerboard pattern: first whole, then the remaining parts. In this case, the horizontal joints of the panels should not coincide.
- Cover the plasterboard wall with a primer and wait until it dries.
- Reinforce the joints and treat them with special putty.
- Putty the entire surface and prime again.
If the above work is performed correctly, the wall will certainly be smooth and strong. It will be completely ready for finishing.
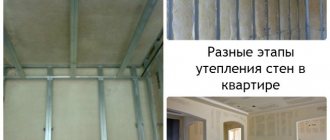
Before installing drywall in the bathroom, it is advisable to install a reliable metal frame Source guruotdelki.ru
Advantages of plasterboard base
Due to its versatility, plasterboard has found wide application in the field of repair and decoration. This material can be used for a variety of purposes - from the usual leveling of a wall or ceiling plane, to the construction of decorative partitions or other functional structures. Let's look at the main advantages of this material as a base for laying tiles:
- One of the main advantages is the ability to tear out walls in the shortest possible time. In the old-fashioned way, many are accustomed to creating a plane using various cement-sand mixtures, however, if the differences on the surface are too large, it will not be possible to achieve the desired result in one go. Simply because each solution has restrictions regarding the maximum allowable application thickness in one layer. Accordingly, in order to apply the second ball of putty, it is imperative to wait until the first one has completely dried. Next, you will have to wait again until the finishing layer dries to perform the stripping, and then apply the primer. And again wait until the soil is absorbed and only then proceed with the actual laying of the tiles. This process can take from several days to a week, depending on the size of the room, the curvature of the walls and your skills. While sheathing walls with plasterboard can be done in a couple of days;
- Another nice fact that those who have a limited budget will especially appreciate is cheap material. If you compare the costs of purchasing the required amount of putty with the costs of purchasing a certain number of sheets of drywall, you can see that the second option will be more economical. Especially if there are holes on the walls that will require a large amount of mixture to fill;
- It is also worth noting that working with drywall occurs without dust and a lot of dirt, of course, if you do not cut it with a jigsaw;
- Do not forget that this material is completely safe for health;
- Has increased fire safety indicators;
- It is an excellent heat and sound insulator;
- It is characterized by sufficient strength;
- Easy to process. You don't need any special skills to get a perfectly flat surface. It is enough to know how to use a building level.
By the way, recently even leveling the floor with drywall has been widely practiced.
Care
Regardless of whether the plasterboard walls in the bathroom are painted or tiled, they require constant maintenance. During the latter process, it is recommended to perform the following actions:
- Regularly wipe gypsum plasterboard walls with a cloth dampened in a mild detergent. The best time for this procedure is after a bath or shower, when the walls are steamed. You can also turn on hot water for a few minutes to create steam. Subsequently, the room should be dried to avoid the accumulation of moisture and damp odors.
- Monitor the quality of ventilation indoors.
- Periodically inspect all surfaces for mold growth.
In order for plasterboard walls in the bathroom to serve for a long time, they must be protected from the negative effects of water droplets and prevent liquid from accumulating on the floor surface. During care, you can use detergents that do not contain acid.
When caring for plasterboard walls in the bathroom, it is not recommended to use acid-containing detergents Source krasimsami.com
Painting walls in the interior: types, design, combinations, color choice,
Painting walls in two different colors serves as a rational technique to visually enlarge a room, change the perception of the geometry of asymmetrical walls, or simply focus on one wall. One wall can be painted with two different colors. Suitable for visually increasing the ceiling if the dark color near the floor fades into white. A gradient or smooth transition of color can be horizontal or vertical, with a transition to the adjacent wall.
Created with 2 or more colors, where at the junction of colors, using a dry roller or brush, a dark color is stretched onto a light area in one direction. Effects using a textured roller or sponge are made on a uniformly painted wall, creating the effect of watercolor, bark beetle, waves, cracks, velor or mosaics. A children's room can have the walls painted with special paints marked; they are water-based and dry quickly. There are also paints with silver ions, which do not absorb moisture and allow you to paint over regular watercolors. Colorful stencil designs, stripes, patterns, letters and numbers are all suitable.
The interior can be easily replaced by painting the walls a new color. You can make your own designs using stencils and templates by cutting them out of paper and attaching them to the wall. You can also draw boundaries for the design using masking tape glued to the dried base color.
How to properly and quickly sand seams?
After the glue has dried, you need to complete the final part of the facing work - seal the seams with a special waterproof compound. Fortunately, the choice of manufacturers and colors is quite large.
- Do not mix a large amount of grout at once, as it tends to harden quickly;
- When diluting, you need to achieve a consistency that will resemble thick sour cream;
- You can apply the grout using a small rubber spatula, after first clearing the glue from the joints with a wooden stick;
- Movements should be directed at an angle relative to the seam. About 45 degrees. Firstly, it will be more convenient for you. And, secondly, this way the composition will penetrate deeper into the seams;
- The most important thing is to fill the space between the tiles to the very base. Only then will the grout not begin to crack and fall out in separate pieces over time. And only under this condition can complete tightness be achieved;
- If the seams are wide, you can push the compound into them with the end of a spatula until it is completely filled;
- When the seam is completely filled, run along it from top to bottom or from left to right to level the surface and remove excess mixture from the tile;
- After 15-20 minutes, the tiles can be immediately wiped with a damp soft cloth. This way it is much easier to wash off traces of the composition than after it has completely dried;
- Finally, wipe the surface with a dry cloth;
- To protect the seams from dirt and excessive moisture, you can additionally coat them with a special water-repellent sanitary sealant. It comes in both transparent and white.
The article was written for the site.
Tags: Drywall, Ceramic tiles
Pallet device
The elevation is necessary in order to provide a sewer slope. If it is possible to have a good slope of the pipes without raising the floor plane, then the pallet device consists of a screed with the formation of the required slope towards the drain - a hole for water drainage. The ladder is located in the center or at the edge opposite the exit.
If the plane of the cabin floor has to be raised, then use bricks or any other building material as filler, which are then filled with screed (at least 3 cm).
Sometimes they use expanded clay concrete or even pure concrete. To do this, formwork of the required diameter is knocked together from boards, after which concrete is placed in the formed container. It is necessary to carefully thrombus the concrete where the pipes pass so as not to damage their integrity.
When forming a pallet using concrete, it should be remembered that dismantling such a structure (if necessary) will be quite labor-intensive. Also, you should not use this method in apartments of multi-storey buildings, so as not to create additional load on the floors. For a private home, this option is quite acceptable due to its durability and strength.
Laying the first row of tiles
The most critical stage of all work, on which the final result directly depends, is laying the first row of tiles. After all, in the future it will set the position of all other tiles and will serve as the main guide. You need to start with clear markings:
- Usually the first row is the one that will be located directly above the bathtub, since many people believe that it is in this place, and not under the ceiling, that the entire tile should be visible. If you are of the same opinion, then measure the height of your bath taking into account the height of the frame on which it will be installed and transfer the mark to the wall;
- Next, using a building level, draw a strictly horizontal line at a given height across the entire wall;
- If it doesn’t matter to you how much the bathtub will overlap the tiles, then focus from the ceiling and draw a line that will correspond to the penultimate row from the floor. Don't forget to add thickness to the seams;
- Focusing on the line, screw a beam or profile to the wall, which will serve as support for the first row, allow you to respect the horizon and prevent the tiles from sliding;
- Lay the first tile in the corner, moving from left to right. Remember that the most visible corner should be the most beautiful and not undercut;
- Lay two more tiles in rows, placing crosses between them;
- Now move up;
- Lay 3-4 tiles, excluding the first one, in a vertical row. Don't forget about the crosses;
- Periodically check the evenness of the masonry using a rule;
- Complete the horizontal row up to the next wall and take a break.
It is necessary to take a break every 4-5 hours of work. The interval should be 30 min-1 hour. During this time, the stresses that arise in the foundation under load will be relieved, and you will have a little rest. If you have a laser level, you can draw lines on all the walls at once and attach guide strips. In this case, installation can be done around the room. Immediately remove excess and traces of glue from the surface of the tile with a damp cloth.
Tips for choosing an adhesive composition
The reliability of fixing tiles to the base depends entirely on the adhesive composition. When laying tiles on a plasterboard surface, you need to select a composition that can be used simultaneously for both of these materials.
Based on their composition, the variety of mixtures can be divided into 3 groups:
- Cement based adhesive. It can be used for gluing tiles to drywall, since, in fact, we will be installing on thick paper, and not on the plaster itself. But you should be extremely careful and not purchase frankly cheap products. Pay attention to adhesives that additionally contain various plasticizers, otherwise an excess of liquid in ordinary cement-sand adhesive can lead to soaking and deformation of the surface;
- Elastic glue. It is also produced on the basis of ordinary cement, but contains various polymer additives, which makes its structure elastic even after complete hardening. This type of glue is recommended for use in buildings that have recently been built and can still “float” a little. Thanks to its properties, the glue will react quite flexibly to such shrinkage and compensate for stress, and the tile will not peel off. This mixture can be sold either in dry form or as a ready-made solution. Its cost is slightly higher than the first variety;
- Liquid Nails. Due to its high cost, it is rarely used for installing tiles throughout the room. More often used for gluing a single fragment that has come off or needs to be replaced. If you still decide to use this type of glue, be sure to choose moisture-resistant compounds.
Ask the seller or read on the packaging about the toxicity of the selected composition and the possibility of its use indoors. For direct installation of tiles, do not mix all the contents of the package at once, otherwise, if difficulties arise during installation, the composition may simply dry out. The packaging also indicates the maximum time during which the glue will retain its properties. While you gain speed and get used to working with this composition, stir enough to cover approximately 1 square meter of wall.
Construction of a shower room
Let's consider the stages of arrangement:
- Preparation of a design plan and its installation;
- We consider and analyze all technical issues;
- Preparation for installation;
- Preparation of working materials and tools;
- Construction according to the drawn up plan.
Now we should consider each point separately in more detail.
Preparing a plan
This issue should be addressed at the stage of considering the option of providing such a design. Of course, without it you won’t be able to build such a shower room yourself, so you should take the design and planning of the construction as seriously as possible. What factors should be taken into account?
- First of all, use should be comfortable, and for this the dimensions must be at least 80 by 80 centimeters;
- To accurately calculate such dimensions, several factors should be taken into account, such as the thickness of the tile and the thickness of the partition;
- The first parameter, the thickness of the tile, is calculated quite simply - half a centimeter is added to the nominal thickness, which is the thickness of the mortar;
- The thickness of the partition depends on the size of the profile and the size of the plasterboard sheet itself. On average, the dimensions reach 120-150 millimeters;
- Having done all the calculations correctly, you can enter them into the plan, only after that, having fully calculated all the required expenses, you can directly move on to the next stage, namely the consideration of technical issues.
The design of the shower has a rather complex technological aspect. Especially if the construction is carried out manually on your own, without involving specialists. This issue should also be considered at the planning stage. There are usually no problems with the plumbing; you just need to lengthen the main pipes and that’s it. But it’s worth stopping separately at the sewerage system.
- First of all, the drain hole should be located either on the side or in the center of the cabin;
- Remember that the minimum slope of a sewer pipe is 2 degrees or 3 cm per 1 meter of pipe;
- Provide a place for a siphon, otherwise the smell from the sewer will enter the room;
- Before final fastening, check the tightness of the system itself so that there are no leaks in it; to do this, pour at least 1-2 liters of water into the system;
- Afterwards the sewer pipe is installed, usually using a special solution.
At this stage, fully think over the arrangement of water supply and sewerage, because then it will be too late. All calculations, drawings, etc. should be processed before work begins, even before the idea is fully approved and the material is purchased.
How to avoid mistakes when laying tiles on drywall?
It is recommended to use the required amount of metal profile, which ensures the reliability of the entire structure. Without this, the drywall will not be attached securely. It is necessary to choose the right materials: tiles, drywall, primer, putty.
In the process of mixing glue, you need to use the exact amount of components and follow the technology.
Additionally, it is necessary to ensure that there are no voids left between the tiles and the gypsum board. Premature commissioning when the glue has not yet dried will shorten the service life of the coating. They also note the importance of protecting seam joints. After installing the tiles, these areas are more exposed to moisture than the rest of the coating area, which means they require more careful treatment.