Most likely, you are partial to mosaics. Such is the peculiarity of this type of art. Surely you have admired a certain street panel by an unknown artist more than once. Perhaps your home is not even deprived of factory-made mosaics. Thousands of miniature elements, assembled with a caring hand, invariably delight the eye, but sometimes bite the pocket. And they hurt your pride - you have so many wandering, but bright, ideas. Why not try it yourself? Take a chance, a mosaic made by yourself is an irreplaceable thing not only for the interior, but also for the soul.
At home, compositions are made from anything, the most incredible objects are used: mosaics from tiles, broken dishes, pebbles, broken bottles, mirrors and even wood chips.
Making mosaics is divided into stages:
- tile preparation;
- surface preparation;
- planning and sketching;
- laying mosaics;
- grouting;
Where to lay mosaic tiles
The mosaic is created by:
- On the walls and floor in the bathroom;
- On the floor and walls in the toilet room;
- In the kitchen: wall, countertop;
- Tables and benches (sidewalls) in the country;
- Street cladding of a country house or gazebo;
- On flowerpots.
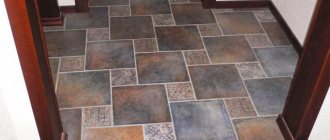
If the tiles are laid on the floor, then take into account that they will walk on it with their feet. Therefore, there should be no sharp protruding corners, roughness or irregularities. The installation should be a smooth surface with good grouting.
Step-by-step instructions for beginners
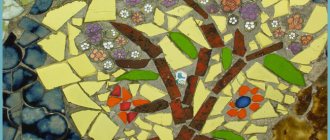
It's incredibly fun to decorate walls and other surfaces using broken tiles of different colors. This opens up great scope for creativity, improves imagination and creativity.
- If you want to make a drawing on a flat surface, then a stencil, diagram or sketch will help you with this.
- Multi-colored pieces of different shapes and sizes laid out scattered will look no less interesting.
- But if you still want to recreate some kind of drawing, then you can choose a sketch on the Internet or create it yourself.
- Moreover, you do not need special devices for this. This can be done in regular Paint or simply drawn by hand.
But if you don’t want to bother with this, take advantage of the opportunities that the Internet provides. For example, Pinterest contains a lot of ideas for any type of work. Perhaps you will find inspiration there.
The use of broken tiles in the interior implies not only a greater amount of material, but also a variety of colors and textures. It is this set that helps achieve the brightest and most beautiful paintings and ornaments.
If you have chosen a drawing on the Internet and want to bring it to life, then you should take care in advance to ensure that your materials, especially colors, match the picture you have chosen.
Don’t be upset if all your broken material is the same color; you shouldn’t throw it away, because you can easily find a use for it. For example, you can lay out paths in your dacha or lay them out on any surface and thus create an unusual ornament.
Stages of creation
The mosaic panel is created in stages. The following steps must be performed sequentially:
- Prepare material: pieces of tiles.
- Prepare the surface.
- Think over and come up with a sketch and make a drawing.
- Lay tiles
- Rub the gaps (seams).
Material
You need to prepare the tile battle in advance. If desired, tiles can be purchased in a store, inexpensive and multi-colored.
- At home, they break it into pieces of different sizes and shapes. To do this, place the tile square in a bag and knock on it from above with a hammer, with a cloth wrapped around it (to minimize the impact, in order to preserve beautiful neat pieces, not too small and sharp).
- Also, construction stores often sell substandard or broken tiles. You need to ask the sellers about purchasing opportunities.
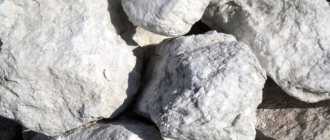
In addition to broken tiles, the following are used to create mosaics: broken glass, broken porcelain, small stones (pebbles), seashells, semi-precious stones, etc. If desired, the tiles can be diluted or combined with such elements.
Surface
It is necessary to prepare the surface for laying the mosaic. To do this, clean the wall (floor, countertop) of old finishing material (wallpaper, peeling paint), as well as dust and dirt.
If there are deficiencies in the coating: chips, cracks, unevenness, they must be repaired with putty or cement mortar.
The surface is plastered and primed for better adhesion. The tiles can be glued to drywall, wood and metal if necessary.
Drawing
Come up with a drawing, make a sketch on paper and transfer it to the base. To do this, use a pencil (marker) to draw an outline of the image on a dry wall (or tabletop).
- If the panel is large, then the image is transferred using a projector (if there is one) or the old, long-known method - with a grid.
- It is better and more professional to carry with a projector. It looks like this: a projector displays an image on the wall, and the person can only trace the outline of the drawing.
For beginners, abstraction or a geometric pattern: lines are suitable. As well as plant motifs. In the following works, a more complex sketch with symmetrical lines is taken.
Laying
When the primed surface has dried and the sketch has been transferred, proceed directly to laying the mosaic elements. They start working from the center or from the edge. Most often, the central image is laid out first, and the background is left for later.
- The adhesive for work is cement-based, white, or epoxy resin-based, transparent.
- If the mosaic is applied to wooden surfaces (tabletop, bench, chair), then liquid nails or also white glue are used.
- The adhesive composition is not applied to the entire surface to be glued at once, but first to a small area.
Gradually fill the entire canvas. Cement-based adhesive is convenient to apply using a spatula.
Rubbing seams
When the tiles are laid with glue, you need to wait about a day (or several hours) for the product to dry. Then you can start grouting the joints. Grout the facing surface using cement or epoxy grout.
The action is carried out with a rubber spatula. When all the gaps in the panel are completely filled with the solution, the surface is left to dry. After drying, pass over the cladding with a damp cloth to clean the elements from the dry solution.
Garden paths
Garden paths made from broken tiles
Large pieces of broken tiles can be used to decorate a garden path. You can make a cement base, on top of which you can glue the remains and pieces of tiles in a certain order in accordance with the chosen pattern. The result will be a durable and high-quality beautiful path. However, you need to walk on it in the rain carefully - the tiles can be slippery.
This option for a garden path will cost much less than in the case of laying paving slabs purchased in a store. And to make it beautiful, you just need to turn on your imagination.
Sketches: what can be depicted
There are many options for transferring a picture.
Here are some of them:
- Geometric figures;
- Abstraction with asymmetry;
- Flowers and grass;
- Patterns;
- Butterflies;
- Birds;
- Fish;
- Various animals;
- Portrait of a man;
- Human silhouette, etc.
In fact, almost any design can be filled with a mosaic, but some work requires skill and patience.
Kitchen apron
Kitchen apron made from broken tiles
You can create an original kitchen apron from the remains and fragments of tiles. The pattern will be laid out like a mosaic, but it’s better to use larger pieces. You can create your own unusual design. And believe me, no one else will have such an apron.
To create such an apron, you can use, in addition to tiles, fragments of dishes, and even whole plates and saucers, and pebbles, and shells - whatever you like. The work is also not easy, like creating a mosaic pattern, but very interesting.
Covering the top of a coffee table
There was an old wooden table lying around at the dacha that I wanted to throw away. Do not do this. Using mosaic techniques, it can be turned into a new original piece of furniture.
For work they take:
- Tile battle in several colors (light brown, beige, almond, white);
- Tile adhesive "Titan";
- Plastic and rubber spatula;
- Grout for joints;
- Nippers (glass cutter, tile cutter);
- Acrylic paint for wood;
- Pencil, ruler;
- Rags.
The working process:
- Sand the surface of the countertop. If necessary, fill all chips and cracks with putty. Let dry and sand again.
- Degrease the countertop with a special solution (White Spirit or just alcohol).
- Mark a pattern on the surface. It will be a square in the middle surrounded by three colored frames.
- First, apply glue along the edges in a zigzag pattern and glue elements with one straight edge of the lightest tile. Leave to dry.
- Then they lay out a square in the middle and fill in subsequent frames, leaving each area to dry for a while.
- After the product has completely dried, dilute the grout for the joints to a thick sour cream and treat all joints and gaps.
- Leave to dry for at least 12 hours. After this, use a damp cloth to remove all excess from the cladding.
- The table legs and side edges are painted with any paint you like. Can be done using the technique of aging furniture, with a translucent effect.
- Allow the table to dry completely. The result is a beautiful, unusual and “new” coffee table.
Using mosaic technology, you can make something new out of something old, or something original out of something boring. The cladding work is not fast, but very interesting. The result is simply amazing!
Flower pots
Flower pots from broken tiles
From the remains of tiles, as well as from its pieces, you can make original flower pots. Simply decorate a ready-made pot with a mosaic of tiles or connect entire tiles into a cube-shaped structure - and your indoor plants will have new beautiful “houses”. Interestingly, mosaics were used to decorate pots and vases back in Ancient Greece.
Video - How to make flower pots from tiles
Photo of mosaic made from broken tiles
Mosaic fence
Panel of broken tiles on the fence
And again mosaic. And yes, if you have a lot of old and broken tiles, then you can even decorate a fence or some kind of enclosure with it. It will take a lot of free time, but the result is worth it. All your neighbors will be jealous when they see you have such an original fence. Moreover, it will look quite expensive and impressive.
Preparation of pieces
If there are broken residues, the issue resolves itself. Whole damaged tiles are cut into the required segments; a tile cutter is used for these purposes; if the chosen tool is a hammer, then it is used after wrapping the samples in a rag, preventing the fragments from scattering to the sides.
Do not overdo it with the power of blows, so as not to end up with crumbs. It is better to start selecting material in advance, gradually collecting it in sufficient quantities. Single-color combat is good on garden paths.
Mini pond
Mini-pond decorated with broken tiles
Tiles are not afraid of water, and therefore pieces of them can be used to decorate a small pond in the garden. It will look perfect at the bottom of a mini-reservoir or decorate its sides. And here again, just turn on your imagination and you can bring any ideas to life - even create a real sea kingdom.
Water containers
Ceramic tiles are usually laid in places of contact with water. Therefore, it is logical to use its fragments in the same conditions and to line containers that are often filled with liquid or are in contact with it for a long time: a mini-pool or drinking bowls for birds.
Finishing the basement and stairs
Finishing the stairs with broken tiles
In this case, as in the case of a fence, you will need a lot of broken tiles and a lot of work will have to be done. However, the results are worth it. The base, trimmed with small pieces, looks great. And the staircase will definitely become a decoration not only for the house, but also for the garden. In this case, it is best to glue the tiles not randomly, but according to some plan, idea, or chosen pattern. Then the result will exceed all expectations.
Nuances of use in different rooms
As we have already noted, wooden mosaics are used to decorate walls in almost any room, regardless of its functional purpose. However, you need to understand the difference between a wall completely decorated in this way and only a separate fragment of it. The first case is most typical for living rooms, hallways, and corridors.
And the opposite case. Calm walls in neutral shades. Of course, a timber frame spread over the entire area or an impressive three-dimensional drawing will come in handy here.
Be especially careful with experiments in the bedroom. This is primarily a relaxation room, and not a convenient springboard for testing various design concepts. A small fragment of marquetry or intarsia will fit perfectly into the overall mood of this room, nothing more.
A few more photos using wooden mosaics. We tried to select both options with ordinary city apartments and luxurious private houses.
Design of beds and flower beds
Flowerbed decorated with broken tiles
Broken tiles make cool fencing for flowerbeds and beds. Those who love landscape design will definitely appreciate this option. A flower bed decorated with pieces of tiles can become a real decoration of the garden. The tiles can also be used as a kind of mulch - laid out on the ground around the plantings, it will prevent weeds from hatching and filling everything around.