Insulation of the walls of a house is carried out when the house is intended for living and the walls do not retain heat sufficiently.
All devices for heating a house (steam, stove, gas heating) consume maximum energy, but the heat is not retained.
By carrying out thermal insulation, you can ensure a comfortable environment in the house by insulating the walls, because the wall is a vulnerable place in the house, which experiences a large wind load.
If the walls are not insulated sufficiently, the cold easily penetrates into the house.
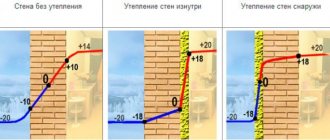
Internal or external insulation - what to choose
Insulating walls from the inside or outside is an individual decision. A less popular method of insulation is from the inside . With this method, the area of the room is significantly reduced.
This disadvantage of the method plays an important role in deciding the method of thermal insulation in favor of external insulation work. In addition, there is a high probability of moisture occurring inside the wall, this is especially true in regions with high humidity.
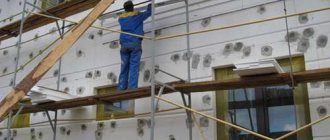
Insulation of walls from the outside is carried out much more often . This method requires more costs, but the internal living space in the house is preserved, which is important especially in houses whose area is already small.
Methods of wall insulation
Frame installation
Stages of installing insulation
If, before starting work on installing insulation, you did not have a frame ready for filling, then you should not be afraid of it. It is created using a fairly simple technology, which requires the use of wooden blocks, usually 50x50 mm in size. They are mounted vertically and at a distance of 580 mm from each other, so that mats or insulation boards fit perfectly here. The thickness of the insulation is 50 mm, and the width is 600 m. This is very important, if you make a mistake, you will have to cut off the edge of the insulation, do you really need additional work that could have been avoided without loss of quality? If you have mats whose width is 1200 mm, simply cut them into 2 parts, and there is no need to expand the frame - then the insulation will not be attached firmly enough. It is quite important to be demanding about the strength of the frame; usually people think specifically about insulation, forgetting that the frame will be one of the foundations on which the comfort of your home rests.
Types of thermal insulation, their advantages and disadvantages
Among the many insulation materials, those that are most suitable in terms of their physical characteristics and heat-insulating properties predominate.
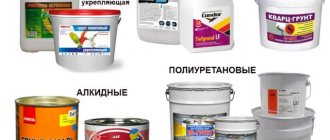
What is the best way to perform external insulation? The main types of wall insulation intended for external thermal insulation are:
- expanded polystyrene (good thermal insulator, resistant to deformation, waterproof, but poor vapor permeability, risk of damage by rodents, toxic when burned);
- penoplex (low water resistance, durability, resistance to temperature changes, but is vapor-tight, susceptible to rodents);
- polyurethane foam (durable, low thermal conductivity, durability, resistance to temperature changes, no seams during application, however, it can create pressure in the cracks of the building, susceptible to ultraviolet radiation, low fire safety during application);
- mineral wool (an excellent heat insulator, sound insulator, non-flammable, durable, but during installation it emits harmful formaldehyde);
- liquid thermal insulation (waterproofing, sound insulation, environmental friendliness, durability, no seams, not affected by mold, rodents, however, shrinks when applied, which can provoke peeling, recommended for combined insulation);
- glass wool (thermal insulation, sound insulation, not affected by mold, rodents, fire safety, moisture resistance, non-toxic, but due to the fragility of the fibers requires additional protection);
- fiberboard (thermal insulation, sound insulation, environmental friendliness, fire resistance, durability, but despite all the positive properties it is short-lived, not recommended for rooms with high humidity: baths, saunas);
- cork material (light, durable, non-flammable, environmentally friendly, heat insulator, sound insulator, but quite expensive). In addition, there are other materials, but they are less popular.
Choice of insulation
Material selection
There is a huge amount of materials on the construction market that can be used as insulation. At first glance, it is very difficult to make a specific choice in favor of one of them. The insulation must be selected not only by cost, but also by quality
Each of them is capable of performing various functions and tasks during operation, which should be paid special attention to. There are several main criteria that you pay attention to when visiting a store:
- Ecological cleanliness. The installation and insulation of floors should not have a negative impact on the environment and on humans in particular.
- With a high degree of vapor permeability and resistance to fire and elevated temperatures.
- Resistance to sun exposure, high levels of humidity and temperature changes in the room.
- Easy to install insulation on the floor, as well as convenient use.
For this reason, it is worth thinking about what materials are best to choose in order to properly arrange warm ones with your own hands. They will vary for a specific room. It could be a bathhouse, a balcony, an apartment, houses, etc.
You should pay attention to possible loads on the subfloor during operation, as well as the properties of the environment. Insulating materials exhibit their qualities in different ways.
Among the popular ones you can choose:
- Mineral wool, as well as fibers, glass wool.
- Light mixtures based on cement and additives. Expanded clay is the main choice here.
- Cork, particle board, dry sawdust, ecowool, .
- Insulation of a concrete floor with penoplex.
- Insulation in liquid form is paint that can create a porous layer on a surface 5-7 mm thick.
- Materials with foil side, foam plastic, polymer materials.
Glass wool is not intended for wet rooms, as it can absorb it very well
For this reason, it is best to look at other materials.
Differences in insulation of aerated concrete, wooden, brick houses
The method of insulation depends on what material the walls of the house are made of. If we compare houses made of wood, brick and aerated concrete, we can highlight the following points that deserve attention:
- Unlike brick walls and aerated concrete houses, a prerequisite for installing insulation in a wooden house is the installation of sheathing to ensure ventilation. Installation of sheathing for block walls is carried out only under siding or other suspended cladding;
- the most suitable insulation for aerated concrete and brick walls are materials with a high moisture resistance (penoplex, expanded polystyrene), while for wooden houses the ideal insulation is breathable mineral wool slabs;
- the thermal conductivity of a brick wall is higher than that of an aerated concrete wall, so the wall must either be insulated with a thicker layer of insulation, or the thickness of the brickwork must be increased;
- when externally insulating a wooden house, the surface should be carefully prepared by treating it with antiseptics;
- Most often, attaching the layers of a wooden wall requires the installation of chipboard or OSB sheathing.
In addition, you should keep in mind all the indicators of the materials from which the walls are built, such as moisture resistance, thermal conductivity and heat resistance.
What do they recommend?
Experts note that a good insulation option is Ursa M-15 fiberglass mats, as well as fairly high-quality and comfortable Ursa P-15 slabs. At least, these insulation options have become especially popular, which is why much more attention should be paid to them. In general, it is possible to browse a wide variety of construction forums. Before you, a huge number of people insulated their homes on their own, so here you will find hundreds of pages discussing the strengths and weaknesses of various insulation materials: an hour or two of reading and you yourself will begin to understand this area.
If we talk about everything that is available to you, then it is worth noting stone or mineral wool. Such insulation will boast absolute non-flammability, as well as soundproofing, which will allow great savings for those who make a music studio out of their home or would like to be in silence; classic sound insulation costs a lot of money.
Separately, we note glass wool, the popularity of which in industry is simply off scale. This material has a low thickness, which allows for dense and reliable insulation in a small volume. The level of thermal conductivity of the material is significantly reduced with the help of air gaps. Here we note expanded polystyrene and extruded polystyrene foam, which are not expensive, but at the same time do their job perfectly. Polyethylene foam, which is easy to use and does not require any kind of hydro- or vapor barrier, will effectively protect your home from the cold. Usually this is an excellent opportunity to do everything extremely economically, while not forgetting about quality.
How to calculate the thickness of insulation for walls
Before purchasing insulation, it is necessary to correctly calculate the thickness of the purchased material.
An indicator of the thickness of a material is the result of thermal resistance. The value for each region is different and is determined in accordance with the readings of SNiP.
For the region of the central part of the Eurasian continent it is approximately equal to three.
The thickness of the insulation layer is equal to the difference between this indicator according to SNiP and the total amount of thermal conductivity of each material that is present in the wall.
To determine the thermal conductivity coefficient for each material, use the formula:
P=R/K ,
where R is the thickness of the material, K is an indicator of its thermal conductivity (the manufacturer indicates on the packaging).
After adding all the coefficients, the value is subtracted from three . This results in the thickness of the material required for insulation.
Application area
Foil-coated thermal insulation products are often used for heating equipment (heaters, oil radiators, boilers).
In addition, wall surfaces and floor bases are covered with such insulation with foil towards the room. The reflective layer retains maximum heat in the room and does not let it out.
Since the product is small in thickness, it is often used to insulate small areas. It is used for thermal insulation of saunas, garage cooperatives, outbuildings, pipeline communications, wells and boreholes.
Penofol for floor insulation.
Wall pie device
A wall pie is a collection of layers of materials that are laid vertically in a certain order.
IMPORTANT!
Each layer of the wall pie has its own laying characteristics. If the sequence of layers is disrupted, there is a risk of destruction of the entire structure.
The construction of a wall pie for external insulation must correspond to the order of laying materials, starting from the inside of the walls:
- interior decoration;
- internal load-bearing layer (plasterboard, sheathing);
- vapor barrier (required in frame houses);
- load-bearing wall;
- insulation;
- waterproofing (depending on insulation);
- sheathing;
- ventilation gap (depending on the heat insulator);
- finishing.
Wooden wall pie
This scheme for laying materials should be followed if the house is timber, frame or log.
If the wall is brick or aerated concrete, then the wall pie is slightly different:
- interior decoration;
- Brick wall;
- insulation;
- ventilation gap (if mineral wool is used);
- load-bearing layer on the outside or sheathing (if it is necessary to install façade materials);
- finishing (plaster, siding, porcelain stoneware).
"Wet" wall cake
Particular attention should be paid to waterproofing and vapor barrier.
House thermal insulation technologies
A comparative analysis of the thermal insulation system of a two-story house, installed according to old and modern thermal protection standards, was carried out. The house has an attic, the total area of the building is 205 sq.m. According to calculations, the initial power of the heating system was 30 kW. After insulating the house, no more than 15 kW is required for optimal thermal protection.
Let's consider possible options for the location of insulation, noting the advantages and disadvantages of each type. 1. Insulation is installed on the inside of the wall
Thermal insulation work is carried out indoors, which allows you to insulate the house at any time of the year, regardless of the weather. In addition, the exterior finish remains intact, any type of material can be used and the latest technologies designed for interior spaces can be applied.
The main disadvantages of this technology include the loss of usable area, and the higher the thermal conductivity of the selected material, the more noticeable the loss.
Insulation of internal walls can lead to an increase in the level of humidity in the walls: water vapor passes through the insulation, but does not have the opportunity to escape outside, accumulating directly in the wall or between the insulation and the wall surface.
If the method of internal insulation has been chosen as a thermal insulation system, it is necessary to ensure that the wall is protected from moisture penetration and its negative effects. For this purpose, an effective ventilation system is created in the room, and a vapor barrier is created on the inside of the thermal insulation system.
2. The insulation is installed inside the wall
Placing insulation inside a wall is a labor-intensive process and is recommended for installation during the construction of a new building. The fact is that with this type of thermal insulation, the insulation installed on the outside of the wall is covered with a layer of facing brick. To install such thermal insulation on an existing wall, it is necessary to increase the thickness of the entire structure by strengthening the foundation.
3. Insulation is installed on the outside of the wall
The main advantages of external insulation:
• The wall acquires stable protection from temperature changes and, due to these fluctuations, freezing and thawing of the wall. • The condensation zone of escaping vapors is carried beyond the load-bearing wall - the so-called “dew point” is located in the insulation. Thanks to the use of modern thermal insulation materials, nothing prevents moisture from being converted into steam and released into the external space, which significantly reduces the level of humidity in the wall. • Heat is retained in the load-bearing wall and turns it into a kind of heat accumulator - in winter the structure retains heat, and in summer it retains coolness.
With all its advantages, external thermal insulation needs to be protected from external mechanical and atmospheric influences by a special coating that has high strength and vapor permeability. To do this, the external wall is plastered or a “ventilated facade” is installed. To prevent an increase in the level of humidity in the insulation, materials with increased vapor permeability should be used, so that moisture entering the layer can evaporate freely.
If we compare the above methods of installing insulation, we can confidently note that installing external thermal insulation is the most effective and efficient.
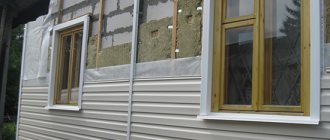
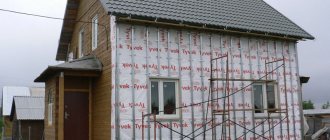
Insulation of the building facade Finishing the facade has two main functions - aesthetic and protective, and it is impossible to talk about each of these factors separately. The attractive appearance of the building, of course, is important, but it is much more important to create comfort and conditions that are optimal for living indoors. Therefore, the goal of competent façade finishing is to insulate the house, protect it from weather conditions and be visually attractive.
Wooden structures
Wooden structures are considered to be the most complex, since they are very sensitive to improper construction, as a result of which they can collapse. Depending on the type of building, certain thermal insulation technologies and finishing materials are used.
Among all existing building materials, wood is the most traditional and environmentally friendly and is used for the construction of log and frame houses. Despite all the advantages of wood, it does not have sufficient thermal insulation properties; moreover, it is too sensitive to moisture, susceptible to rotting processes, mold and various diseases. To insulate wooden structures, external thermal insulation is recommended, which is a screen with protective and decorative functions, while the ventilating properties are provided by the gap between the outer skin and the insulation.
Such a system consists of the following components: • Wooden supporting structure • Internal lining • Vapor barrier • Insulation • Wind protection • Ventilating air gap • External lining
Thermal insulation materials - use
During the heating season, you can observe a temperature difference between indoor and outdoor spaces. At the same time, a heat flow is formed in the wall structure, which moves in the direction “from heat to cold.” The wall has a certain thermal conductivity and, absorbing heat from the room, releases it to the street. To prevent heat leakage, walls should be insulated with heat-insulating materials, the use of which is regulated by the provision on requirements for thermal protection of structures under number 3 to SNiPU 11-3-79 “Building Heat Engineering”. Changes to the document were put into effect at the beginning of 2000.
What are the requirements for thermal insulation material?
The main requirement for a thermal insulation material is the ability to prevent the leakage of large volumes of heat from a heated room, and the greatest efficiency can only be achieved if the insulation remains dry. As soon as the level of moisture in the insulating material increases, the transfer of heat into the space to the street increases. To restore the thermal insulation properties of the insulation, it is necessary to find out the reason for the appearance of moisture in it and find possible ways to solve this problem.
Where does moisture come from?
The content of water vapor in the air is about 17.3 g of water per 1 m3 at a temperature of 20 degrees Celsius. In the cold season, indoor air has a humidity of 55-65%, and this figure differs significantly from the air humidity outside. As the temperature drops, the air loses its ability to hold moisture, and excess steam begins to transform into water. Warm air begins to move from indoors to outdoors. Drops of water penetrate the insulating material and moisten it.
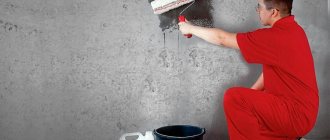
You can prevent the conversion of heat flows into water vapor by creating a vapor barrier. For this purpose, a layer of heat-insulating material is installed on the inside of the room or several layers of oil paint are applied. Then decorative sheathing is applied over the thermal insulation, and humid air is removed from the room using forced insulation.
Another source of moist steam can be warm air emanating from the insulation towards the street. If proper ventilation is not organized at the outer boundary of the thermal insulation, wet steam can transform into droplets of moisture. A special gap and conditions are created between the outer skin and the heat-insulating material that are favorable for the free movement of air flows - “draft”, which will bring water vapor out.
To protect the thermal insulation material from atmospheric influences and strengthen the vapor barrier effect, the outer side of the wall must be treated with a material that provides protection from wind, insulation from moisture, and at the same time has excellent vapor permeability.
Please note that you cannot install the same type of thermal insulation material on the outside of the wall that was attached from the inside - the vapor-tight material insulates the wall and blocks the ability of air to move towards the ventilation gap. Thus, the movement of air from heat to cold does not stop, but the whole process occurs inside the thermal insulation system - thermal vapor cools and releases moisture, which, having no way out, remains on the surface of the insulation and is converted into ice. With the arrival of spring, the ice melts and thermal insulation materials begin to rot.
So, based on all of the above, we can derive a formula for the effective operation of a thermal insulation system: the structure must remain dry at any time of the year, and this condition will be ensured by a vapor barrier on the inside of the wall and a wind barrier on the outside.
Installation of sheathing
Before you begin installing the sheathing, you need to decide on the material that will be used as a protective screen. Let's look at the installation principle using one example, when the installation of sheathing for laying insulation occurs followed by the installation of siding.
To install the structure, you need wooden beams treated with an antiseptic composition, the thickness of which is 50 mm, and the width exceeds the thickness of the insulation sheet. If the thermal insulation material has a thickness of 80 mm, then the beams should have from 100-110 mm, which allows for an air gap. The pitch of the lathing depends on the width of the slab of heat-insulating material. The insulation is placed in the grooves formed between the beams, and then attached to the load-bearing wall using anchors. The number of anchors per square meter of insulation is calculated based on the density of the material; as a rule, it is 4-8 anchors. Then a layer of windproofing material and siding are applied to the insulation.
This system is one of the simplest ways to install sheathing, because it has one significant drawback - wooden beams form “cold bridges” with weak thermal resistance. As an alternative, you can use a sheathing installation scheme, in which the insulation sheet is divided into two parts and each layer is laid on its own sheathing, with the beams of the upper layer placed perpendicular to the lower one. This installation method practically eliminates the formation of “cold bridges”, although it requires more time and effort.
Vapor barrier materials
The vapor barrier is created using vapor barrier materials, which should be selected depending on the type of structure and installation method. The vapor barrier can be installed both vertically and horizontally from the inside of the structure protecting the heat-insulating layer. Installation is carried out using galvanized flat-head nails or a mechanical stapler. The seams of the vapor barrier screen must be sealed and the film intact to prevent the movement of water vapor and wetting of the structure.
It is recommended to seal the seams with special connecting tapes based on butyl rubber. In addition, you can overlap individual strips of vapor barrier and secure them along the seam with a counter bead. When installing a vapor barrier on the ceilings of residential premises, attics or in spaces with high humidity, a ventilation gap of 2-5 cm must be provided between the internal lining and the vapor barrier to prevent excessive moisture.
Windproofing materials
Wind insulation is intended for external protection of the thermal insulation system, to ensure moisture and wind resistance of wall structures, while maintaining the free movement of thermal vapor.
When choosing a windproofing material, the main requirement should be taken into account - the vapor-permeable resistance should decrease depending on the direction of thermal vapor from the interior to the street - “from heat to cold.” In this way, the formation of condensation in the internal layers of the structure can be prevented.
Please note that the optimal level of vapor permeability can vary from 150 to 300 g/m2-day at a cost of about 0.5 USD. per square meter. But the use of superdiffusion materials with a vapor permeability of 1000 g/m2-day does not make any special differences, but will increase the cost of the structure at a price of 1 USD. per one square meter.
Wind-insulating materials are installed on the inside of the protective structure, and are placed close to the heat-insulating layer. Installation is carried out vertically and horizontally, and the width between the panels must be at least 150 mm. Manufacturers emphasize the correct placement of the front and back sides of vapor barriers: if the material is used incorrectly, the structure, instead of being breathable, can become insulated and disrupt the normal functioning of the entire system.
Vapor barrier materials are secured to the structure using galvanized stainless steel nails with a wide head, or special staples with a pitch of 200 mm. The final stage of installation is fastening timber with a cross-section of 50x50 mm with galvanized nails and covering the surface.
Thermal insulation of a brick (stone) wall
Thermal insulation of a stone wall can be carried out in two versions - with further plastering of the surface and the creation of a structure with a ventilated gap. Let's take a closer look at both methods of insulation.
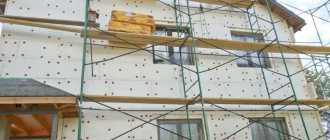
Thermal insulation with surface plastering
For thermal insulation of stone walls with further plastering, contact facade heat insulators are used, which include the Belarusian “Termoshuba”, German Tex-Color, Ceresit, Heck and others. All systems have significant differences between the type of insulating material, the method of its fastening, the reinforcing mesh, the composition of the protective layer and glue, as well as their thickness.
The thermal insulation schemes of each system have a common feature - they are attached to the wall using dowels, anchors and frames using adhesive or mechanical means, and then covered with a vapor-permeable layer of plaster.
Insulation is applied to a dry, clean and durable surface, which can be a concrete, brick, foam-gas concrete wall, both plastered and unplastered. If there are significant unevenness on the wall, they should be leveled using cement mortar. In the case when the surface of the brick wall is smooth, you can do without a primer, which cannot be said about other types of walls.
Installation of thermal insulation on a brick (stone) surface is carried out in the following way: first, you should equip a supporting surface, which can be the protruding edge of the foundation or the edge of a concrete slab. If there is no such support, it is necessary to build a metal or wooden false support - a support rail, and the wooden one must be removed before plastering the surface.
Thermal insulation boards are laid on the wall according to the principle of “bandaging the seams” - very close to each other.
Please note that gluing slabs on small facades is not necessary, since in the future they will be attached mechanically. But mechanical fastening is necessary for the structure to be durable.
Two to three days after gluing, plastering should begin. First, door and window slopes are reinforced with aluminum or plastic corner profiles, and only then the main plaster layer is applied. To apply a small layer of plaster, up to 12 mm, onto dense mineral insulation, you can use alkali-resistant fiberglass mesh. If the layer is thick, 2-3 cm, and polystyrene foam is used, a metal mesh is recommended.
As a rule, a thick layer of plaster is first applied, and reinforcing mesh is pressed into the outer third of it, which allows the structure to respond more gently to temperature changes. The second layer of plaster is made thinner. Each strip of mesh should be overlapped in width and length by approximately 10-20 cm and overlapped at the corners of the building.
During the work process, various types of solutions can be used to glue the slabs and the main plaster, and when plastering, compositions with microfibers can be used, which gives the structure high strength and prevents the appearance of cracks.
The final stage of work is the final finishing, which everyone performs at their own discretion.
Please note that with the considered plastering method, windproof materials are replaced by vapor-permeable plaster, and the supporting structure acts as a vapor barrier. Even if warm water vapor appears in the inner layers of thermal insulation, it will be removed naturally through the layer of plaster and insulation.
Thermal insulation with a ventilated gap Thermal insulation material is attached to the facade using dowels, then the surface of the structure is covered with a windproof layer and a ventilated gap is introduced, which is covered from the outside with a special screen that performs a protective and decorative function. During low-rise construction, additional sources of convection recharge are installed on the surface of the screens, in the form of slotted air intakes, which are formed at the stage of facade production. The use of a vapor barrier is not required in this case. Both wooden and metal structures can be used as lathing.
An undeniable advantage of this method of thermal insulation is the ability to perform work at any temperature and atmospheric conditions. However, it is quite difficult to install such thermal insulation in cases where the building has a complex architecture, or it is necessary to reproduce the appearance of the facade as accurately as possible
Installation of sheathing
Lathing for external insulation is necessary when attaching siding as an external wall finish . With vertical siding, the sheathing is attached horizontally, and vice versa: with horizontal siding - vertically.
The sheathing can be made from wooden beams or their metal profile.
Lathing made of beams
Before you start lathing, you need to prepare the beams: treat them with an antifungal agent.
The following steps are followed:
- saw off the beam of the required size;
- secure the brackets around the entire perimeter with self-tapping screws according to preliminary markings;
- secure the timber as guides along the right and left sides of the wall;
- If there is no thermal insulation, then the beam must be attached to the wall by drilling holes for dowels and securing it with self-tapping screws.
Perform lathing along the entire wall; if necessary, level the surface, use special mounting wedges.
Lathing made of beams
Profile lathing
The metal profile should be secured using hangers and brackets.
Installation of metal sheathing:
- fix the profile on the right side of the wall and on the left so that there is at least 100 mm from the corner to the guide;
- According to the markings, drill holes for dowels and attach brackets along the entire wall;
- if thermal insulation is installed, then the insulation boards are pinned onto the brackets;
- lay a vapor barrier in the same way as insulation;
- install metal profiles along the edges of the wall;
- Use a thread to set the height of the profile and secure the profile along the entire wall;
- between the elements, fasten stiffening ribs from the remains of the profile.
NOTE!
It is better to choose metal profiles for siding with curved edges.
It is best to use a good quality aluminum profile.
Profile lathing
Direct choice of insulation
To decorate your roof with the best material, you should understand the quality characteristics of popular sources:
Mineral wool. Mineral wool is obtained by melting the mineral substances of rocks. This source appears to be an exemplary insulator. Sold in the form of rolls and slabs, it has a high density. Mineral wool is used by the majority of the population, because it has a low price. Glass wool. This raw material resembles the previous material in its functionality. Produced from glass production residues
However, installation work must be carried out with the utmost care, for this you should wear a protective suit. The material is distinguished by high heat retention rates. Styrofoam
This type of insulation is characterized by a cellular base. Produced by foaming a polymer material. It has low density, but the level of isolation from extraneous sounds is not bad. On sale you can only find a tiled form of the material. Notable for its low price, it has good insulating properties. Extruded polystyrene foam. This source is similar in composition to polystyrene foam, but it has a much better level of heat retention. This is due to the use of different manufacturing techniques. The compared option quickly becomes unusable under the influence of external mechanical factors, which is not observed with extruded polystyrene foam. It has a strong cellular structure, its bubbles are filled with gas, united by a molecular bond. The material is water- and vapor-proof, it has excellent thermal insulation qualities.
In the process of laying insulating components, cotton-based materials are often used, which have good performance in absorbing extraneous sounds.
However, mineral wool changes its performance when the humidity level increases, and such metamorphoses do not have better performance. This material requires the construction of a layer of hydro- and vapor barrier.
When choosing a material in a store, you need to pay attention to the packaging. Lack of tightness can have a negative impact on its quality
The raw materials may become damp. Therefore, when purchasing, you should choose a surface with sufficient moisture resistance.
The priority direction in terms of flammability is class G1. It will prevent the fire from spreading over long distances. To answer the question of which insulation is the best, it is worth noting that it will be the one that has a sufficient price, ease of installation and the desired effect.
Why do you need a counter-lattice?
Lathing and counter-lattice are concepts that are often confused. The lathing is necessary for attaching covering elements to it.
The counter-lattice is attached perpendicular to the sheathing and performs the function of ventilation and at the same time secures the water barrier.
Counter battens must be installed in the walls on the sheathing or on the rafters.
The walls of houses equipped with counter-lattice are called ventilated.
With a ventilated facade, the properties of the cake materials are preserved and the formation of moisture and mold is prevented.
Roof insulation from inside and outside
You can use a combined roof thermal insulation scheme - two-layer insulation. With this method, one part of the thermal insulation material is laid between the rafters, and the other under them.
Roof insulation material:
When laying insulation between and above the rafters, mineral or glass wool of normal density can be used for the main thermal insulation layer. The top layer must have high shear strength. Fiberboard or basalt slabs are suitable for it. When laying the top slabs, it is necessary to completely cover the rafters to prevent the formation of cold bridges.
Read our article: Which insulation is better to use
Do-it-yourself roof insulation
First, the waterproofing material is laid, it is secured using a construction stapler or galvanized nails with wide heads. Then insulation is laid under and between the rafters. The inner layer of insulation is laid between the cross beams, completely covering the rafters. The thickness of the timber should be equal to the thickness of the heat-insulating layer.
A vapor barrier layer can be laid between layers of insulation, but then to prevent the accumulation of condensation on the film, the inner layer of thermal insulation must have a thermal resistance of no more than 20% of the main one.
It is permissible to lay a vapor barrier on top of the inner layer of insulation, but with this method the risk of damage to the film during the installation of interior decoration of the room, installation of electrical wiring and lighting devices increases.
Installation of waterproofing and vapor barrier
When installing waterproofing outside the wall of a wooden house, it can be done:
- by applying a special solution to the walls;
- using additional materials (waterproofing polyurethane foam).
If the wall is brick, then you can use special solutions or resort to an adhesive form of waterproofing: roofing felt . Glue it vertically, overlapping, removing any air bubbles that have formed and gluing the joints with mastic.
When using decorative facing materials, special plaster waterproofing is used.
Waterproofing mineral wool
When installing a vapor barrier from the outside, films should be used that protect the wall surface from the outside and allow moisture to pass through from the walls.
Installation of vapor barrier films comes down to the following rules:
- they should be laid between the insulation layer and the wall;
- provide a gap for ventilation between layers;
- Lay the film overlapping, glue the joints, secure the film with staples.
IMPORTANT!
If the vapor barrier is installed on a round beam, then there is no need to install a ventilation gap . In the case of square boards, this is a must.
Next, the remaining layers of the structure are laid. Now let's talk about ways to insulate walls with your own hands.
Do-it-yourself roof insulation
The first stage when performing insulation work is waterproofing. As mentioned above, in this case it is laid on top directly along the rafters. Attach the waterproofing film using construction staples or galvanized nails with wide heads.
If the room is not heated or the attic is cold, a vapor barrier is not required. It is enough to lay only the waterproofing layer.
At the second stage of work, thermal insulation material is laid. Laying is carried out below the rafters. The material is secured using a construction stapler. A vapor barrier film is installed on top of the thermal insulation layer.
The final stage is installation of the internal cladding. Sheets of plasterboard, plywood and lining are suitable as building materials here. The cladding is attached using galvanized nails equipped with wide heads or self-tapping screws. In order for the finishing to be of high quality, you need to ensure that the heads of the nails or screws are recessed into the facing material. Before performing the final finishing, the recesses from screws or nails are puttied. Then you can stick wallpaper onto the drywall or plywood.
External wall insulation with mineral wool for siding
To effectively insulate walls with mineral wool, you should prepare the surface for subsequent installation work : clean it of debris, seal cracks, remove gutters and other decorative elements, apply markings, attach hangers.
Next, install the elements in order:
- laying mineral wool slabs from bottom to top between the guide posts end-to-end, placing the material on hangers and attaching with dowel nails;
- seal the cracks with pieces of insulation;
- cover the vapor barrier membrane in the same way as insulation;
- attach racks to hangers;
- then proceed to cladding.
Metal sheathing
This method is suitable for metal profiles.
If wooden beams are used, then insulation with mineral wool is somewhat different:
- Attach the beams to the prepared wall with corners at a distance of the width of the mineral wool slab;
- the insulation is laid end-to-end between the studs, secured with a pair of dowels, and the cracks are sealed with polyurethane foam;
- if a second layer of insulation is needed, then counter-battens are attached to the racks and mineral wool slabs are laid between them;
- a diffusion membrane is attached to the frame with staples;
- install a counter-lattice, which serves as the basis for fastening the siding panels and creates an air gap in the wall pie.
Wall cake for siding
Fastening mineral wool to the wall with dowels
Roof insulation from above
Thermal insulation of the roof above the rafters will qualitatively protect most of its structural elements from precipitation and temperature changes. In this case, the insulation is laid on solid wooden sheathing. This method is also interesting because it provides the opportunity to use open rafters when decorating the interior of the attic.
But a problem immediately arises - where and how to attach the waterproofing material? The modern market offers thermal insulation panels with already provided waterproofing. In this case, you need one level of air circulation located between the thermal insulation material and the roof. The air cavity is created by means of a counter-lattice, in which the slats are laid parallel to the rafters. A necessary condition for the high-quality functioning of such thermal insulation is the installation of a good vapor-proof layer on the inside of the roof.
The advantages of this roof insulation scheme are the minimal risk of cold bridges, constant temperature and humidity of all structural elements, which eliminates the possibility of thermal deformation of materials; the most effective sound insulation compared to other constructive methods; maximum use of the entire internal space of the attic floor.
Disadvantages - the difficulty of performing insulation work on a roof with a complex shape, high requirements for under-roofing films, and the impossibility of carrying out installation work in bad weather conditions.
External insulation technology using foam plastic
To insulate the walls of a private house from the outside, you can use polystyrene foam. The procedure for foam insulation involves the sequence of work performed:
- preparation of walls (cleaning of debris, sealing cracks, priming);
- applying the necessary markings;
- attach a profile at the bottom of the wall, which will serve as the basis for the even laying of the first row of slabs;
- attach the foam by applying the adhesive solution, starting from the bottom corner. The second row of sheets is fastened in a cross pattern;
- after the glue has completely dried, secure the foam with umbrellas;
- the joints are sealed with polyurethane foam, if large, with pieces of polystyrene foam. After hardening, excess foam is cut off;
- To finish slopes and corners, you should use special corners that are glued to the reinforcing mesh tape.
Laying sheets in a checkerboard pattern
Fastening sheets
Sectional diagram of insulation
Further along the wall, a reinforcing mesh is attached to the layer of glue and leveled with a spatula . After the glue has dried, the surface is primed and covered with finishing plaster or other decorative materials.
CAREFULLY!
It is better not to insulate wooden houses with polystyrene foam , since with breathable wood it is better to use porous insulation that can allow moisture and air vapor to pass through.
In this case, mineral wool is ideal.
How is installation done?
Don’t be alarmed, the installation of insulation has already been done independently by a variety of people. There is a proven step-by-step scheme that will allow you to make durable and reliable insulation. To begin with, the technology for laying insulation requires some precautions - the work should be carried out in:
- respirator;
- glasses;
- cap or hat;
- hood;
- You should always wear gloves on your hands;
- After completing the work, the clothes are washed separately from the rest.
Laying insulation
It is not difficult to follow these rules, but they will raise the level of comfort and safety in the work being carried out to the limit. Let us note that many people ignore the use of a respirator, which is a big mistake - there is something to breathe in, and then you will need to seek help from a doctor, and it is difficult to imagine what this can lead to. The key instructions for laying insulation on walls are the following sequence of actions:
- We start by very carefully foaming all the seams and cracks, of which there are usually a very large number on the outer sides of the walls. Polyurethane foam is perfect for this and is easy to use, so you will be satisfied with the result;
- Next, we must take care that the insulation fits very tightly to the heated part of the house and fills all the space inside the frame. If there are any voids along the edges of the wooden frame, everything is corrected, even if this place is made of small cut pieces of insulation;
- then we check that the edges of the insulation do not wrinkle inward - everything should be strictly parallel;
- we check all connections - the insulation is laid end-to-end, even a small gap is a huge loss in the quality of insulation. If the insulation is laid in several layers, this is done as when laying bricks: a new layer overlaps the previous joint;
- Next, you need to take care of placing the insulation even behind the junction box, behind wires and other elements - there should be no gaps or gaps at all;
Thermal insulation of walls - you need to spend more time cutting the insulation - take measurements and cut it so that it fits snugly against the various wires, installation boxes and other elements. If you do the calculations correctly and approach this procedure carefully, you will get an excellent result that will be both reliable and look very stylish;
- When laying insulation with your own hands, do not be afraid of contact with heated surfaces; the same insulation made from classic staple fiberglass will melt only at a temperature of +426 Celsius, which is an unattainable mark in simple home conditions. Basalt wool will melt at +1000 Celsius. If you got to the bathroom from the outer wall, then you don’t need to go around it - no empty areas, no matter what is located on it, but here we just need steam-resistant drywall;
- then you will encounter fairly narrow gaps that are not at all scary in terms of airing the house, but they must also be filled, this is where condensation will form, which will give rise to mold, which is dangerous to health. Special care is needed for the corners of the house - we don’t let anything pass by;
- if the house has more than one floor, it is necessary to fill the interfloor ceilings;
- fiber insulation is not suitable for insulating gaps between windows, doors and walls - we will use polyethylene foam cord, which has proven itself in this matter;
- at the stage of insulating the floor, we must take care that there are absolutely no gaps left, which are often missed - between the heated and unheated rooms;
Carrying out communications behind the crate - there is no need to be afraid of electrical wires - usually people leave large voids around them, fearing that something might happen to them, but they are more likely to suffer without insulation than with it;
- Laying insulation in a private house involves installing a vapor barrier. This procedure is not complicated, but remember that everything must be secured very evenly and carefully - no bends, crumples or similar defects;
- We will even insulate the hatch to the attic, for which we will need 20 cm of insulation. This simple procedure will allow you to achieve ideal comfort in your home; even through such a small gap nothing will blow in.
If you acted carefully and responsibly, you will need to cover the insulation with the material that you chose for this, but this is a completely different task, it has its own subtleties and rules - the insulation for your home is completed and a comfortable winter awaits you.
Basic insulation mistakes
External insulation of the walls of a country house must be carried out in accordance with the requirements and rules for installing materials. Errors that most often occur during insulation contribute to improper circulation of air flow and the formation of moisture inside the cake, which leads to a weakening of the thermal insulation qualities:
- incorrect calculation of thermal resistance;
- if there is no base strip at the bottom of the wall, the insulation may come into contact with the ground;
- Expanded polystyrene should not be left in the sun for a long time during installation;
- cracks between insulation boards lead to the appearance of cold bridges;
- Expansion dowels should be installed at the corners of the building and around doors and windows to securely fasten the material.
In addition, you should not skimp on materials, since in addition to their correct installation, the low quality of the material should not cause poor-quality insulation.
Thus, when insulating walls, the living space is preserved; careful consideration of details is required to calculate the amount of materials and determine the order of installation work.
Characteristics and cost
The performance characteristics of thermal insulation with foil coating are significantly higher than materials without foil:
- better tolerates humidity and temperature changes;
- reflects up to 97% of heat into the room;
- reduces the vapor permeability index to 0.001 mg/m*K;
- extends the operational period of the foundation by 2 times;
- increases the noise insulation rate to 68%.
The cost of insulation depends on the material used and its size. For example, a set of 6 LOGICPIR slabs measuring 1190x590x40 mm (to cover an area of 4.16 m²) will cost from 1900 rubles.
Tools and materials for work
Let's start by choosing the right material. Considering the fact that polystyrene foam is a flammable material, for work you should use expanded polystyrene, in the manufacture of which fire retardants are used - special substances that promote self-extinguishing of the insulation and limit the spread of flame.
Polystyrene foam PSB-S-25 retains heat well in the room.
So, for work I chose foam plastic of the PSB-S-25 brand. The presence of fire-fighting additives is indicated by the letter C in the marking. The manufacturer of the material is absolutely unimportant. The dimensions of the sheets are usually 100 by 50 cm, I took the thickness to be 50 mm, but I will lay two layers of insulation so that the total thermal insulation layer reaches 100 mm.
In addition to the foam itself, you will need something else:
- Wooden beams with a section of 50 by 50 mm. From these I will construct support joists. As I already said, I will install the foam in two layers, so I won’t need thicker joists.
- Wooden slats with a section of 50 by 30 mm. They will be used to construct a counter-batten, with the help of which I will create a ventilation gap under the rough floor covering.
- Polyethylene film. Take the one that is thicker. I will use it to cover the floor to create a waterproofing layer. Perhaps it is not required for polystyrene foam, but due to the presence of a basement floor under the slab, I still decided to use a membrane, especially since it is inexpensive.
Polyethylene film.
- Penofol. Or foamed polyethylene with a foil layer from another manufacturer. It will act as a heat-reflecting screen in front of the insulation. Buy penofol type A, equipped with foil on one side.
- Polyurethane adhesive for foam plastic. Needed to seal joints between sheets of material. It can be replaced with regular polyurethane foam, but I do not recommend doing this, since its heat-retaining characteristics are slightly worse.
- Birch plywood 10 mm thick. Will be used as rough floor covering for decorative coating. To secure it, you will need black self-tapping screws with a coating that protects them from corrosion.
- Flooring. In my case it's laminate. Under it you will need a backing made of foamed polyethylene or cork plus plinths, with the help of which the laid laminate will be pressed against the plywood.
The support beams will be constructed from wooden beams.
Regarding tools: the main thing is to stock up on a hammer drill, since you will have to drill a fairly large number of holes in the concrete. You will also need a screwdriver and a jigsaw for working with wood. I would also advise renting a laser level, which will help you align the joists strictly horizontally.
Technical advantages
A layer of foil reflects heat inside the room so that it does not escape outside.
Advantages of the material:
- thermal insulation of foil insulation reaches 95%;
- the material does not allow water to pass through;
- protecting the premises from wind, drafts, temperature changes;
- the presence of foil increases sound insulation;
- the material is environmentally friendly, safe for humans and the environment, does not emit harmful substances;
- protects walls and floors from rotting, moisture, and damage by rodents;
- performs a mirror image of heat into the room, since insulation with foil must be laid with the foil side up.
The advantages of the material make it possible to use it in almost any type of building, for insulation of private houses, hydro- and sound insulation.
Varieties
Mineral wool is produced in several versions, which differ in the material of manufacture, thermal conductivity and density. They all have a similar structure and weight, and may differ in color, hygroscopicity and purpose.
Stone
It is also called basalt wool, because the main raw material for making the product is basalt. It is ground to a powder and mixed with phenolic resins, which ensure the static position of the fibers.
The finished cotton wool is glued to a foil base or stitched with metal thread. It is used mainly for insulating saunas, baths, and building facades.
Stone wool is produced in three types:
- slabs;
- rolls;
- cylinders.
They differ in the degree of rigidity and thickness. The softest types are the most flexible and are produced mainly in rolls. They are able to replicate the surface of the house, which is important for walls made of logs.
The wool in the slabs is the hardest, it is used for insulation of stone buildings. Insulation in the form of a cylinder is used in production to insulate highways, gas pipelines and other places most susceptible to fire.
Advantages of stone wool over other insulation materials:
thermal conductivity is 0.032 to 0.048 W/(m*K);- ignition temperature is 1114°C;
- does not ignite;
- allows vapors to pass through, wooden walls “breathe”;
- absorbs moisture only 2%;
- provides sound insulation.
You can insulate with basalt wool outside the house and inside the room. Despite the presence of resins, it is considered an environmentally friendly product, since phenol neutralizes its toxic properties at the cotton wool production stage.
During operation, it is not subject to destruction from exposure to other materials.
Glass wool
A cheaper option for cotton wool than basalt wool, and more hazardous to health. Glass wool is made from tiny glass particles bonded with phenolic resins. The danger lies in its structure, which can crumble, remain on clothing, enter the respiratory tract and penetrate the skin.
Therefore, to work with it, respirators, gloves and work clothes that completely cover the body are used.
If safety measures and installation technology are taken into account correctly, then it does not cause harm to health. Most of the internal space of glass wool is voids that hold warm air, preventing it from penetrating outside. However, if condensation gets into it, it will immediately lose up to 50% of its basic properties.
Glass wool is produced in rolls and blocks with a thickness of 50-75 mm. Its strength is lower than that of basalt wool, so it is not worth laying it on the facade under plaster. The scope of application of this type of wool is attic floors, rafter systems.
Reference. The Isover company produces glass wool of the same strength as basalt.
Main characteristics:
- thermal conductivity - 0.035-0.037 W/(m*C);
- provides sound and noise insulation;
- melting begins at a temperature of 450°C;
- does not ignite.
On the market, glass wool is cheaper than basalt wool, which determines its popularity. This type of mineral wool is the leader in terms of sound absorption. It absorbs moisture more actively than stone wool, so it is impossible to insulate rooms in which evaporation occurs.
Slag
The cheapest type of wool, which is made from blast furnace slag fibers. It has the greatest ductility and flexibility and is produced only in soft rolls.
However, it is not suitable for insulating wooden walls for the following reasons:
- high percentage of thermal conductivity - 0.46-0.48 W/(m*K);
- quickly accumulates moisture;
- releases dangerous resins and acids;
- there is no sound absorption;
- burns at a temperature of 250°C.
Its only advantage is its low cost. It is used for insulation of non-residential premises or temporary buildings.
In addition, during the insulation process, small fibers can flake off and get under the skin; the work requires the use of protective clothing, respirators and safety glasses.
Ecowool
Quite an expensive material, which is produced from leftovers and waste during the production of cardboard corrugation and other paper products. It contains boric acid, which protects the main product from the effects of rodents and insects. The binder also contains fire retardants.
However, it is not recommended to use it in a room where there is a fireplace or other heat sources, as it may begin to melt.
Its main drawback is its crumbly structure. It is sold in bags or blocks, and during insulation it is poured into cavities, for example, into floor or attic joists.
During operation, it can shrink, losing up to 20% of its density, so it is not recommended to be applied to vertical surfaces, although this is possible with the help of special equipment.
Classification of insulated flat roofs
The external simplicity of a flat roof can lead to deep bewilderment for home craftsmen who want to quickly erect a roof over private property. Those who consider flat roofing a budget option will also be surprised.
If the roof is built wisely: with the proper number of waterproofing layers, with insulation of the required thickness, with parapets, drainage and its heating, in the end it will cost quite a lot, but also work flawlessly.
Flat roofs of the following categories are subject to insulation:
- Combined , they are also without attics. Their roof structure is combined with the ceiling. Insulation is carried out by laying thermal insulation with accompanying layers on top of the base. The advantage of combined systems is that they practically do not require winter clearing of snow cover. After all, the ceiling is regularly heated from the inside. Minor snow deposits can be easily removed by the natural force of the wind, which is why it is recommended to equip such roofs not with parapets, but with lattice fencing. Disadvantage: the condition of the roof is difficult to monitor. The slightest damage will result in leaks, followed by serious restoration of the roofing pie.
- Attics , which have two subtypes within the category. The attic floor of the first subtype is supplemented with a light superstructure on top. It is clear that in such cases the ceiling should be insulated. In the scheme of the second subtype, the attic superstructure and the ceiling are independent structures. This means that insulation is acceptable for both of them. The advantage of attic structures is the free monitoring of the condition of the roof and the timely detection of impending leaks. Owners can dry out the roofing pie by simply ventilating the attic. Among the significant advantages is the ability to carry out insulation upon completion of roof construction. The disadvantage lies in the impressive cost, which, however, pays off through long-term operation and rare repairs.
The second category of attic roofing systems means that the insulation can be located either within the superstructure or above the ceiling. However, the second option for laying insulation for a flat roof is a priority.
According to the second scheme, an air chamber is formed between the roofing and the thermal insulation system. This is an attic that divides the structure into two parts with different temperature backgrounds.
The difference between the external and internal temperatures of the attic roof will not be as significant as it is with structures without an attic. The temperature change will not be so sharp and destructive. Plus a minimum of condensation, which is the secret to the longevity of attic roofs.
How to properly ventilate a roof
- The area of exhaust and supply openings must be determined taking into account certain parameters, which include the volume and concentration of removed vapors, etc., which in practice is not always possible to do. Therefore, they usually use existing empirical findings. 2. The height of the ventilation gap between the base of the roof and the insulation must be at least 5 cm. It directly depends on the length and angle of inclination of the roof slopes. 3. The flow of air is organized both along the entire eaves and in local places - with the help of ventilation grilles that cut into the lining of the eaves overhang. 4. The total area of exhaust ventilation openings installed only at the highest point of the roof must be no less than the area of the supply openings for each slope. Exhaust devices are ventilation hoods for hipped roofs, ventilation ridges, roof aerators, etc. You can use both ready-made (store-bought) devices and those made by yourself. https://www.youtube.com/watch?time_continue=3&v=uzNCsJO2k6w