Since plasterboard has recently been increasingly used when leveling walls, after its installation the question arises of how to seal the joints between the sheets. In this case, special-purpose putty mixtures are used, combined with serpyanka.
Sealing drywall joints requires proper surface preparation. For example, you need to make sure that the screws are not too deep. The fasteners should not protrude above the surface. Such work is carried out not only in the area of walls, but also in ceilings. In the latter case, the task will look somewhat more complicated.
How do you join drywall seams?
After installing plasterboard sheets, small plasterboard joints are most often left between them, which will need to be repaired later. In order to carry out this procedure, you will need to select a suitable putty, while the process of sealing the internal corners of drywall will not be difficult. The main thing here is to work carefully and strictly follow the steps indicated in the instructions.
Tools for puttying walls.
It is worth noting that sealing plasterboard profiles is the most critical moment, because the final appearance of the structure will depend on it.
List of elements that will be needed to seal the joints:
- plaster;
- paper tape or sickle tape.
Official ways to putty corners correctly
There are also some official methods (from the manufacturer Knauf) on how to putty drywall seams.
It is worth noting immediately that they are not ideal and cannot guarantee that cracks will not occur.
Layers of drywall putty.
The first option is more economical - using the universal Fugenfüller putty as a mixture, and you must use a painting reinforcing mesh, also called serpyanka.
Practice shows that using such a mixture to putty seams is not the most optimal solution, because with the slightest deformation of the ceiling or minor violations during the installation of the structure, or a slight change in humidity in the building, the seam can crack with a high degree of probability.
It makes sense to use this method if you do not plan to finish the surface with expensive decorative plasters and paints, but plan, for example, to cover the walls with wallpaper. In this case, even if a small crack forms, it will not be noticeable under the wallpaper.
The next option is to use a special putty based on alpha gypsum with various Knauf Uniflott additives as a mixture.
This mixture is intended to putty corners without using reinforcing tape. However, in practice it turns out that you will still need to use the serpyanka. The use of such materials makes plasterboard products resistant to cracking.
Even though the Knauf Uniflott mixture is slightly more expensive, you will need very little of it. If, for example, Uniflott is used exclusively for sealing internal corners and seams, one bag weighing 25 kg can be enough for approximately 80-100 sq. m. m of plasterboard structures.
If you have a small area, it is not at all necessary to buy a large bag - a small package will be enough. It is worth knowing that such a mixture is packaged in bags weighing 5, 10 and 25 kg.
Decorative braid
Recently, a new way of decorating the contour of the ceiling using decorative cord has appeared. This element will not only hide the joint between the vertical and horizontal planes, clearly separate the canvas and the vertical surface, but will also become a bright detail that requires a special style throughout the rest of the interior.
The texture of the braid can be woven or twisted. It is installed in the same way as a plastic plinth: pressed into the groove of the profile. But at the same time, you need to control the straightness of the edging, so on straight sections they use a long rule, and on curved sections they rely on eye and patience.
Decorative cord
There are the following types of decorative cord for installation in a suspended ceiling:
As a rule, the interior always contains garlands and picturesque ornaments inherent in the classic, empire, and baroque styles.
Preparing the surface for sealing seams with tape
Before joining the drywall seams with tape, you will need to clean the surface from dust and make sure that all screws on the surface of the materials are carefully tightened.
Wall priming scheme.
If this step was not completed immediately after installing the drywall profiles, before sealing the seams you will need to apply chamfers using a sharp knife. The depth and width of one chamfer should be approximately 0.5 cm, and it should be applied at a slight angle. Such recesses may be necessary so that the putty and the surface of the plasterboard sheets have better adhesion to each other.
In addition, it will be much more effective if the drywall is coated with a primer before sealing the seams. With a primer, putty and gypsum have a much better connection. That is why the joints will be of much better quality if they are puttied after the primer has been applied to the surface.
Next, you will need to knead the material to seal the internal corners, using the instructions from the manufacturer. The instructions most often contain answers to all the questions that may arise, but it is worth knowing that there is a technology for diluting the putty: first of all, you need to pour the mixture into clean, lukewarm water (it should be approximately room temperature), stir it with a mixer until until it becomes like thick sour cream in consistency.
It is recommended to use the smallest possible attachment on the mixer. In this case, the material must be mixed extremely carefully. Otherwise, it may lose some of its properties.
Which is better: heated floors or radiators?
Warm floorBatteries
You need to understand that in no case should you try to dilute a mixture that is already beginning to harden in a container with water - even if you manage to make it to the required consistency, the material will still most likely lose some of its properties. Therefore, if it was noticed that the material has already set, all that remains is to throw it away, after which a new putty will be needed for thinning.
After the surface has been cleared and primed, and the putty is completely ready for use, you can try to putty the corners.
Wallpapering the ceiling for painting
/ / / Minor defects on the ceiling surface are not the rarest occurrence in modern apartments.
You can fight them in different ways. You can level the floor using plaster, you can make a tension covering, but all these options involve quite impressive financial costs. There is a way that will allow you to save money and bring the surface into proper shape - pasting the ceiling with wallpaper for painting.
Wallpaper has been applied to ceilings for a very long time.
This is a good opportunity to give the surface a certain texture or pattern. The choice of textures is very wide and you can choose the right option for any interior. The height of the walls will not change with this finishing, which means you don’t have to worry about this problem in rooms that are not too high.
Visually, the room may, on the contrary, become a little higher. To achieve this effect, you need to choose the color in which the ceiling will be painted.
How to properly seal drywall corners
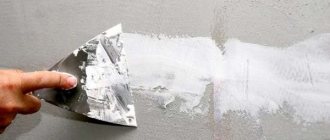
Scheme of puttying the seams of plasterboard panels.
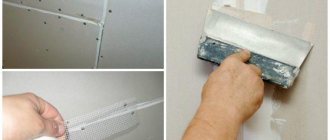
In order to putty the corners of drywall, you will need additional material such as a tape called “serpyanka” or paper tape.
Serpyanka is a special tape that must be used to reinforce seams. It should be glued before the putty is applied, or after the first layer of putty is applied to the corners of the profiles. However, there are some nuances that should be taken into account before sticking perforated paper tape or sickle tape.
First of all, you need to know that the tape is glued exactly in the middle of the seam. Next, it is necessary to take into account the fact that if a non-solid tape is used, it must always be glued overlapping so that its edges overlap each other by several millimeters. In addition, sickle or paper tape is used not only for sealing seams, but also glued to the corners.
The serpyanka must be pressed into the corners with strong movements.
If the paper tape is glued on top of the putty, it is necessary to press it firmly into the corner, and then immediately remove any excess material that may appear on the surface.
You can often come across advice that you need to use finishing putty instead of serpyanka. Under no circumstances should this be done, because this type of putty is not at all intended for such work - the material may crack along the seam as a result, which indicates an obvious defect.
It is necessary to wait until the putty dries along with the glued tape, and then apply the next layer. This is necessary in order to make even corners. When the first layer of material is applied, no matter how thick it is, no matter how carefully it is leveled, the putty will in any case shrink slightly. In this regard, the difference between the material of the seams and the level of drywall will become noticeable. Repeated application of putty will help correct this problem and hide this small defect.
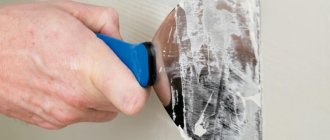
It is recommended to use a spatula for seams, the length of which will exceed the width of the seams. When you move the spatula with the material along the seam, you need to make sure that the spatula is positioned with its edges on the plasterboard sheet. It is extremely important to fill the seams with putty so that the material lies flush with the sheet. Therefore, you need to work very carefully and fill it with putty as tightly as possible.
It is important to note that this type of putty cannot be sanded; therefore, it is extremely important to seal the corners evenly.
How to properly seal drywall joints
When carrying out work on covering rooms with plasterboard (plasterboard sheet), you should first of all remember that correct sealing of plasterboard joints is the basis without which it is impossible to achieve an acceptable result. If the technology is violated, even the visible gloss will wear off very quickly, leaving behind cracks that can spread to the finishing, thus ruining the entire work. To prevent this from happening, you must carefully follow the presented technology.
Preparation of the working area, correct joint
To begin with, it is important to understand how to join plasterboard sheets together so that in the future they do not cause all the troubles described. Fastening and joining is the cornerstone of all work. Drywall has two types of edges: longitudinal and end. And if everything is simple with the end edges, since they are the same on all products and represent a straight cut of the material, then the longitudinal edges are different:
- Folded. Found on moisture-resistant boards used for rough finishing. The edge is marked as FC;
- Straight edge, which is also rough and is designated as PC;
- Rounded. This type does not require the additional use of reinforced tape. Denoted as ZK;
- Semicircular edge that requires special attention. It must be processed in several stages, without using a serpyanka. Marked as PLC;
- PLUK, or semicircular. This slab is thinned on the front side. When working with such a seam, you cannot do without serpyanka (perforated masking tape), which, if necessary, can easily be replaced with drywall putty;
- Beveled is the most difficult type of edge; to seal the seams you will need a serpyanka and several layers of putty.
These are the main types of edges that can be found on the domestic market. It is necessary to separately note the method used by experienced installers. When using it, any types of edges in advance or already on the mounted structure are cut along the edge with a construction knife, at an angle of about 45 degrees each. Thus, an angular groove is formed with increased adhesiveness, which is the same on all joints and does not require additional special means for its processing.
The gap between the sheets of drywall should be in the range from 3 to 7 millimeters. You need to make an indent of one centimeter from the floor, and half of this value from the flow. In the future, these places will be puttied and covered with baseboards.
Tools for seam sealing work
To get started, we will need the following set of high-quality tools, necessary to ensure that sealing gypsum board joints is as easy as possible, and the result remains unchanged over time:
- Brush for applying primer before sealing joints;
- An abrasive grater-plane, with the help of which the surface will be cleaned of excess elements before puttying, and removed after all puttying work;
- A painting or construction knife; without it, you won’t be able to properly trim the corners of the slabs before joining them; Construction level for quality control of work performed;
- A set of spatulas consisting of at least one narrow, one wide, and one angled spatula. You can also take a putty tool, but it can easily be replaced with a second spatula;
- container for mixing putty, container for primer.
The materials we will need are a primer, putty, and a special tape for sealing drywall joints.
All materials must be designed specifically for drywall, and it is advisable that they be from the same manufacturer. This will help to avoid conflicts between the materials used, which can lead to a violation of the properties and, as a result, destruction of the layer.
Preparing the surface to be treated for work
First of all, you need to trim the edges of the drywall using the method described above. Professionals use a drywall plane for this purpose, but you can also get by with a paint knife. It is most convenient to cut off the edges before installing the slabs on the wall, but this is not so difficult to do once the structure is installed. The optimal cutting depth required for this is 0.5-1 cm. High-quality sealing of joints on drywall can be hampered by a large gap between the plates; try to keep it no more than 7 millimeters.
- Sand the cut edge to increase the surface roughness;
- Clean the surface from debris and dust;
- Prime the areas you will be treating.
At this point, the surface preparation stage can be considered complete.
When they differ noticeably in texture or stand out in contrast
How to proceed? - Depends on the place where both materials meet: on the surface (wall or ceiling), in the corner between the walls or between the wall and the ceiling.
Task 1: Joints on the wall or on one surface
Solution 1: Pronounced drop
The easiest way to connect different materials is to screw a sheet of plasterboard at the junction of the coverings. The minimum difference is 12 mm: this is enough to separate different materials. But it is possible to build more complex structures - it depends on the task and capabilities. In any case, a joint made by a difference in planes will look logically complete.
Solution 2: Bring to one level
This happens when you have to join a relief material of a certain thickness and a smooth one (like wallpaper or a wall painted over plaster) in one plane.
The same drywall will help - “bring” the failed fragment exactly to the protruding level, as was done, for example, with the transition of a slatted wall into a decorative fragment behind the headboard.
Step-by-step instructions for carrying out work on sealing joints in drywall
A good craftsman knows how to seal drywall joints. To do this, the prepared, cleaned and primed joint must be filled to the edges with putty, and sealed on top with serpyanka or reinforcing tape - this is the first stage of the work.
At the second stage, after the first layer has dried, puttying is carried out with a second, finishing layer, on top of the reinforced tape. Next, the surface is treated with abrasive.
And the final stage is the final priming of the resulting seam.
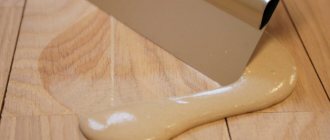
The preparation of the putty is also carried out in two stages: after the initial mixing with water, it is allowed to stand for a while and become saturated, then carefully stirred again, the mixture already beginning to thicken. Prepare a small amount of putty for about an hour of work, as it hardens quite quickly.
Preparing the putty mixture
How to cover drywall seams? The special mastic mixture is prepared strictly according to the attached instructions, without various improvisations and deviations. Special mixtures are produced for sealing joints of plasterboard panels. They are available in gray or beige. Color does not affect the quality of the solution. So what kind of putty should I use to seal drywall joints? it is preferable to use Knauf mixtures specially developed for this technology. We recommend using Uniflot or Fügen Füler dry mixes. But there are other high-quality analogues from different manufacturers. The consistency of the solution should resemble the thickness of non-liquid sour cream. Remember! You need to prepare as much solution as you can develop during the life of the solution, this is 20 minutes.
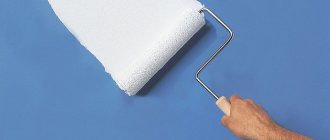
Using a spatula, the mixture is evenly applied to the seams and leveled with a wide spatula. At the same time, the screw caps are puttied. The layer of putty on seams with a cut edge is thinner than the layer on seams with a factory edge.
While the putty is wet, a special reinforcing tape is applied to the seams and smoothed with a wide spatula. Bonding reinforcing tape increases the strength of the seam and prevents the formation of cracks in the future. It is recommended to use Kurt paper tape or equivalent. The tape is very durable and protects against breakage. Kurt reinforcement tape is breathable, does not stretch and easily absorbs moisture. After drying, the tape does not bubble or cause cracks. Of the analogues of Kurt's tape, we recommend that you do not use paper tape to seal drywall seams. Paper tape does not allow air to pass through and does not absorb moisture. After drying, the paper web swells, lifting the layer of putty. Well, the self-adhesive mesh tape so beloved by Russian painters is completely useless. It stretches easily and is not durable. During finishing, drywall seams are treated with putty.
Important details during work
Compliance with these rules will give guaranteed good results:
- First of all, a guarantee of a high-quality result will be the correct joining of plasterboard sheets. The sheets must be firmly fixed and not separated from each other by a distance greater than 7 millimeters;
- Monitor the room temperature. The thermometer should not fall below plus ten degrees Celsius. At the same time, it is necessary to maintain the same temperature for two days after work;
- Use two types of putty: starting putty for sealing the seams under the tape, and finishing after, this will give the best result for subsequent finishing;
- Wet work must be completed before starting work with drywall, since it is very hygroscopic and carrying out such work after its installation can cause distortions and distortions of the finished structure.
It goes without saying that the fastening of the sheets to the frame must be 100% reliable and without backlash.
Useful tips from professionals
And in conclusion, some useful tips from professionals, thanks to which you can prevent mistakes that may seem insignificant at first glance, but can reduce all the work done to zero.
Professionals recommend:
- Even if all the rules regarding grouting are followed, small cracks cannot be ruled out. This is due to the fact that during the puttying work there were temperature fluctuations in the room. Of course, at home it is quite difficult to achieve constant temperature conditions, but it is worth trying to at least slightly minimize the risks.
- If there are wooden floors in the room, and plasterboard structures were attached directly to them, it is possible that cracks may occur in the area of the corner seams. In this case, the seismic activity of the walls is to blame.
- Some putty mixtures have the inscription on the packaging: “intended for sealing seams without the use of reinforced tape.” Don't let this inscription mislead you. If you putty the joints without using tape, cracks may still occur. In this case, the manufacturer wanted to say that this type of putty simply could not hold it.
That's all, you can start sealing the seams on the drywall.
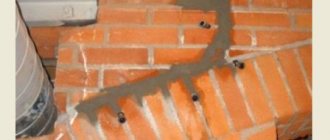
Working with fillet welds
Now all we have to do is talk about how to seal the joints between drywall located at the corners. There are a number of features here too. The main one is that you will use special metal corners, secured in the following order:
- Using an angle trowel, apply a layer of starting putty to the corner joint of the drywall;
- Place and secure the corner on it and wait for it to set with the putty;
- Apply another layer of putty on top and reinforce it with reinforced tape folded along the corner;
- Apply the last layer of putty to the stretch.
By working in compliance with all the specified technologies, you will receive a guaranteed high-quality result.
Which putty to buy
You can prepare the putty composition from dry mixtures or, what is more convenient, purchase ready-made prepackaged special putty.
Currently, a large number of different putties from domestic and foreign companies are produced and sold. The most popular and widespread of them (Knauf, KREISEL, Fugenfuller, Vetonit, Ceresit, Unis, Vetonit, OSNOVIT, etc.) have in their assortment putties intended for drywall. You can purchase them at specialized retail outlets, for example in Leroy-Méreln.
Go to the Leroy-Merelin catalog =>>
Basically, all brands of putty have similar characteristics, but some companies offer a wider range of products for specific operating conditions, a wider range of packaging weights and more universal material characteristics.
How to properly join plasterboard sheet to sheet
• For future holes for sockets, you need to: either mark the exact location of the centers, and/or immediately cut a hole for the box on a sheet of drywall.
If you are covering walls with plasterboard, then you need to take into account the peculiarities of fastening future objects, furniture, lamps, and other elements. There are special fastenings for drywall, often called butterflies.
They come in metal and plastic:
In order to glue sheets to gypsum or cement-polymer glue, you will need a minimum of tools, some experience in working with adhesive mixtures, a fairly smooth initial surface (differences up to 20 mm), and a strong, primed base.3. Or we don’t use the corner: we just putty, glue wallpaper or paint, and then glue a plastic corner on top of the finish: it will close a possible crack and protect the corner from minor damage. However, a plastic outer corner will not interfere with any method of processing outer corners. It is mandatory to glue a reinforcing mesh to all joints.
If there are two factory edges at the junction, then we use a mesh 80-100 mm wide.
Door (window) opening
If the partition has a door, then a gap of the appropriate length is made in the lower guide. Then they proceed according to the following scheme:
The racks adjacent to the doorway are aligned vertically using a level. They are attached with self-tapping screws to the frame guides and then reinforced with wooden beams.
- The upper jumper from the guide profile is installed. It should be located 1–1.5 cm above the future door structure.
- An additional vertical post, cut to size, is attached to the gypsum board joining line above the door.
The window opening in the partition is made in a similar way, only another horizontal lintel is added at the bottom.
How to make drywall joints: video instructions for DIY installation
Let's deal with the internal seams first, as a simpler matter. To reinforce these drywall joints, use the following tool:
One of the most important and critical questions in the construction of plasterboard structures: how to then putty the joints of the walls? They are the painful places of such covering and even in this they are ahead of the seams.
Moisture and dust accumulate in internal cracks, and external cracks must undergo significant tests against collisions with residents and mechanical damage. And you shouldn’t be careless when processing these elements if you don’t want to start working with drywall again in the very near future.
In order to obtain a high-quality, durable and reliable internal corner, you should know several rules for handling a material such as gypsum board.
- we attach the gypsum board strips to the inner side surfaces of the niches so that its ends are at the level of the front side of the guides;
The perforated corner can be placed on glue, but most craftsmen prefer to use the same starting putty for this purpose.
Inaccurate profile cutting
Many craftsmen do not consider profile cutting a responsible task and use the first tools that come to hand. For example, a grinder. Its disk rotates at tremendous speed, the metal overheats and moves like a wave. But what’s more important is that the galvanization burns out at the cut site, which serves as protection against rust. What this leads to is unnecessary to say.
To cut a metal profile, you must use metal scissors. Only they will ensure an even, neat cut without damaging the galvanization.
Joints of plasterboard sheets and their sealing
When fastening in two layers, it is necessary to shift the sheets of the second layer by 60 cm in relation to the first. You should start with half, cut along a line running along the sheet.
After joining, there is one more important part left - sealing the seams. Putty will help us with this. Following the instructions, dilute the gypsum base in water.
In order for your repair to be durable and reliable, you first need to take care of the quality of the seams, and therefore the putty itself. In addition to this, we need a spatula; a regular 15-centimeter construction spatula will do. The most important question for beginners is whether to leave a gap between sheets of drywall? Yes, because plasterboard sheets, like any other material, tend to expand from heat and swell from moisture.
The gap in this situation will help prevent the deformed sheet from leading the rest. If the joint is located in a corner, one sheet is attached to the profile, then the second is attached to the one standing next to it. Only then a perforated corner specially designed for this purpose is put on the outer corner.
The internal one is simply covered with putty. The gap should not exceed 10 mm.
Question about the gap between the gypsum board and the floor (partition)
In the book INSTALLATION OF RIGIPS SYSTEMS and also in KNAUF INSTALLATION CARDS in black and white: in partitions the gap between cardboard and floor is 10 mm, ceiling - 5 mm. Seal with elastic sealant. I place the sheets on a piece of drywall placed on the floor. Then I fill it with sealant. The sheet does not come into contact with the ceiling and does not “draw” moisture. In Odessa, the construction situation did not make me happy, to put it mildly, starting with the fact that there are simply no moisture-resistant tongue-and-groove slabs - in Knauf they offered to buy a carriage from Kiev, and it was difficult to find GVLV (for the outer cladding of the corridor, inside the bathroom there are two layers of gypsum board and tiles ); ending with the attitude to the work, first they wanted to put profiles on the beams, then pour them into the screed, etc. I will add that some agreed that the gap was needed, but they suggested sealing it with gypsum putty (as hard as gypsum board). paradox
- We cover the wall.
- We sheathe the ceiling (even if there is a gap left at the vertical sheets, it is covered by the ceiling sheets). Next, he cuts the chamfers, primes and fugen with serpyanka - that’s it!
Sealing drywall joints
If we are not talking about a factory-made edge, but about a self-made edge, which is formed after cutting drywall to the required size, then it needs to be thinned. To do this, a special tool is used that chamfers the edge of the sheet. However, this can be done with an ordinary wallpaper knife with a sharp blade.
When processing an edge, you need to cut off about two to three millimeters of gypsum at an angle of 45C.
When installing drywall sheets, you need to leave a gap of no more than seven millimeters between them. This distance between the sheets will allow them to contract and expand freely with changes in temperature and humidity.
For the same purpose, gaps are left - a centimeter between the drywall and the floor and a five-millimeter gap between the gypsum board and the ceiling. All seams are subsequently puttied and covered with plinth on the floor.
The joining of drywall in the corners is done one by one: first, the first sheet is attached to one of the installed corner posts, and then the second sheet is attached to another profile standing in the corner. The gap between the sheets forming the corner should not be more than one centimeter. Subsequently, a special perforated corner is mounted on the outer corners, and the inner corners are sealed using putty and sickle.
First of all, it’s worth talking about what types of longitudinal edges there are. The transverse edge of all types of this material, be it simple, water-resistant or fire-resistant sheets, is always straight and not covered with a layer of cardboard. So, the longitudinal edge can be as follows: If the drywall on the wall is mounted in two rows, the second one must be shifted relative to the first by 60 cm. Since the sheet width is 120 cm, half of the sheet cut along the longitudinal line is mounted first. Don't forget to purchase a spatula 15 cm wide.
It is necessary for collecting the diluted mixture and for further applying it to the gypsum board joints. When applying putty, the spatula should be pressed slightly - this is necessary so that the gypsum mixture completely fills the joint. Now let's answer the main question - how to seal joints on drywall. For this work you will need gypsum-based putty, which is diluted in the required proportion.
Remember that you shouldn’t skimp on building materials, as a low-quality mixture can simply crack when dried and significantly deteriorate the appearance of your structure.
How to treat the surface → Room decoration → How to choose the right paint → Surface treatment technologies → Leveling and finishing the walls → Selecting and applying a primer → Removal from the surface → Stretch ceilings and technologies → Reviews and testimonials
Decorative baguettes
Decorative plinth is chosen by those owners for whom the stretched canvas does not yet mean the end of the work on decorating the ceiling space. In this case, the plinth not only hides the joint, but also performs an important decorative function. Although it can be installed flush against the ceiling, more often it is mounted at a lower level. A stretch ceiling looks much more impressive with lighting, and lamps are installed in this niche.
Of all the variety of forms, a smooth extruded type plinth will be a win-win. The smooth baguette harmoniously combines with the glossy surface of the film in any setting. A plinth with imitation of decorative stucco requires a balanced approach, taking into account the style of the rest of the interior.
Foam baguette
Any baguettes made of polyurethane or polystyrene are used under the tension fabric, but with some installation features. Since the plinth cannot be glued to film or fabric, it is only attached to one side to a vertical surface. Hence some nuances regarding the selection and installation of decorative moldings:
The disadvantages associated with the complexity of installation are obvious:
Important! You won't be able to remove the baseboard without damaging it. If it is necessary to dismantle the canvas, the baguette is torn off and after installing the film in place, a new one is purchased.
If desired, you can install gypsum stucco. In this case, we are talking about creating an entire cornice-type composition using elements of pilasters, curly moldings, and columns. Such decorations decorate complex multi-level structures with combined finishes.
Wooden skirting boards are installed only in rooms decorated with wood, where other materials are inappropriate.