A stone house always looks impressive and respectable. Its extraordinary stability and strength allows you not to be afraid of ground movements in earthquake-prone areas, and you can be confident in the exceptional durability of your housing.
However, natural stone has very significant disadvantages related to the comfort of living and the low affordable cost. Therefore, finishing a wooden house with an artificial structure with stone is an affordable option for every family, and also has a lot of advantages.
The advantages of a wooden house with artificial stone cladding
Why are imitations of natural materials valued by builders? Let's take a closer look:
- This is the only material whose structure turns out to be more environmentally friendly than that of the original. The thing is that rocks are capable of accumulating radiation and then releasing it. That is, a simple cobblestone “fonit”. Forms of artificial material are made from a mixture of sand, lime, cement and other raw materials, carefully purified from harmful impurities.
- The cost of natural stone is high. It includes delivery from the mining site, the value of the mineral and mechanical processing on machines. Imitations can also be expensive, however, they are more accessible to the average consumer, unlike “natural” ones.
- Natural stone is porous and can accumulate moisture, grease, dirt and soot. Over time, such decoration of a wooden house with wild stone will look sloppy. Artificial raw materials can be washed, cleaned and other manipulations without the use of abrasive substances.
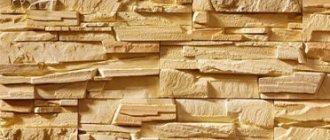
- Appearance. Imitation products are not inferior in external grandeur to the original. Moreover, it even surpasses the richness of types and shades.
- For a wooden structure, especially if the house is a log house, the weight of the cladding is important. Natural stone is quite heavy, which will require structural interventions at the design stage.
The advantages include ease of installation with the obligatory condition of preparing the wood to accept stone and wet cement mortars or adhesives.
How to clad a house with stone correctly
Of course, finishing a concrete wall with ceramics is much easier than finishing a wooden one. Therefore, as a rule, the base of the object is subjected to such actions, and the log or timber walls remain pristine.
Instructions for fastening cassette facade slabs
Metal or composite cassette slabs for external cladding are a very convenient and profitable material for self-cladding.
External and internal view of the cassette
The installation of cassettes is a whole structure, which includes a metal profile, internal and external corners, platbands, flashings, slopes, and fasteners. Such frames greatly facilitate self-assembly. The work can be done using internal and external fasteners. The visible principle is carried out through special holes with which each cassette is equipped. Usually these are curved steel tiles. The hidden method is typical for cassettes with curved bases. They fit into the slots like a Lego set. For such a system, the installation of an L-shaped profile is required.
Flush mounting cassette
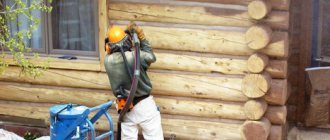
Preparation of wooden surfaces
Before finishing a wooden house with stone begins, the walls should be inspected for damage - rottenness, mildew, mold. Wet solutions can increase the problem.
The next stage will be the installation of the sheathing, especially if the house is not timber, but log. This is the case when galvanized profiles are used.
The house will have to be insulated if it is decided to cover large surfaces - stone does not help retain heat, so the width of the guides should be slightly wider than the thickness of the foam boards or cotton mats. They are placed in formed sectors and covered with suitable waterproofing.
When finishing a wooden house with stone on the outside is planned to be done only on certain parts of the facade, the sheathing is left without insulation and is covered with asbestos slabs, which are also labeled as moisture resistant. You can use a special drywall - GKLVO, it resists not only moisture, but also fire. A reinforcing mesh is attached to the sewn surface. It will prevent the plaster mass from sliding down.
It is better to purchase basic cement surfaces in the form of ready-made mixtures. There the composition is more carefully verified than handicraft. You'll need a lot of it.
What conclusions can be drawn?
- Facade plaster is easy to apply to the wall without using a mounting mesh, because it is light in weight.
- Due to the versatility of the material, it is used not only indoors, but also outdoors.
- Due to the wide selection of shapes, the most suitable texture of the treated surface is selected.
- Stone plaster can be combined with other building materials. It will make the interior of the house original and visually attractive.
- The mixture allows you to fairly level the surface if you apply it in two layers.
- Treating a wall with such a facing material will not take much time and effort.
- By adding cement to the finished mixture, the plaster has excellent characteristics, does not crack, tolerates temperature changes and is not affected by moisture.
Decorating your home with decorative plaster is very easy. To do this, you do not need to have any deep knowledge of construction. It is enough to strictly follow the instructions and carry out the work step by step.
Sources
- https://1oschtukaturke.ru/dlia-fasada/imitatsiya-kamnya-iz-dekorativnoj-shtukaturki-svoimi-rukami
- https://1pofasady.ru/shtukaturka/shtukaturka-pod-kamen
- https://santehmen.ru/kamen/shtukaturka-iskusstvennyj-kamen-svoimi-rukami.html
- https://DekorShtukaturka.ru/dekorativnaya-shtukaturka/dekorativnaya-shtukaturka-pod-kamen
- https://kraski-net.ru/obrabotka-sten/oshtukaturivanie/dekorativnaya-s-imitatsiej-kamnya-svoimi-rukami
- https://PoShtukaturke.ru/steny-snaruzhi/dekorativnaya-shtukaturka-naruzhnyx-sten/imitaciya-kamnya-iz-shtukaturki.html
- https://1beton.info/shtukaturka/pod-kamen
- https://svoimi-rukami2.ru/imitacia-granitnoj-kladki/
- https://myshtukaturka.ru/oshtukaturivanie/imitaciya-kamnya-iz-shtukaturki.html
- https://remontonly.ru/shtukaturka-pod-kamen-svoimi-rukami.html
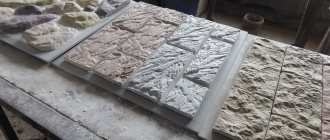
Material preparation and cladding
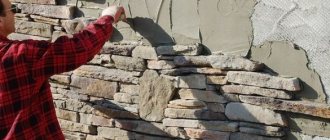
Proper finishing of a log house with stone begins with careful selection of materials. Artificial raw materials have a smooth back and therefore fastening is not difficult, but at the same time each element must remain natural and natural. To accurately display natural motifs, you first need to lay out a small amount on the ground and then transfer them to the wall.
Each decorative element is generously applied with adhesive mass, and it is pressed forcefully against the plaster layer. Laying begins from the bottom and up to 5 rows are performed at a time. If you make the entire surface at once, there is a risk that the mass will slide under the weight.
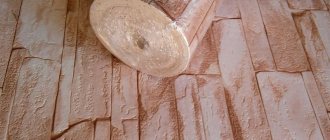
Compositions from saw cuts for room decor
You can use wood as an original accent for any room by placing objects made from wood cuts in the rooms. For example:
- Stylish watch;
- Placemats;
- Vases;
- Shelves;
- Panel;
- Frames for pictures and mirrors.
Making such decorations is not difficult - it’s just a matter of imagination and the availability of materials. We offer videos as a source of inspiration and ideas.
If you decide to create your own decor, do not forget about proper surface treatment. Be sure to coat each element with a protective agent or varnish. It is undesirable to use paints - they can disrupt the texture of the material.
You can stick thin saw cuts on the walls, having previously prepared the surface. A nuance - it is better to take elements of different sizes, but approximately the same thickness. If any detail stands out too much, the stylistic picture will be disrupted.
Cutting a tree in home design
Decor from cut wood in the interior
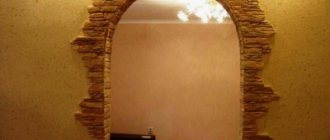
Combination of stone and wood finishing in the interior
- The concrete or brick surface of heating units is covered with reinforcing mesh and leveled with plaster mixture. If the stove or fireplace is not an imitation, then it is worth purchasing special heat-resistant raw materials.
- The cladding process is similar to the method on external walls - a pattern is laid out and transferred to the plastered surface.
- In places of contact with wood - walls, jambs - either a small gap is made or a wooden area is captured. Then it is the wall that is subjected to all kinds of processing before work begins.
This wood and stone finish will make the corner of the kitchen or living room exclusive.
Basic rules for installing panels
Facade cladding made of polyurethane, polypropylene, vinyl, acrylic is installed in compliance with thermal clearances. Small gaps should remain between adjacent elements of decorative finishing. The sheathing, made up of a continuous sheet, will increase in volume when heated. Having expanded in the hot season under direct sunlight, the finishing material breaks off the fastening elements and becomes deformed.
Installation of facade panels is carried out gradually from left to right. The parts are attached to the base with self-tapping screws. The outer parts are fixed on the sides of the facade using nail strips.
About 1 mm is left between the screw head and the surface of the part. Do not tighten the plate too tightly. The panels are screwed exactly along the center line.
No glue
The facade cladding is mounted on a frame made of wood and metal. Use this method of assembling panels if necessary:
- improve a wall with an uneven surface;
- install a soundproofing layer or insulation.
On glue
Fixing the slabs with adhesive is only possible if the walls have a perfectly flat surface. For each type of finishing material, manufacturers recommend a specific product.
Designer secrets for complex stone finishing of wooden interiors
The services of professionals in this field are expensive, so owners of a private home who want to save money should put the following into practice:
These are not all the recommendations, but if you follow them exactly, finishing the house with stone and wood will make it respectable and correct from the point of view of professionals.
The fashion for decorating your own home dates back to ancient times. The ability to make a home different from everyone else, to show status and position has always been valued.
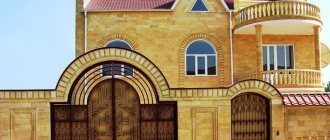
Many people dream of covering the façade with stone. This mansion is beautiful. It immediately stands out from other cottages and is the pride of its owner. But this type of finishing has pitfalls. In addition to the high price, developers fear that the stone will fall off over time. We will tell you how to avoid this and install a stone facade for centuries.
- How to decorate concrete walls with stone
- What is the danger of cladding a house made of aerated concrete and foam concrete with stone?
- How to properly clad a gas silicate house with stone
- What is a double base reinforcing layer?
- How to combine plaster and stone facades
- Why you can't stick stone on stone wool
- How to stick stone on frame walls
- Video with the secrets of facing a house with Dagestan stone
Cost of plastering finishing works
The price for the services of professional craftsmen is ultimately more expensive than the materials purchased for wall decoration. This is not surprising, since the work of builders is highly valued.
The price for the work will be per square meter. Wall decoration with decorative plaster can be ordered cheaper from private craftsmen working without the mediation of construction companies. Private traders rarely give a guarantee for work; even reviews help little.
When paying professionals, they order a labor-intensive type of plastering and complex reliefs. It is not in the interests of builders to delay the completion of work, which has a positive effect on the speed of repairs. Imitating stone from plaster with your own hands will take much more effort.
The “stone-like” interior effect for everyone implies an individual vision of design. Rough brutal surfaces of the castle wall, or delicate brickwork, bright red shades, muted brick, or inconspicuous beige. There are a huge number of options for both textures and color palettes. But even an amateur designer will choose the right option for any room.
How to glue stone to concrete walls
Stone is a heavy type of cladding. Weight 1 sq. m of large-format artificial stone can exceed 50 kg. Therefore, additional load will fall on the walls, foundation and soil foundation of the house.
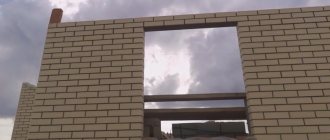
The most rational approach is to build a “box” of solid brick or concrete under the stone cladding . This will give a margin of safety. This is exactly what a portal user with the nickname swin1983 did.
I built a modern house with a flat roof using monolithic technology. The foundation is FBS blocks laid below the freezing depth. Wall thickness – 140 mm. The “box” is insulated with extruded polystyrene foam and polystyrene foam 100 mm thick. The façade was finished with artificial stone. Some stones weigh 25 kg. I thought for a long time about how to stick such a stone so that it would not fall off.
Main stages of construction:
- Construction of walls and ceilings.
How did you glue the stone onto the façade?
My stone gluing technology step by step:
- If the foam has yellowed from the sun, clean it with a brush.
- Mechanically attach the reinforced fiberglass mesh to the foam.
- Using a spatula, prime the surface with the same glue you use to glue the stone. Layer thickness 5-6 mm.
- Moisten the surface.
- Glue the stone to imitate random masonry. The gap between the stones is as thick as a finger. The bottom stone must have support.
- Sand the seams.
The user advises gluing the stone at an outside temperature of + 10 degrees Celsius and low humidity. It is better to grout the seams in the morning. The stones hung on the facade for several seasons and did not fall. The strength of the masonry is shown in the video.
Advantages of panels
This method of finishing external walls is so popular that you immediately want to figure out what the secret is. Those who have already been lucky enough to sheathe a house in this way give extremely positive reviews.
- Price. The cost of the panels themselves, as well as all the necessary materials for fastening and arranging the frame, is much lower than for natural materials.
- Installation. The whole process is quite simple. If you carefully read the instructions and strictly follow the recommendations, you can cope on your own. For installation you do not need to buy special expensive tools. There will be enough of those that every owner has. Well, as a last resort, you can borrow it.
- The ability to heat and sound insulate the building. Do-it-yourself installation of facade panels is carried out according to the principle of a ventilated facade. That is, first the frame is installed, and then the cladding is attached to it. Insulation can be laid in the space that has formed between the main scrap wall and the sheathing. It will retain all the heat indoors and not release it into the atmosphere. This same layer will help protect yourself from external noise.
- Weight. Natural materials create a large load on load-bearing walls, and not every structure can withstand this. Facade panels weigh relatively little, so they are an excellent option for those houses. Which lack strength.
- Lifetime. Thanks to synthetic components, facade panels last a very long time - up to 50 years. But this figure will depend on the correct installation and the quality of the chosen material.
- Variety of colors and textures. Manufacturers, trying to conquer a wider range of the construction market, create a wide variety of shades and textures. Thus, among the facade panels you can find a wide variety of imitations, ranging from brickwork to wood or stone.
- Easy to care for. To wash the cladding, just spray it with water from a hose, but rainwater will do the job just fine.
Why is it dangerous to finish aerated and foam concrete with stone?
I built a house from D400 aerated concrete. Region of residence – Rostov region. I want to decorate the walls with natural stone, sandstone or shell. Have questions:
- How to properly glue a stone?
- What mesh and glue should I use?
- How will the stone on the facade affect the microclimate in the house and the durability of the walls?
- What will happen to the vapor permeability of the layers?
Opinion of FORUMHOUSE specialists
The walls of the house are made of material with high vapor permeability. Therefore, such exterior finishing cannot be used. Otherwise you will get moisture accumulation in the block!
I will glue the sandstone with glue. Stone has greater vapor permeability than aerated concrete. The question is not about vapor permeability, but about masonry technology. I need a durable façade. How to make it?
Opinion of FORUMHOUSE specialists
The vapor permeability of sandstone is lower than that of aerated concrete. If you stick a stone onto aerated silicate, the condensation zone will be in the aerated concrete, and the stone will not allow moisture to escape. Moisture will collect on the inner surface of the sandstone. In winter it will freeze and begin to tear the block. Therefore, according to technology, aerated concrete is finished on the outside not with ordinary cement plaster, but with special compositions for cellular concrete with high vapor permeability. As an option, make a ventilated façade.
Strange. SNiPs indicate that the vapor permeability of sandstone is greater than that of a gas block. Or I'm wrong?
You are confusing something. Sandstone has lower vapor permeability than foam and gas blocks. If you initially wanted to decorate the house with sandstone, you had to think at the design stage about what would be best to lay the walls for this type of finishing. In your case, only a vapor barrier mounted on the inside of the house will help. Or consider an alternative finish.
An important point that many people overlook! When finishing walls with stone, you install it with a special adhesive composition, and the glue, in the aerated concrete wall-stone finishing system, works as an additional vapor barrier . This leads to moisture accumulation in cellular concrete.
The summary is summed up by Dmitry Galayuda, a consultant in the ventilation section at FORUMHOUSE. Nickname on the Gaser portal.
The problem is this. Water vapor from the house passes through the aerated concrete, but cannot pass through the stone cladding, which is practically impenetrable to it. At low temperatures, steam condenses, and frozen moisture breaks the boundary of the layers of the wall pie. I believe that you cannot glue stone directly onto gas silicate. Or make a vapor barrier from the inside of the house. But then why build a house from aerated concrete?
Ventilated facade made of siding or imitation timber
Siding and imitation timber have their pros and cons, but they are largely related to the material from which the panels are made. Both finishing materials can be: vinyl and metal; imitation timber is mainly used in wood.
The main advantages of the coating include:
- Easy to install siding.
- Low cost.
- A large assortment of different colors (except for wooden imitation, it usually has a natural pattern).
- Good protection from wind and humidity (wooden imitation timber absorbs moisture like any wood).
- External protection against mechanical damage.
- Service life up to 40 years.
- Does not fade in the sun.
Main disadvantages:
- Wooden imitation timber is a fire hazardous material; metal and vinyl materials are not dangerous.
- Vinyl siding can crack from a strong impact.
Siding goes well with the exterior finishing of the base with stone and the façade with panels. You can combine several colors, for example, corner and connecting panels use brown, wall siding panels are pistachio, etc. There are many similar options in photographs on the Internet. Installation of siding and imitation timber requires a ventilated facade and additional insulation.
Installation of siding panels and imitation timber
Installation can be done at any temperature, and it consists of several stages:
- The walls are cleaned and covered with antiseptic. You can even use tar oil for this, since they will be hidden later.
- The sheathing is sewn up; the thickness of the beam may depend on the thickness of the insulation. The width should be 1 cm larger. The timber should be fastened in increments of 40-50 cm with screws using a screwdriver.
- A vapor barrier is laid with an overlap of 10-15 cm. The joints are taped with special tape.
- Matt or roll insulation is installed.
- The insulation is covered with protective insulation; it also needs to be overlapped and the joints taped.
- A second sheathing made of 50x25 mm timber is installed. It must be secured to the first one with screws. It will additionally press the insulation.
- The panels are attached. Sheathing starts from bottom to top. You need to step back 10-15 cm from the ground for ventilation. The siding is fastened into a lock, screwing each panel. Imitation timber is screwed from above and through. In order to subsequently hide the caps from the screws, they are screwed in a little deeper. The resulting holes are covered with a mixture of varnish and sawdust and sanded.
- The imitation wooden beam is coated with antiseptic and paint or varnish on top.
Today, siding panels can be replaced with more modern glass-plastic or polypropylene panels. They are stronger and more resistant to high and low temperatures.
Price for finishing work with siding and imitation timber
Any of the listed materials will last for many years only with proper installation. If you don’t have time for this, then it is better to contact specialists who will do this work professionally. The price for work with siding and imitation timber is presented in the table:
| Type of work | Price, rub./m2 |
| Installation of siding (vinyl, metal) | From 120 |
| Installation of imitation vinyl timber | From 170 |
| Installation of imitation wooden beams | From 150 |
We told you how to properly carry out external finishing using the most popular materials, which option is better - only you can choose. Properly completed façade finishing will highlight the individuality of the owners and extend the life of the house.
How to properly stick stone on walls made of gas and foam concrete
Is there a way out of the situation described above? After all, in the south of Russia, houses are often faced with stone without ventilation facades and nothing crumbles. In addition, there is positive experience in regions where winter is harsh.
In Yekaterinburg there are frosts - 40 degrees. There are many houses decorated with stone. Covered after plastering. The stone stands and does not fall.
Opinion of FORUMHOUSE specialists
In the southern regions, houses are not insulated. The walls are built of bricks. Then the reinforcement is driven in, a metal mesh is welded to it at a distance of 1.5 - 2 cm and stones are mounted at the same distance, on the “feathers”. A polymer cement solution is poured into the gap between the stone and the wall.
Exactly! This is exactly what they do here.
Under the stone cladding, build structurally sound walls with low vapor permeability . For example, from solid brick. Then take a galvanized metal mesh. Mesh size – 25x25x1.6 mm or 50x50x2.5-3 mm. Attach it to dowels driven into the wall. Drive the dowels under the top rod. So the mesh, under the weight of the stone, will not move down over time.
Step-by-step installation instructions
In addition to the plastic panels themselves, fittings are needed that give the cladding a finished look. These are starting, corner, F-shaped profiles. To install plastic panels with your own hands, prepare a set of tools:
- building level;
- marker;
- grinder for cutting blades;
- knife for cutting slabs to width;
- hammer;
- screwdriver
Thanks to a special device, the panels are attached tightly. The joints are overlapped in order, one after another. Wall decoration cannot be done in winter. The plastic material becomes brittle. The panels can easily break under the slightest load.
Step-by-step installation instructions:
- Install a wooden or metal frame. First vertical, then horizontal guides. For metal siding you will need corners.
- If necessary, for noise and thermal insulation, insulating foam material or mineral wool is placed under the frame.
- Install corner posts. First, they are nailed at the very top, without recessing the caps. They are centered and nails are driven in at a distance of 2-3 cm. The lower element should extend 0.3 cm under the upper one so that moisture does not seep through.
- The first panel is installed starting from the lower left corner. The starting rail is fixed. At the bottom of the facade, two nails are hammered into different corners. The twine is pulled between them and the horizontal level is controlled.
- The first row is the most important. From him will come the direction of those who follow. The plates are fastened with screws, taking into account temperature changes, leaving a gap of 1 mm. Each panel is inserted into the grooves of the previous one.
- Frames around windows and doors are installed in the same way as corners. J-straps are used to connect the shaped slopes of the front door and window frames.
Sealant can be used for joints if recommended by the manufacturer. Experience shows that it is not necessary to glue the resulting overlaps between the plates. The use of sealants disrupts heat exchange and impairs the process of condensate removal.
Plastic cladding panels give an unattractive structure a modern look. Such a facade will be reliable and durable. Decorative installation work is carried out quickly and easily and does not require large financial costs. A large selection of decorative solutions allows you to create the home of your dreams.
Quick questions and answers on façade finishing with stone
Below we have collected information that will help you understand how to properly glue stone to a facade.
- How to make a double base reinforcing layer?
Make a double reinforcing base like this:
- Apply a layer of glue to the insulation.
- Embed a reinforced fiberglass mesh, so-called, into the glue. armored mesh with a density of 320 g/m².
- Through the first base - armored mesh and glue, drive dowel-fungi with a metal nail into the foam . Number of dowels – 10-12 pcs. per 1 sq. m.
- Place the facade alkali-resistant fiberglass mesh with a density of 145-160 g/m² into the glue.
- Apply the glue.
- Glue the stone.
- Sand the seams.
- To protect the facade from moisture, cover the stone with a water repellent.
- How to combine plaster and stone facades?
Make temperature-shrinkable joints between the stone cladding and the “wet facade” by laying a bundle of foamed polyethylene and sealant. There is no need to plaster the unit. Decorative frames made of PSB-S, with a base reinforcing layer with mesh, will cover these seams, and they will not be visible on the facade.
- Why can't you glue stone onto stone wool?
Mineral insulation is vapor permeable. Therefore, glue the stone only to a thick layer of facade foam. Otherwise, when moisture condenses, the mineral wool will get wet under the stone, which will lead to an emergency with the facade.
- How to decorate a frame with artificial stone?
In order not to trap moisture in the frame walls, and to allow steam to escape outside, make a curtain façade. Pie designs:
- counter-lattice;
- OSB-3 boards;
- damping layer - facade foam plastic 5 cm thick glued to OSB not with cement, but with polymer glue, i.e. - glue foam;
- double base reinforcing layer;
- stone.
Finishing the foundation with panels: step-by-step instructions
Facade panels for the plinth are installed on the frame.
Work on the construction of the sheathing should be carried out especially carefully - the durability and reliability of the entire structure depends on how smoothly and firmly it is mounted.
Frame elements - profile or timber (Description, types, properties) - can be installed horizontally or vertically; horizontal ones are more suitable for plastic panels.
Work order:
The starting bar is installed at a height of 4-5 cm above ground level. Determine the starting point, using a level, tapping cord or marker, draw a line along the entire perimeter of the foundation. The plank is mounted along the intended line, securing it with dowels. If the façade will be insulated along with the cladding, the frame should be located at a distance from the walls sufficient for laying thermal insulation. The insulation is laid closely, leaving no joints, and secured with plastic dowel umbrellas. Waterproofing material is fixed on top. How to insulate a house with polystyrene foam can be found in this article. At corners, near doorways, exits or entrances of communications to the house, corner strips and a j-profile are installed. Proceed to fastening the panels
The first element is installed on the starting strip, fixed with self-tapping screws along two edges and in 2 places in the middle of the panel. It is important not to tighten the fasteners all the way, but to leave a millimeter gap so that the expanding or contracting panel does not crack during temperature fluctuations.
The remaining panels of the first row are installed in the same way. If the height of the elements is not enough, and a second or more rows are required, then they are made offset, like brickwork. When the foundation is completely sheathed, the last row of panels is covered with plastic sheathing. If after carrying out the work small gaps between the elements are noticed, they are sealed using silicone sealant of a suitable color.