MesterulManole
17722 0 4
MesterulManole October 17, 2016Specialization: many years of experience in finishing works of residential and office premises, dachas, country cottages, etc. Hobby: cycling in all its forms
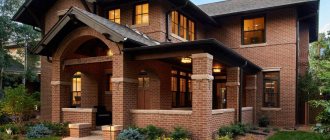
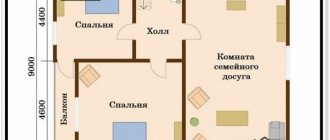
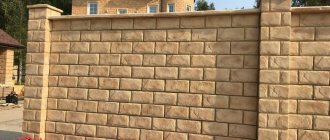
Modest but aesthetically attractive design of an opening in a country house
Greetings. Today you will learn about how to lay window openings from facing bricks. The topic is not easy, since cladding through finishing masonry is carried out by highly qualified specialists. Our task is for you to carefully familiarize yourself with the technology, look at photo reports and get a general idea of how this work is done.
Why are windows framed?
When erecting the walls of the designed building, all masonry work is carried out according to the drawings.
Surely, there will be no disproportions in such a structure, which cannot be said about houses that are built “by eye.” Those who are engaged in construction themselves should keep in mind that the appearance of the facade largely depends on the size and symmetry of the openings, and this is what you need to pay the main attention to
The role of openings in the aesthetics of the facade
The dimensions of windows, the width of the walls between them, the height of the window sill area - all this is regulated by standards. But even if the dimensions of the openings do not correspond to them, there is no big problem in this - any company today will manufacture window blocks according to individual sizes.
The key to the harmony of the facade is that the windows are located symmetrically on the walls and are themselves proportional. To understand what we are talking about, just look at the photo below. In our opinion, the shapes and sizes of the windows here are extremely poor, as well as their location on the wall, which is why the façade is not at all pleasing to the eye.
- In such situations, decorative lining of the opening with brick will only aggravate the dissonance, and the asymmetry will be even more striking. In any case, finishing of openings is carried out not during the process of laying the wall, but after it has already been completely raised to the designed height.
- It happens that the frame of the house was built earlier, and other work, including the design of brick window openings, is carried out after the house has settled. If this is exactly the situation you have, then before you begin this work, you need to check whether the window openings are located symmetrically in the brickwork.
All about the material, its advantages and types
Thanks to the use of facing bricks, the external defects of the building are hidden. If facade brick is used for old buildings, then it perfectly hides the presence of cracks on the walls of the house that appear due to load. But not only old houses require finishing - the brick facade of a new house looks even more impressive. Previously, many buildings were erected using brick, but now it is customary to use facing bricks specifically as a finishing element for the facade.
Facade bricks are:
Thanks to the use of facing bricks, external defects of the building are hidden
Both are used to decorate the exterior walls of the house and give it a beautiful appearance. The use of clinker is necessary for houses that are made using three-layer wall technology. Of course, the expenses for such a facade will be greater, but the benefits will also increase. A favorable microclimate is created inside houses with three-layer walls, and all thanks to the fact that the thermal insulation is distributed as evenly as possible between the load-bearing and outer walls.
The use of clinker bricks has a number of advantages:
- The material has high mechanical strength
- Frost-resistant and non-flammable, and also serves as a barrier to fire
- Not afraid of corrosion and pollution
- A huge selection of clinker facing material allows you to perform a variety of finishes, which allows you to make your house beautiful and attractive
Clinker brick facade
In addition to a large selection of shades, the facing material is also available in black and white. And if you take advantage of this and make the facade of your house from facing bricks of different colors, you can achieve incredible effects and show everyone that you have taste and imagination. The shapes of clinker bricks are varied; they can have rounded edges or chamfered edges. Clinker facing bricks can be perfectly combined with wood, stone and metal, so various combinations of clinker material and other facade elements will give an original appearance.
Nowadays it is customary to use facing bricks as a finishing element for the facade.
Repairing the brick façade is a major challenge. The cause of cracks on the wall can be not only time, but also shrinkage of the house or improper design. Sometimes it is possible to use overlays and metal belts - they strengthen the wall of the house and prevent further destruction.
Important! Outwardly, it can be difficult to understand whether a crack is growing or not. In order to understand this, glue a sheet of paper onto the damaged brick - if after time the sheet remains intact, then the crack does not increase and you can begin to carry out repair work and restoration
When it is impossible or you do not want to use such a finishing element as brick, you can use other options. For example, brick siding will be a cost-effective solution that you can implement yourself. Siding is lightweight, and thanks to this there is no unnecessary load on the house. Siding can be easily processed, and it is applicable for a curtain wall.
Brick siding panels: original and inexpensive facade design
Of all the advantages of using, the following can be highlighted:
- Brick siding is so similar to natural material that from afar it can be very difficult to understand whether a building is built of brick or lined with siding
- The ideal appearance is obtained by making a mold based on a cast of masonry from natural material
- A brick wall requires restoration, and facing siding just needs to be washed with water
- The service life of the finish reaches 30 years or even more - it is not afraid of precipitation and does not fade in the sun
- Light siding panels can be used to cover not only the walls of a house, but also its individual elements.
- A wide selection of colors, along with the lightness and low price of the panel, made it one of the most popular cladding elements
A hinged ventilated facade is used to cover the house with siding. The panels are fastened to the sheathing after the thermal insulation layer is laid. The ability to decorate your home yourself using such panels is a huge advantage. And the fact that this work is clean and dry, unlike “wet” facades, makes it even more pleasing and enticing to do it yourself.
Siding panels imitating brickwork
Recommendations
When finishing a house with brick, you should consider some nuances:
- Laying is carried out at positive temperatures and low humidity.
- The parts can be slightly moistened to prevent rapid absorption of water from the solution.
In this way, you can lay facing bricks with your own hands.
There is an opinion that this method of designing openings is not suitable for residential premises. However, many experts recommend in some cases finishing the door jamb with decorative stone. A detailed examination of this technology leads to the idea: this type of framing allows you to realize original design ideas, and with your own hands.
The feasibility of using decorative stone is determined on site; it depends on many factors - the overall interior, the appearance of the door installed in the opening, its geometry and others. But in some cases this material is simply irreplaceable.
- For decorating openings in large, spacious rooms. As an option - small, but with a minimum of furniture.
- If the walls in the area of the door jamb have significant, difficult-to-remove defects, decorative stone perfectly masks them.
- In cases where this finishing material is an integral part of the decor. For example, if the room is stylized as antique.
There are two types of decorative stones on sale – natural and artificial. The former are not used so often in the interior of residential premises due to the high cost and complexity of the cladding; they are characterized by heavy weight. And this includes the load on the ceiling and certain difficulties in fixing the samples on the jamb. The tiles are an imitation of natural analogues; moreover, they do not contain “chemistry” (or its concentration is negligible and is not taken into account). The raw materials are crushed rocks; Dyes are added to the mixture prepared for molding to give the desired shade. To reduce the weight of samples and increase fracture strength, some manufacturers add granular polymers.
Framing options
Homeowners and professional builders use a variety of window framing options.
Wooden elements
Framing windows on the façade of a building using wooden elements is a very common option today. Their use allows you to decorate windows in a unique Russian style. This method of framing has come down to us since time immemorial and is still very popular.
The disadvantages of such finishing include significant cost, difficulty in manufacturing design elements in the same style, fragility of wood and high requirements for finishing care.
Related article: Window insulation using Swedish technology
Brick
Very convenient material to use. It is most often used in brick buildings, since in this case the framing of the windows of the house can be done directly at the construction stage.
Stone
Decorating window openings with stone is quite a labor-intensive job, which requires the use of a significant number of elements. They can be represented by cornices, platbands, keystones, carved brackets, window and door slopes made of stone, and window sills.
Decorating window openings with stone is quite a labor-intensive job, during which a significant number of elements should be used
Plaster stucco
This option for finishing windows on the facade of a building is very expensive not only in terms of cost, but also in terms of labor intensity at the stage of installation work. In recent years, the popularity of gypsum stucco has declined significantly. It has been replaced by modern and more affordable materials.
Plastic profile panels
A very affordable option in terms of price and installation for finishing windows on a facade made of various materials, including brick, wood and others. The only, but quite noticeable, disadvantage of using profile panels is the low decorative effect of the resulting cladding.
Plastic profile panels are a very affordable option for finishing windows on the facade in terms of price and installation.
Wood-polymer composite
Recently, this material has received close attention. Its undoubted advantages are low cost, simple installation and guaranteed durability.
The building in which Soviet power was proclaimed
| Sight | |
| The building in which Soviet power was proclaimed | |
| 56°25′00″ n. w. 61°53′39″ E. d. HG I OL | |
| A country | Russia |
| City | Kamensk-Uralsky, Lenina 111 |
| Construction | 1890s |
| Status | Object of cultural heritage of the peoples of the Russian Federation of regional significance. Reg. No. 661710974820005 (EGROKN). Object No. 6600001215 (WikiGida DB) |
| Media files on Wikimedia Commons | |
The building in which Soviet power was proclaimed
- a mansion in the historical part of Kamensk-Uralsky, Sverdlovsk region [1].
By Decree of the Government of the Sverdlovsk Region No. 859-PP of December 28, 2001, it was given the status of an architectural monument of regional significance [2].
Architecture [ edit | edit code]
The one-story brick building on a low base is located within the boundaries of the historically established part of the city in a densely built area. This area was actively built up with residential and commercial buildings during the second half of the 19th century. The main northern facade faces the red line of Lenin Street and, together with the one-story brick shop placed on the right, forms a single facade front. The rhythm of the frequently spaced windows is determined by their symmetrical grouping. Large high windows with beamed lintels, decorated with elegant frames with an elongated frame and a complex crown shape give the house a special solemnity. The blades on the corners of the façade and in the walls between the windows are decorated with figured patterned brickwork. The multi-broken cornice with denticles crowning the façade is braced with blades.
The original symmetrical composition of the eastern end facade with six evenly spaced windows is distorted by a doorway cut in the central part and placed in front of it by a high plank porch of six steps with railings on four pillars and a pitched roof. On all courtyard facades, the windows are designed much more modestly than the street ones. The windows are framed by frame platbands with “ears” and sandriks-edges. A memorial plaque made of marble is attached to the main facade. There is an inscription carved on it: “In this building in 1917, Soviet power was proclaimed.” The size of the board is 50x50 cm, the signature is covered with bronze paint [1].
Material selection
First of all, you need to decide on the material that you want to use for finishing. Very often, in brick houses, windows are also framed with brick of the same or a different color. It’s not difficult to make simple brickwork, and this option will always look simple and stylish. The material is easy to use, beautiful and durable. Framing can be done both during the construction of your home and after its completion.
For a brick house, you can also use stonework around the windows. The decor of window frames with facing stones can be very diverse - sometimes the stone is laid evenly on the frame, and sometimes an interesting design or mosaic is created from several types of stones.
Metal framing looks interesting and is suitable for both modern and traditional home designs. The design of such structures can be extremely diverse. The advantage is their durability, but you need to remember that the metal quickly heats up in the sun and becomes extremely cold in the cold - in some cases this can cause discomfort.
Framing with wood is typical for both brick and wooden houses. You can make both laconic frames and carved versions in the Russian style. At the same time, it is very important to properly treat the wood from moisture and contamination so that the frame really lasts you a long time.
Concrete structures are also quite simple. Concrete can look quite interesting if the structures are covered with plaster and paint. This option looks good in a house with a painted facade, and it is most convenient to make such window framing during the construction stage.
For houses in a classic style, moldings with a wide variety of designs are often used. They are usually made from polyurethane. The molding is usually a white structure that imitates columns or stucco: this option can look very elegant, but it will only be appropriate if the design of the entire house is appropriate.
If you want to save money, you can use siding, plastic structures and even foam. If you choose an artificial material, you need to carefully consider its quality. The advantage is that from artificial materials you can create quite a few options for unusual design framing - this solution is suitable for modern cottages and country-style houses.
TOP 10 projects of country brick houses in 2022 according to the ABC Construction company
Project of a house in the village. Leninskoe
It successfully combines modern trends and classic ideas about a country house. The finishing of the facades with white plaster, inserts of warm wood, the presence of large windows and simple architectural forms make the house very modern. But at the same time, due to the pitched roof, wooden fences and terraces that unite the cottage with the landscape, it is perceived as very traditional and cozy.
The house is without decorative excesses and looks great due to the proportions found. Thanks to this, it will fit perfectly into both the pine forest landscape and the traditional cottage development of the villages around St. Petersburg.
9. House project “First Ray”
Project of a two-story brick house with an area of 190 square meters. m. The facades of the cottage are laconic and at the same time expressive. The sharpness of the image is given by a simple gable asymmetrical roof covered with cement-sand tiles.
The brickwork of the facades is made in a two-color version. Up to the top of the first floor windows, densely colored brick was used, then, after the dividing strip that encircles the building along the entire perimeter, lighter brick was used. The window openings are accentuated in height by wooden plank inserts.
House project AS-339
In the process of creating a modern residential building, we primarily focused on the preferences of the future owner, which consisted of original design, functionality of the premises and general comfort of housing. This can be seen in this project: openness and airiness. Thanks to panoramic glazing, the boundaries between the living space and the external environment are blurred. Proximity and visual contact with nature are also ensured through the creation of terraces and balconies.
The nuances of facing a house with bricks
Finishing the facade with brick has features that must be taken into account to obtain a high-quality result.
Strengthening the foundation
If you intend to cover a structure that was erected quite a long time ago or is a frame structure, then it is necessary to obtain reliable and durable support for the cladding layer. The fact is that the brick puts a serious load on the building itself and on the area where it is located. In the absence of a strong base, the surface will sag and become deformed. To strengthen the foundation, a solution in the form of a reinforced tape is additionally poured over the entire area of the house.
If there is no space for external brickwork on the main foundation, then it is necessary to install a reinforced concrete frame nearby
Bunch
The lining needs to be securely connected to the main walls; for this purpose, metal mesh, anchors or wire are used. The bottom line is that there must be at least 4 points per 1 m2. The selected material is installed in load-bearing walls and located along the seams of the masonry, while the minimum depth should not be less than 8–9 cm.
When arranging decorative masonry during the construction of walls, the tie is carried out using a mesh; for finished buildings, anchors are used
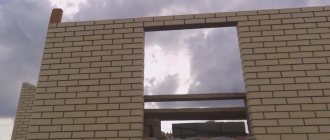
Creating window openings
Window openings in brickwork require a very responsible approach. To install them, it is necessary to carry out markings in advance and draw up a layout diagram. That is why most often surfaces are covered in parallel with the construction of load-bearing structures. The laying of window openings is carried out as follows:
- Initially, the main part of the walls is erected according to the chosen method.
- The creation of the opening begins as soon as the height of the areas located nearby is equal to the height of the window. The main thing is to make sure that all openings have a uniform structure.
- The masonry is carried out using the end method; for this purpose, the brick is cut to length. First, the lower section of the opening is laid out, and then the vertical posts.
- The upper part needs strengthening. For this purpose, a metal corner of suitable thickness, treated with a protective anti-corrosion solution, is used.
- The corner is located exactly above the window; one of the corners of the brick is cut off. First, the elements are placed without mortar to ensure the accuracy of their location, and then they are mounted on the composition. The masonry can be made protruding or flush with the main walls. To avoid deformation, the corner is propped up with a wooden strip.
- If it is planned to line the opening without removing it, then the bricks are laid close to the frame with the elements trimmed to the required size.
Of course, if you lack experience, window design may require more time and effort, but the main thing is to install the parts exactly to the level. Doorways are created using a similar principle.
In the absence of experience, it is advisable to check each level of masonry with a template
Brickwork technology
In order to comply with the technology of laying facing bricks, the process is divided into several stages. This allows you to perform work more efficiently without inviting specialists.
Preparation
The installation of a finishing coating involves preparing the surface.
Negligence in preparation can end very badly
The following work is being carried out:
- The reliability of the foundation is checked. If required, strengthening is performed.
- The general condition of the walls is assessed, especially when working with old houses. Decorative trim is completely removed.
- Cracks and crevices are covered with putty.
- The base is treated with antiseptic solutions. Metal elements are coated with an anti-corrosion mixture.
- The surface is thoroughly dried. High humidity inside a long-constructed facility is not allowed.
- A suitable cladding method is selected. All masonry methods have their own nuances.
- The base is covered with waterproofing.
- If required, insulation is installed. It is fixed with special anchors.
Before laying, the concrete base must be waterproofed; in the simplest version, 2 layers of roofing material are laid.
Thus, the front side must be free from any defects that could lead to unpleasant consequences.
Mixing the solution
When deciding how to brick a house, take into account that a suitable mortar must be used for the job. The traditional mixture is M500 cement and well-sifted sand in a ratio of 1:4. First, the dry ingredients are mixed, after which the liquid is added. It is very important to use water without mineral impurities, otherwise there is a high probability of efflorescence. The composition should be homogeneous and thick in consistency.
It’s not difficult to mix masonry mortar with your own hands, but if you want to get a guaranteed good result, then it’s better to take a ready-made mixture
On a note! It is recommended to prepare the solution for a certain period of time to avoid the appearance of lumps.
Brick laying
In order to properly cladding the façade, it is necessary to lay the first row correctly. First, it is installed without mortar, this allows you to align all the elements and perform trimming taking into account the width of the seams. Next, reinforcing mesh and mortar are laid on the waterproofing. All parts are arranged according to level.
It is customary to reinforce the starting row
A ventilation gap is immediately provided. To create an even gap between the finishing layer and the base, a slab of the required thickness can be laid, which is moved from section to section.
After completing the installation of the first row, they move on to the corners; they are laid out in three or four bricks. When applying the solution, a metal rod is placed on the front side, and the construction mixture is spread along its level. When the elements are fixed, the rod is removed.
Cladding the main part of the walls
After creating the corners between the rows, the cord is pulled, then laying the bricks is carried out without any problems.
- The solution is applied to the bottom row, taking into account the laid rod.
- The end part is coated with the mixture, the part is installed in its place and lightly tapped. So, gradually rearranging the jointing rod, the entire row is filled.
On a note! For ventilation, areas without mortar are left in the masonry above and below.
External masonry with ventilation and insulation requires the installation of inlet ventilation holes - The cord is transferred to the next section, after which the process is repeated.
- After a certain number of rows the binding is made. To do this, an anchor is driven into the base or a mesh is screwed, which is bent and laid at the junction of adjacent rows. When the height of the lined area reaches the window opening, it is bypassed taking into account further finishing.
- If jointing is intended, then it is carried out after the mixture has set, which is prepared independently or purchased ready-made. The composition is applied to the joints and a beautiful seam is formed.
Although facing a facade with brick is not the easiest task, with some diligence the work can be completed even without experience.
Installation algorithm in an already finished wall
The second option for arranging a window opening involves performing work on an existing wall. The workflow looks like this:
- First the marking is done. This stage involves identifying zones for placing jumpers and technological holes. The working stage is carried out using the triangle method, the lintel is marked so that its top is in the lower masonry row;
- Having made such marks, fifteen centimeters are added for each edge of the jumper. This distance is necessary to install supports that secure the lintel made of metal structures or reinforced concrete;
- installation of the support begins. It is necessary to provide a distance of seventy to eighty centimeters between the load-bearing wall and the supporting element;
- as soon as the support is placed, a wooden beam is laid on it, which is necessary to redistribute the load effects;
- a mark is made along the outer surface of the wall corresponding to the placement of the beams;
- in order to place these marks on the inside of the wall, drill holes into which studs are installed, supporting them on each side with supporting elements;
- the next stage is fixing the support. This can be done with ordinary nails, driving them into boards and studs;
- Using a hammer and a sharp chisel, the plaster layer is removed from the surface of the wall. The cleared area should correspond to the size of the future window opening. An additional three centimeters are added on each side;
- Having removed the plaster material, we begin dismantling the brickwork section. It is best to move from the place where the jumper is located, after that all that remains is to install it;
- all protruding bricks are adjusted;
- Having finished installing the jumper, use a grinder to make a cut. This will help to level the edges of the brickwork of the opening area, remove irregularities above the window, and facilitate subsequent processing of the slopes;
- At this stage, the design is completed, it is allowed to proceed with the installation of the window structure.
Finishing doorways
When renovating or remodeling houses and apartments, there is often a need to relocate door openings. In order to move an opening in a wall ceiling you need:
An example of a doorway trimmed with brick
- mark the future opening according to the size of the door block, taking into account gaps of 15 cm.
- dismantle the baseboard.
- knock out a row of wall blocks under an iron or concrete lintel.
- install the jumper and secure with mortar.
- Leave for two weeks until firm.
- knock out brick blocks according to the markings.
- level the floor with a screed.
But such work requires maximum precision and accuracy from the performer, but can still lead to damage to the wall partition. A more suitable option for making holes in a brick wall would be diamond cutting, its advantages are as follows:
- accuracy of cutting line;
- speed of work performed;
- minimal impact on the supporting wall;
- reduced noise level;
If work is required to reduce the doorway, the sequence of work will be as follows:
- It is necessary to perform brickwork in one brick.
- Plastering of the sides is carried out three days after installation.
- After a week, you can install the door block.
It is also necessary to take into account the moment of strengthening with metal structures if the strength of the hole under the door is insufficient.
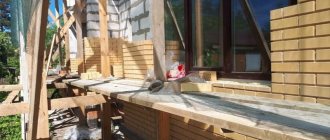
The work on finishing the doorway is carried out by a master
Peculiarities
Exterior window framing is a process that must be approached carefully. Framing is preceded by the installation of the windows themselves - wooden or plastic. If you have never encountered this, it is better to seek help from professionals
It is especially important that the work is carried out by specialists if you have a ventilated facade
Once the windows are installed, you can think about the exterior decor and take into account several nuances.
Modern finishing options are extremely diverse
At the same time, when choosing synthetic options, make sure that the material does not have any foreign odor when heated and does not deform - the quality of the material is important for your health and comfort
Before installing frames made of stone or other heavy materials on the facade of the house, calculate whether the weight of the structure is too large
In rare cases, particularly heavy structures lead to deformation of the walls. Pay attention to the rules for working with different materials and think about whether you will do the finishing yourself. While siding can be easily fixed with your own hands, stone framing will require special knowledge, and the work of specialists can be expensive. Consider what style of framing will suit your home
The finishing should be organically combined with both the exterior of the house and the decorative elements on your site.
Cladding methods
Varieties of finishing design
Laying window openings from facing bricks will not cause any particular difficulties if you initially plan everything correctly, use high-quality tools and materials, and maintain proportions and symmetry.
There are the following methods for lining window openings with brick:
- Chernova. It is used when masonry is carried out by an inexperienced worker, when using stones from an uneven surface or creating a complex figure with gaps. Once the solution has hardened, the structure is finished using decorative plaster.
- Finishing. Assumes precise work with high quality materials. The masonry is carried out with millimeter precision; no additional finishing is required upon completion.
The choice of method is determined by your own abilities and the configuration of the purchased brick.
Homemade run
When designing window openings of non-standard sizes, the production of the lintel (its filling) is carried out at the location. To do this you will need to perform the following typical operations:
- first of all, the masonry surfaces on the sides of the window opening are cleaned of mortar residues;
- after this they are thoroughly primed;
- At the final stage of work, formwork is installed at the location of the lintel.
Formwork
Reinforcement
Upon completion of these procedures, a thin layer of pre-prepared concrete mixture is poured into the formwork, after which a reinforcing mesh is immediately placed there. After this, you can continue pouring the lintel, followed by placing another reinforcing fill in the concrete. When dismantling the formwork, it should be taken into account that it is not always possible to dismantle its lower part.
Supports for formworkLintel laying
When decorating window openings lined with facing bricks (the so-called facing brickwork), in order to preserve its decorative advantages, it is allowed to use channels (wide metal corners). In this case, the visible part of the purlin will be located only on the inside of the load-bearing wall.
Laying a figured window opening
At the same time, there should not be any noticeable traces of the presence of a lintel on its façade surface.
Style and design
It is very important that the design of the entire house looks like a single whole. For a harmonious style, not only the material is important - the color design is also of great importance, as well as the design itself
Depending on your preferred materials, consider tips for stylish exterior window treatments.
Very often, for the facades of houses in the Russian style, windows are framed from wood with traditional floral patterns. At the same time, more modern options can also look great: you can create a wooden frame with an asymmetrical streamlined shape, or make a strict geometric pattern on it. It will look very good to add a second wooden element of a different color - for example, light wood can be combined with wenge or red wood decor.
Stonework can be very diverse. Sometimes neat identical stones are used to lay out an even frame around the window in the same way as with bricks. Nevertheless, the material allows you to try more interesting designs. For example, you can make masonry that smoothly transitions into the masonry of a facade of a different color if your house is entirely trimmed with stone. You can use two or three stones to frame one window. Contrasting colors such as black and white can look good, or, on the contrary, options that are similar in tone: for example, shades of beige, brown and terracotta.
Often frames made of artificial materials also highlight windows in an interesting way. You can choose an unusual siding color or make a plastic structure of an interesting shape.
Frame-type slopes
So, if plaster is a continuous covering of a slope, then there is also a frame type, when there is empty space inside that can be additionally insulated. The choice of material for such solutions directly depends on the type of building cladding. Slopes can be made of plastic, wooden lining, vinyl or metal siding, window profile, metal cassette element. The installation of these materials is almost identical, so we did not separate them.
View the following photographs showing similar slopes.
Metal cassettes with matching façade cladding
Slopes made of wooden lining
Siding slopes with external frame
Special window profile
Slopes made of plastic with a metallic sheen
Each of the listed materials has its own set of characteristics, but none of them provides the window system with additional thermal protection, like special compositions of plaster mixtures. However, there are methods for insulating such slopes: the internal space is filled with polyurethane foam or mineral wool.
External insulation of window slopes and walls
Installation proceeds according to the following scheme:
- A frame is exposed, which can be external and internal, or only external. In the first case, a belt of slats or metal profiles is attached near the window frame and the same along the outer perimeter of the slope. In the second - only the outer element - the inner one is replaced with a starting profile, which is attached directly to the frame. The last solution is suitable for plastic and thin lining.
- All frame elements are set clearly in level, since they completely determine the geometry of the future slope.
- They are attached differently, depending on the material. Most often, anchors and metal hangers are used as fasteners.
- The finishing material is installed according to the fastening scheme of the specific material. For example, wooden lining can be held in place by nails and self-tapping screws directly or through metal clamps, and siding is held in place by self-tapping screws and a special fastening profile.
- The outer corner of the slope is covered with a decorative element. Usually these are overhead corners, examples of which you could see in the photographs shown above.
Determining the width of the slope
Galvanized profile frame
Sheathing for lining
Slopes made of fiber cement siding can also be installed over the sheathing.
It is much easier to make a frame slope than a plaster slope, and in 90% of cases it does not require additional processing. The product begins its service life immediately after installation. Everything would be great, but not every material will last long. Painted elements fade over time in the sun, wood can rot and change color. You can repeat the coloring, but it will not look like the factory one, and the slopes will definitely lose their attractiveness. But plaster surfaces can be renewed an unlimited number of times.
Peculiarities
Exterior window framing is a process that must be approached carefully. Framing is preceded by the installation of the windows themselves - wooden or plastic. If you have never encountered this, it is better to seek help from professionals
It is especially important that the work is carried out by specialists if you have a ventilated facade
Once the windows are installed, you can think about the exterior decor and take into account several nuances.
Modern finishing options are extremely diverse
At the same time, when choosing synthetic options, make sure that the material does not have any foreign odor when heated and does not deform - the quality of the material is important for your health and comfort
Before installing frames made of stone or other heavy materials on the facade of the house, calculate whether the weight of the structure is too large
In rare cases, particularly heavy structures lead to deformation of the walls. Pay attention to the rules for working with different materials and think about whether you will do the finishing yourself. While siding can be easily fixed with your own hands, stone framing will require special knowledge, and the work of specialists can be expensive. Consider what style of framing will suit your home
The finishing should be organically combined with both the exterior of the house and the decorative elements on your site.
How to decorate a facade with decorative bricks?
Façade finishing is a responsible and quality-demanding job. Without having special knowledge and experience, it is better to leave this work to qualified craftsmen. But if you follow all the technologies, you can do the work yourself.
If you decide to do decorative masonry, follow the basic rules:
First. Calculate the exact amount of material needed. An emergency purchase of brick may result in a different shade. Take 10% more material than needed.
Second. Start with a trial laying. It will help you determine the quality of the mortar texture and joint filling.
Third. Soak the brick in water. Water will clean the brick from dust. This technology will improve interaction with the mortar mixture.
Fourth. Do not hurry. During breaks, you can assess the quality of the work being done with fresh eyes and eliminate shortcomings in a timely manner.
Cladding brick windows
It emphasizes the contour, adds volume and highlights the windows on the façade of the building. Cladding a window with contrasting or relief brick allows you to almost completely change the facade. Facing brick gives the building a more neat and elegant look.
The surroundings of the windows must be carefully calculated and symmetrical in relation to the masonry of the main walls and the corners of the building. Original, beautiful windows will complete the look of the facade, provided that the cracks are carefully sealed using special masonry or using brick platbands.
The harmonious appearance of the facade directly depends on the size and shape of the windows, or more precisely, on how symmetrical they are relative to the corners of the building and the width of the partitions. It is necessary to comply with certain standards when constructing the walls of buildings, but in practice it is often possible to observe inconsistencies that it is advisable to eliminate before laying facing bricks.
Advantages of artificial stone
- A variety of shapes, shades, textures of decorative slab products.
- Easy to attach. The imitation of natural material is characterized by correct geometry, low weight and is easy to cut, which makes it easier to fit fragments when finishing door jambs.
- Increased sample strength and resistance to abrasion.
- Inertness to climatic factors and aggressive chemical compounds. Consequently, finishing doors with decorative stone can be done in any room, regardless of its specifics. Even in those where there are sharp changes in humidity/temperature and their high/low values.
- Convenience of choice. All artificial stones differ in standard sizes and thickness. In addition, they have smooth edges, and this makes it easier to calculate the required number of products for finishing a specific area.
- Consistency of color over time. The dye introduced at the stage of preparing the mixture is evenly distributed throughout the entire structure of the material.
- Decorative stone does not burn and does not block the base; it “breathes”, which has a beneficial effect on the microclimate of the room.
- Good maintainability of the jamb lining.
Window frame made of polyurethane - advantages
The first (main) advantage is the original design.
Almost no other material for decorative framing of windows and doors has such variability and the ability to combine various components. Here you can create compositions from moldings and cornices, arches and rustications, rosettes, consoles and keystones; you can “play” with the length of elements, the distances between them, patterns of alternation, color and style.
The ability to cut any decorative elements in any place and at any angle without compromising quality, easy assembly of stucco molding allows you to create individual compositions from finished elements or their parts. For greater expressiveness, you can use individual stucco details with small patterns - bas-reliefs, rosettes, panels, door trims. The result is a truly exclusive frame for a door or window, one of a kind, since the designer’s imagination is limited solely by the size of the opening and the financial capabilities of the customer.
Related article: Do-it-yourself repair of plastic swing windows
The second advantage is the durability of polyurethane stucco molding and its ability to hold its shape even for small artistic detailing.
Indeed, the ease of care and durability of polyurethane products can hardly be overestimated. Facade decor made from it is not afraid of snow, rain, or frost; it can be washed with both ordinary water and detergents. Frames of windows and doors made of polyurethane on the facade of the house do not need to be restored, like wooden decor - it is enough to paint it and it will look like new. As for durability, the service life of polyurethane stucco is comparable to the service life of a building - more than 25 years.
The third advantage is ease of installation.
As you know, polyurethane stucco is very easy to process. It can be sawed, cut, drilled, and glued. Therefore, the installation of frames for openings is greatly simplified. Elements - door and window frames, sandstones, rusticated stones and so on can be put together almost like a mosaic; they just need to be fastened together and fixed to the load-bearing surface with glue and self-tapping screws: the decor will hold firmly.
Another advantage is the lightness of polyurethane stucco.
Due to its low weight, it can be attached to any flat surface, including plastered walls and houses of lightweight construction (for example, those made using frame technology). Stucco molding is also convenient to work with: even large decorative trims and moldings can be lifted by installers without the use of special equipment, and this is a direct reduction in the costs of construction work. Our website presents original architectural solutions for decorative framing of windows and doors with polyurethane stucco, developed by the FACADE PROJECT company.
Tips for working with the material
Strength, durability and visual attractiveness of a brick facade can only be achieved by working in strict accordance with existing technologies:
Brick cladding is always a ventilated facade. It is better to use “breathable” mineral wool as insulation (if necessary). The use of polyurethane foam and polystyrene foam sheets is impractical, since in this case they cannot be avoided becoming damp, which means the materials will lose their thermal insulation properties. Their use is permissible only if there is no ventilation gap between the facade and the walls.
- The service life of mineral wool insulation can be increased by using a moisture-proof, vapor-permeable membrane.
- Brick cladding, especially a combined facade (when different materials are used for the walls and the façade) requires mandatory connection with load-bearing walls. Outdated “old-fashioned” methods of connection (reinforcement, steel mesh and other improvised materials) usually cause cracking of the facade in the area of connection.
- If it is necessary to cut brick, the only tool that will allow you to make an even cut without destroying the material is a grinder with a disk for cutting dry stone with a diameter of 230 mm.
- Before laying the facade, load-bearing walls must be cleaned, dried and coated with at least two layers of primer, and wooden buildings require additional treatment with antiseptics and fire retardants.
- Using products from several batches at once will help to avoid the effect of a striped facade, the appearance of which is due to differences in brick shades. To do this, you should take 3-5 pallets with bricks from different batches and use them alternately when laying rows.
- When using not special masonry mixtures, but self-made cement mortar, the bricks are soaked in water for several minutes before laying. This is done to prevent the material from taking moisture from the solution.
It is important to make vertical ventilation gaps every 3 rows of cladding. They are not filled with solution; when it gets there, it is immediately removed with a wooden stick.
You can also create ventilation gaps using plastic boxes. Their width is 10 mm, and their height corresponds to the height of the brick. Their use is much more convenient, especially since the boxes are inexpensive. At least 2 ventilation gaps must remain in the lower part of the windows when facing.
Basic rules for decorating jambs with stone
- Symmetry. Both sides of the opening, regardless of whether there is a door jamb in it or it is dismantled, are finished identically. Only this approach will ensure the completeness of the composition.
- Height proportions. Priority is given to the bottom of the door. This applies not only to the vertical, but also to the horizontal axis. That is, the base of the opening, with any method of its design, should visually look more massive. In accordance with this, a scheme for decorating the jamb is drawn up, taking into account the size of the purchased samples.
- A combination of texture and seams. The task of a master working with artificial stone is to achieve complete naturalness of the cladding. Experts recommend that before starting installation, lay out the “picture” on the floor and evaluate the effect it gives. How to position the products relative to each other, with what interval or offset - all such nuances are calculated in advance.
- Compliance with the jamb material. This must be taken into account even before purchasing decorative products. If the door frame and slopes are well polished and varnished, then stones with a smooth front surface are used to decorate the opening. And it is advisable to attach textured samples around a jamb that is untreated (made independently) or with a “rough” wood pattern.