Plaster, plastic, plaster bas-relief is an original decoration suitable for many interior styles. This decor option creates a unique highlight in any room. When illuminated in the right way, it creates a very voluminous composition.
Relief is a special sculptural technique when the composition is created only partially in the form of a three-dimensional image on a plane.
What is a modern bas-relief
Many people wonder: what is a bas-relief? This technique is one of the types of sculptural images within a plane, slightly rising above it. To create such a “convex” picture, it is permissible to use very different materials: plaster mixtures, including those based on acrylic, gypsum, various types of stone (marble, limestone), wood, polystyrene, clay, metal, paper, etc. Popular themes include figures of people, animals, birds, fish, trees, flowers, houses, ships, landscapes, and various geometric abstractions. Such items are carried out both indoors and on the facades of the building.
Bas-relief - sculptures protrude less than half above the flat background.
Syringe
This is also a very simple and at the same time original way of creating three-dimensional patterns. In this case, the mixture is placed in a large-volume medical syringe - you need to find syringes of fifty milliliters or more. Having removed the rod and filled the tool with plaster, diluted to a liquid paste, the rod is returned to its place. Next, a pattern is drawn along the drawn contours by squeezing the mixture out of the syringe.
You can use other similar devices - a culinary bag with a nozzle or a culinary syringe. They will give greater thickness of lines.
Advantages, disadvantages of artistic stucco molding
Like any other method of decorating a room, stucco decoration has a number of advantages:
- a high-quality bas-relief looks expensive and luxurious;
- a product made of plaster or polystyrene foam will cost very little;
- with the help of stucco molding, a unique design of any room is created;
- decoration with relief paintings is perfect for almost any interior style;
- With the help of bas-relief it is easy to hide some of the imperfections of the walls and zone the room.
In modern interiors, decorating with such sculptural compositions has become accessible.
There are also some disadvantages:
- creating this item is a labor-intensive process;
- gypsum structures are not suitable for placement in wet rooms (bathroom, kitchen), as well as in the open air;
- the finished product requires regular maintenance.
The bas-relief is made of wood, clay, alabaster, plaster or stone.
Preparation of the solution
To make your own gypsum stucco molding beautiful and durable, you should choose high-quality dry raw materials. They differ in composition. Some manufacturers add additional components that make working with the mixture more convenient and the final product highly durable.
Cooking rules:
- The solution is prepared in small portions in order to have time to distribute the entire amount among the containers.
- First, water is poured in, then powder is poured in, but not vice versa. Otherwise, lumps will form and the mixture will not work.
- The ratio of parts of water and alabaster is 10 to 7.
- The liquid is used cold.
- The consistency of the solution resembles liquid sour cream.
- First, the gypsum is poured into water and allowed to settle. Then mix thoroughly. A small volume is stirred with a spatula; for a significant amount, a drill with a mixer attachment is used.
- To improve the plasticity of the composition and to prevent the finished product from cracking, PVA glue is mixed into the mixture.
- Cement is added to increase strength.
Preparation of the solution
Beginners in handling gypsum should know the features of the material:
- liquid solution is plastic;
- hardens quickly;
- when drying, alabaster expands;
- the final product is fragile, especially small parts.
The solution hardens within 5 minutes. During this time, it is necessary to fill out all the blanks. For those who are faced with such work for the first time, the task will be impossible. The hardening mixture will not penetrate into all recesses, especially small and narrow ones.
Advice! To slow down the hardening of the gypsum mixture, add gelatin or hide adhesive solution, borax, slaked or quicklime. They allow you to delay hardening by 30-35 minutes.
In some cases, hardening needs to be accelerated, for example, if a figure is formed on a wall. The easiest way is to pour in hot water. And also for this purpose, add alum, sodium sulfate or regular table salt.
Characteristics of bas-relief paintings in the interior
Volumetric stucco molding located inside an apartment, private house, cafe, or other similar establishment looks very different. Historically, such products were carved from stone and carved from wood. Now they are used to decorate door and window openings, decorate walls, arches, ceilings, niches, fireplaces, columns in the apartment.
Bas-relief products, unlike ordinary sculptures, allow you to maintain a 1:1 scale and at the same time save on materials.
Tip: to make the relief look more voluminous, it is illuminated with spots and LEDs on a strip.
STENCIL
To make stucco molding in full size exactly as in the sketch, you need to print it with these dimensions. You can, of course, draw it, but it will take much longer and there will be an error in the drawing. How I did: 1. photographed a small sketch, 2. scanned it, 3. cropped it in Photoshop along the edges of the pencil and changed it to the desired size 150 cm wide, 4. created a new A4 document (important!!! with the resolution as on the scan sketch!!!) 5. Dragged the large sketch into a new document A4. It only holds a small piece of the sketch, that's what you need. 6. Now I move the sketch in the resulting A4 window and print each piece. The result is a puzzle with a slight overlap. 7. I assemble the stencil and glue the sheets together with tape.
Tools for modeling putty in an apartment
For sculpting work with putty you will need the following tools:
- putty knife;
- trowel for decorative plaster;
- palette knives;
- bucket for solution;
- stacks of different sizes;
- pencil for drawing an outline;
- polyethylene film;
- chisel;
- sandpaper;
- masking tape;
- brush-brush;
- cream injector;
- latex gloves.
Volumetric compositions are invariably associated with classical styles.
The materials you will need are plaster itself, primer paint, Marseilles wax, acrylic or latex paints, glue, spray paint.
Tools
The relief is created using tools designed not only for application, but primarily for the formation of the laid mass. Some of the tools will need to be purchased, some can be made from what is on hand.
tools for creating bas-relief
For example, half of a regular rubber ball is suitable as a container for kneading the mass. It is easy to clean it even from dried mortar, as you can lay out the whole mass by simply turning it inside out. Such a ball will reduce the time for kneading and cleaning.
For sculpting you will need special shaped spatulas called palette knives. Their narrow blades allow the formation of particularly fine patterns. You will also need spatulas with small concave-convex blades. These can be made from plastic or aluminum spoons (the sizes come in different sizes - tea, coffee, table or dessert). The handles bend and bend for convenience. For example, plastic utensils are heated near a scoop, after which the still heated handles are bent to give the required shape. The palette knife can be replaced with a shoe knife with a wide blade.
palette knives
For dosed or shaped application of the mass, confectionery syringes are used, and for fine work - disposable medical ones, with a capacity of 20 ml (without a needle). It is advisable to take chicken ones from confectionery shops.
Also prepare brushes that are used for oil painting (flat and round). There is no point in buying expensive ones. A small nylon brush is also useful for children's drawings. Brushes are used for plastering and applying texture. You will need a priming brush.
Other tools you will need:
- a metal trowel with a plastic spatula (the solution follows the plastic tool well);
- medium-sized spatula;
- stacks;
- chisels (for carving plaster);
- sandpaper or abrasive mesh;
- roller
Before applying each portion of the composition, brushes and palette knives are dipped in water so that the drying mass does not leave clots or scratches on the treated area. Upon completion of formation, the tool is lowered into water and washed. Dry before storing.
DIY techniques for making relief designs
At home, bas-reliefs are made mainly from plastic materials - clay, plaster, paper, salt dough. Standard plastic elements that have lower artistic value are purchased less frequently.
Such decor would look appropriate in the design of the same name, Art Nouveau, Art Nouveau, Baroque, Rococo, Empire.
Made from gypsum plaster
Gypsum and plaster products are created using the following techniques:
- Free plastering of individual elements that are not fixed to the wall. This is the best option for beginners, as the design can be edited several times;
- Plastering models on the wall itself - performed directly on the supporting plane;
- Reverse casting is a complex method in which the model is made using a mold. The good thing about this technique is that it allows you to create many identical parts;
- Flat modeling directly on the wall - some experience is required to work. The finished product is an intricate picture, individual parts of which extend onto the ceiling and go around corners.
This natural material is well suited for creating stucco.
Advice: if the modeling is made from individual elements, they are glued using PVA or acrylic glue.
From clay
Often bas-reliefs are made from colored polymer clay or ordinary clay. Both options require firing in a kiln, followed by mounting on the wall. There is flat and volumetric modeling. Both are performed on a substrate using various shapes of stacks and fingers. The finished item is fired and pasted on the wall. Large paintings are made up of many details. “Botanical” bas-reliefs are popular – voluminous fresh flowers are “rolled” into a layer of clay, a form is placed on top, into which a liquid solution is poured. The result is a flat surface with voluminous plants on it.
Clay is the most accessible material that is suitable even for beginners.
From paper
Creating a three-dimensional painting from papier-mâché is a quick, cheap way. The hardened composition is more durable than gypsum. To complete this you will need paper napkins and PVA glue. These materials are kneaded into a thick mass from which the details of the painting are sculpted. The finished composition is slightly tinted and covered with a layer of paint and varnish.
A paper bas-relief will give your home an original and unique look.
Materials for creating a bas-relief
In plaster reliefs, the ancients used both clay and alabaster (gypsum), lime, mixing them with sand or stone flour. The first classic material for modeling and plastering was clay. It is environmentally friendly, waste-free, non-flammable, plastic, and stucco can be easily repaired. Disadvantages - heavy weight, poor palette, fragility, tendency to crack when drying.
clay bas-relief
The gypsum material turned out to be more successful due to its inherent properties: non-shrinkability, ductility, rapid hardening, and environmental friendliness. Gypsum powder, diluted with water, forms a non-shrinking dough, from which the most precise patterned shapes are easily formed and a smooth surface is achieved. In addition, hardened plaster can be easily sanded and cut.
The material for relief images is papier-mâché. Light, cheap raw materials are turned into a mass that is sculpted by hand. The material does not load the base, is environmentally friendly, and the products are easy to repair. Disadvantage - only rough relief shapes can be formed. In addition, papier-mâché is prone to burning.
Many modern finishing mixtures can be used to create stucco images. Amateurs or craftsmen use putty, mixtures for finishing with polymers - acrylic plasters - as raw materials for mixing molding mass. For example, the following composition is successfully used: architectural gypsum - 1 hour; acrylic plaster – 1 hour; PVA (glue) – 0.5 tsp (proportions are taken by volume). Water is poured into the pre-mixed dry components, bringing the stirred mass to a kefir consistency, and glue is introduced. Viscosity is selected in accordance with the modeling technique.
Without changing the composition, gypsum putties produced by well-known companies are used:
- Polish AkrylPutz (acrylic putty, ready for use);
- Pufas (a gypsum putty mixture containing cellulose fibers);
- Rotband (used for layers adjacent to the wall, for the top layers - Shitrok);
- Knauf Uniflot (plastic, high-strength, allows you to create deep reliefs that hold without additional reinforcement);
Knauf Uniflot
For stucco work you will need impregnating primers. Impregnations are selected according to the base (wall) material. For weak bases, use deeply penetrating impregnating agents. For loose substrates, moisture protection is also used, for example, Aquastop; for wood substrates, Pufas primer is used.
How to make a bas-relief at home
Before you start creating a three-dimensional picture, you need to decide on a suitable location. It is desirable that the space being decorated does not have any other decor, is level, and well lit. The drawing is also thought out in advance. The easiest way is to make geometric patterns, abstractions, make berries, leaves - a little more difficult. To complete paintings depicting realistic animals, graceful plant elements, and portraits, you will need some experience.
Polyurethane stucco is an environmentally friendly material. Using polyurethane stucco molding you can visually adjust the room.
Tip: if the image is made up of several parts, the seams between them are carefully covered, and the finishing coat is evenly applied to the entire picture.
Preparing a sketch, marking the walls
At the beginning of work, the wall to be decorated is cleared of any existing coatings (paint, wallpaper, etc.). Leveling is also necessary - for large products, height differences should be no more than two to three mm. for every meter. The markings are applied to an already flat wall, but the sketch is first created on paper.
You should not attempt overly complex paintings unless you have sufficient experience.
Tip: limit the dimensions of the image using masking tape and thin slats nailed to the wall.
Securing the stencil
The stencil is made from self-adhesive film or cardboard. In the latter case, it is fixed to the wall with ordinary tape or masking tape. The template is removed after the outline is outlined or when the element of the product is completed and dried.
Even a beginner can create a bas-relief design.
Wall primer
The wall is carefully primed - it is better to use deep penetration primers. If the picture is supposed to be sculpted on drywall, it does not need to be leveled. After the surface has dried, a base plaster coating is applied, followed by the main background layer, which, if desired, can be tinted with any color.
With a reasonable approach, you can give the design of your home an original, even unique look.
Tip: For maximum adhesion, it is recommended to apply two layers of plaster.
Applying plaster to the wall
The plaster mixture is applied to the surface to be treated in thin layers so that it adheres well. It is important that the plaster is not too liquid - otherwise the composition will simply flow down. Using spatulas and chisels, an image is formed. To make the picture three-dimensional, the plaster layer is built up, and self-tapping screws are screwed into particularly high places, giving the product strength and protecting it from falling off.
The bas-relief perfectly emphasizes the peculiarity of the ethnic style, regardless of which country the interior “comes from”.
Tip: during sculpting, the object is slightly moistened with a spray bottle so that it does not dry out or crack.
Removing the template
The template is removed after the product has dried and is no longer deformed by physical impact. Less often, stencils are removed immediately after transferring the picture to the wall or after applying the plaster mixture.
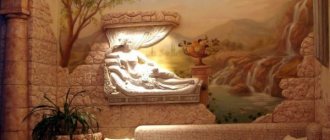
You can depict architectural motifs, antique scenes or abstract elements.
Tip: before applying the finishing coat, carefully sand the pre-dried surface without disturbing the finished texture.
Bas-relief decor
The bas-relief is decorated with acrylic paints and dyes in spray cans. Individual details, contours, leaf veins, eyes of animals and people are drawn with thin brushes. To make the relief a little higher and deeper, dark colors are used, applied to areas that require deepening. You can use as many different shades as you like, but it is advisable to avoid excessive variegation.
A three-dimensional painting can be made on the wall itself, or a pre-prepared slab with a ready-made relief image can be installed.
MODELING FLOWERS
I sculpted each flower-lamp and its details separately.
- Petals. First I sculpted the main part of the flower with petals. I primed the stencil with PVA glue so that it would not become too deformed and let it dry. And yet it was deformed)) First, I blinded the main volume of the flower without detailing. When the plaster has set, I made sharp edges and additional folds, and when this layer hardens, there will be adjustments, smoothing out irregularities, and sanding. After complete drying, I drilled 3 holes in each flower with a drill: for attaching screws and pulling the wires of the LED strip.
- Columns – fastenings for LED lighting . Then I made columns for the “stamens”, around which the LED strip would be wrapped. I took a cylindrical tube of vitamin C and poured a plaster solution into it. When the plaster had hardened, I cut the tube, took out the resulting rod, and cut it into several parts. The posts were glued to a mixture of plaster and PVA glue. To ensure they held tightly, I randomly scratched the gluing areas.
- Caps-stamens of a flower. On the inside, a recess is needed for a column with LEDs, so before sculpting, I formed a small dome from ordinary food foil, on top of which I applied plaster in two layers: first, a basic plaster, and when it hardens, clarifying the shape, details, texture, sanding... If you need to remove excess, you can moisten it with water and trim with a knife.
- Painting. Before painting, you need to prime it with either acrylic primer or PVA, but if the product has not been sanded, you can do without a primer (this is how I painted the leaves)
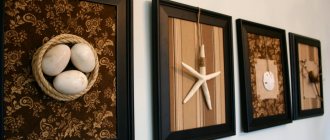
Examples, interesting ideas for relief walls
Bas-relief patterns are very diverse - the theme depends solely on the imagination of the master. Bas-reliefs are made large, occupying the entire wall, or very small, located above the desk, head of the bed, interior door, arch, around the perimeter of the window, around the TV screen, etc. Different paintings are made for different rooms.
The bas-relief looks very aesthetically pleasing and cannot be compared with other types of interior decoration.
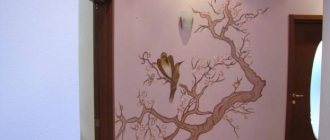
The children's room is decorated with three-dimensional pictures depicting your favorite cartoons, cute animals, flowers, and berries. In the bedroom, a huge convex butterfly placed above the bed, a field of fluffy dandelions, in a technique reminiscent of a fresco, looks good on the wall. The living room is decorated with large-format roses, designed so that the petals look thin and the water droplets on them are transparent. Tree branches on a completely free wall are intertwined so that they easily form a frame for a picture or a large mirror.
You don't have to be a sculptor or painter to pull this off. It is enough to acquire basic skills.
An arch decorated with birds of paradise, such as hummingbirds, is sculpted in the hallway. If there is a free wall, a wild animal is depicted on it, which will symbolically guard the house. It could be anyone - a wolf or a zebra, a lion or a small tiger cub, a snow leopard or even an angry cat. The picture is carefully drawn in color and covered with a moisture-proof compound. The kitchen interior is decorated with warm, mostly bright, “tasty” tones - orange, light green, raspberry, etc. It is recommended to depict fruit baskets, still lifes with appetizing dishes, and flower bouquets. To create a bas-relief in the bathroom, use moisture-resistant coatings, marine themes - waves, sailboats, algae, silhouettes of dolphins, underwater fish, etc.
This decor can decorate any room.
Finishing work
If all the steps are completed according to the instructions described, then the DIY stucco molding should turn white after 24 hours of drying. At this stage, the part is polished, defects are removed, and brought to the desired appearance. For leveling, use fine sandpaper. You must act carefully so as not to damage the fragile part. Then the parts are coated with a primer.
Sanding of finished products
The plaster figure has a matte white color. Having covered it with colorless varnish, we get a decoration ready for installation. Alabaster stucco in a natural shade is used in many interiors. But if, according to the idea, the figure should have a different color, then it is painted with water-based paint or patinated. It is more convenient to do painting before attaching the parts.
Where can beginners learn bas-relief work?
The art of making reliefs is taught by all educational institutions with an artistic orientation. It takes years, but the three-dimensional paintings made by such masters are true masterpieces. Not everyone will allow themselves to spend three to five years in an educational institution, and not everyone is going to create works of art. To learn how to make simple three-dimensional patterns, elementary figures, lines, just watch several step-by-step master classes with photos, educational video lessons, published daily on sites related to handicrafts and interior design.
You can choose the composition to suit your individual taste. And recreate it, right on the wall, with your own hands.
Mold making
To make gypsum stucco molding look beautiful with your own hands, you need to choose or make the right matrix for casting yourself. You should not save either money or time on this. Cheap templates stretch, have inaccuracies, and may break. Metal patterns are of high quality and durability. They cost several times more, and they are usually made to order.
Silicone is suitable for creating a template at home. When handling it, you need to take into account the following features:
- less durable than metal ones;
- the composition does not spread well over the workpiece.
These problems can be solved. For greater strength, a frame is made of alabaster or other hard material (plastic, wood) under the silicone template. To make the gypsum solution easier to distribute over the impression, the latter is lubricated with a liquid that improves sliding.
The finished model is coated with silicone using a brush. At this stage, it is important to prevent bubbles, which will lead to unevenness in the plaster decor. After applying the first layer, reinforcement is done - gauze is laid, then repeated 2-3 more times. The thickness of the silicone should be 3-5 mm. The gauze should not be stretched so that when compressed it does not deform the product. Each layer of silicone takes 2-3 hours to dry.
After final drying, the silicone blank is removed from the model. For greater stability, a frame or base is constructed. The first one is made from boards according to the dimensions of the workpiece. The second is cast from alabaster. It follows the contours of the silicone template and does not allow it to change when pouring plaster.
Removing the silicone mold from the model
Advice! For small molded units, ready-made silicone blanks are suitable, intended for creating soap, candles, and confectionery. They are presented in a wide range in the creativity departments.
Recommendations for choosing a bas-relief
Modern bas-reliefs made from plaster and putty with your own hands are one of the best decorations for any room. For romantic interiors, images of roses, orchids, birds, butterflies, and ships on the open sea are suitable. High-tech rooms are decorated with monochromatic wall panels with cosmic landscapes, city views, and abstractions. The design of classical interiors involves the creation of complex plot compositions, similar to those that were performed in ancient times.
The colors used are predominantly pastel and soft.
An ecological room is decorated with voluminous plant patterns, a Provencal apartment is decorated with small ornaments depicting small flowers and poultry. For the avant-garde, images in the style of cubism are suitable, for antiquity - silhouettes of sphinxes, amphorae, and griffins. Shabby chic is replete with curls, flowers, bows, and ribbons. Empire style is decorated with bows and arrows, heraldic symbols, decorated with gilding and bronze compositions. For Arabic rooms, pointed false arches and “Indian cucumber” patterns are depicted on the walls.
Themed elephants on the walls and decorative sculptures of multi-armed Hindu deities will harmoniously blend into a house with elements traditional to India.
For art deco, “suns” are formed on the walls, including those located around mirrors; the Japanese style allows only a couple of contrasting hieroglyphs and blooming sakura branches. The ethnic option involves decorating several plain walls with realistic plants - herbs, flowers, trees. In the hygge style, it is permissible to sculpt an elegant fireplace on the wall, in which a flame, firewood, and a pot over the fire are drawn. In the loft, the wall is decorated with stucco bricks that look like they are cracked and ready to fall out of the masonry.
Unlike decorative painting, bas-reliefs do not necessarily need to be highlighted with color.
Restoration and care of the bas-relief
When parts break off, they can be easily restored using a composition similar to the original one. To increase adhesion, the surface is cleaned and primed. Then the dry mixture or plaster is diluted and the mixture is applied to the damaged area. Formation is carried out, trying to make the transition unnoticeable. The paint is being renewed. The varnished panel is cleaned with water or a damp cloth.
As we found out, even a beginner can create a bas-relief on the wall with his hands. The main thing when working is patience, a willingness to carefully work out even small details and a creative mood.
How to restore
Over time or due to mechanical damage, the gypsum decor is destroyed. In this case, restoration of worn parts or their complete replacement will be required.
Renovation Tips
When carrying out restoration activities, the following recommendations are taken into account:
- Before starting reconstruction, you should study the scale and type of damage, and then choose the appropriate method of exposure or camouflage.
- If a small fragment is destroyed, replacement is not required. Existing damage is repaired directly on the element.
- If the stucco molding has changed color due to getting wet or dirty, the entire product is painted in a color that matches the interior. Water-based paint is suitable.
- Artistic painting will help hide minor scratches. Oil paints are used for this.
- In case of loss of a significant part, restoration work is carried out by checking the photograph, if available.
- If there is no photograph of the lost part, then a new one is made taking into account the general style of the room.
- During restoration, cracks and seams are opened and re-sealed with fresh mortar.
- Weakly fixed parts are removed, the surfaces are leveled and fixed again. In this case, double fastening is recommended - with glue and dowels.
- If paint comes off on an area of a figure, the entire element is painted over. Otherwise, the color of the freshly coated area will be different. To do this, the old layer is cleaned off the part, the surface is sanded, primed and a coating of the desired color is applied.
Making a decorative panel from plaster for the wall
You can perfectly complement the design of your home thanks to such an amazing and wonderful thing as a decorative plaster panel on the wall. From this material you can create three-dimensional compositions of amazing beauty.
It’s quite easy to make a decorative panel with your own hands. Let's consider the process of making a panel for the kitchen in the form of a cup.
You should start the process with:
- Preparing two containers: the cup itself and another larger container, let it be a flower pot of a similar shape;
- Cover the outside of the cup with soapy water to prevent the solution from sticking;
- We immerse the cup exactly in a horizontal position into the pot and fill the free space between them with sand up to half;
- Pour the gypsum solution into the original form;
- When the plaster has dried, carefully remove the mold from the pot of sand and remove the cup.
A beautiful and stylish plaster panel will help revive a static kitchen interior and reflect your personality and taste.
As a result, we received a cast of half the cup, repeating its shape. Next, you need to dry the cast well and lubricate it completely with soapy water. Afterwards you need to fill it again with an even layer of plaster.
During the process of pouring the solution, the mold should be constantly shaken a little so that all the air comes out and ultimately does not remain on the product.
These types of forms can be made in any quantity. You can paint them with multi-colored paints or cover all the elements with white. You can fix the composition with a frame made of baguettes or other homemade materials. The bas-relief is fixed on the wall with liquid nails. Such products decorate the wall and add zest, making it more voluminous and interesting.