No cozy home interior is complete without decorative elements. Of course, they can be purchased at the store. But in this case, the apartment or house will become like a mass of the same type and faceless premises. For this reason, it is advisable to decorate the wall with your own hands, putting your warmth and soul into it. This will give the living space atmosphere and uniqueness. You will always feel the warmth of home here.
Briefly about the panel
Before you start making panels by hand, it is worth recalling that a thematic product is a decorative work in the form of different particles or segments protruding above the supporting base. These segments create a single plot with a certain volume and shape.
Therefore, the panel can be considered an analogue of the painting only in part: if the paint is spread on the canvas almost at the same level, then the fragments of the panel rise above each other.
On the other hand, no one canceled the fastening of elements and products at the same height. The main thing is that any kind of painting with paints is out of the question - all the fragments have nothing in common with the liquid mass.
Drawings created with “non-standard” brushes
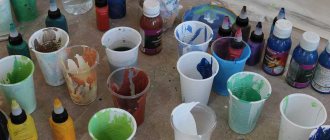
Here you can take a brush made of feathers or threads for painting. To get patterns like in the photo, the brush needs to be dipped in almost dry paint . You can also use rag painting for a similar result.
It turns out that our fingers are the perfect shape for creating delightful modern paintings. Thanks to this, a wonderful picture of the panel turned out.
Image of the panel
The appearance of the panel directly influences the style and also allows you to decide on the material. The latter will be discussed a little later, because... First of all, you need to choose a style direction:
- Modern minimalism - straightforward or intricate geometry made of artificial materials on a single-color background;
- Neoclassicism is an analogue of minimalism, but already made from classical materials;
- Classicism - landscape or still life made of multi-colored materials;
- Avant-garde – surrealism made of multi-colored materials;
- Colonial image - any subject from products that are closely related to travel, conquest or tourism.
- Art Deco - intricate geometries of man-made materials that create sharp contrasts (for example, gold plus black).
Classic panels, like a DIY painting made from scrap materials, come with a frame, while modern analogues may not require decoration along the entire perimeter of the supporting base.
From salt dough
This type of panel is one of the most budget-friendly, since its production requires a minimum of material and usually everything you need is always at home.
We offer a version of a molded panel where your child’s arms and legs will be imprinted. This creation will allow you to decorate your baby's bedroom in an original way and preserve the memory of his childhood for a long time.
We will need:
- Flour;
- Salt;
- Colored gouache (optional).
Procedure:
- We take flour and salt in proportions of two to one. Two glasses of flour are mixed with a glass of salt, then water is added. The approximate volume of water for this amount of flour and salt will be 125 ml.
- Knead the stiff dough. If it sticks to your hands, then add more flour. The dough should be elastic and not stick to your hands.
- If you want to make the panel colored, then it’s time to add gouache, decorating the dough with it.
- Roll out the dough. Its approximate thickness should be about 2 centimeters. The shape of a piece of dough can be any.
- We bring the dough to the baby and gently press his palm and foot into the mass. The pressure should be light, but sufficient to leave a mark.
- We make two through holes in the dough - this is for the future ribbon, on which the panel will then hang.
- Place everything on a baking sheet and cover with baking paper.
- Preheat the oven to 90 degrees and put the dough there to dry. This will take approximately two to two and a half hours. It is necessary to carefully turn the dough once, halfway through drying.
- We paint the resulting panel with colored or white gouache, thread the tape through the holes - voila! A very touching and cute decoration for your home is ready!
Materials for making panels
Creating a specific plot is not so easy when there are no materials at hand that are easily wrinkled, bent or cut. They make excellent objects that are in the foreground - trees, flowers, animals, etc. Thematic materials often include:
- Textile;
- Wire;
- Leaves;
- Buttons;
- Flower petals;
- Threads;
- Glass;
- Branches.
You can generally glue finished products or things onto panels with your own hands for the interior, provided that they themselves are light and miniature. In particular, we are talking about toy cars, gears, light bulbs, bolts, stripes, etc.
At the same time, do not forget about filling the background. To do this, it is better to use funds that are always in abundance.
- Cereal grains;
- Coffee beans;
- Dry leaf fragments;
- Pebbles;
- Shells;
- Metal filings.
The easiest way is to make a background from multi-colored or single-color fabric. Moreover, it can be represented by a simple canvas stretched on a stretcher. By the way, you can stretch a piece of worn curtains, a shirt, or a T-shirt onto the latter.
We use available means given by nature
Eco-friendly material is very popular and is used in the implementation of various design ideas:
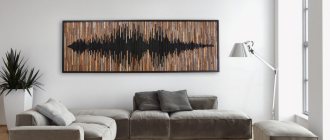
- wood cutting;
- landscapes with branches and dried leaves;
- photo frames.
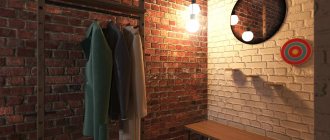
Abstractions made of bars and inlaid with stones look beautiful and original. Wood products will look elegant in any setting. To preserve wooden structures, they are treated with special means and varnished.
Select flexible branches so that they take a position in the composition and do not break. They are secured with staples and self-tapping screws (the caps are rubbed down). Thin ones are tied together with wire. For the background choose cardboard, fiberboard, burlap. Suitable for interiors in the bedroom, hallway, living room. You can always diversify and add new elements. They go well with dried leaves and flowers.
- Wall mirrors in the bedroom: rules for ideal placement according to Feng Shui
How to make a shelf with your own hands - diagrams, drawings, design and features of use in the interior (105 photos)
- Roller blinds for plastic windows: examples of ideal design and combination
Dimensions and shape of the panel
The appropriate indicators are selected depending on the purpose of the room and the style of the interior. Modern trends welcome non-standard panels:
- Assembly from several modules;
- The plot is oval in shape;
- Monotonous plot on an oval-shaped supporting base;
- A plot without a supporting basis.
The appropriate focal point is hung in a single row, in the center of the background or near doorways. The size of a modern 3D wall panel with your own hands is usually large, because... the product is in limited quantity or a single copy, regardless of the purpose of the room.
Classic analogues come in different sizes, and therefore load the background area in different rooms differently:
- Living room – 15-25%;
- Bedroom – 10-15%;
- Hallway-dressing room – 10-20%;
- Balcony-veranda – 10-15%;
- Office – 15-25%;
- Children’s – 20-40%;
- Corridor – 20-40%;
- Kitchen – 15-30%.
It seems that a small kitchen and a narrow corridor are not made for hanging a lot of panels with your own hands. However, when it comes to classic execution, then you can give in and turn the problematic space into a gallery.
By sewing
Technique for sewing images from scraps. Contours are drawn on cardboard, the pieces are laid out on top and sewn together by hand or on a sewing machine. For fabric or hard canvas, patterns are used. Not only fabric is used for the work, but also paints and brushes.
Needlewomen sew New Year's toys from it, for children, and make canvases. You can buy it at any store. Patterns, scissors, thread and needle will come in handy. This craft will decorate a room and is perfect as a souvenir.
DIY arch - step-by-step instructions on how to make a stylish and beautiful arch (115 photos)Bottle decor: master class on making a stylish and original decorative element (85 photos)
- Cake decor - master class on original design and decoration methods (75 photos and videos)
They use it under the base, tighten the frames, and sew brownies. Herbariums, flour collections, things with the addition of buttons, stones, beads, ropes look very good against its background. Burlap paintings are placed in bright colorful frames for greater impact.
Modular panels
Even adherents of the classics understand that a plot on one canvas, along the edges of which there is a mat with a frame, seems boring compared to modular compositions - several panels that demonstrate one plot, despite a short distance from each other.
Note!
Do-it-yourself easel - types of designs, choice of materials for creation + step-by-step instructions and simple diagrams for beginners- DIY wedding glasses: a detailed master class for DIY decoration, selection of decorative elements and materials (photo + video)
DIY phone stand | Dimensions, features and beautiful options for telephone stands
Modular panels, like DIY paintings made from scrap materials, are called differently depending on the number of modules:
- Diptych – two modules;
- Triptych – three modules;
- Polyptych – more than three modules.
But it happens that dozens of panels are arranged in complex configurations like a star or a cube divided into five, six or more segments. This is possible by performing intricate and multi-colored ornaments or designs on each panel.
Moreover, all panels should be miniature and almost identical in size.
Attaching parts to the panel
In order for the panel to remain intact for many years, its elements must be securely fixed to a supporting base. Fixation can be done in the following ways:
- Gluing – using epoxy glue;
- Sewing - using a needle and thread;
- Fastening - using screws or staples from a stapler.
The most reliable way is the last one. But it is only appropriate when working with a thin board and its corresponding parts. You can fix the details on the canvas using thread or glue. Obviously, cardboard only welcomes glue. As a result, the choice of fixation method depends on the weight of the parts and the strength of the supporting base.
Decorative plaster
A very costly and time-consuming process. Everything is done on a pre-plastered surface. A sketch of the design is made, and then a special plaster is applied using a stencil or adjusted independently with tools. This type is used to decorate walls and ceilings with a variety of images.
Difference between panel and background
If a DIY wall panel merges with the finishing material, then the idea of creating a focal point by default loses its meaning. Accordingly, there must be a contrast between the panel and the background:
- Light finish – dark panel
- Dark finish – light.
And don’t forget about the density and depth of the patterns. The fewer patterns on the background, the more intricate the panel should be. But it is recommended to complement the obsessive finishing with a panel in a white frame, which serves as a border between the two zones.
What it is
The panel is a decorative element and its purpose is to decorate the interior and fill empty space on the walls or ceiling. Sounds a lot like the description of a painting, doesn't it? How does it differ from a painting, if both decorative options are designed to decorate the room? The answer is simple: a painting is a subject of painting art, and a panel can consist of anything. Dough, plastic, plaster, beads, fabric, wood - there is no limit to imagination when it comes to making panels and the material for decoration can be anything. If you want to make your interior unique, then the panel will do it perfectly!
Panel for good luck
Faith in the favor of fortune is present in the heart of every creator and housewife. Therefore, you should not be surprised at the use of the following attributes in the panel:
- Coins;
- Horseshoes;
- Pheasant feathers.
It is very profitable to create money trees from coins. Horseshoes and pheasant feathers are more suitable for use in a single copy (horseshoes are best attached to boards, feathers are best tied to canvas).
Children's panels
A children's room requires wall framing no less than a living room. True, before you start creating children's panels, you need to take into account several rules:
- Firstly, exclusively safe fabric is used for children's panels (it can be filled with soft material to create volume, shape, relief);
- Secondly, the fabric should be multi-colored to please the eye;
- Thirdly, finished products are hung without frames or with light frames, so that in case of a fall they do not injure the child.
It remains to be noted that children under 8 years old can be delighted with do-it-yourself fabric panels with peaceful cartoon characters, and up to 12 years old – with various cars or dolls.
How to place it correctly
To place it correctly, you should consider some points:
- integrity and volume - do not cut off or hide part of the work, then the meaning will be lost and it will look ugly;
- purpose of the premises - for what purposes it is intended;
- harmony in combination with decoration - selection of things and palette.
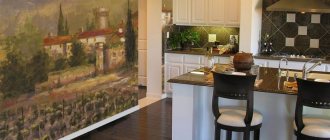
The kitchen will be decorated with thematic items: fruits, vegetables, still lifes, grain products, cereals, spices, including cutlery and dishes.
The bedroom creates an atmosphere of lightness, peace, and tranquility. Here people relax not only with their bodies, but also with their souls. Heavy objects will be out of place.
Light bright colors, the child’s favorite characters, animals, collages of children’s photographs and other interesting objects are chosen for the child’s room.
In the hall, the design is complemented with wood products, macrame or abstractions.
Additional Tips
If in a classic interior a panel can correspond to curtains, bedspreads or carpets, then in a modern interior the plot should take the form of glazing, furniture, electrical appliances or fittings.
A panel on canvas with a stretcher is hung on a screw using a rope. But how to make a panel with your own hands if the supporting base is thin cardboard or board?
It's simple - you need to drive several 4-mm staplers into the thematic material, and then tie a rope to them for hanging. In this case, it is advisable to bend the brackets on the front side of the panel if they protrude through the supporting profile.
The beauty of the panel is that it can demonstrate stories through thematic products. For example, to demonstrate a still life with morning coffee, it is enough to glue a bowl to the board, and to the bowl - a brown piece of synthetic fabric with foam swollen from heating. Such a focus of attraction can only be supplemented with coffee beans, a sugar bag and a teaspoon.
Determining the scope of work
The first stage in creating a wall panel is to decide on the design of the future product. If you already know where it will be located, then this complicates the task. You need to weigh the color scheme, dimensions, what it will have, whether the material from which it is planned to be made fits into the overall picture of the interior.
So, we decide: size, color scheme and what materials will be used. This is the first step. If this is possible, then it is worth drawing a sketch of the planned product. This will help take into account all the nuances in completing the task.
If a piece of cardboard, canvas or any other hard surface is taken as a basis, then markings are made on it: where and how the decorative elements will be located. If the base is fabric, then it is stretched onto the base (for example, onto a piece of plywood, board or plastic), and the rest of the fabric is secured on the back side. After the craft is completed, it is placed in a frame and hung on the wall.
There is another option for making panels on a fabric basis. You will need to take a solid base, for example, a plasterboard sheet of the required size and glue foam rubber to it. The fabric is stretched onto the resulting soft base. In this case, you can do without a frame.
After all the preparations, you can begin the main part of production: decorating.