What it is
The panel is a decorative element and its purpose is to decorate the interior and fill empty space on the walls or ceiling. Sounds a lot like the description of a painting, doesn't it? How does it differ from a painting, if both decorative options are designed to decorate the room? The answer is simple: a painting is a subject of painting art, and a panel can consist of anything. Dough, plastic, plaster, beads, fabric, wood - there is no limit to imagination when it comes to making panels and the material for decoration can be anything. If you want to make your interior unique, then the panel will do it perfectly!
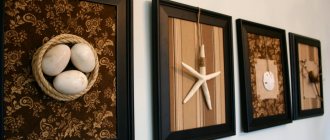
Wall panels in the interior
For each room in the house, choose a wall panel that matches its style, purpose, color scheme, and size of the room:
- In a hallway, even a small one, you can successfully place both a small panel and an image on the entire wall. If this room has the shape of a corridor, then it would be appropriate to make a small gallery of several works on one wall.
- For the living room, large formats that cover the entire wall are often chosen, sometimes consisting of several separated elements. The most suitable themes include abstract compositions, images of cities, and landscapes.
- In the kitchen there are panels of medium and small formats, made of practical materials that retain their appearance after numerous wet cleanings. The colors chosen are bright and saturated; the themes are dominated by images of fruits, vegetables, and flowers.
- For the bedroom, choose images of flowers, natural landscapes, abstract compositions in soft pastel colors.
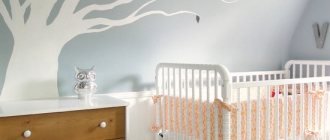
- Bright panels with images of cartoon characters, funny animals, and flower arrangements are made for the nursery. It's best to make them together with your children so that they get exactly what they like.
- For the bathroom, choose moisture-resistant materials that are easy to clean. Mosaics made of glass or ceramics, painting on tiles with waterproof paints, and the use of moisture-resistant decorative elements (porcelain, seashells and stones, fiberglass, etc.) are more suitable here.
Determining the scope of work
The first stage in creating a wall panel is to decide on the design of the future product. If you already know where it will be located, then this complicates the task. You need to weigh the color scheme, dimensions, what it will have, whether the material from which it is planned to be made fits into the overall picture of the interior.
So, we decide: size, color scheme and what materials will be used. This is the first step. If this is possible, then it is worth drawing a sketch of the planned product. This will help take into account all the nuances in completing the task.
If a piece of cardboard, canvas or any other hard surface is taken as a basis, then markings are made on it: where and how the decorative elements will be located. If the base is fabric, then it is stretched onto the base (for example, onto a piece of plywood, board or plastic), and the rest of the fabric is secured on the back side. After the craft is completed, it is placed in a frame and hung on the wall.
There is another option for making panels on a fabric basis. You will need to take a solid base, for example, a plasterboard sheet of the required size and glue foam rubber to it. The fabric is stretched onto the resulting soft base. In this case, you can do without a frame.
After all the preparations, you can begin the main part of production: decorating.
By sewing
Technique for sewing images from scraps. Contours are drawn on cardboard, the pieces are laid out on top and sewn together by hand or on a sewing machine. For fabric or hard canvas, patterns are used. Not only fabric is used for the work, but also paints and brushes.
Needlewomen sew New Year's toys from it, for children, and make canvases. You can buy it at any store. Patterns, scissors, thread and needle will come in handy. This craft will decorate a room and is perfect as a souvenir.
They use it under the base, tighten the frames, and sew brownies. Herbariums, flour collections, things with the addition of buttons, stones, beads, ropes look very good against its background. Burlap paintings are placed in bright colorful frames for greater impact.
Types of panels with your own hands
Let's look at the main types used in decoration:
| Fabric | These are all variants of embroidery, applique and tapestry techniques that are made on fabric. The technique can be anything: from hand embroidery to machine embroidery, made in mass production. |
| Stone | Often made using mosaic technique. Natural stones that are considered noble are used: basalt, marble and others. Less often, such products also contain artificial stone. |
| Made of ceramics | They are made using ceramic tiles and are usually placed in the bathroom or kitchen. |
| Sculptural | A volumetric version of the product, which is made of special plaster, plaster or metal. |
| Graphic | Anything done using various types of printing. These can be reproductions of paintings, photo printing. |
| Other types | Here you can find handmade products made using any available materials. Salt dough, wood, dried flowers and plants, shells, clay, beads - there is no limit to your imagination for decoration. |
Here are examples of manufacturing different types of panels:
Attaching parts to the panel
In order for the panel to remain intact for many years, its elements must be securely fixed to a supporting base. Fixation can be done in the following ways:
- Gluing – using epoxy glue;
- Sewing - using a needle and thread;
- Fastening - using screws or staples from a stapler.
The most reliable way is the last one. But it is only appropriate when working with a thin board and its corresponding parts. You can fix the details on the canvas using thread or glue. Obviously, cardboard only welcomes glue. As a result, the choice of fixation method depends on the weight of the parts and the strength of the supporting base.
From prints of fruits and vegetables
A child can also participate in the creation of this panel, as it is very simple to make. The bright, colorful design of this creation is ideal for the kitchen.
For production you will need:
- Solid vegetables or fruits (this could be apples, any citrus fruits, pears, cabbage, etc.);
- Paint (gouache, oil, acrylic);
- The basis on which the decoration will be made. It can be cardboard, board, fabric stretched over a sheet of drywall.
The surface of the base is pre-degreased and painted in the desired shade. Cut fruits and vegetables into halves and dip them in paint. It is best to pour the dye thinly into a plate. We apply the cut side of the colored fruit to the base and get a stamp.
Stamps can be made anywhere on the base, but images that are positioned symmetrically look best.
From salt dough
This type of panel is one of the most budget-friendly, since its production requires a minimum of material and usually everything you need is always at home.
We offer a version of a molded panel where your child’s arms and legs will be imprinted. This creation will allow you to decorate your baby's bedroom in an original way and preserve the memory of his childhood for a long time.
We will need:
- Flour;
- Salt;
- Colored gouache (optional).
Procedure:
- We take flour and salt in proportions of two to one. Two glasses of flour are mixed with a glass of salt, then water is added. The approximate volume of water for this amount of flour and salt will be 125 ml.
- Knead the stiff dough. If it sticks to your hands, then add more flour. The dough should be elastic and not stick to your hands.
- If you want to make the panel colored, then it’s time to add gouache, decorating the dough with it.
- Roll out the dough. Its approximate thickness should be about 2 centimeters. The shape of a piece of dough can be any.
- We bring the dough to the baby and gently press his palm and foot into the mass. The pressure should be light, but sufficient to leave a mark.
- We make two through holes in the dough - this is for the future ribbon, on which the panel will then hang.
- Place everything on a baking sheet and cover with baking paper.
- Preheat the oven to 90 degrees and put the dough there to dry. This will take approximately two to two and a half hours. It is necessary to carefully turn the dough once, halfway through drying.
- We paint the resulting panel with colored or white gouache, thread the tape through the holes - voila! A very touching and cute decoration for your home is ready!
Decorating the nursery for a birthday
Balloons
Important! You can use balloons only in cases where the baby has already ceased to be afraid of sharp sounds, and the sound of a bursting balloon does not cause unpleasant emotions in him. Otherwise, you risk ruining the celebration with frightened screams and tears.
Garlands and streamers
Additional Information. The nursery of a child born in winter can be decorated with a garland in the form of snowflakes cut out of white or blue paper.
Poster with children's photographs
Important! There is no need to put photographs on the poster that your child does not like. Teenagers, for example, hate pictures of them naked in early childhood.
Thematic sets
Important! When decorating a nursery for a birthday, remember that not only the decor of his room is important for a child, but also a cheerful, spiritual company and the general atmosphere of the holiday.
From fabric
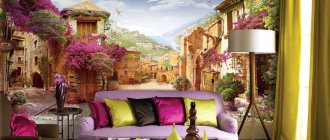
Decorating panels with fabric has become fashionable not so long ago: only in recent years have handmade lovers paid close attention to fabric. This product is ideal for a Provence style interior. Let's look at the main types of fabric panels that you can make with your own hands:
Patchwork
Various techniques are used to make such panels, but they all have one thing in common: the use of scraps of fabric in the work. There are many patterns for such products on the Internet. Panels can be either on a fabric basis or on rigid structures. You will need any fabric for making: from pieces of tulle to scraps of old bed linen.
Felt for creativity
Felt panels are one of the most popular among needlewomen. All you need are pieces of felt of different colors, a pattern for future parts of the picture, thread and a needle or glue and a base on which you plan to attach all the details of the panel. Felt is a very beneficial material for creativity: it will help bring all your fantasies to life. A felt panel will be an excellent decoration for a living room or hallway.
Burlap panel
Burlap looks like an extremely inconspicuous material, but it begins to play with completely different colors when craftswomen use it in their work. Burlap can be used to cover a frame for a panel; it can be used as a basis for other materials: beads, lace and others. This rough material perfectly emphasizes the delicacy and sophistication of other fabrics.
Wool panel
A wool panel is the simplest product using the wet felting technique. This is an interesting process in which wool is compacted in a specific way to create felt. The design on such a panel can be anything: it all depends on the skill of the needlewoman.
If you want to take a single-color piece of fabric and draw a certain picture on it, then keep in mind that this is not as simple as it seems. It’s worth practicing on a rough draft, and then moving on to the fabric that you plan to use on the panel.
Creating a wall panel from improvised materials
The main advantage when creating a wall panel with your own hands from scrap materials is the minimal financial investment and the most authentic option. One thing is guaranteed - no one else will have something like this, which allows you to give the interior of any room authenticity and originality.
One thing is guaranteed - no one else will have something like this, which allows you to give the interior of any room authenticity and originality.
From beads
The technique of creating panels from beads consists in the formation of volumetric structures at the first stage, which are then combined into one image, fixed on one base. The effectiveness of such panels lies in the ability to use any color scheme without restrictions, since beads can be purchased in different colors. You can make a money tree out of glass beads.
The only drawback is the high cost in the case of large-sized decorative options, since high-quality beads are quite expensive.
The effectiveness of such panels lies in the ability to use any color scheme without restrictions.
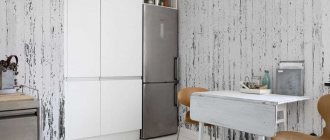
From wallpaper
A panel made from wallpaper is a simple decorative technique that can be implemented by a novice lover of all sorts of designer things. The main idea comes down to the fact that an overall rectangle or square in the amount of 1 or several pieces is marked on a free wall. Then it is covered with wallpaper of the selected color. And a plaster or foam molding is fixed around the perimeter, which completes the panel.
An important rule is the use of contrasting wallpaper, which will effectively emphasize the base of the wall decoration.
A panel made from wallpaper is a simple decorative technique that can be implemented by a novice lover of all sorts of designer things.
From flowers
If you have the tools to make decorative flowers from fabric, then by making them you can assemble the elements into an original panel. The flight of fancy here is not limited by anything. It all depends only on the desires and taste of the home owner.
You can do it from:
- Dried flowers, which are treated with a special composition and varnish.
- Artificial flowers.
- Dried seed pods, fruits and other things.
It is important to fix each element securely so that it does not fall off during use.
It is important to fix each element securely so that it does not fall off during use.
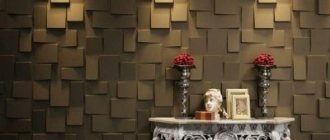
Made of wood
Wood is a fertile material that allows you to implement decorative elements of any stylistic direction for different rooms. Here are some original room design options:
- Having selected a dozen boards of different lengths but the same width, they are fixed to the wall in a vertical or horizontal direction so that there is a small gap between them. In addition, the edges of the boards should not be on the same vertical or horizontal. This creates a torn, careless look on both sides.
- Another beautiful and no less original option is tree cuttings. When a certain number of small wooden disks of different sizes are collected, they can be arranged in a pattern or simply placed in any order without following regular rules.
Wood is a fertile material that allows you to implement decorative elements of any stylistic direction for different rooms.
From fabric
The fabric is often processed using the patchwork technique. This is how you get a patchwork picture, placing it in a frame, you can get an original panel that is more suitable for a child’s room or bedroom.
The fabric is often processed using the patchwork technique.
From plaster
Gypsum is an ideal option for highly artistic decor that can decorate the most expensive living room in a private house, not to mention a modest room in an ordinary apartment. But it is worth considering that its implementation will require deep skills and abilities.
Gypsum is an ideal option for highly artistic decor that can decorate the most expensive living room in a private home.
From boards
One option for placing boards has already been considered. But the tree does not reveal all its secrets. All you have to do is use a little imagination and you can lay out any geometric pattern from planks of equal width. And if you combine several wide, untreated boards together to create a background, you can use the printmaking or contour technique to create an image on them.
All you have to do is use a little imagination and you can lay out any geometric pattern from planks of equal width.
Knitted
For needlewomen who know how to knit, both knitting and crocheting, it will not be difficult to make a panel from threads of any ornament or design. More often they perform plant motifs or animalistic themes. Therefore, such pictures are well suited for the kitchen, corridor, nursery or bedroom.
Such pictures are well suited for the kitchen, corridor, nursery or bedroom.
From disks
If you have accumulated a large number of old, unnecessary disks, then there are several ideas on how to implement them without throwing them away:
- By carefully dividing the disk into several parts using a sharp instrument, you can create a picture from the fragments.
- They are crocheted, leaving free space for the shine of the mirror surface. Then combine them into a certain combination and fix them on the wall.
If you have accumulated a large number of old, unnecessary disks, then there are several ideas on how to implement them.
Made from artificial flowers
If you don’t want to tinker with homemade fabric flowers, you can purchase ready-made products in a specialized store for needlewomen. At the same time, having thought through the composition in advance, both in color and in shape, you can create an original version of the panel. Compositions complemented with natural driftwood, twigs and branches look great. It is also possible to include other natural materials.
Compositions complemented with natural driftwood, twigs and branches look great.
Made from lace
Craftsmen who have mastered bobbin weaving, thin crochet and bead weaving techniques can use lace to create impressive or, on the contrary, small pictures that are fixed in a frame on the wall.
You can use lace to create impressive or, on the contrary, small pictures, fixed in a frame on the wall.
From paper
The Japanese, having developed the idea of origami, came up with the idea of making panels from colored paper. The main principle here is strict geometry, which, repeated in a certain sequence, forms an image.
The main principle here is strict geometry, which, repeated in a certain sequence, forms an image.
From plywood
Cutting on plywood is quite easy. Therefore, you can create any image using two types of techniques:
- Cutting out a sheet of plywood in one layer and then laying the base, which looks through the cutouts.
- Overlaying several cut out elements on top of each other. Moreover, each subsequent one should be slightly smaller than the previous one, thereby forming a convex realistic image of the object.
Cutting on plywood is quite easy.
From buttons
Here the flight of imagination is not limited by anything. Or, perhaps, only with the remainder of the buttons that are available. Dimensions can range from small to panels that cover the entire wall.
Dimensions can range from small to panels that cover the entire wall.
From shells
It is better to combine shells with other materials to make the composition more original. They look great with plaster convex bas-reliefs or in combination with wood.
It is better to combine shells with other materials to make the composition more original.
From newspaper tubes
No matter how strange it may seem, a newspaper tube can also be an excellent material for creating a decorative element of the interior. Moreover, you can use not only newspapers, but also magazines with glossy paper. This will allow you to diversify the texture, texture and color scheme of the finished object. The tubes can be laid out in two ways:
- In length - this way the design acquires some linear orientation.
- Or the end - in this case, the picture is created from circles.
A newspaper tube can also be an excellent material for creating a decorative element of the interior.
And other possible options
To create panels you can use different materials. To all of the above you can add:
- Pebbles.
- Feathers.
- Dried leaves.
- Driftwood branches and small twigs.
- Sand.
- Coffee beans.
- Wine bottle corks.
- And anything else that comes to mind.
To create panels you can use different materials.
From threads and nails
This is far from a new, but very interesting way to make a panel with your own hands! Minimalism reigns here in the choice of materials, but this does not make the panel bland and boring, but, on the contrary, attracts admiring glances.
The whole point is that cloves are hammered onto a solid base. This can be done chaotically, or it can be done according to a certain pattern, which can be successfully found on the Internet. Threads are stretched between the nails in several layers. Thanks to this, a certain pattern is created.
For children and with children
Every mother, of course, will not refuse to make a children's panel with her own hands. In a children's room, over-bed panels made of fabric look good, which can easily replace a wall carpet. This will be even more hygienic, given the frequent occurrence of allergies to carpet pile.
The topic must be chosen together with the child. Boys will like patchwork panels with cars and airplanes, and many girls will like voluminous panels of patchwork with knitting elements, where the voluminous elements depict figures of dolls or cartoon characters.
However, it is quite difficult to make such a complex picture-panel, since accurate patchwork sewing is only possible for craftswomen.
If you don’t have enough talent for sewing, you can choose a graphic panel, creating, for example, a whole picture from fragments of photos, illustrations, and wallpaper. Such a panel using the appliqué technique will also require a glass coating.
DIY hats for newborns. Several types of knitted winter hats for every occasion in a baby’s life- How to prepare essays on physical education
How to crochet beautiful napkins: tips with video lessons and patterns
Despite their apparent simplicity, such panels look good. In addition, the application can be done together with children, leaving in their memory an episode of joint creative work with their parents.
From buttons
Ideal for beginners! You can use buttons to decorate a panel made of fabric or paper, or you can create a product made entirely of buttons. For this you will need
- PVA glue;
- Buttons;
- The basis.
Execution order:
- Draw a sketch on the basis: where the buttons will be located and what pattern they should represent together.
- Glue the buttons to the base with PVA glue.
The design can be anything: inscriptions, abstraction, flora and fauna and others.
Mirror panel
A modern panel created from pieces of mirrors. Complex versions can only be made by specialists, while simple ones are very accessible for independent work. The mirror panel will become additional lighting in the room.
Necessary materials:
- Mirror tiles;
- Liquid Nails;
- A base with wooden planks, if you plan to stick the mirrors not directly on the wall.
The principle of operation is clear: we combine various mirror pieces and attach them in the required order to a wall or other base using liquid nails.
Compositions from disposable tableware
You can quickly assemble a beautiful original panel from disposable paper or plastic dishes.
For this use:
- Dishes,
- Cups,
- spoons,
- Forks,
- Plastic bottles.
Operating procedure:
- Spoons make especially beautiful flower arrangements and are also often used to create frames.
- You can use forks to make panels in the form of fans.
These materials look interesting in combination with others, in combined compositions.
Wooden panels
They are usually made in an abstract style from a variety of wood types. Wooden panels with inlaid semi-precious stones look very advantageous in a classic interior.
Dried flowers and leaves
Great for children's creativity. We decide on the plot of the future work, and then glue dried flowers and leaves (juniper branches, tree leaves - any flora will do) onto a solid base (cardboard, fiberboard) using glue. Grains, seeds and twigs would be an excellent addition.
Cereals and seeds
A sketch of the future painting is applied to a solid, already painted base. Then, cereals and seeds are attached to the base using PVA glue. Large grains need to be glued individually, and small grains, for example, rice, should be poured onto the glue already applied to the base.
Natural materials
There is a huge selection here - plant twigs, river sand, dried flowers, seashells and pebbles, various cereals and seeds, beans, coffee beans, eggshells and many others.
- Some of them are ready for use, just attach them to the panel with a glue gun and varnish them, others still need to be prepared.
- For example, dry the leaves and place them in transparent boxes, and then assemble them into a composition in the form of a herbarium.
- Or preserve the beauty of flowers by making beautiful blanks for panels using epoxy resin.
Decorative plaster
A very costly and time-consuming process. Everything is done on a pre-plastered surface. A sketch of the design is made, and then a special plaster is applied using a stencil or adjusted independently with tools. This type is used to decorate walls and ceilings with a variety of images.
Gypsum putty
By analogy, it is similar to the manufacturing process of decorative plaster. It may take a little more labor, because all the reliefs in the image on the panel are made using a special syringe or spatula.
Decoupage
A panel made using the decoupage technique can decorate any wall: be it a kitchen or a corridor. This technique consists of gluing cut-out pictures and decorative elements onto the selected surface, and then covering it all with several layers of varnish. The general idea of the work can be anything.
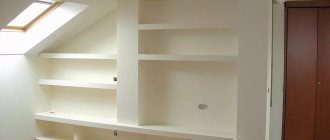
Choosing a base for the material
The first thing to do is to choose what the panel details will be placed on. In other words - basic material. The base can be made from either natural or artificial material. The material must be:
- dense enough to hold its shape;
- flexible so as not to break or crumble during operation;
- the surface must be such that parts can be fixed on it;
- easy to cut in order to cut out the base of the required shape.
The following materials can be used as a basis for the panel: good plywood, wood, polystyrene foam, plastic and many other acceptable options.