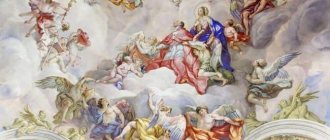
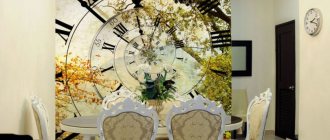
Frescoes will help create the atmosphere of, for example, a small Mediterranean town
The process of creating a traditional fresco is complex, labor-intensive and time-consuming. Painting requires filigree skill and precision of execution, since it is almost impossible to correct the applied drawing. Comparing an artistic composition created by a real artist and a modern fresco with a printed design, from the point of view of production technology, is tantamount to comparing a painting and a poster. However, we have to admit that the artist’s vision does not always coincide with the customer’s vision, and the result of the work can be perceived ambiguously. The production time for a large (2.7 × 3 m) fresco by the hands of a master takes at least 1.5–2 months, while a printed design on canvas can be obtained in 5–10 days. And the cost of 1 m² of finished products varies by more than 6 times, which undoubtedly serves as a powerful argument when choosing the type of decor. But, just like in the old days, modern frescoes become an element of decoration, a decorative accent around which the interior of the room is formed.
Frescoes on a non-woven basis can decorate not only flat walls and ceilings, but also convex and concave surfaces, corner or round
Surface preparation
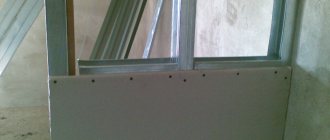
If available, remove old wallpaper from the walls. The surface to be pasted must be clean, dry, durable, normally absorbent, free of capillary moisture, smooth and have a uniform color. The surface must be pre-primed, preferably with a deep penetration primer. Do not glue on walls that are not completely dry. Various wall defects that were not removed during their preparation will be visible after gluing and may affect the quality (so-called “bubbles” may appear on the canvases, peeling, etc.).
If there are outlets and switches on the wall, turn off the power and remove the decorative strips from them. Remove the floor plinth and other removable objects that interfere with gluing.
Application rules
Interior decoration using frescoes is not only a fashionable and unusual solution, but also a sign of excellent taste. How to make a fresco on the wall should be considered in more detail. They are created by applying natural pigment-based paints over freshly applied plaster.
- A brush is used as a tool.
- Before this work is done, the pigments are dipped into water. This must be done quickly before the plaster sets. The inhabitants of Pompeii were the best creators of frescoes that decorated churches, cathedrals, and palaces. During the Renaissance, their creation was revived as an art.
There are some nuances in creating a high-quality fresco, and you should know them:
- A correctly executed fresco creates a three-dimensional image. The pigments are combined with small inclusions of plaster. Therefore, there is no gloss, as when using oil-based paints. It can remain in this state for many years.
- The absence of a glossy surface, and therefore glare, will allow you to view the drawing from any point without distortion. Professionals can create any visual effect using the bulge or unevenness of the walls. And the calm and pleasant structure gives a natural look to the interior.
- Large areas of walls are an endless flight of fantasy. They can depict epic battles, portraits, simply beautiful landscapes, and capture memorable moments of your life.
- They do not lose their appearance under the influence of sunlight and mechanical damage in the form of chips. The image is part of the wall. In warm and dry rooms, the service life increases many times over.
Fresco making technique
Without a doubt, you can make a fresco on the wall with your own hands; there are several techniques. They differ not just in material, but also in the manufacturing options themselves.
Pasting
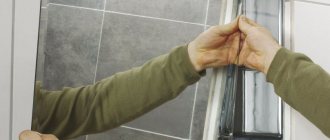
Please note that when smoothing frescoes, you cannot use rags or other rags. Use only the special tool described above. It is recommended to use rags only to remove glue that has got on the surface, and the glue is wiped off immediately with a damp cloth without pressing hard.
Determine or draw a line (border) from which you will paste. This line, for example, can be the right or left corner of the wall, the border of the ceiling (be sure to check with a level or plumb line that they are vertical and horizontal).
If the product is not glued to the entire wall, or you are not sure of the verticality or horizontality of the selected line, then the line from which you will glue must be drawn using a plumb line or level, using a tape measure and a pencil.
! Helpful advice: do not draw the line too boldly and brightly, as it can show through some types of photo wallpaper and frescoes. Draw a line in the form of inconspicuous marks with a finely sharpened pencil.
All gluing work is carried out in a room with normal humidity at a temperature from +15 C to +30 C.
! When receiving a fresco in the cold season, it is necessary, without opening the packaging, to keep the fresco for 24 hours in the room in which it will be installed.
! When gluing frescoes, glue is applied only to the wall.
! Before gluing, it is especially important to make sure that there are no color spots, inscriptions, marks, etc. on the wall, since after installation they may be visible.
Before gluing the frescoes on the reverse side, it is recommended to slightly moisten them with a wet cloth or spray. It is better to glue two people together from left to right or from right to left, holding the roll vertically.
- Roll the photo wallpaper or fresco from the tube into a tight roll.
- Apply glue to the wall using a roller and brush.
- One person holds the roll vertically and slowly unwinds it along the glue-smeared wall, the other gradually smoothes the canvas onto the wall using a rubber roller. The excess (stock) is cut off on the wall after gluing using a metal spatula and a utility knife.
! It is recommended to smooth the fresco (roll it) with a rubber roller to avoid damage to the texture.
Recommendations
- It is advisable to carry out gluing of frescoes by qualified specialists who have experience in gluing such materials.
- Keep your wallpaper knife sharp at all times. Replace even slightly dull blades.
- When gluing, do not allow glue to come into contact with the surface, the glue leaves stains and their complete removal is not guaranteed.
- The glue can be removed with a damp sponge. Do not rub the glue on the canvas.
- Any exposed adhesive must be removed immediately before it dries.
- During the gluing and drying process, avoid drafts in the room and temperature changes.
- Do not ventilate or heat the wallpapered room, do not carry out other repair work until the wallpaper is dry (at least 24 hours, and preferably 48 hours).
- If you are not sure that the corners are perfectly straight, when joining images on different walls, it is recommended to make the joint not in the corner itself, but nearby. Otherwise, a gap between the panels may be noticeable.
- If the edges have come off after drying, possible reasons are uneven gluing in these places due to insufficient priming of the walls (the glue has been absorbed), non-compliance with the temperature conditions in the room during gluing or during the drying process (drafts, changes in temperature and humidity), glue the edges and press .
- Do not rub the surface too hard or for too long, and do not scratch the fresco.
Completion of work
Drying time for frescoes is 1-3 days. During drying, do not open the windows in the room where the pasting took place and allow drafts to occur. If there are air bubbles left on the product, they can be removed using wallpaper glue and a medical syringe with a thick needle.
Fill a syringe with wallpaper glue, put a needle on it, carefully pierce the bubble and squeeze a small amount of glue into the bubble. Smooth out the bubble with a wallpaper spatula, squeezing out excess glue through the hole created by the needle.
! The manufacturer is not responsible for complete or partial peeling of the product due to improper surface preparation, as well as for damage resulting from improper installation or improper storage.
! Claims about color discrepancies, color defects, size discrepancies, poor-quality images after applying glue to at least one part of the photo wallpaper or after gluing all or part of the photo wallpaper and frescoes will not be accepted.
Modern frescoes
The basis of high-quality interior frescoes is most often non-woven fabric - non-woven fabric. It is covered with a thin (1–3 mm) layer of elastic plaster, which is securely fixed using a binder.
Photo: Affreschi & Affreschi
Using different tools and application techniques, varying the number of layers, surfaces with a variety of textures are obtained. After drying, colorful decor is applied using digital printing. Technological equipment ensures high accuracy of color reproduction, the smallest details and a large image format. For some companies, the dimensions of the seamless fabric reach 3.26 m in height and 10.2 m in width! This means that any wall in the room can be decorated without joints.
By the way, what these innovative products have in common with traditional frescoes is that in a number of companies the main details of the printed design are drawn by professional artists. After which the surface is coated with varnish or other protecting and strengthening agents. The finished fresco is rolled up like regular wallpaper and packaged in a hard tube. On the domestic market, this type of decorative wall decoration is offered by Affresco, Fresconovo. Cost of 1 m² - from 3990 rubles.
Minor abrasions on the fresco can be corrected with paint using the padding method. more serious damage is corrected by the artist
From cracks to rhinestones
The fresco, as a rule, plays the role of the compositional center of the interior. It is no coincidence that every year manufacturing companies present new textures and techniques for working with images, and catalogs of drawings are replenished with fresh works by talented artists. A new product from the Russian fresco manufactory Applico, the “Crystal” series of interior frescoes, combines beauty and durability. A dense mother-of-pearl base with a noble shine and a light texture reminiscent of sand deposits create unusual visual effects due to the reflection of light. Price 1 m² - 7460 rub.
How to glue
Fabric wallpaper on non-woven fabric is easy to apply. It’s easy to remember what kind of glue is needed for this type of photo wallpaper. They use glue intended for non-woven or vinyl wallpaper.
The paper-based material is glued using glue intended for paper wallpaper. Self-adhesive wallpaper is fixed to the wall using a material that has already been applied on the back side. The surface must first be carefully prepared.
Textile wallpaper, pasted with liquid glue, masks small flaws well. There are also single-layer textile wallpapers. They are a classic option, fixed with glue designed for vinyl wallpaper.
Types of wallpaper
Photo wallpapers are divided according to various criteria:
- texture;
- number of layers;
- material of manufacture;
- three-dimensionality of the image;
- subject.
Different types may have their own characteristics in terms of service quality, gluing technology and what kind of glue is best for gluing photo wallpapers. The thoroughness of surface preparation also varies somewhat. Therefore, it is necessary to first obtain some information regarding each type of photo wallpaper.
Based on the material used, wallpapers are divided into:
- non-woven;
- paper;
- fabric;
- vinyl.
They can have up to two layers. The two-layer version is called duplex, the single-layer version is called simplex. Double-layer photo wallpapers have a lining layer made of a material that differs from the main one, which gives additional positive properties, simplifies the gluing technology and determines what kind of glue to use to glue the photo wallpapers.
All photo wallpapers are also divided into those to which conventional gluing is applied using liquid glue, and self-adhesive ones, to which the adhesive composition has already been applied. The latter are covered with a special film, which is removed directly when glued to the wall.
Additional costs when installing a canvas with an image
Before you begin installing the painting, you must properly prepare the surface on which it will be applied. The old finish will need to be dismantled and leveled. On average, craftsmen charge from 300 to 500 rubles per square meter for surface preparation, excluding materials, depending on the volume and complexity of the work. If you add materials, you need to increase the amount by another 70-100 percent.
In some cases, it may be necessary to install skirting boards around the perimeter of the panel. This service will cost from 100 rubles per linear meter .