In interior design, you can always go a little further than typical options, using the ideas and possibilities that art itself suggests. For example, many have probably heard about fresco (this is the name given to painting with paints on wet plaster). But what is the peculiarity of modern painting using this technique and is it organic to today’s interiors? What is the difference between fresco and alsecco? How did the fresco appear and what contributed to its development? How does the painting process itself technically unfold?
If you want to know the answers, look here.
A little history
Painting walls with paints, done on wet plaster, is called “fresh”, and in Italian – fresco. The history of the development of frescoes lasted more than one century. Painting “in a fresh way” began with the ancient Romans with the creation of coloring substances on lime.
The paintings found in Pompeii were made, rather, on dried, moistened plaster (secco) with compositions containing a small amount of lime, coated on top with substances containing tempera or wax. Fresco images that decorated Romanesque churches of the 11th and 12th centuries have been preserved. In the 14th century (after a long period of oblivion), painting on dry plaster became widespread again.
It was only in the 16th century during the Renaissance that full-fledged wall painting on wet plaster, or buon fresco, appeared, when lime-based paints were applied to freshly laid plaster.
Fresco from Pompeii
Michelangelo said that fresco is a courageous art, since the work of an artist painting frescoes requires a precise, bold hand, the ability to apply a stroke with one stroke that does not require edits, is physically difficult, and requires working for a long time at high speed. Therefore, not every artist was able to work in the fresco technique, and skill was tested by a fresco test.
The credit for creating the fresco technique is deservedly given to Italian masters. It was Italian artists who were invited to other countries of the world to paint temples, cathedrals, palaces and other majestic buildings.
The technique required the application of at least 5 layers, special preparation of lime, solutions, paints, precise adherence to each point of the technology, and a lot of time. In a 16-hour day, the artist could decorate a maximum of 1.6 m2, and every day a layer of freshly laid plaster was required to be removed from unpainted areas, and the next day to be applied again. We studied technology for many years.
With the advent of wallpaper, the spread of adhesive paints, changing tastes, and the desire to speed up the finishing process, the demand for fresco masters quickly fell. Nowadays, the real art of painting with water paints on wet plaster is mastered by a few master restorers and a small part of artists involved in custom finishing.
An example of the buon fresco technique, Florence Cathedral, Italy
A modified technology is common among craftsmen, allowing them to reduce time costs and partially use modern materials and techniques. There are methods of imitating a fresco.
The essence of the process
Lime plaster, consisting of slaked lime and sand, is applied to the wall in several layers, the top of which is covered with painting. Paints for frescoes are water-soluble, prepared on a lime, casein or silicate base. When applied to wet plaster, they are absorbed into it and, as the solution sets, remain in it, coloring the calcium carbonate. From a chemical point of view, this process looks like this:
Ca (OH)2 + CO2 = CaCO3 + H2O,
where Ca (OH)2 is slaked lime (calcium hydroxide), CO2 is carbon dioxide.
The painting obtained in this way is an integral part of the wall, and it cannot be washed off. You can only paint over or knock down the plaster completely.
Is a fresco needed in an apartment?
Fresco is one of the types of monumental painting. Unlike an easel painting, when you can remove a painting and hang it in another place, this will not work with a wall painting.
Initially, any monumental art was designed to be not an independent work, but part of the entire complex. It may be harsh to say this in relation to the artist’s work, but a fresco in an apartment will be an alternative to painting or wallpaper, only at a higher cost.
Before you decide to decorate your wall (or ceiling, if the height allows), think about the composition that you will place there. It’s even better to consult a specialist about this. The fact is that the picture you like may not fit into your interior at all. What looks good under the dome of a cathedral is completely unsuitable for decorating a wall in a Khrushchev-era building.
Another important point that I would like to warn you about is qualification. Most often, modern artists do not have plastering skills, and plasterers have very poor artistic talents. The masters of the Middle Ages mastered both, it was easier for them. You have two ways out of this situation:
- Hire an artist and work in pairs, having mastered plastering work.
- Try to do everything yourself.
One important warning: if you do not have any knowledge about the properties of paints, composition, light and shade, and artistic skills in general, you should not start studying fresco. Believe me, this is not the case. You will be driven into the narrow framework of setting a layer of plaster and, most likely, you will ruin both the wall and the material. Assess your capabilities realistically .
Application of frescoes in modern interiors
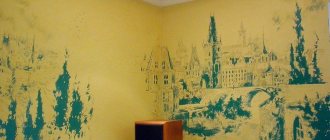
Using the technique of painting on wet plaster with water-based paints, large rooms are painted. This painting looks beautiful from a distance.
For home interiors, a fresco is no worse, you just need to match the size and subject of the painting painted with water paints to the space of the room and its dimensions. Also keep in mind that the viewer will be close to the painting, which changes the visual perception.
Pros and cons of the method
Interior wall painting has the following advantages:
- The wall composition is created manually, so the design of the room becomes unique.
Wall decoration with a sepia effect Source stroyfora.ru
- The technique allows you to create a design of any complexity, from a simple floral ornament to a detailed landscape.
- The right theme will help you fit the fresco into any interior.
Painting on plaster has several disadvantages:
- The performer must have artistic talent and a sense of proportion.
- Even with the talent of an artist, the work is difficult to complete, since the drawing must be applied quite quickly.
- You need to know how to properly prepare the base; The durability of the image directly depends on this.
- Ordering painting on plaster is not a cheap service. The cost of application is calculated in square meters and starts from 1500-2000 rubles per square, depending on the complexity of the image, the professionalism of the artist, the paint used, and the technique of execution.
- The application process can take a long time.
Unique alsecco fresco technique
The above-mentioned technique of painting on a dry plaster layer requires the use of paints based on raw eggs, water and glue. This image is resistant to water, so it can be used for facades. Alsecco increasingly decorates gazebos, fences, and retaining walls.
A striking example of the alsecco technique is Leonardo da Vinci. "The Last Supper" (1498)
The technique is easier to use and allows beginners to take their time, devoting time and attention to detail. Paints are applied to an already dried plaster base, which is moistened before painting. The paints are not absorbed into the hardened plaster layer into the wet plaster, so they can be washed off when making corrections.
Wall painting on wet plaster is a unique creation every time. The complexity of execution, the need to own equipment, special materials - all this affects the price. Such completed work should live for a long time. This condition is facilitated by the measures taken by craftsmen at each stage of production.
Technology for creating frescoes on plaster
The work includes two main areas: applying plaster and painting it. Both stages are directly related, and the second follows from the first. It is important to strictly follow the technological process, otherwise the image may crack and soon crumble.
Image selection
To make a fresco, choose any design that suits the main style. To paint the walls yourself, you should not take more than 3 primary colors. The wall on which the fresco will be located should be well lit by the rays of the sun, not cluttered with pieces of furniture.
Preparing the base
Finishing work always begins with high-quality preparation of the wall. As part of the preparatory activities, the following actions are carried out:
- Removing the old coating. Remove all flaking materials, clean the plaster down to the base (concrete, brick, wood). If the layer holds tightly, you can limit yourself to partial removal of crumbling areas. The surface of the wall is carefully swept with a rag to remove debris and dust.
- Making notches. Using a hammer drill with a special chisel attachment, small cuts less than 0.8 cm deep are made on the wall. For 1 sq. m area approximately 120 notches are applied. Once again brush off the dust from the base.
- Padding. The substrate is treated with a deeply penetrating composition in 1–3 layers to improve the adhesion strength to the plaster.
Preparation of the solution
Experienced craftsmen prepare solutions according to their “recipes”, selecting the ratio of components experimentally. But recommendations on proportions still exist. Usually, to complete the first layers of plaster, the following are mixed together:
- 1 part slaked lime;
- 4 parts sand;
- a little finely chopped hemp or cellulose.
For the finishing layer of plaster, combine 1 part lime and 2.5 parts sand. The ideal option would be to replace the sand or its share with brick powder. For street work, the amount of brick should be small. As for lime, it must be of high quality, otherwise it will not be suitable for painting frescoes. Cheap lime has minimal calcium oxide content, so slaking it can take several months. As a result, efflorescence will occur and the plaster will pull away from the wall or peel.
The ideal option is to buy pure fluffed lime for the solution, which has already been quenched. You can also purchase quicklime powder and extinguish it yourself (fill it with clean water for 2 weeks, then drain the liquid). Sand for plastering must also be of high quality and clean. It is better to take river sand and sift it through a fine sieve to make the plaster more plastic.
Applying plaster
After preparing the plaster, you should immediately begin applying it to the wall. There should be at least two layers, but most often 3 layers of plaster are performed (maximum number - 7). If the thickness of the plaster is more than 1–1.5 cm, the risk of cracking will increase.
Plastering is carried out in three stages:
- Spray
- Priming.
- Cover.
First, beacons are attached to the wall, which will allow you to level the plaster. Spraying is done with a trowel, casting the first layer up to 6–8 mm thick. Distribute the plaster with a trowel to ensure uniformity, but do not smooth it too much. Excess solution is removed as a rule. Using a notched trowel or other convenient tool, make wavy lines up to 2 mm deep in increments of 40 mm. Such waves will help form the relief and improve adhesion to subsequent layers of plaster.
After partial setting of the first layer, proceed to the second, intermediate one. For soil, the solution should be thicker than for spraying, so less water is added to the plaster. The mixture is applied to the wall with a trowel, rubbed with a trowel, and the excess is removed as a rule. The position of the plaster layer is regularly checked by level, since at this stage the base is leveled.
For covering, the plaster is made more liquid. Apply it using a grater in a thin layer (2–3 mm). In one approach, it is advisable to apply as much covering to the wall as can be painted over immediately, because it dries very quickly. Experienced craftsmen paint 6–9 square meters. m per day, and beginners should start with small paintings.
Paint for painting
When choosing paint, you need to take into account that the lime component of the plaster has an alkaline reaction, so the pigments must be alkali-resistant. Otherwise, the paint will quickly change color or become discolored altogether.
Also, the pigments must be soluble in water, otherwise it will be difficult to dilute them, and upon contact with the plaster, the paint base will be damaged. Most often, the following types of paints are used for painting on wet plaster:
- acrylic water - diluted with ordinary water, contain various pigments: chromium oxide, umber, sienna, burgundy, ocher, cinnabar and others;
- lime - prepared on the basis of lime water or dough, very convenient for making changes to the fresco;
- tempera - contains chicken eggs, casein, liquid glass, and additives to slow down drying.
Tempera paints are considered the most durable and beautiful. Egg white albumin reacts with the lime of the plaster, resulting in a new chemical compound - calcium albuminate. It is very durable and does not collapse for many years. Experienced craftsmen dilute tempera paints with beer or wine, not water, and add only egg white (the yolk can change the main shade).
Liquid glass improves the quality of the finished paint: it is always added for painting exterior walls. When in contact with lime, silicates form an insoluble substance that is not at all afraid of precipitation and temperature changes.
The finished paint should not be thick. It is better if the consistency resembles semi-liquid sour cream. When painting plaster, you need to use a soft brush that does not leave lint.
Applying an image
First, apply a sketch of the future picture to the wall and carefully pin it directly to the layer of plaster. Mark the lines with a sharp awl, getting a clear imprint, and remove the paper. Next, we begin to draw the light areas. It is recommended to bleach them with slaked lime in advance so that the pastel shades have their natural appearance. Gradually move to medium-bright tones, then to dark ones.
The strokes are made with light movements so that the brush does not remove the wet lime composition from the wall. If white streaks appear in the paint, immediately wash the brush and squeeze it out. After completing the main drawing, begin drawing in the reverse order:
- Dark colors.
- Medium shades.
- The lightest colors.
Drawing makes it possible to make transitions between individual areas smooth and natural. At the end of the painting, the edges of the unpainted plaster are carefully cut off with a sharp knife, forming bevels, gypsum mortar is applied to them and carefully smoothed. As a result, the joints between the fresco and the wall should completely disappear.
The finished fresco takes about 10 days to dry, since the paint is absorbed into the plaster rather slowly. During this time, drafts and temperature changes should not be allowed to occur. In general, the technique of painting on wet plaster is quite complex, but if you wish and have artistic taste, it is quite possible to master and practice it yourself.
painting
As you know, lime solution has an alkaline reaction, therefore, when mixing paints, alkali-resistant pigments are needed. What kind of pigments are these: ocher, cinnabar, ultramarine, this will also include manganese peroxide, lemon, umber, as well as burgundy, scarlet, etc. Although in relation to today there is no point in even listing the pigments: there are many more of them. The main thing when buying paints is to look at their solubility in water and their resistance to alkalis.
Attention! The pigment needs to be tested. It needs to be diluted in the composition with which you will work. For example, in water and lime
And then the pigment is applied to a previously prepared piece of plaster. For beginners, it makes sense to carry out such testing with all pigments.
For example, in water and lime. And then the pigment is applied to a previously prepared piece of plaster. For beginners, it makes sense to conduct such testing with all pigments.
How the painting itself happens:
- If you are doing wall painting for the first time, it is advisable to make a full-size template on paper. A troublesome measure, but not at all superfluous. The template is subsequently applied to the wall and the master pierces the contours of the main figures of the picture with a needle. This is done so that an imprint of the image appears on the wall.
- After the print appears, you can trace the contours. Usually they start working with light tones, gradually moving to dark ones. Layer-by-layer application works well - this way the finishing layer shows itself more clearly.
- If there is a need to whiten light areas, this can be done with slaked lime. Only then will the primary colors be applied to them.
- If the working day is already over, but you didn’t have time to do everything (and this happens most often), the plaster, which has not yet been filled with painting, needs to be cut off diagonally with a stationery knife. Cut exactly to the thickness of the covering layer - this is done for subsequent masking of the seam.
And a little more about paint. If you decide to paint the external walls, then the best option would be paints based on liquid glass. They are spread on the palette. In contact with lime, liquid glass will give a stable, insoluble texture, very durable. Such paints outperform traditional compositions in many respects.
Adviсe
To ensure that the image remains bright after drying, choose brighter colors.
To get a high-quality image on the wall, you need to consider a few tips:
- when choosing paints, take into account that after drying the color fades significantly, you need to choose brighter colors;
- the image is selected so that if the purpose of the room changes, it is in harmony with the design of the new room. You should not choose flashy, irritating colors and paintings depicting scenes of war, etc.;
- while the plaster dries, the room must be protected from drafts, direct sunlight and sudden temperature changes;
- paint is applied with light brush pressure so as not to damage the base. Apply in a thin layer, a thick layer is not completely absorbed into the plaster;
- To depict haze, lime white is added to the pigments.
Paints are applied from lighter to darker. It is imperative to follow such a sequence so that the light colors have time to be absorbed into the plaster. When the artist moves in the opposite direction, he sees where the tone has faded and needs to be updated.
Drawing a picture
Step 1. Preparing a sketch. Before starting work, a sketch of the composition is drawn, the details are not drawn, only the outline of objects and people is drawn.
Option sketch for a fresco
Step 2. Transfer the sketch. First, the area is marked and the scale of transfer is determined. The main anchor points are drawn, and the initial drawing is made on them. If the image is small in size, then the sketch is transferred using the pinching method: the paper is applied to the surface of the wall, marks are made with the sharp tip of a pencil.
When transferring a sketch to the wall, the proportions must be strictly observed.
Step 3. Preservation of the drawing. After the transfer, the so-called process of preserving the condition of the wall surface is carried out. The fresco is completely covered with a thin technical film; it adheres perfectly to fresh whitewash. Air bubbles are removed with a sponge or rollers, thereby ensuring a tight fit. This method allows you to keep the plaster damp for a long period of time, and open for painting only those areas that can be completed relatively quickly. Of course, the features of the composition are taken into account; it is necessary to work on the whole image, and not its parts.
Part of the wall is covered with film to prevent the plaster from drying out.
Step 4. The master determines which piece of the picture he can paint in a day and frees the corresponding area of the wall from conservation. The film is cut very carefully with a sharp blade; no marks should be left on the wall. The surface under the film is constantly damp, but not so wet that it interferes with the application of paint. Only an experienced painter can determine whether a wall is ready for work.
To draw the next fragment, part of the film is carefully removed
Practical advice. If for some reason the humidity is insufficient, then it must be moistened with a spray bottle and whitened with whitewash. They are transparent, the outline is clearly visible.
As work progresses, the drawing may change and be adjusted slightly. The writing process must be done quite quickly, the brushes must be soft and not leave marks on the wall. The consistency of the paint depends on the style of the fresco. In some cases it is paste-like, while in others it is liquid and is applied in three or four layers. The total thickness can reach several millimeters.
Paints for painting on wet plaster
On a damp wall, the paints adhere perfectly, and when calcium comes out of the lime, it covers them with a protective film. Russian traditions of painting frescoes involve the use of thick dyes; claims that the drawings are thin and translucent are misleading. The method of work is chosen by the painter; he makes decisions as he works. Drawing frescoes has its own requirements and rules; the master studies them for many years and only after that has the right to engage in such work. You should not hope that you will be able to create a real drawing on a damp wall the first time. Apprentices learn their skills from experienced artists over a long period of time.
Prices for various types of acrylic facade paint
Video - Painting on wet plaster
Painting on wet plaster is the most expensive method of finishing a room, and now you have an understanding of the technology of the process. Such work can only be done by professional artists; you can apply only the simplest compositions yourself using simplified technology. Painted walls require an exclusive design of the premises; it should resemble ancient buildings. It is advisable to make all window and door openings arched. On the pages of our website there is a detailed article on the technology of making plasterboard arches; we recommend that you familiarize yourself with its contents.
| This is carried out only in cases where the walls are already finished using modern technology. As we have already mentioned, the building should only be made of solid red brick; in principle, other options cannot be considered. Old plaster is removed in all cases, it does not matter whether it holds up well or not. The reason is that there are strict requirements for painting on wet plaster; it cannot contain cement. In those distant times, this building material was not known, but all modern mixtures are made using it. Cement coatings do not have the physical characteristics required for frescoes. Special compounds are prepared for plastering; we will talk about them in more detail in the article a little lower. | |
| Preparing the surface for plastering | All measures must be taken to increase the adhesion strength of the plaster. The surfaces are not only cleaned of dust and dirt, but also heavily moistened. If the masonry is smooth, then notches are made. The walls must be leveled, the difference in surface unevenness cannot exceed one centimeter, and the total thickness of all layers of coating is within 2–4 cm. Violation of this requirement leads to the fact that the paint unevenly penetrates the plaster, and this causes uncontrolled changes in shades after drying . |
| No primers are used before starting work; this is a gross violation of technology, which has an extremely negative impact on the final result and durability of the fresco. The plaster is applied in several layers, the interval between them can be up to 10–14 days. The final decision is made by an experienced technician depending on the actual conditions and condition of the coating. | |
| Most often, this is done by the artists themselves before applying the drawing. The finishing coating is carried out only with a solution of high-quality specially prepared lime. |
Preparing the wall surface
This stage must be approached very responsibly. The fact is that traditional technology prohibits the use of modern materials and impregnations to increase adhesion rates and prevent cracking and peeling. Long-term effects must be achieved by other methods.
Table. Stages of foundation preparation
| the name of the operation | Features and execution procedure |
Removing the old layer of plaster
Now we should look at some of the steps in more detail.
Preparation of the solution
The durability of the frescoes is explained by two secrets of the oldest known painting technique: a special solution for plastering and the unique composition of the paints used. And the artistic part of the work depends on the artist’s talent. What components should be in the plaster layer?
- Perennial slaking lime. Very strict requirements are put forward for it; for the most important frescoes, ten-year-old Austrian slaking lime is specially purchased. Domestic materials are not of suitable quality. Lime not only has good adhesion to brick walls, this material has antibacterial properties. This explains the absence of lichens and moss on ancient frescoes; the surfaces of such walls inhibit the proliferation of all microorganisms.
The basis of the plaster is slaked lime.
Quartz sand is used as filler
Brick chips retain moisture
Hemp fiber is used as a reinforcing additive
Ancient craftsmen always used crushed coal in the manufacture of frescoes.
Prices for popular types of plaster
Features of plastering
Specific proportions are chosen by the master. In this case, the size of the building, the microclimate in the room, and the peculiarities of using the structure according to the seasons are taken into account. All these factors have a direct impact on the operating conditions of the building and the microclimate parameters in it. These characteristics, in turn, influence the specific composition of the plaster. On average, about four parts of sand are needed for one part of lime, but this is not a specific recipe, but only an approximate recommendation without taking into account fillers and other individual additives.
Preparation of plaster mortar
Construction mixer price
Plaster is applied in several stages.
Step 1. Wetting the wall. You need a lot of water, the brick must absorb the maximum amount and to the maximum depth. In some cases, this requires several days; the time is determined by the master based on personal practical experience and intuition. The more water the wall absorbs, the longer the plaster will be damp, and this is a very important condition.
Execution algorithm
All actions are divided into several stages; only the precise implementation of each of them can ensure proper quality. Even the slightest deviation from the technology used will certainly have extremely negative consequences.
- Choosing the location of the drawing and its theme. These issues are resolved by the artist together with the customer. Not only the architectural features of the room are taken into account, but also the quality of lighting, the chosen style, the subject of the drawing, etc. Another important factor is that you need to pay attention to the materials used to make the walls on which you plan to paint. They should only be made of solid red brick; all other modern building materials are categorically unsuitable in terms of their physical parameters. There can be no question of plasterboard, foam concrete and other modern materials.
Having decided on the theme of the drawing, prepare its sketch
The quality of the substrate preparation is critical
Drawing is the most creative process
Now you can briefly familiarize yourself with the features of each stage.