Finishing a bathroom even in a standard apartment always raises many questions, what can we say about those cases when the bathroom is located in a wooden house. Many people believe that wood has no place in the bathroom, since wood becomes deformed when exposed to moisture, becomes covered with mold and mildew, and will not last long. However, today, thanks to modern technologies, there are many available means that allow wood to successfully withstand adverse effects. Timber or logs that have undergone decorative treatment with special compounds can be safely used for bathroom design. All that remains is to find out what paint can be used for a bathroom in a wooden house.
Bathroom Features
The bathroom is a special room in the house; it always has high humidity and has its own microclimate, different from other rooms. The fumes released during bathing settle on all surfaces. But if tiles, metal and plastic remain unchanged after drying, then dampness and moisture are destructive for wood.
The wood swells, becomes loose, microorganisms grow in it, and plantations of mold and mildew appear. Here the task that comes to the fore is to protect the tree and make it invulnerable to moisture and dampness. Therefore, when choosing a paint for a bathroom in a wooden house, first of all you need to pay attention to its water-repellent properties.
Disadvantages of plastic lining
When choosing plastic lining as a finishing material for the bathroom, you must also take into account its disadvantages:
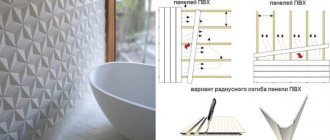
- Risk of incorrect installation. Sometimes beginners use wooden blocks to arrange the installation sheathing. Such mistakes must be avoided in every possible way, because... Due to increased humidity, the wood will bend and the lamellas will separate. It is strongly recommended to construct the frame only from a metal profile.
For the bathroom, it is recommended to use only metal sheathing under the lining - Low mechanical resistance. Thin plastic panels are quickly damaged, so it is better to use the thickest possible material.
- Toxic hazard. When burning, plastic releases dangerous gas. It's good that it's not that easy to set it on fire.
- Reducing living space . Installation of lining requires the construction of sheathing, which leads to concealment of an already small area.
- Cheaper look. This does not apply to modern panels that imitate wood, marble, granite, etc.
- Limitation in the subsequent design of the bathroom. It is difficult to attach additional shelves and wall cabinets to plastic lining.
How to protect wood from moisture
There are many wood preservatives, but not all of them are suitable for treating wooden walls in the bathroom. For these purposes, it is not recommended to use natural varnishes, since they allow water to pass through and the wood under such a coating begins to darken and swell. Water-based antiseptics should also not be used, since their protective properties are quickly lost with constant contact with water. The best safety products for a log home bathroom are:
- Organic-based antiseptic coating solutions that form a protective film on the surface that prevents moisture from penetrating inside.
- Combined products containing high-carbon and oil components. These compositions are considered universal; they are suitable not only for internal, but also for external processing, and therefore are quite expensive.
- Biomoisture-proofing compounds not only give wood water-repellent properties, but also effectively resist the appearance of fungus and mold, and also actively combat existing lesions. However, these compounds are very toxic, so when using them you must follow safety precautions and use protective equipment.
Manufacturing and installation of wooden countertops
If you wish, you can make a completely decent tabletop with your own hands. Purchasing materials is not a problem now, and such a product will cost several times cheaper than a factory-made one. In addition, you can show your imagination and give the tabletop some original shape.
To work you will need:
- furniture boards and larch boards;
- jigsaw;
- drill and wood bits;
- level and pencil;
- fine-grained sandpaper;
- wood varnish and paint brush;
- screwdriver;
- colorless silicone;
- brackets;
- dowels and screws.
Step 1. Place the shield on a flat surface and attach the template for cutting holes, which comes with the sink, to it. Use tape to secure the template.
Drawing according to which drilling and cutting will be carried out
Step 2. Drill holes for fasteners, then use a jigsaw to cut out a hole for the sink and communications.
Drilled holes
Hole for installing a sink
Trying on the faucet, drilling holes for water supply hoses
Step 3. Determine the height of the sink, measure the length of the legs for the countertop, transfer the measurements to the board and cut out 2 blanks from it.
Place where the countertop and countertop sink will be located
Sawing legs from timber
Step 4. The tabletop and blanks for the legs are thoroughly sanded, after which the resulting dust is removed. Treat the wood on all sides with waterproof varnish. It is advisable to apply the varnish in 2-3 layers, observing the drying intervals between layers. Instead of varnish, you can use any protective impregnation.
Surface grinding
Sanding process
The wood needs to be varnished
Step 5. While the blanks are drying, markings are made on the wall for fasteners. To do this, at the selected height, apply a level to the base and put marks with a pencil at a distance of 40-50 cm from each other.
Step 6. Drill holes in the wall according to the marks, insert dowels, then screw the brackets with self-tapping screws. Check their horizontal position again to avoid distortions of the tabletop.
Step 7. The legs are attached to the tabletop using self-tapping screws and metal corners, then they are placed close to the wall and screwed to the brackets. Insert the sink, connect the siphon and water supply, carefully apply sealant around the perimeter of the joints.
Tabletop mounted on brackets
A homemade countertop is no worse than a factory one
Tips for choosing bathroom paint
When deciding how to paint a bathroom in a wooden house, you need to pay attention to the type of dye. The main criterion by which paint for a bathroom in a house made of timber or logs is selected is resistance to moisture. In accordance with this criterion, there are two types of paints:
- Moisture resistant.
- Washable.
Moisture-resistant paint can withstand prolonged exposure to a room with very high humidity levels and periodic exposure to water without changing its appearance. But if the surface coated with such paint is regularly moistened, this may cause damage to the coating. Moisture-resistant compounds can only be painted on walls that are not in close proximity to a water source.
Walls that are located above the bathtub or near the sink, from which drops of water regularly fly, are best painted with washable paints. These dyes form a film on the surface that is not affected by humidity. The surface perfectly withstands exposure to water and chemicals. It can be washed periodically with household products, but should not be rubbed with abrasive brushes, since rough bristles can damage the front layer of the coating.
Recommendations for caring for wooden floors
There are many ways to protect wood from moisture. This is the use of various oils, waxes and varnishes. However, all of them are not suitable for use in the bathroom, since they violate the natural hygroscopicity of the material. Wood will simply stop regulating the level of humidity in the room. Therefore, it is recommended to combat high humidity using other methods. Provide good ventilation and purchase a thermohygrometer. Constant monitoring of moisture levels at different times of the day and year will allow you to determine the optimal microclimate in the room.
Thanks to the use of modern technologies for processing natural materials, a wooden floor is easy to imagine even in difficult bathroom conditions. The main thing is to choose the right type of wood, and then the bitumen solution of protective mastic.
Bathroom paints
Paints that can be used to paint bathroom walls:
- Water-based paint. It has many advantages: it has no odor, fits well and dries quickly, is resistant to temperature changes, and allows you to obtain the desired shade due to the variety of color pigments. But the paint does not withstand direct contact with water, so it can only be used to paint those walls that are located away from the water source.
- Acrylic dyes have unique characteristics; they are considered one of the best for the bathroom. The paints tolerate temperature fluctuations and the humid microclimate of the bathroom well, do not lose their appearance when regularly exposed to drops of water, and also protect the wood itself from moisture. They form an elastic coating that goes through the shrinkage process together with the wood without cracks or deformation of the front layer. In addition, acrylic dyes have antiseptic properties and are a reliable barrier against fungus and mold.
- Latex paints. As the paint hardens, it forms a water-repellent layer from which dirt and stains can be easily removed with regular wet cleaning without negative consequences for the appearance. Scientists were not lazy and calculated that the coating can easily withstand up to five thousand washing cycles. The product has excellent adhesion, does not emit a smell, and dries quickly. However, the paint cannot withstand low temperatures, which can cause the coating to crack and simply fall off. Due to this latex composition, it is not recommended to paint the walls of the bathroom in a country house, which is inhabited only in the summer. Latex is a material that microorganisms and mold love very much, so before you paint the wooden walls of a bathroom in a log or timber house, they must be treated with an antiseptic.
- Silicone compounds are excellent for painting walls in a bathhouse. After painting, the walls become waterproof and withstand the effects of water perfectly. With these paints you can safely paint areas located directly near the bathtub and shower. The dye forms an elastic and vapor-permeable coating that does not crack when the material shrinks and allows the wood to breathe.
- Alkyd enamels. They form a durable sealed layer with good resistance to moisture and water. However, the paint has a pungent odor that can be felt even several days after application.
Types of wooden countertops
There are several types of wooden countertops, which, in addition to products made from solid wood and furniture panels, also include models made from chipboards. Each type has its own characteristics, the study of which will allow you to better navigate your choice.
| Type of material | Main characteristics | Flaws |
Solid wood | Solid wood countertops represent the optimal balance of price, durability and visual appeal. The products have a unique pattern and pronounced natural texture; the material can be easily given any geometric shape. A variety of wood species are used for production, but most often they are coniferous and hardwood - teak, oak, larch, cedar. The most elite are countertops made of exotic woods | High price, the need for careful and regular care. Poor quality solids are susceptible to cracking and deformation |
Wood slabs | Slabs are transverse or longitudinal cuts of large trees. Mostly valuable species are used for production, and each product has an individual design. As a rule, the edges of the slabs can be minimally processed to preserve the natural shapes of the wood. | Very high cost |
Furniture board | The material is made from polished boards, which are connected to each other by gluing and pressing. For the manufacture of furniture panels, the wood most often used is ash, beech, larch and oak, and less often - pine boards. The products have an optimal quality-price ratio, are durable and attractive in appearance. | Wide panels may become deformed or crack under high mechanical loads |
Laminated chipboard | Models made from chipboard belong to the economy class. They look attractive, are distinguished by a variety of shades and textures, and are resistant to mechanical and chemical influences. For the production of boards, sawdust and shavings are used, impregnated with resins and pressed under enormous pressure. To protect against moisture and damage, the material is laminated with a special polymer film. | Fragility. The main problem is the edges of the slabs: moisture penetrates through the joints and contributes to swelling and deterioration of the countertop |
MDF | The most popular option for the bathroom. The cost is a little more expensive than chipboard, but it is more reliable and durable in operation. MDF is made from very fine chips, and paraffin or lignin acts as a binder, so the material is environmentally friendly | The service life is shorter than that of solid wood countertops and requires careful care |
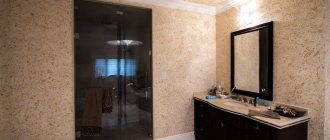
wooden countertop in the bathroom
Other decorative products
All coloring compounds completely cover the natural grain of the wood. But what to do when the design of the bathroom involves preserving the wood in its original form? For these cases, there are also products that can be used to paint the walls in the bathroom.
- Wax natural paints. They are made on a linen base and are well absorbed into the wood, making it impermeable to water. Clear or tinted liquid wax creates a beautiful matte finish, making it waterproof.
- Wood oil. It is based on natural oils with additives that form a vapor-permeable coating protected from moisture. However, the coating requires regular updating at least once a year.
- Stain. Paints the surface in the color of various types of wood, preserving the natural texture of the wood. To give the coating water-repellent properties, it is additionally treated with drying oil. But you need to take into account that some types of drying oil are not suitable for indoor use due to their high toxicity. The best, in terms of protective properties and safety, is drying oil based on alkyd resins.
Which wood is better
The main criterion for choosing a countertop is, of course, the type of wood. For a bathroom, you need to select high-density wood that is resistant to rotting, cracking and deformation. The best indicators in this regard are the wood of exotic species - merbau, rosewood, iroko, teak.
Merbau wood texture
The pattern of rosewood can vary quite a lot from tree to tree.
Iroko color and texture
In addition to strength and moisture resistance, these breeds are distinguished by a rich range of colors and expressive patterns. Tabletops made from them look incredibly impressive and give the interior a solid look. Of course, the cost of such products is very high, and not everyone can afford to buy them.
Teak
Among the domestic species, the most resistant to moisture are larch, oak, walnut, ash, spruce and pine, and cedar. But it is better not to install countertops made of birch, linden, maple and aspen in the bathroom, since these species strongly absorb moisture and are prone to rotting. Even after appropriate treatment, such products are less durable, especially if the exposure to moisture is intense.
Walnut, texture
Oak texture
As for processing: countertops can have absolutely even, smooth edges or, conversely, remain unedged to give a deliberately rough look. There are models that are artificially aged, using firing or brushing. Processing methods do not affect the performance properties of the countertops, they only provide a visual effect, so the choice here depends on the bathroom design style and the preferences of the homeowner.
Brushed pine
Brushed and patinated wood
All countertops go on sale completely ready for use, that is, impregnated with protective compounds and varnished. There are models treated with wax and patina, with an antique effect, which is ideal for a retro-style bathroom. There is no need to additionally apply protective compounds after installation, but they will definitely be needed later to extend the service life of the product and maintain its attractive appearance.
Preparing and painting walls
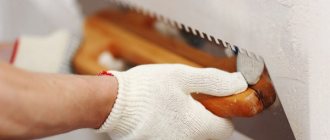
Before applying the coloring composition to the walls, the wood must be prepared for painting.
- The surface is cleaned of old coating with a spatula. Quick paint removal is facilitated by preheating the areas to be cleaned with a hair dryer or applying a chemical remover.
- The wood must be treated with coarse sandpaper to smooth out irregularities and remove small knots.
- When the surface is leveled, it needs to be sanded to perfect smoothness with fine-grain sandpaper. Sanding is a very important procedure; the better the surface is sanded, the better the wood will absorb antiseptic compounds designed to protect it from moisture and water.
- All gaps between the boards and small cracks in the wood itself must be sealed with putty. Any holes in the wooden walls of the bathroom are potentially dangerous places in which the process of rotting and mold can develop due to water ingress.
- After puttying, you need to go over the entire surface again with fine sandpaper to finally level the surface.
- A protective agent is applied: antiseptic, special impregnation or moisture-resistant primer. It is necessary to treat the surface at least twice.
- You can begin painting the bathroom walls after the primer has completely dried at an air temperature of 20-25 degrees Celsius.
It is necessary to provide the dye with optimal polymerization conditions. The bathroom is characterized by high humidity, and the paint takes longer to dry than in other rooms. This may affect the quality of the coating. Therefore, it is important that the room has good ventilation and no drafts.
In all other respects, it is advisable to follow the recommendations for painting the interior walls of a wooden house.
Waterproofing methods
Often craftsmen use one of three technologies: coating, painting and pasting method. Let's look at how to properly protect a wooden floor in a bathroom using each of these methods.
- Coating. This technique is characterized by simplicity of the process and excellent water-repellent qualities. Despite the fact that the solution can be prepared independently, ready-made mastics are often used. The bitumen mixture is applied to the rock surface in a dense layer (2 kg/m²) using a roller and brush. The walls below are also treated with bitumen mastic, forming a protective “trough”. The procedure is repeated twice, with an interval of several hours.
Attention! The second layer must be applied perpendicular to the previous one.
There are several different ways to protect a wood floor.
Then the bathroom is left to dry for 24 hours.
- Painting. This technology is considered more accessible to consumers, but is short-lived. The painting technique guarantees protection of the wooden surface for only 3-4 years. The paint mixture (usually bitumen-polymer) is also applied using a roller. However, it involves not two, but three stages, which are extended over time. If three days of drying are needed between the first dyeing procedure and the second, then about a week between the second and third. This is necessary to restore the natural properties of wood after impregnation. To ensure that the wooden floor is reliably insulated from moisture, you can also use safety nets. Namely, purchase soft linoleum.
- Pasting. This technology involves laying multi-layer waterproofing. The use of roll and various sheet materials is necessary to create a moisture-resistant carpet. Moreover, all work is carried out at high temperatures.
Attention! Thermal conditions are the main condition for using this technique. Therefore, the work should be trusted exclusively to professionals with tools and many years of experience.
To reliably glue such a carpet to a wooden surface, bitumen mastic is used. It should be applied in a fairly thin layer over the entire plane (about 1.5 mm), after which rolls of bitumen-polymer materials can be rolled out. This procedure is carried out as many times as necessary to achieve the desired effect. Then the edges of the bitumen material are treated with polymer putty.
Proper care of wooden floors is the key to its long service life.
Mistakes when painting a bathroom
When carrying out work independently, it is extremely rare to avoid mistakes. Painting the walls in the bathroom is a very responsible process. It is necessary to carefully prepare the base.
Preparation is necessary for any wooden surface, but in the bathroom this procedure takes on special importance. In a damp room, wood will have to withstand great strength tests, which, without careful preparation, can trigger irreversible processes in the wood.
It is at this stage that mistakes are most often made, ranging from poor-quality sanding to an incorrectly selected wood protection product. As a result, the coating quickly loses its appearance, and the tree is left without protection and begins to collapse.
Preparation for waterproofing work
Before laying waterproofing materials, it is necessary to remove the previous flooring, cladding, all dirt, dust, debris, wash the walls and floor, and allow the wood to dry. Then the wood needs to be treated with an antiseptic, the necessary moisture-repellent agents, and the surface thoroughly leveled. Existing cracks and crevices are covered with special means.
Before starting work, you need to remove the previous materials and clean the walls and floor
The next stage of work will be to apply a primer to the floor and walls - this will promote good adhesion of the waterproofing to the base. Let it dry thoroughly. Waterproof tape is applied to the joints between the floor and the wall, the ceiling and the wall, in hard-to-reach places, and corners - it will not allow moisture to get into the joints between the bases. Not only walls, floors, but also ceilings need to be treated with waterproofing materials. The basement, located under the bathroom, also needs to be waterproofed.
Primer must be applied to walls and floors
Professional painting
Our specialists have extensive experience in painting any wooden surfaces. We know all the nuances of working with wood, we have the necessary equipment and materials. We use professional paints and varnishes that are ideal for painting wet rooms. Craftsmen will complete all stages of bathroom painting work in a short time and at a high level of quality. You will find our coordinates in the “Contacts” section; you can contact us in any convenient way.
Calculate the cost of painting and insulating your home right now
Select types of work:
Select materials:
Important points of waterproofing in the bathroom
As a rule, the materials used for waterproofing do not allow liquid to enter from the outside. There are those that can allow air to pass through due to their tiny pores. The main thing is that you need to carefully waterproof in the corners and in those places where communications are located - this is where there are many cracks and cracks, they must be carefully sealed. If you have applied mastic to the floor, it is important to prevent dust and various contaminants from getting on the floor. The remaining work is carried out when the mastic is completely dry - after 24 hours.
If you use rolled materials, they should be overlapped by 10-15 cm. The floor must be made lower than in other rooms. Such a recess will not allow the entire room to flood. If this is not possible, then you need to install a high threshold - it will prevent water leakage. Another important point is a competent approach to choosing a tree.
Rolled waterproofing should be overlapped by 10-15 cm
Before you decide how you will waterproof it, it is important to consider some features:
- what material is the ceiling made of? its preliminary condition;
- how long will it take to carry out all the necessary work; what floor is the bathroom on?
- will it be necessary to reduce the height of the room, its area;
- how difficult is the shape of the room;
- what tools may be needed;
- your financial capabilities;
- Can you do the work yourself or will you have to turn to specialists?
Before you start work, it’s worth calculating everything down to the smallest detail.
Installation of lining on bathroom walls
Both plastic and wooden lining are used to finish the surface of walls or ceilings. If there is a perfectly leveled base, the planks are fixed to the base surface using adhesive or nails. If there are significant irregularities, a frame will need to be installed.
The sheathing is usually made from antiseptic-treated wooden blocks or steel profiles. In any case, the guide elements are fixed to the surface every 40 centimeters. Their location should be perpendicular to the position of the panels during installation. At the same time, wiring is being installed.
At the first stage of work, we trim the panels to the height of the room.
Usually the planks are mounted in a vertical direction from the corner of the wall. In this part, a special part, a plastic corner is installed and a panel is inserted.
- The plastic lining is secured to the sheathing using staplers.
- Wooden products are fixed with nails into the groove with the heads recessed with a hammer.
To prevent possible cracking of the material, before driving a nail into hard wood, it is recommended to drill a small diameter hole for the fastener. As they are laid, holes are made in the covering for installation of lamps and utilities.
Waterproofing concrete floor
Waterproofing a concrete floor can be done using all of the above methods. New types of waterproofing of concrete bases include applying a special plaster mixture with polymer additives to the concrete. After hardening, this mixture forms a durable moisture-proof coating. For optimal results, carefully follow the instructions for preparing and applying the solution.
More recently, penetrating waterproofing has appeared. Components of a special composition penetrate into the pores of the concrete base, forming waterproof crystalline compounds. The structure of the concrete does not change; the composition protects the concrete not only from moisture, but also from adverse chemical influences.
Penetrating waterproofing will protect the concrete floor well without destroying it Source stroim24.info