Depending on the type of treatment, the wooden surface takes on a different appearance.
Do-it-yourself wood brushing: how the process is carried out
In this case, the wood is processed using special brushes that have durable (usually metal) bristles.
The meaning of the actions performed is to ensure that the annual rings on the tree become noticeable. This makes the surface visually embossed. The origin of the term is associated with the English word brush. Many people know such a tool as a cord brush. It is suitable for brushing wood.
Nowadays, completely manual processing of wood with brushes is becoming increasingly rare. Automatic devices are used much more often. Moreover, there are even special large-sized machines equipped with appropriate fleecy parts. With their help you can quickly process a large surface.
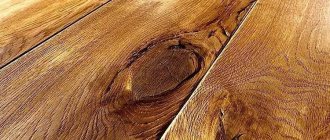
Brushing is ideal for working with larch, pine, spruce, alder and oak. In other words, we are talking about hard wood.
Binding of wood is not recommended for species such as pear, maple, teak, beech and cherry.
Mastering the process of brushing wood with your own hands is not that difficult. To get started, you will need a set of necessary tools:
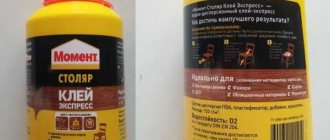
- Brush (with metal or other dense bristles)
- Paint (one or more shades)
- Solvent
- Surface to test (a kind of “palette”)
When everything is ready, it's time to feel like an artist and do some brush work!
- Degrease the wood
- Apply a sufficient amount of carefully selected shade of paint with a brush; excess can be removed with a rag.
- Check the color and visual effect on the “palette”. If all is well, you can continue.
- Start applying paint to the wooden surface with a brush, making movements strictly along the grain of the wood. It is recommended to go in one direction, without reverse movements and repetitions, but this is not so necessary. While working, do not put pressure on the brush - the bristles should not tuck or wrinkle.
- When everything is ready, simply let the product dry.
Do-it-yourself wood brushing is complete!
Direct maximum effort to processing the protruding parts of the product - carefully go over the edges, corners, etc. This will create the illusion of a 3D effect and emphasize the relief, which always looks advantageous.
Imitation of metal surface
Metallic paint and “contours” for applying a relief pattern are easy to find in art stores, but this is not enough to create the illusion of a metal surface. Mikhail shared a trick with the participants of the master class: the finishing touch should be the application of patina. To do this, acrylic paint of the required color (blue for gold, greenish for copper) is diluted in water, and the item is simply doused with this solution. The liquid lingers around the circuit and, when dried, leaves traces of “oxidation” on the “metallic” thing.
Tip: to make an imitation of blackened silver, paint the item black, then use a stencil and putty or thickened chalk paint to apply a pattern, paint it in a dark background color and, after everything has dried, go over the surface with a dry brush with silver or pearlescent paint. It will linger only on convex surfaces, creating the effect of old metal.
How to age wood
Things from the distant past are quite popular these days. This did not bypass the design sphere either. The design of the house, which contains notes from the past in the form of old wooden furniture, floor beams, and various antique wooden decorative elements, gives it a chic and expensive look. You might even think that the owners inherited from their great-grandfathers a luxurious house that was centuries old.
In fact, everything is much simpler. The fact is that with the fashion for everything old came the concept of imitation of the old. The same thing happened with wood, because in any construction or furniture store you can find decorative elements made to match the old style. Of course, the prices for such items are quite high, so rarely anyone can afford them.
Antique wood processing is done using 3 common methods, namely:
- brushing;
- burning;
- alkali.
At home, great preference is given to option 1.
The first step is to select the wood that we will process. If you want to artificially age boards or timber to further create various objects and furniture from them, then you can choose materials with various defects (chips, small cracks, potholes, knots). After proper processing, such defects will only improve the result. If you choose ready-made furniture for aging, then you need to use pieces that look like they were made by hand in past centuries. Before processing, the furniture must be completely disassembled so that it is possible to reach hard-to-reach places.
You also need to prepare the necessary materials, such as:
- hard metal brush;
- softer wire brush;
- paint brushes;
- acrylic paint, varnish, wax or stain;
- sandpaper.
It doesn’t hurt to practice a little on unnecessary, small pieces of wood before working with the prepared material.
Some operations can be harmful to health (when fired or using chemicals), so it is better to carry them out in the fresh air and in compliance with safety rules.
Patination of wood
A brown or greenish surface patina is more characteristic of metal. First of all, it concerns copper and bronze objects that have been affected by oxidation.
e4ff561f178dac0036cea758d1067463.jpe
a405a5d1a8accfffcc764ba4559d5062.jpe
However, patina can also appear on non-metallic objects. In this case, patina refers to any plaque that appears on the surface over time, regardless of shade and origin.
Aging wood using the patination technique makes it unevenly dark, as if it has been in human hands many times and has been exposed to high humidity and time.
Depending on your goals, you can artificially achieve a more or less dark patina on wood, make the surface look like metal, and even give it a very specific color. For example, it is very common to age wood with a white patina (a process known as liming) or to give it a noble bronzed appearance.
The types of wood with which the patination technique works optimally are cherry, maple, beech and others that do not have a clear texture.
The instructions and tips below will help you figure out how to age wood with paint and how to achieve patina.
The process of processing a wooden product and the necessary tools depend on which type of patination to choose. Let's look at the main ones.
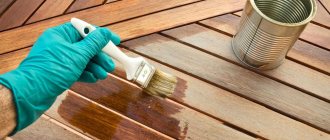
In this case, bitumen varnish and shellac varnish are used. The first is applied to clean, dry wood with a soft brush or sponge. The second is to cover the entire product to consolidate the patina effect.
This is the simplest and most understandable method, so it is ideal for those who are trying to age wood with their own hands for the first time. All you need is acrylic paint of the desired color, a brush or roller, and a cloth to soak up excess paint.
The process is simple: apply acrylic paint to the indentations in a loose layer, apply a dry rag to remove excess. Then all you have to do is wait for it to dry completely.
It is necessary to apply a small amount of oxidizing agent (lye, ammonia) to the painted and cleaned wooden surface. Within a few minutes, the surface will begin to oxidize, causing its color and appearance to change.
To consolidate the result, after using alkali, you need to wipe the wood with a vinegar solution. This is not required for ammonia.
In addition to these agents, during the process of chemical patination, you can etch wood with iron or zinc sulfate, calcium chloride or potassium chromium. It is necessary to create a solution based on any of these substances and place the tree in it. The longer you keep the wood in the solution, the more obvious the effect of surface corrosion will be.
When chemical patination, you need to be as careful as possible so as not to spoil the product or achieve an excessive effect. In addition, you cannot do without safety precautions - be sure to use gloves and work in a well-ventilated room.
You will need a wax polish, which needs to be rubbed onto the wood. Overall, the wood will instantly become smoother and shinier. And over time, an additional result will be added - tinting will become noticeable in the recesses and places where wax accumulates, highlights and reflections will become softer.
The wax on the wood takes quite a long time to dry, so you will have to be patient when using this method.
The general sequence of actions for color patination of wood with your own hands is as follows:
We degrease and clean the wood We perform a gentle sanding We apply a primer, paying close attention to the recesses and grooves We begin to carefully apply the paint in a thin layer (before giving the color to the wood completely, you need to make sure that the shade is chosen correctly) We finish painting the wood We briefly go over the painted surface with emery We perform patination using one of the methods described above. Rub the wood with a dry cloth. If desired, coat the treated object with varnish from a spray bottle or with a brush.
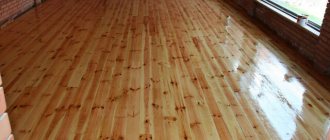
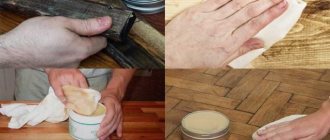
Wax
Another wood treatment option is waxing. Wax is used in pure form or mixed with turpentine and rosin. Such compositions are popular when restoring wooden products. You can make a mixture of linseed oil and beeswax by melting the ingredients in a water bath and then applying to the surface with a brush or soft cloth.
Wax is convenient to use - it can be applied to both a clean surface and one treated with oil.
There are products of natural origin - plant and bee.
Wax, like oil, is applied to the prepared surface:
- clean the wood from dust and dirt;
- carefully sand with sandpaper (P220-240);
- impregnation is applied (for example, from vegetable oils).
When cold, the wax is rubbed into the surface with a soft cloth. To treat large areas, it is melted in a water bath and applied with a wide brush. The procedure is repeated several times. After drying, the surface is carefully polished with a woolen rag to make it shiny.
An example of waxing with a mixture of linseed oil and beeswax:
A waxed surface is smoother than an oiled one. In addition, wax protects wood from moisture better than oil. It has minimal effect on the color of the wood and is easy to apply.
Disadvantages of waxing - wax is not resistant to high temperatures, so it is not advisable to leave products treated with it where the sun regularly shines brightly. Do not place hot dishes on a waxed surface. This will damage the coating and will have to be renewed.
Thermal and chemical treatment of wood
Thermal treatment of wood.
These methods can be called related, since the destruction of the top layer of wood occurs almost without mechanical influence. These are more dangerous methods than the previous ones, so processing should be done in the air and in compliance with safety measures.
d38a11acc721b6e7f63305bd75228ae7.jpe 487063a49eaddd6ab4361668c06841bf.jpe
bd7655974f7fb4ec37862d665fe32c49.jpe 8e509b1b77ca50b9575993c0d4932b6a.jpe
The essence of firing is that soft fibers are destroyed when exposed to open fire. To do this, the surfaces of the workpiece are burned with the flame of a blowtorch or a special gas burner to a depth of 3 mm. With superficial firing, the aging effect will be insignificant, with deeper firing it will be more pronounced. The master regulates the process depending on his taste and needs.
After the top layer is charred, a metal brush or drill attachment is used, scraping off the carbon deposits until the desired color and texture is obtained. Such wood does not need to be painted, because it will already have dark and light areas. Final processing consists of sanding and varnishing the product.
With the chemical method, decorating wood to look antique occurs through exposure to alkalis or ammonia. To do this, you can use stove cleaning aerosols or drain cleaner. It is necessary to familiarize yourself with the composition of the product before use; it must contain alkali
Particular attention should be paid to safety precautions when working with it.
Once on the surface of the wood, these chemicals “burn out” some of the soft fibers, while simultaneously coloring the wood gray. After treatment, all surfaces are washed with water and coated with a weak solution of table vinegar or citric acid (1 tsp per 200 ml of water), removing any remaining alkali.
Dried products are brushed and painted, if necessary.
Processing wood using the listed methods will help the owner to decorate the interior of the apartment in an antique style without investing a lot of money and without spending a lot of time on it. The availability of materials and tools for processing allows both an experienced carpenter and a beginner, and even a woman with imagination and skillful hands to engage in this type of creativity.
What products are used for moisture?
If wooden structures are placed indoors with high humidity, the internal base begins to deform. There are several consequences that negatively affect the condition of wood.
These include:
- Reduced operation;
- The appearance of mold;
- Fungus growth and reproduction.
What substances are used to protect against high humidity? The following tools have been developed for this:
- Varnish;
- Oil impregnations;
- Pastas.
They form a dense film on the surface. It repels moisture and preserves the internal contents from destruction.
When choosing a product, it is recommended to take into account the type of wood. For example, for conifers it is best to choose pastes or oil impregnations. For deciduous trees, the best solution would be to choose varnish solutions.
Preparing for work
Different types of wood can be aged using different methods. A number of methods are not suitable for working with certain varieties.
Table 1. Aging methods and types of rocks that can be subjected to the techniques.
| Technology | What breeds are recommended to use? |
| Aging by chemical action | Oak, willow, walnut, maple, beech, mahogany, linden, aspen. |
| Techniques related to mechanical surface treatment | Everything except teak, maple, cherry, beech and pear. Particularly suitable: pine, larch, oak and ash. |
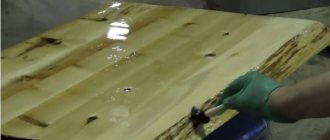
The result of aging a pine board using brushing and a solution of vinegar and steel wool
Effects on the surface using special compounds can be divided into techniques:
- using a dry brush;
- patination;
- glaze;
- spray;
- crackle;
- technique for creating scuff marks (Shabby Chic);
- etching (use of compositions such as stains).
Bark beetle - a technique for applying a pattern that imitates the movement of a bark beetle larva along a tree (you can use a denture drill with a large attachment)
Processing with physical impact on wooden planes is also possible:
- brushing – a technique using brushes with metal bristles (cord brushes);
- roasting – the use of fire or metal heated to a high temperature;
- in hot sand.
Other methods are also possible - for example, imitation of natural damage, which is achieved using an awl, sandpaper and other tools.
Master Class. How to age wood?
Wood protection technique
There are several comprehensive measures to create a dense shell and prevent pathogenic processes inside the fibers.
These include;
- Smart planning. By taking into account important criteria, it is possible to extend the service life of a wooden structure. For example, it is not recommended to use soft wood in rooms with high humidity. They quickly absorb moisture. The growth of fungi and mold is observed inside them;
- Regular monitoring of the condition of wooden surfaces. Frequent inspection of wooden structures and planes helps prevent large financial investments in the purchase of new elements;
- The right choice of protective equipment. As noted above, when choosing, it is necessary to take into account the composition of the wood, its location, temperature conditions and humidity levels.
Today, several technologies are known that make it possible to evenly apply preparations for additional protection of the wood surface. They include:
- Use of antiseptics. The compositions include the use of special components that prevent the proliferation of pathogenic microflora on the surface and inside wood fibers. In addition, thanks to such liquids, it is possible to increase adhesion and reduce the volume of coloring components during further processing;
- Canning. This technique is often chosen at production stages. The wood is exposed to high temperature or vacuum.
In this way, the wooden base can be given the desired color and additional strength.
A couple of antique wood recipes
You can find many recipes for aging wood using improvised means, but all of them are derivatives of the processing methods already described. Let's look at some of them.
Using wax
Using regular wax you can achieve a good effect; you only need 2 types of wax (colored and regular), as well as a wood sanding machine. This method is convenient because it does not require additional steps such as brushing the wood or using acid to remove soft parts of the wood.
You can buy any color of wax
The technology for doing the work will look like this:
- first the board is sanded, and the direction is strictly along the grain;
- then colored wax is applied; at the previous stage, the pores of the wood have opened, so it will penetrate well. It takes about a day for the coating to harden;
- Next, you will have to apply colorless wax on top of the colored one, and some of the colored wax will inevitably be removed.
An example of wood processing with colored wax
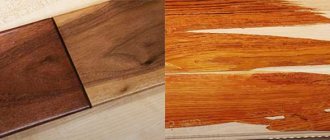
Bleached wood
Bleached wood will look unusual in any interior. It costs a lot, but you can achieve the same effect with your own hands when painting wood. The main task in this case is to ensure that the white color does not completely “clog” the texture of the wood; ideally, the wood should have a slightly grayish tint and the wood pattern should be visible through the layer of white paint.
Bleached wood
You can get the desired effect using brushing technology, and the key point will be how to paint an antique board so that the wood pattern remains noticeable after painting.
To do this, you can use tinted and transparent varnishes, and painting will be carried out in several stages:
- if the wood is dense and does not absorb varnish well, then you can immediately treat the prepared surface with tinted varnish in a couple of layers;
- then a clear varnish is applied over it to protect the tint.
Tinted varnish from a renowned manufacturer
The same effect can be achieved using white paint, but here you need to take into account that it is easy to paint over the wood pattern 100%. Therefore, after applying the paint, you can carefully blot it with a sponge so that the texture of the board becomes visible.
Wax mastic for wood
This mastic is easy to make yourself using inexpensive materials. It is suitable for processing any wood, even the highest quality varieties. You will need natural beeswax, cut into small pieces.
Advice! It is better not to use paraffin for this purpose - it is quite hard and will not give the desired effect.
The wax cubes are placed in a saucepan and melted over low heat on the stove or using a gas burner. When smoke appears, remove the container from the heat, pour the liquid wax into a jar and add approximately an equal volume of gum turpentine. The mass is mixed. After cooling, it will acquire a paste-like consistency.
Oil wax for wood
Ready-made colorless wax can be used to treat old and new wooden objects. It is convenient to apply and rub with a shoe brush until the composition is completely absorbed into the surface.
Afterwards, polish the products with a soft-bristled cloth. If you want to make the wax brown (many types of wood have this color), drop a little bitumen varnish into it. To obtain a more saturated tone, increase the amount of varnish.
How to age wood? Preparing the material
First, before aging the wood, it must first be prepared. First of all, for brushing, it is better to choose soft wood or medium-hard wood, which has a pronounced woody texture. This could be, for example, spruce or pine. These species are distinguished by the fact that their soft fibers are often formed in spring and summer, and during this period the tree’s growth rings grow fastest, so the fibers are more “loose.” Wood with a uniform and almost unexpressed texture, such as beech and maple, is not suitable for aging.
Before starting work, the surface of the wood must be carefully prepared. All dirt and possible defects are removed, these could be traces of grease, sweat, or other stains - the fact is that they can appear when applying the tinting solution. Any wooden products must be processed in disassembled form, regardless of their size - this way you will reduce time costs and reach with a brush in all places, thereby ensuring a uniform aging effect.
How to process wood
The master class took place in the showroom of the home textile studio Helgi Home, which that evening looked more like a cozy living room than a workshop. The tables were covered with pink tablecloths and the instruments were laid out like utensils for a dinner party.
As promised, the participants mastered five techniques for decorating wood: etching, glazing, aging, imitation of metal and wooden surfaces. We tell you how it happened.
Do-it-yourself wood brushing
If you really want, you can make artificially aged wood yourself:
- The selected workpiece needs to be slightly moistened, this will eliminate the release of wood dust during work. First, the workpiece is processed with a hard metal brush. Its rigidity is selected experimentally. It is necessary that the brush removes soft surface fibers well, but does not disturb the structure of hard fibers. The movement of the brush attached to the grinding machine or grinder is carried out in the direction of the fibers. The rotation speed is also pre-selected on the sample; for each wood the speed can vary significantly. When working manually, there are no problems with selecting the rotation speed of the brush, but the process of preparing wood becomes significantly more complicated and lengthened.
- After using a wire brush, use abrasive bristles. Using this attachment or brush, all fiber fragments and roughness are removed. At this stage, using a chisel, you can further add various indentations and grooves. They can be given the appearance of natural cracks in wood.
- In the future, final polishing is necessary, this is usually done using a brush with sisal bristles. You can use sandpaper by hand. At this stage it is necessary to achieve perfect polishing of the entire surface.
- The part acquires a special decorative appearance if it is tinted, painted, or gilded at the final stages. Stain is often used. Impregnation with stain and its quick removal allows you to paint areas with the softest fibers, while the hard ones are practically not stained.
- Painting with gold or silver paint gives the wood an original look. When applying the dye, particles of coloring pigment get clogged into microcracks, which ensures the appearance of glare in sunny weather. You can use different dyes for painting, but they must be designed for working with wood. After painting, it is recommended to polish the surface again, this will remove roughness from the product.
- At the last stage, you need to apply several layers of varnish. Before applying a layer of varnish, the previous one must dry well and it must also be polished.
With sufficient experience, the process of brushing wood and using special devices is not particularly difficult. At the same time, it is possible to produce the most exclusive products, ranging from wall shelves to cabinets and kitchen units.
This video will tell you how to age wood yourself:
Brushing
This method of aging wood with your own hands is called from the concept brush, which translates as brush. The second name is tree structuring.
The degree to which it needs to age is determined by its purpose. If necessary, to create the appearance of deep antiquity, cutouts are made up to 3 mm. For floor coverings, such aging is not suitable, since it will collect a lot of dirt, and it is difficult to wash it off. On average, a depth of about 0.7 mm is left. Only hardwood can be aged using this method. Brushing wood improves its quality characteristics. It becomes stronger, lasts longer, and is not susceptible to attack by fungi and parasites.
Tools and materials for processing
The basis of the brushing aging method is cleaning with a hard metal brush. Soft fibers are cleaned manually. Using this tool, a relief is formed. The shorter the bristle of the brush, the more it will age after the procedure. Using a chisel, apply straight deep stripes, changing their curvature. Sandpaper is used to emphasize the resulting effect.
After the first stage is completed, the wood is coated with paint that has its own natural wood shades. The coloring composition is applied unevenly on purpose. This is how the upper layers age, they acquire a dark shade, while the lower ones remain lighter. The relief after this coloring stands out even more. The ideal texture of aging wood is created by gray-white paint. Before it completely dries, the top layer is wiped off the surface. The result is the appearance of a tree that is at least 10 years old.
Processing technology
Before aging by structuring, the wood must be prepared. Lumber is selected without defects with a moisture content of 10-15%. Otherwise, the fibers will not be processed and will break. How to properly age wood with your own hands:
- Moisten the surface so that there is not a lot of dust during work.
- The brush should move in the direction of the grain. Remove only soft wood fibers.
- The speed should be moderate so that the wood does not heat up.
- Primary grinding is done with a polymer brush with abrasive. Remove torn fiber residues using sandpaper. After removing the roughness, it will become clear how well the aging was done.
- If necessary, make the grooves better by brushing again.
- Decoration is done with a chisel. The appearance of cracks is created.
- Polishing. It is carried out with a sisal or hair brush, if aging is carried out with a grinder or a grinder. The final appearance of the workpiece is given. For the same purposes, fine-grain sandpaper is used for manual processing.
- Next, the piece of lumber needs to be dried and then completely cleaned of dust.
- A layer of stain creates a contrasting pattern. A generous layer without rubbing and quickly removing excess will dye soft fibers and leave hard fibers light. Gold and silver colors look especially advantageous if the wood is aged.
- Patination is the darkening of deep furrows. Gives nobility when aging.
- Finally, polish again, erasing any unevenness after painting.
- Varnishing is done with parquet varnish.
If you age the workpiece in this way, it will preserve the characteristics of the breed for a long time.
With a candle
This is a versatile technique that helps give wood or wooden furniture an antique look. It can be used on both untreated wood and already painted wood and furniture. Suitable for painting in one or several layers.
Let's take a closer look at how to paint wood using this method, making three layers (brown, white and yellow).
Necessary materials:
- paint (brown, white and yellow)
- brush, candle, rag.
Step 1: First coat of paint
- Decide on the color of paint that you will use as a basis. This will be the first, bottom layer of paint, which we will apply directly to the wood. In this case we use dark brown color.
- Paint the wood with slightly chaotic strokes, without painting the surface completely and evenly.
- Leave until completely dry.
Step 2: Use a candle
Take a candle and rub it on the surface of the wood in several randomly selected places (press the candle quite hard so that a clear trace of wax or paraffin remains on the wood).
- Step 3: Second Layer of Paint Select a color for the next layer and apply paint (we're using white here). At this stage, the paint can be applied evenly over the entire surface, and not in strokes, as with the first layer. Leave until completely dry.
- Step 4: After this, take a rag and wipe the surface, using some pressure. In those places where wax was applied, the paint will come off the surface. If two layers are enough for you, then you can stop there, but if not, move on.
- Step 5: Third coat of paint Repeat steps 2 and 3, but the last one using a different color of paint (here it will be yellow). After the paint has dried, you can apply a protective varnish. The latter is not necessary due to the fact that we deliberately gave it an antique look, so if the paint starts to lag a little over time, it will not be noticeable.
Glaze
The glazing technique came into decoration from painting, and consists of applying paint in translucent layers. I didn’t have to look far for an example - a beautiful chest of drawers, painted in this style, stood right in the studio. Those gathered repeated this technique on tablets. The sequence of actions turned out to be simple: apply a base coat of paint to the item, dry it, and then work on top of it with a wet brush with a small amount of paint. Each layer should be allowed to dry so that the paint is applied in gentle layers without mixing.
Advice. Instead of water, use a special thinner - it will allow the paint to maintain its thickness and color saturation, the drawing will be transparent, but more clear.
Antiquity effect: what is it?
Paradoxically, the more technologically advanced a society is, the more it values antique products. It would seem that with the appearance on the market of a huge range of innovative building materials with which you can build and decorate your home in an ultra-modern style, many people prefer old things.
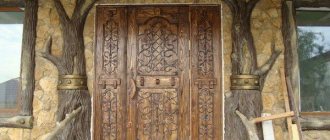
By the appearance of the front door you can determine the status, level of well-being and personal preferences of the home owners
The Wright (Prairie) style is easily distinguished by its clearly defined lines, flat or hipped roofs with widely projecting eaves, and maximum integration of houses into the surrounding landscape
What styles does the antique effect suit?
- French, Swedish or German;
- Victorian, medieval and Gothic;
- country, baroque, rococo, classicism;
- modern or alpine;
- Russian estate style.
Thanks to the wooden design elements, the super-fashionable industrial loft style does not seem lifeless and gray, but, on the contrary, cozy and stylish
If initially loft-style rooms were rough and sometimes brutal, recently such living rooms have become more and more sophisticated and fashionable.
Although this super fashionable trend is considered bohemian and the most expensive, you can still bring the characteristic elements of this attic style into any room without special expenses. This may be due to the existence of techniques for aging materials.
afc5bf42701d7a257de741e117f01aca.jpe