Manufacturing of tension fence
This is the simplest design of mesh fencing. It will require minimal financial and labor costs. Next, each stage of construction is discussed in detail.
Site marking
Preliminarily mark the location of the supports on the site:
- in the area where the fence is installed, large plants and debris are removed, depressions and mounds are leveled;
- markers (stakes) are driven into the ground at the corners of the site boundaries;
- a cord is pulled between them;
- along the towline from the entrance to the site, mark with pegs the position of the wicket and gate posts;
- measure the distance between the corner markers, and from the corners to the installation site of the goal posts.
Then, for each side, the span length is selected from the range of 2-2.5 m, so that a whole number of them fit in the space between the markers, and they themselves are approximately equal along the entire perimeter of the fence. It remains to place markers along the string in increments equal to the accepted span length, thus indicating the location of the supports.
Preparing holes for pillars
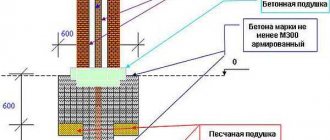
It is more convenient to make holes for posts using a garden drill. Depth - 10-15 cm more than the buried part of the column. At the bottom of the excavation, a sand or sand-crushed stone cushion 10-15 cm thick is arranged. The material is compacted in layers of 5 cm, after watering it with water. This is a drainage cushion: it does not retain moisture, so the base of the column remains dry.
Installation of load-bearing pillars
The supports are installed in the following sequence:
- a “heel” (a square plate for support) and hooks are welded to the posts, then they are primed and painted, and the buried part is also covered with bitumen or polymer-bitumen mastic;
- randomly choose one of the sides of the future fence and install the outer supports. Each column is brought into a strictly vertical position using a plumb line and temporarily fixed with wooden wedges or fragments of brick;
- Using a water level, determine which rack has the lower top. Sand is added under it until both posts are the same in height;
- Having removed the wedges, concrete is poured into the holes with installed racks or a mixture of soil and sand is filled with a layer-by-layer tamper. The rack cavity is filled with the same material;
- The cord is pulled strictly horizontally between the supports, for which equal distances are removed from the tops. A thick wire is laid between the cord and each stand. Without this, when installing other racks, they would have to touch the cord, which could lead to its unnoticeable bending.
Then the intermediate posts are installed one after another, observing the following conditions:
- strictly vertical position (controlled by a plumb line);
- the distance from the top to the cord is the same as that of the outer supports;
- the gap between the post and the twine is equal to the thickness of the wire laid under it on the corner posts.
Methods for installing fence posts
All vertical parts are welded on top with plugs. They also practice driving a post into the ground. They drill a small hole, install a support, put a glass on top to protect the head from flattening, and hammer it in with a sledgehammer. This option is suitable for dense soil.
Fastening the mesh
The easiest way is to unfold the mesh and hook it onto the hooks of the supports, having first tensioned it properly. You can do without hooks - just tie the fabric with wire or clamps. But such a fence will soon sag.
It is more correct to use guy wires with a diameter of 4-6 mm; there are two installation methods:
- the panel is “stitched” with wire, passing it through each cell, then the fabric is mounted, tensioning the stretch with tensioners or ties. This is an ideal option, but it is labor-intensive, especially since at least two strings are required, and preferably three;
- First, tension wires are stretched between the posts, and then a web is screwed to them with wire every 20-30 cm. This is a simpler installation method.
Stretch marks put a significant load on the corner posts, which is why it is recommended to make them from a larger diameter pipe.
But the installation step of the supports can be increased to 3 m. The strongest fences are on logs - crossbars made of profiled pipes welded to the supports. It is allowed to use steel bars or reinforcing bars with a diameter of 10 mm.
Do this:
- roll out and secure the mesh on the posts using hooks or clamps;
- thread a rod through the cells;
- weld the rod to the vertical structural elements.
To evenly stretch the mesh, a rod is threaded through the cells and the panel is stretched by two people from above and below.
Types of slats
There are the following types of Euro picket fence:
- "Econova". Unlike its analogues, this type of fence has a lower cost due to the smaller width of the pickets, up to 100 mm, and the number of ribs - up to 14. The height can vary depending on the order of the fence and, as a rule, is made within 1-2 m. Slats installed in increments of 2–10 cm. Installation can be done in a checkerboard pattern. The picket fence is most often used for fencing country houses and dachas.
- "Nova". The width of the pickets up to 120 mm with 15 edges makes it possible to apply various patterns and create a rigid and reliable fence. The protective polymer layer is 20 microns, which prevents the formation of corrosion. There is a matte and glossy finish. It can be installed to fence off dachas or used for protective fencing during the construction of various structures.
- “Barrera” retains all the properties of a European picket fence, but is distinguished by a special method of painting. A special powder coating promotes the appearance of a protective film on the surface of the sheet. The special shapes of the top create a wide range of picket fence choices, and manufacturing in sections simplifies the installation of the fence. The width of 85–130 mm with a size of 1.4–2.2 m allows you to install the picket fence in 2 rows without a gap. In this case, the profiled sheet can be attached evenly or in a semicircle to a brick or metal base.
- "Light-M". The width of the picket fence is 75 mm with 5 ribs, allowing the structure to be light in weight. The fence is installed in one row with a gap of 2–10 cm, or a checkerboard is used. Due to its low cost, in addition to the standard use for fencing country houses, it is also often installed as a temporary structure for fencing construction sites.
Varieties of design
Before you make a fence on your territory, you also need to decide on a design option:
- “convex arc”, the fence is installed in spans, the top of the sections looks like a convex arc;
- “wave”, the fence is distinguished by a wave on each section;
- “herringbone”, the installation pattern of the fence is standard, and the picket fence itself in the upper part resembles the shape of a spruce;
- “concave arc”, installation is carried out in sections, which are made in the form of a concave arc, with the middle parts of the picket fence being the smallest in length;
- “peaks”, the top is made in the shape of a peak. Each section has 5–6 of these outlines installed;
- “trapezoid”, a section curved in the shape of a trapezoid;
- “canyon”, the installation of this metal picket fence occurs in sections, with each picket from the beginning of the sheet being made smaller by one centimeter and, starting from the center, the pickets increase in size again;
- “pyramid”, the top of the plank looks like a pyramid;
- “ladder”, made of strips of longer and shorter lengths, alternating with each other;
- “wings”, the top of the picket fence is similar to the wingspan.
Colors
Euro picket fence fastening
The slats are screwed to the joists with self-tapping screws at the rate of two screws for each crossbar. Self-tapping screws are needed from stainless steel, otherwise they may be affected by the corrosion process, which will spread to the planks themselves.
Marks are made on the joists where holes need to be drilled later. Then a picket fence is applied to this place and drilled at the top or bottom. Fix with a self-tapping screw, level and drill at the other end.
How exactly to install the “boards” is a personal matter for everyone. Some people like them to stand close to each other, while others like them to have a gap of several centimeters.
Photo: Instagram evroshtaketnik_stav
Net
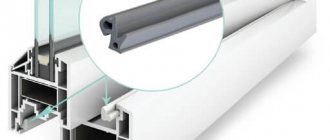
Installation of a chain-link fence is not possible from any type, of which there are dozens, if not hundreds, in production and sale. “Black” chain-link made of structural steel without coating (item 1 in the figure) is a plastering and reinforcing mesh, not intended for external use: it rusts quickly, does not hold paint well, is quite fragile and begins to tear from the winds even sooner than it rusts.
Types of mesh
Fences are most often used with galvanized chain-link made of wire of increased ductility (item 2), the so-called. gray It costs approx. 7-12%!d(MISSING)more expensive than black. A cheerful fence can be made from plasticized chain-link (coated with colored PVC, item 3), but only sectional. The solid fabric of their colored chain-link frays in the wind, the plastic at the joints wears out over the winter, and the mesh rusts. Very quickly, because in this case, the metal is eaten by capillary moisture. Plasticized chain-link costs about 1.5 times more than sulfur.
Mesh and wire
Fences are usually made from vertical chain-link with a mesh of 50-60 mm, from wire with a diameter of 1.6-2.2 mm, pos. 5. To fence a household yard with birds, you need a more expensive mesh with a mesh no larger than 30 mm, otherwise the chicks and ducklings will scatter, and it will not be difficult for ferrets and weasels to get into the house. In this case, the lower gap of the fence (see below) is covered with boards or slate.
A high-strength mesh made of wire up to 4-5 mm thick (item 6) is needed to fence a paddock or pasture for cattle. It is difficult to work with it, especially to splice panels (see below), because reinforced chain-link is heavy and rigid.
A very strong and elastic type of chain-link with a small, up to 20 mm, highly flattened mesh, the so-called. armored mesh (item 7, remember the old beds?). But it is much more expensive than a regular fence chain-link, and it is even more difficult to work with. And finally, horizontal chain-link, pos. 8: it is impossible to make the joint of its panels in the fence invisible.
Splicing and tensioning
Chain-link mesh is available in widths starting from 1.1 m in rolls of 10 m. For fences, 10-meter rolls with a width of 1.5-3 m are usually purchased. It is impossible to turn large rolls without lifting mechanisms. That is, the fence will need several rolls, the panels of which (if the fence is not sectional) need to be spliced into one sheet.
There is no need to splice the chain-link panels into a fabric with wire (item 1 in the figure) - it is ugly and fragile. To splice chain-link webs, one spiral is carefully unscrewed from the edge of one of them (one layer) and, screwed into the 2 outer layers of the fabrics, they are spliced, pos. 2.
Splicing and tensioning mesh
Also, when installing a chain-link fence, the mesh must be tensioned. Especially - if the fence is tensioned along a string, then the mesh should be stretched tightly. In the methods for this, it is recommended to use a screw lanyard (pos. 3) or hoists, but with improvised means and with 2 assistants you can do it easier, pos. 4:
Sections of reinforcing bars with a diameter of 10 mm or more are tucked into the outer layers, and bridles made of textile or synthetic cable with a thickness of 12 mm or more are knitted to their ends. On one side, the bridle is carried along the hollow on the support 4a, thrown onto a firmly driven “boy” stake with a support between it and the outermost post, and a cable collar 4b is made, without tightening it tightly yet. On the other hand, a stake (waga) 4c is placed in the hole with an emphasis with another bridle thrown over it. One worker holds the collar vertically, holding the bridle on it so that it does not slip, and the other wraps the collar as tightly as possible. The worker on the gate holds it, and the worker on the gate pulls it towards himself. The mesh will be tensioned with a force of approx. equal to the force of hoists made of 4 blocks. Workers hold the mesh taut, and the foreman secures it.
Mesh attachment
The mesh is attached to the outer pillars by inserting the same reinforcement into the layers closest to the pillars from the inside. Then the rods are pulled to the posts in 4-5 places with clamps and, if necessary, the rods (not the mesh!) are additionally secured to the posts by welding. The mesh is attached to the intermediate posts in the same way and is thus tightly stretched. Depending on the type of fence, the method of attaching the mesh may be different, see below.
Installation of pillars
Pole installation methods
To ensure that the supports are on the same line, the installation order must be followed:
- Corner pillars. Since they will experience maximum load when the mesh is pulled, the corner supports are reinforced with spacers
- Posts at breaks in the fence contour (if the area has a complex geometric shape)
- Gate and gate supports (must be concreted for reinforcement)
- Intermediate supports with the same installation spacing on straight sections
Before installation, the lower part of wooden poles is treated with an antiseptic and waterproofed. To protect wood from moisture and decay, you can use used machine oil, heated bitumen, and bitumen-polymer mastic. You can burn wood at a fire - this also protects it from rotting.
When building a fence on a site with a strong slope, terracing of the terrain is required. Supports of greater height are used, to which the mesh (or sections) are attached at different levels so that the fence runs in steps.
For metal supports, the lower part is cleaned of traces of rust and treated with a composition that protects against corrosion, covered with a primer or a layer of bitumen is applied. A plastic plug is put on the upper end or a metal plate is welded.
Work progress
In places where the location of the pillars is marked, pits are prepared using a drill or shovel. The depth depends on the level of soil freezing in the area, but it should be about a meter so that the fence does not sag under loads. The exception is dense clay soil that is not prone to heaving; supports can be immersed in it to 80-90 cm. For heaving and loose soils, the bottom of the hole should be 15-20 cm below the freezing point - this will protect the supports from being pushed up.
Butting and concreting
A 10 cm layer of sand and a 10 cm layer of gravel are poured onto the bottom of the pit; both layers are well compacted - this is drainage, facilitating water drainage. Then the prepared post is installed in the pit.
The free space between the support and the walls of the pit is filled with crushed stone and small stones, alternating with layers of soil, and each layer is compacted well. If a sectional fence is being erected, the weight of which is noticeably higher than the tension one due to the welded frames, the supports are additionally concreted to 40 cm of the pit height or completely filled with concrete instead of backfilling.
A temporary fence on metal supports can be erected without concreting. The posts are driven into the ground with a sledgehammer through a piece of thick board (to protect against deformation). To make it easier to maintain vertical installation, dig a pit to half the required installation depth and finish the support to the required level.
Construction and arrangement of a summer kitchen at the dacha with your own hands: projects, design, arrangement, with barbecue and barbecue (60+ Photos & Videos) + Reviews
Fastening corrugated sheets
The sheets are screwed with special screws. These screws are equipped with a special backing rubber and have a large washer. All this minimizes the likelihood of metal damage and corrosion. The only thing is to ensure that the screw fits tightly. If you press it into the metal, the joint will quickly be corroded by rust.
Many craftsmen advocate the use of blind rivets: they do not require access to the back side of the surface and firmly hold the sheet of metal (it is much more difficult to tear it off the pipe than one drilled with a self-tapping screw).
Photo: Instagram irivet.ru
Let us remind you that corrugated sheeting has a wavy structure. It is attached to the logs on the lower wave, and the sheets are connected to each other on the upper one.
Photo: Instagram most.asia
Photo: Instagram most.asia
Experts recommend decorating the upper end of the fence with a U-shaped strip. It will give an aesthetic appearance.
Description and characteristics
3D fences are sectional structures welded from steel rods that are attached to supports using special clamps. Additional rigidity is given to the fence by V-shaped bends of vertically located rods, reinforced with horizontal rods (see photo above). This horizontal spatial profiling gave the design the name 3D.
It is ideal for the construction of fences for summer cottages, perimeters of cottage villages, school areas, parking lots, sports and warehouse complexes, factories, etc.
The scope of application is not limited to private households
Accessories
The 3D fence from the manufacturer is supplied ready for installation and consists of the following elements:
Mesh sections 2.5 meters wide with several horizontal stiffeners, welded from galvanized steel rods. The height of the section can be different; in the standard version it is 1.5-2.5 meters. The standard mesh cell size is 50x200 mm, but it can be changed at the request of the customer.
Design elements
All components are resistant to climatic influences. The welded fence mesh is powder-coated or PVC-coated; the support posts are powder-painted in any of the RAL colors at the customer's request.
Main advantages
3D fences are gaining ever-increasing popularity due to their many qualities and characteristics.
- High transparency ensures unhindered air movement and penetration of sunlight to plantings and plantings, without limiting the view. At the same time, such a fence reliably protects the site from unauthorized access by unwanted guests. That is why 3D fences are especially in demand for dachas, personal plots and other areas where fruit, vegetable and flower crops are grown.
- Low cost compared to many other types of fencing is another important factor influencing the choice of such a fence.
- The ability to choose any color that matches the design of the site and the buildings located on it.
Support posts and gratings can be the same or different colors
High installation speed. 3D fences are very quickly and easily assembled from individual sections thanks to special fasteners. Most of the time is spent on installing the poles, but if you do not do it yourself, but use the services of specialists with professional equipment and tools, then installation will take very little time even on very long areas.
Drilling the soil to install supports
- Quality and reliability. 3D fence refutes the common belief that cheap cannot be of high quality. Its manufacturing technology is based on circular welding, which makes the bars of the grill almost impossible to break. Therefore, in terms of its reliability, it is not inferior to solid metal or stone fencing.
- Durability. Provided with high-quality external protection of all structural elements.
- Ease. Each section is light in weight, which allows you to install 3D fences without the use of equipment or a large number of assistants.
- Ease of use. Throughout its service life, which can reach 15-20 years, the 3D fence will not require any maintenance or repairs from you.
- Aesthetic and modern appearance.
The production of 3D fences is carried out by many Russian enterprises using imported equipment, using European technologies and standards.
Welding line for the production of 3D fencing
Among the most popular are TerraFence, Fensys, City, Gitter fencing. All of them are of high quality, long service life, and do not require maintenance or additional investments during the entire period of operation.
Types of Gitter fencing, their characteristics and scope of application
The scope of application of fences of this design is quite wide. Due to their strength and long service life, wire fencing is installed not only in summer cottages and country cottages. You can find such a structure at sports facilities, industrial enterprises, around shops and other institutions of the public and private sector.
Homemade
For the dacha, a fence made of gitter mesh is used - a universal means of protection. This fencing option is designed for installation around the perimeter of plots, private houses, vegetable gardens and orchards. It has its own characteristics. The segment width is standard and is 2.5 m. The height is about 2 m. The pillars are fixed using spot pouring, sometimes partially using concrete. The sections are secured with staples and screws.
The pillars have the following standards 60x40x2 with a length of 3 m. A mesh of this type has 4 stiffening ribs. The cell size, accordingly, is 50x100 mm. To fix the canvas, take 4 self-tapping screws and a plug for the top of the post. The supports are secured using a mixture of cement, sand and gravel.
Sports
Objects intended for sports activities can also be separated from other areas using fences made of 3D rods. Such a fence is installed using the same algorithm as the country version of the mesh. The difference lies in the height of the cells, which reach up to 4 m. The design has transverse parts. Easy installation allows you to erect the structure in the shortest possible time and thus speed up the commissioning of the sports facility.
Industrial
When industrial enterprises are commissioned, it is possible to use Gitter fencing to protect their perimeter. The mesh height is traditionally 2 m. The span width is 2.5 m. The pillars are secured with concrete.
Pipes with dimensions 60x40x2 are used as supports. The design of the canvas additionally uses transverse parts with a length of 2 m and section parameters of 40x20x2. The rods of the canvas have several bends. This type of mesh is used not only to protect industrial enterprises, but also parking lots and retail spaces.
Regime
Sensitive facilities require the installation of a secure fence. Previously, the main materials for such structures were brick and stones. Gitter mesh fences are now widely used.
A special feature of this structure is the presence of an anti-undermining. Its depth is 0.5 m. The racks are carefully concreted. The segments of such a fence have 2 transverse beams. When assembling the structure, special clamps are used.
Dimensions
Standard dimensions ratios:
Option #1
- Panel size: 2500x1030 millimeters.
- Cell dimensions: 200x50 or 100x50 millimeters.
- Number of ribs: 3 pieces.
There is a standard processing scheme:
- Initially, zinc is applied. Galvanized rods are the basis for the longevity of the fence. This element is necessary for the resistance of the metal product to corrosion.
- The second stage is nanoceramics. It covers the structure after mandatory galvanizing. This is additional protection against rust and various negative processes that affect the strength of the metal. Nanoceramics will protect the fence from dry and hot air, temperature changes, and direct sunlight (UV radiation).
- The last stage is polymer coating. This is the final layer, the main task of which is to protect the structure from mechanical damage: chips, scratches, cracks, etc.
- Panel size: 2500x1530 millimeters.
- Cell: 200x50 or 100x50 millimeters.
- Number of ribs: 3 pieces.
Wire
The diameter of the wire may vary depending on the manufacturer and model of the fence. Optimal indicator: from 4 to 8 millimeters. The upper protrusion of the rods ranges from 25 to 27 millimeters.
Experts assure that the minimum thickness of the rods should be at least 3.7 millimeters. This indicator ensures long service life and reliability of the design. Unfortunately, not all manufacturers adhere to this rule; in order to save material, they specifically reduce the thickness of the rods
Be sure to pay attention to this indicator when choosing a fence
Height
Experts say that the maximum height of the 3D structure is 2 meters. This is the optimal parameter that almost all brands adhere to. If the customer wishes to purchase a higher fence, he has the opportunity to order a fence of any height.
Cells
Cell sizes also differ. Each manufacturer has its own dimensions. The most common size for 3D mesh fences is 200x50 millimeters.
What to consider when choosing 3D fences
The range of products is really rich. Therefore, this creates many difficulties for those who dream of building a 3D fence. Before purchasing, it is recommended to familiarize yourself with the features of the fence, as well as compare them with various factors. What can influence the choice?
There are several important points to bring to your attention:
Location of the future structure
Think about why you need a fence? In order to hide the area from prying eyes? Or for protection from wind, dust, and foreign animals? If the fence is inconspicuous and will not be constantly visible to passers-by, then why spend a lot of money on it? Dimensions of the structure It is important to take into account that the height of the fence should not exceed the height of the first floor of the house located on the site. For private areas it is customary to use low, small fences, but for industrial or commercial enterprises they use tall, large structures; Landscape
It is not possible to install a fence in every area. In some cases, high groundwater levels or uneven terrain may be a serious obstacle; Design. Not all, but the majority try to choose a fence so that it harmoniously combines with the overall exterior of the site. To do this, colors and configurations are carefully selected; Fencing functions. There are two main functions of a fence: decorative and protective. Sometimes they can be harmoniously combined; Price. For many people, price is a fundamental factor when choosing a fence.
When choosing, it is important to consider the thickness of the rods. This criterion applies to both types of fencing
The minimum value is 4 mm.
It happens that manufacturers save money and deliberately make the rods thinner. A fence made from such parts will not be able to serve for a long time and with high quality. Therefore, if you decide to purchase such a fence, then do not hesitate to ask the seller for a certificate or confirmation of the parameters of the parts.
It is better to pay more for thick rods and the structure as a whole than to spend more money in a few years on repairs and restoration or even replacing the product. If we talk about a fence for decorative purposes, there are no recommendations here.
average cost
The leaders in this segment are electric locking devices, such as electric motor, electromagnetic and electromechanical locks. They have a high degree of reliability.
The magnetic mechanism of the electromechanical lock is duplicated by a spring device driven by a conventional key. This allows you to avoid problems with opening or prevent spontaneous unlocking of the gate during power failures.
The bulkier and heavier electric motor lock works in the same way as its electromechanical counterpart. The only difference is that the deadbolt is driven by a motor.
The electromagnetic lock has a simple design, which is a guarantee of durability. There are holding and sliding devices. The first ones use a magnetic field to keep the gate closed. The operating principle of the latter is not much different from the operation of the electromechanical version.
Stages of construction
You can install the 3D mesh yourself using the following tools:
- tape measure, 5-10 m long;
- laser level;
- U-shaped clamps;
- screwdriver or screwdriver;
- concrete mixer.
Before starting installation work, it is recommended to decide on the method of installing the support pillars:
Concreting. It is carried out to the entire depth of the underground part of the columns or partially. The first technique is used on weak and light bulk soils. In this case, mesh modules are installed only after the solution has completely hardened. The second method is suitable for solid soil. We drive the pillars 1 m into the ground, but only concrete the upper part of the recess.
Butting. For installation work we use crushed stone. The depth of the hole should not be less than 1 m. Then the hole is filled with bulk building materials and compacted
When carrying out such work, special attention is paid to the vertical position of the supports. This method is recommended for use on heaving and swampy soils that contain clay. Flange Applications
This technology for installing columns is used in the presence of a ready-made strip base. The flanges, welded to the supporting elements, are provided with mounting holes. To fix the supports to the strip foundation, we use anchor bolts.
Use of screw piles. This is the fastest way to install posts for a 3D grid. We install the panels immediately after installing the supporting elements. In this case, there is no need to wait for the solution to dry completely.
The 3D fence is mounted according to the following instructions:
A tape measure is used to mark the territory, and a building level is used when installing supports. We install the pillars at the same height and maintain a certain step between them. Otherwise, the 3D mesh will lose its aesthetics, strength and stability.
It is necessary to drill holes for the pillars to a depth of more than 1/4 of the entire height of the support. At the same time, manufacturers advise taking into account the depth of soil freezing in a given region. If the value of this indicator is large, then the depth should be greater in relation to the original calculated value. We install pillars in the prepared holes and pour the solution. To ensure that the supporting elements are in a strictly vertical position, spacers are used
Particular attention is paid to those pillars on which the gate and the 3D mesh itself will be fixed. If this condition is not met during operation, the structure will sag. The mesh is installed 24 hours after installing the posts
To fix it we use U-shaped clamps. To carry out such work, experts advise using a screwdriver (to facilitate and speed up the installation process).
DIY 3D fencing installation.
There are fences made from a standard material – steel. But, there is another type of volumetric fence. This structure is made from wood. To make a wooden fence voluminous, use several levels of picket fence.
Wooden products are attractive and environmentally friendly. Such a fence looks as natural and noble as possible. This fence will emphasize the nobility of your site. This type of 3D fence is valued for its combination of beauty and simplicity. But we must not forget about the specificity of the material. Wood is not very durable. It is easily flammable and rots. To extend its service life, you will have to coat the wood with impregnations and protective agents. Moreover, this procedure is not carried out once, but approximately once every 3-4 years.
To carry out installation, you must have the following tools:
- Roulette;
- Stakes, ropes;
- Boer;
- Shovel;
- Trough for preparing cement mortar;
- Building level;
- Screwdriver.
Stage 1. Preparatory work
Before you start working, it is recommended to draw a boundary where the fence will be installed. Make marks where the gate is planned or from the walls adjacent to the fence product.
This is done in order to evenly install the support pillars. The optimal distance between them is approximately 2.5 meters. This will help calculate the approximate amount of material required.
According to the resulting markings, a rope is pulled, and stakes are inserted at the locations of future racks. It is recommended to check whether the preparation has been carried out correctly. Only after this the volumes of material are calculated and purchased. In addition, you cannot forget that you need to buy crushed stone, cement and sand.
Stage 2. Installation of support pillars
For installation of support posts, it is recommended to make a recess of 1.2 m.
To install a pole, you must complete the following steps:
- Dig a hole approximately 1.4 m deep;
- Fill the bottom with gravel and sand. Layer thickness – 20 cm;
- Stomp on the “pillow”;
- Install the support pillar;
- Secure the stand clearly vertically without deviation;
- Pour the pre-prepared cement mortar;
- Equip the rack with a special part - a plug.
Stage 3. Installing a grid for a 3D fence
After the pillars have been installed, the cement should be allowed to “set.” After about 7 days, they begin to fasten the sections. In your work you will need fittings and fasteners. They are usually included with the product. Having a screwdriver will make the job much easier.
Installing a 3D fence is quite easy to do yourself. But, if even the slightest doubt arises, it is better to entrust this matter to professionals from construction companies. They will do everything efficiently and accurately. The workers will tell you how to choose the right design and build a fence, taking into account all your wishes. At the same time, you will have a guarantee for the work performed.
Types of chain link
The cost of chain-link fencing is much lower than that of fences made of other materials. This is the main advantage of the grid.
Tension with welding
Any owner of a summer house or private house can easily buy it at any hardware store. However, in order to tension the chain-link mesh with your own hands, you will additionally need posts for its fastening, fittings and a cable with a diameter of 5–7 mm.
Today there are 3 types of chain-link, different in fabric material:
- Plasticized. This is a chain-link made of iron wire, which is coated with a protective layer of polymer against the occurrence of corrosive processes. The mesh is not afraid of high humidity and frequent precipitation.
- Galvanized mesh is not subject to corrosion processes. But it is more expensive, unlike black wire chain-link, and therefore less popular.
- Non-galvanized, made of ferrous metal. This material does not last long, no more than 4–6 years. Moreover, corrosion appears on it very quickly. For a temporary fence or enclosure, you can buy such a chain-link, but take into account the fact that another fence will soon be installed instead. Otherwise, the mesh must be painted, this is done once every 3 years.
Fastening with self-tapping screws to wood
In addition to the material, the mesh is different in cross-section and cell shape. Cells can be in the form of a rhombus, square or other
But their cross section is very important. The size is in the region of 20–65 mm
The smaller the cross-section, the less natural light reaches the site through the fence, the greater the strength and solidity, but at the same time the higher the price. For a fence at the dacha, so that small animals (cats, dogs) cannot enter the territory, purchase a chain-link with a cross-section of 45–55 mm.
Tension on reinforcement
Areas of application
Designed to delimit land plots or commercial buildings, dividing the territory into zones.
Welded mesh fabric is used as a fence for:
- industrial facilities;
- construction sites;
- plants and factories;
- educational, sports institutions;
- cottage villages;
- pastures and parts of the yard for walking pets;
- children's play areas; Photo: fence made of welded mesh with a red polymer coating
- parks;
- airports;
- banks.
In the latter cases, a complex type of 3D mesh is in demand.
Welded fabric has also found application in construction work. They reinforce the facades of large buildings and road surfaces.
But depending on the purpose, it is necessary to correctly select the dimensions of future fences:
- For industrial facilities, it is recommended to take raw materials with a wire thickness of 4.5–5.5 mm and a height of 2.05–2.25 m.
- When arranging the private sector, a wire diameter of 4–4.5 mm and a height of 1.25–2.05 m will be sufficient.
- To fence parks, playgrounds and sports grounds, you need to use wire 4-5.5 mm thick with a structure height of 1.25-2.25 m.
Distinctive features
A standard fence is made from welded mesh. Despite the affordable price, this option has many advantages due to which it has become so popular. 3D designs are a new solution in the fencing segment. Experts believe that they are the complete opposite of dull and bulky structures made of stone, concrete and metal.
A classic 3D fence is assembled from metal rods. They are treated with a special compound to prevent the formation of rust. A special volumetric effect is achieved due to V-shaped protrusions, providing 3D volume. A person passing by perceives the fence as a dynamic, relief image.
The special shape of the structure increases the technical characteristics of the mesh fencing. Despite its visual lightness, a high-quality fence is a strong, durable and wear-resistant fence. The number of horizontal bars may vary depending on the height of choice.
Manufacturing of tension fence
Chainlink fence
Chain-link tension fencing is faster to complete than sectional fencing and is less expensive. The installation process includes marking, preparing holes for posts, installing posts and fence fabric.
To work you will need:
- Rabitz;
- metal pipes with a diameter of 60-80 mm;
- metal hooks;
- hand drill;
- level and tape measure;
- anti-corrosion primer;
- dye;
- Bulgarian;
- welding machine;
- concrete solution;
- crushed stone;
- sand.
Step 1. Marking the area
Take wooden pegs and long twine and start marking. First you need to determine the location of the outer pillars. In these places, pegs are driven in and a string is pulled between them at a height of 10 cm above the ground. If the fence line has breaks, a beacon is also placed on each of them and a rope is secured. Further along the marking line, you need to drive in pegs where the intermediate supports will stand. The distance between the pegs must be the same and correspond to the width of the run.
Step 2. Preparing holes for pillars
Drilling holes for posts
In places marked with pegs, using a garden drill, make holes with a depth of 80 to 120 cm. The denser the soil, the shallower the depth. The diameter of the holes should be slightly larger than the diameter of the posts. A sand cushion 10 cm thick is placed at the bottom of each pit.
Step 3. Installation of load-bearing pillars
Installation of load-bearing postsWe make a fence from a chain-link mesh
Prepare the pipes: clean their surface from oil stains and rust, grind it, weld the hooks. The welding areas are cleaned, scale is removed, and then the pipes are primed and painted. After this, the posts are lowered into the holes, leveled, and reinforced with spacers. If all the supports have the same height and are located strictly in one line, you can pour the concrete solution. During the pouring process, the solution is pierced several times with a steel rod to remove air bubbles from the concrete.
Installation of posts for a chain-link fence
Sometimes metal supports are not installed, but driven into the ground: holes are made at a shallow depth, about 30-40 cm, pipes are lowered into them and driven into them with a sledgehammer to the required depth. To avoid breaking the top edge, a piece of steel pipe with a welded bottom is placed on the posts. This method allows you to save materials, and on dense rocky soils it is quite justified, but if the soil is sandy and unstable, the supports may move to the side. Link to an article about concreting fence posts.