Finishing the fence with tiles
Fencing around a country house is an important element. Its main task is to protect private territory from intrusion by uninvited guests. The fence clearly separates one area from another; just look at it, and everything will become clear: one area is on one side, and the other is on the other. Another advantage of a fence is the ability to design it the way you want, in any style. The variety of facing materials on the construction market is huge; one of the best is finishing the fence with stone.
Cladding options
Before you start laying the fence cladding, you need to carefully think through everything and make the right choice of material. In contrast to the types of supports, there are many finishing options that can be listed. This is not surprising, because more requirements are placed on the cladding and its masonry. Looking at the fence, you pay attention to the canvas itself, and not to the supporting pillars, therefore, when constructing the cladding of the fence, it requires more attention. Each option has its advantages, for example:
Types of facing material
- facade brick is considered a durable, expressive and reliable material. However, its laying is quite difficult. When working with it, you will need to be careful and precise;
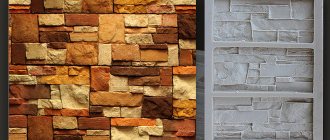
- The advantages of facing tiles are resistance to negative environmental influences, low price and ease of installation. Fences finished with tiles are distinguished by their design variability, thanks to the different types of tiles themselves. It can be porcelain stoneware, ceramic, glass, concrete, artificial or natural stone. Any tile will be good for finishing the base of the fence, regardless of the material of the fence itself. Combinations, for example, of a tile plinth and a fence made of stone or brick always look good.
- natural stone has one significant drawback - high cost. Otherwise the stone is almost perfect. It is durable, reliable, and resistant to mechanical impacts. And if even a small piece falls off in some place on the canvas or base of the fence, there is no need to worry about it. Against the background of the unique appearance of this facing material, the flaw will not even be noticeable. The advantages of natural stone also include its environmental friendliness, resistance to temperature changes and a wide variety of types;
- An artificial stone may look no different from its expensive “brother”, but in all other characteristics it is inferior. When purchasing, you need to be careful when choosing a seller to avoid purchasing a low-quality fake.
When properly laid, stone fence cladding meets all standards and requirements. With the help of stone, a fence can be made beautiful and at the same time durable. Many people underestimate facing stone, considering fences made from it gloomy, boring or gloomy. Today there is a large assortment of this material. This is granite, limestone, shell rock, marble or their high-quality artificial imitation.
Clinker facade tiles as finishing for a fence
Clinker facade tiles are one of those building materials whose history is quite difficult to trace, simply because they were born at the intersection of other materials: clinker bricks and finishing tiles. Clinker facade tiles have become widespread due to the unique properties inherited from both “parents”: excellent frost and moisture resistance, durability, mechanical strength, etc.
In the construction of fences, this finishing material is used for cladding pillars, plinths and planes, because in addition to all the above properties, clinker facade tiles have an excellent appearance and are available in a wide range.
It is the widest range that often attracts primarily those who would like to buy clinker facade tiles. Indeed, the variety of types and varieties of this finishing material, not to mention the colors, is simply amazing. There really is plenty to choose from, and this material will suit anyone, even the most demanding buyer.
But the most pleasant thing about this is the fact that you don’t have to pay more than, for example, when facing the same surfaces with facing bricks. Clinker facade tiles are cheaper and last longer than simple facing bricks. This fact follows from the best mechanical properties of clinker facade tiles.
As an argument in favor of the idea of buying clinker facade tiles for a fence, one can also mention the fact that fences lined with such tiles look richer than brick ones, although they are often cheaper. This step is a smart investment that will help in the future to sell the house for a little more than its real value!
However, with brick everything is somewhat more clear: whatever one may say, it is part of the supporting structure and will not go anywhere. Clinker tiles, in turn, are a facing material, and may at one fine (rather, not so wonderful) moment simply fall off. But if you glue it correctly, this will not happen: this is guaranteed by the manufacturers of not only clinker, but also adhesive mixtures for gluing it.
Meanwhile, facing the fence with clinker facade tiles goes much faster than if facing bricks were used. There are many reasons for this: the use of special glue, the smaller size and weight of the tiles compared to bricks, the high setting speed of the glue, etc. The result of this speed is a lower cost of finishing work: installation is faster, which means it costs less!
Finishing the fence with clinker steps
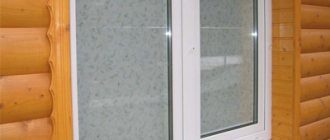
Clinker steps are an excellent example of a modern finishing material that has become widespread in our country. From the name it becomes clear that clinker steps are primarily intended for finishing stairs. But in other branches of construction there is a place for this wonderful universal material, for example, in the construction of fences or the installation of window sills. Let's talk about this in more detail.
Why does the idea of buying clinker steps so often come to the minds of those who build a serious fence? Everything is very simple: with their help you can reliably protect the base of the fence from the effects of precipitation! Why clinker? Because this material not only does not allow moisture to pass through, but also does not absorb moisture! Clinker steps absorb no more than 3% of moisture from their own weight!
In addition, clinker steps are a material of amazing strength and durability. The warranty on these products reaches 100 years. It is clear that they can be used much longer. Well, if you use them not for their intended purpose, but as protection for the base of the fence, then this material will not literally be demolished, because in the case of such use there is no main factor influencing the service life of clinker steps - abrasive wear. After all, clinker is not destroyed by moisture and frost, does not fade, in general, it is not at all afraid of time!
To be fair, it should be noted that finishing the fence with clinker steps is not a cheap option. However, it is very popular and is truly a purchase for the ages! In addition, the appearance of clinker tiles cannot be confused with anything - this element is recognizable even in the construction of a fence, and brings there the unsurpassed charm of an expensive, elite finishing material.
Another pleasant aspect of using clinker steps for finishing fences is their widest range. The variety of colors, shapes and sizes, allowing the implementation of any design solutions, cannot but attract a buyer who really needs a beautiful and unusual fence. Well, the fence is most often used to judge the owner, his wealth and merits!
Clinker, including clinker steps, combines well with other materials. In terms of building fences, this is very good, because for this purpose they use brick, wild stone, corrugated sheets, forged metal and many other materials, for each of which you can easily select clinker steps of the appropriate color and texture.
What to rely on when choosing material for laying cladding
The use of natural stone for cladding
When selecting a suitable facing material, the first thing to consider is the frame of the fence itself. If the fence is made of brick, the fence will be able to withstand natural stone cladding. If the canvas is metal, it is recommended to cover it with some artificial imitations. You can simply cover the metal pillars and base with stone chips.
The base of the fence, lined with solid stone, will look good. Much also depends on the desires and imagination of the owner of the fenced area. The longer the fence, the more ideas can be turned into reality. You can depict various patterns on it, paint a whole picture using stone, or make stone arches. Various mosaic compositions will look good.
When choosing, you need to take into account durability, appearance, aesthetics, compliance with the overall style and the combination of the material with the environment. When choosing a stone for laying the cladding of a fence and plinth, it is always better to give preference to natural material. Natural material is stronger and more durable. And one cannot doubt the quality created by nature itself, and not by unscrupulous people thirsting for easy money.
The surrounding landscape should have a significant influence on the choice of cladding and base of the fence. Some material will look worse against the background of trees, but better in open areas. The local climate should also be taken into account. For example, marble does not tolerate low temperatures well, so it is better not to use it where cold is a common occurrence. Many other types of stone can be destroyed by moisture, including snow. If the fence has canopies, then you need to calculate snow and wind loads in advance.
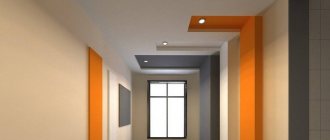
Plinth design features
The appropriate design (especially for industrial buildings) of the plinth is given by the choice of facing lining, material for drip and decorative elements. It all depends on the taste of the homeowner and the money he wants to spend on the appearance of the house and basement. Types of design:
- Its actual absence. Everything is simple, practical and economical.
- Elementary design. The color of the walls and base are chosen to match or, conversely, in the opposite color scheme. There are no decorative elements.
- Unprofessional design. The choice of a base mutula with a designer look. A skillful combination of color, composition, structure, masonry (brick, marble, etc.), the presence of decorative elements.
- Professional design. Very creative and extremely expensive.
Basic requirements for finishing materials
Option for cladding pillars and fencing span
The stones that will be used for laying the cladding of the fence and the base of the fence must meet certain requirements:
- thickness should not exceed 30 mm;
- each stone must be clean and free of unnecessary impurities;
- the relief should be well defined.
If tiles are used for laying cladding, its surface must be smooth and hard. If decorative brick is used as a finishing material, it should be characterized by increased strength, low moisture absorption, and good resistance to negative temperatures and fading. It should withstand various mechanical impacts well.
The ability to absorb moisture is a bad property for any brick. As a result of temperature changes and periodic freezing and thawing of water, the structure of the material will collapse. Well, if the facing brick loses its original color under the influence of ultraviolet sunlight, it will turn into something faded. This will not decorate the fence, but, on the contrary, will make it boring and dull.
Advantages
process of finishing a fence with facing tiles
There are quite a few advantages of tiling, the main ones are:
- Strength. Not subject to mechanical and physical stress.
- Practicality. The tile does not absorb dirt and is easy to clean. Does not require additional care.
- Durability. The service life of tiles, provided they are installed correctly, can range from 5 to 15 years, depending on the type of material. Stone and glass tiles, for example, have no service life limitation at all.
- Moisture resistance. Not subject to destruction under the influence of water.
- Fire resistance and frost resistance. Facing tiles can withstand sudden temperature fluctuations, do not deform, and do not ignite even when exposed to direct fire.
Fence facing tiles are also not without some disadvantages, but they are insignificant and inherent to certain types. The most popular types of tiles are discussed later in the article.
Required tools and materials
Tools and material for cladding the fence
When the stone has been selected and purchased in the required quantity, you can proceed directly to laying the cladding. To do this you will need the following tools and materials:
- putty knife;
- mallet;
- various containers for solutions;
- fasteners;
- building level;
- the cladding itself.
To remove dirt from the surface you will need a brush, broom and scraper. As reinforcement you will need to use a mesh, the cell dimensions of which are approximately 5*5 cm. For plastering you will need a cement-sand mortar.
In order to remove excess moisture from the composition, you can add a plasticizer to it. If you do this, the fence will withstand low temperatures much better. And for better attachment to the surface of the fence, you can add coarse filler to the solution.
The adhesive is prepared from cement, sand and tile adhesive intended for external use. If the stones used for cladding are large enough, you will need to install pins in the fence, but first make holes in the canvas using a drill.
A special grout is used to fill the gaps between the stones being laid. At the final stage of work, you will need to apply a moisture-repellent substance to the surface of the almost finished fence.
Stages of finishing work
The process of cladding a brick fence
Fence cladding is divided into several main stages.
- Preparation. At this stage, it is necessary to clean the surface of the fence, as well as the facing stones themselves, from contamination. Dust can be simply removed with a brush or broom. And to remove more serious contaminants you will have to use a scraper.
- Fastening the reinforcing mesh. You can use a ready-made mesh or create it yourself from metal rods. The minimum cross-sectional diameter of the rods is 1.5 cm. The mesh is attached to the surface of the fence using connecting elements such as screws, washers and dowels.
- Plastering. Under no circumstances should you skip this procedure. The plaster is designed to protect the space between the facing material and the fence from the penetration of debris, as well as from various organisms that, through their vital activity, can ruin the entire structure. After the plaster is applied, you need to give it exactly one day for it to harden. And the very next day you can begin the final stage of work.
- Fastening of facing material. To do this, you will need to prepare a solution from cement, sand and special tile adhesive. All components must be mixed until a thick mass is formed. To check the thickness, you can put the solution on a spatula and see how it behaves. Ideally, it should slowly slide off the instrument, but not fall off it like a lump or drain like liquid. The solution is applied to the facing material itself. After this, the stone is pressed against the surface to be treated. Laying must begin from the base of the fence, and then rise higher and higher. If the stone is large in size, you can saw off the extra piece. There is no need to press the stones too close to each other. The optimal distance between them is 15 mm.
After the entire surface is covered with stone, all that remains is to rub the seams, wash off the cement-adhesive mortar from the front side and apply a water-repellent substance. The plinth cladding is usually made brick thick. If the base protrudes from the general masonry of the canvas, the void space is concreted and can also be lined.
How to tile a base with your own hands
Let's take polymer mutula as an example. Preparatory work for the installation of an insulating layer and reinforced mesh are discussed above. Mutulu should be chosen as large as possible, given that it bends well and even cuts.
To learn more:
finishing the basement of a private house.
Installation technology:
- The corresponding measurements determine the number of tiles that will be used for cladding without trimming and with trimming (individual non-standard mutul configurations are determined locally).
- To ensure an even bottom edge, a metal profile is temporarily mounted on the ground and checked with a plumb line.
- The frame will be a reinforced mesh, to which the mutula is attached with self-tapping screws or to a pre-applied primer with glue. Using a puncher, holes are made to attach the mesh with screws, and the mesh is put on them. Don’t forget to secure the appropriate layers of insulating materials underneath.
To ensure the stability of the reinforced mesh and the strength of its fastening, it is necessary to put washers of the appropriate width on the screws.
- The mutules are attached end to end, and the inevitable gaps that arise as the work progresses are sealed with sealant. For design purposes, you can deliberately leave gaps of any size and attach cut tiles of a different color to them. The screw heads are also puttied.
You must constantly ensure that the new row falls without deviations from the original one. A deviation of 1 mm can subsequently result in several centimeters, which will already be noticeable.
- Custom-cut polymer tiles are used to make ebbs and shape the corners of the building.