About 30–40 years ago, the process of making arches was quite complex; such work could only be performed by experienced builders. Installation required a lot of time, only its preparation required at least two days. And this applies only to the simplest solutions, since more complex structures were manufactured over several weeks.
Drywall is a building material that significantly speeds up the production of complex structures. True, this happens due to a loss of strength - plasterboard arches cannot withstand high loads and are damaged even with relatively little effort.
This is the main drawback of the material. Advantages: manufacturability, low cost, minimal amount of construction waste, the ability to carry out construction work in residential apartments.
How to make an arch from plasterboard
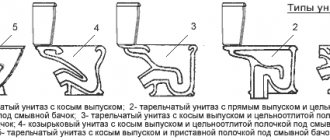
Types of arches
Interior or corridor arches can have different shapes. They differ mainly in the shape of the upper part and sometimes in the way they are connected to the vertical parts. Their main types are presented in the photo.
Types of interior and corridor arches
This group lacks one of the most popular recently - the half-arch. They have a rounded corner only on one side, on the other it remains straight. This is where the name came from - semi-arch. It looks good in modern interiors: minimalism, hi-tech, maybe art deco.
One of the options for a semi-arch in the interior
The classic is distinguished by the correct shape of the top. This is strictly a semicircle, the radius of which is equal to half the width of the doorway. This type looks good with an opening height of at least 2.5 m. It fits well into any interior, but looks best in a long corridor, or instead of the entrance door to the kitchen.
A classic arch requires a height of at least 2.5 m
An arched opening in the Modern style is distinguished by a small radius of curvature and a sharp transition at the junction with the vertical components of the opening. It looks good if the walls and ceiling have a more or less simple design. Looks great in place of the former balcony door, good at the entrance to the office.
Art Nouveau arch on the site of a former balcony door
The “Romantic” style arch is more likely to be simply rounded corners (mostly masters call it that). Looks good with a large width and not the greatest height.
The “romantic” shape is good with large width and small height
The “ellipse” shape is very close to “romance”. It differs only in greater curvature in the middle part. Also suitable for low and wide openings. It just looks a little softer.
Suitable for openings of large width and not very high height
Trapezoid is a non-standard design consisting of broken lines. It is difficult to play out in the interior, therefore it is used infrequently: for some non-standard designs.
One of the design options is trapezoid
It is very similar to an ordinary opening, and that is essentially what it is, only without the door leaf. For greater originality, it is often accompanied by wooden carved elements in the form of columns on the sides. In this form it is good for classical interiors, as well as ethno-style - Greek or Roman, depending on the type of columns.
Portal with wood frame
For decoration in modern styles, they use another example - next to the main arch, smaller portals are located. This technique allows you to “beat” a simple form.
Another version of the “portal” arch
Before you start making an arch, you need to decide on its parameters. select the type, and then the parameters: where it will start, and what the radius of curvature will be. It could be a really sharp bend, or it could just be some rounding of the corners.
Rounded corners in standard doorways look better than steep arched curves
To understand how your chosen shape will look, you can cut out a template from cardboard and attach it to the doorway. Evaluate the effect. If everything suits you, you can make a blank using this template. But only one - for one of the sides of the opening. The second one needs to be done in place, otherwise it will turn out crooked.
Material for production
When planning to make an arched opening yourself, you should choose a material suitable for this work.
To make an arch you can use:
- drywall,
- wood and its derivatives,
- metallic profile.
When thinking about how to make a decorative arch in a house, novice craftsmen should pay attention to drywall. It is easy to use and can be easily mounted on any supporting structure. Drywall is easy to fit into your home interior, and minor flaws in the work will be almost invisible.
A wooden arch will serve as an excellent basis even for finishing with artificial stone, since it can withstand its weight.
Structures made from wood derivatives (plywood, chipboard, laminate) are easy to fit into a finished doorway. The work of making them does not require much experience in such work. The simplest design is easy to make over the weekend.
Step-by-step instructions with photos: the fastest way
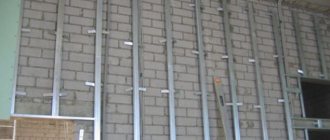
Do-it-yourself plasterboard arches are made in different ways. This takes a minimal amount of time. Having decided on the shape, we proceed to installation. We attach a frame to the prepared opening, cleared of peeling plaster and relatively leveled, according to the dimensions of the future arch. It is made from a drywall profile or a dry wooden block of a suitable size. Sometimes, if the wall is narrow, you can only choose wood.
A profile frame is screwed to the selected dimensions
To begin, we cut out a rectangle from drywall to the size of the future arch, find its middle, mark it, and then temporarily screw it into place. We retreat from the edge 12.5 mm - the thickness of the plasterboard sheet. If the adjacent walls are already plastered, add a couple more millimeters of putty so that the surface can be leveled.
Screwed the drywall into place
Now we take a piece of profile or hard corner and set aside half the width of the opening from one edge. At this point we make a hole in the corner and insert a nail into it. We stick this nail into the middle of the doorway we marked earlier on the sheet. It turns out to be a kind of compass, with which it is easy to draw an ideal line.
Device for outlining an arc
By changing the mounting height you can get a more or less high arch. If you need a flatter curve, increase the length of the “compass”.
Using a corner we draw an arc
Having removed the sheet, we cut out an arc along the outlined contour. This can be done with a special drywall saw, a metal saw with a fine tooth for a smoother edge, or a jigsaw (there will be a lot of dust). If the cut is not very even, smooth it out using sandpaper attached to a grater. With this device we achieve a perfectly even curve of the shape we need. We fasten the cut fragment of the arch - the side wall - back into place.
We fix the cut out fragment
If everything is smooth, there are no distortions or irregularities, on the other side of the opening we attach the same sheet of drywall as a few steps earlier - a rectangle or square, depending on the shape. It must be fixed strictly vertically. Now we transfer the shape of the arch onto it. We take a square, at a right angle and press one side against the drywall, onto which we transfer the arch, and the other side against the arch. Having aligned the square perpendicularly, mark a point with a pencil. We make such points along the entire arc. The more often they are done, the easier it will be to draw the line and the more accurate the match will be - the less you will have to grind down.
Transfer the arch shape to another sheet of drywall
Why is it so difficult and not just to make a copy of the first sheet? Because few openings are symmetrical. As a result, installing the second sheet so that the lines of the arch coincide is very problematic.
Having marked all the points, remove the sheet, draw a line, and cut along it. We install it in its original place. Now we take the smoother again with sandpaper and now we smooth both edges until they match completely. One point - the trowel should be wider than the opening so that both walls of the arch are captured in one pass.
Level both walls at the same time
We measure the length of the arc, cut out a piece of the profile of the same length, make notches on the walls every 3-4 cm. This tape will need to be secured along the arch arch on one side and the other.
How to cut a profile for an arch
We fasten it with self-tapping screws, carefully, pressing the profile and holding it with a block, not with your fingers: it’s easy to get the screw into your fingers. By the way, you need to wear gloves when working with the cut profile. If you don’t, you’ll definitely cut your hands.
We fasten the notched profile, simultaneously giving it the shape of an arch
By the way, the back of the profile can be aligned along the edge - it’s easier to work this way, but the joint will still have to be sealed later. Screw the strip to the other side in the same way.
This is a bottom view - profiles are attached to the sides
There is a second way to attach the profile - attach it to a quick-setting universal glue, such as liquid nails. This method is acceptable if the opening width is small. If the arch is thick, the glue may not be able to withstand the mass of drywall that will be attached from below.
The next step is to attach the jumpers. First, the depth of the arch is lost, 1-1.5 cm is subtracted from it. This will be the length of the lintels. Cut profile pieces of this length.
Jumpers are cut from the same profile
At the places where the jumpers are attached, the “petals” are cut off, and the prepared fragment is installed and secured. It should not rest against the walls, it should be located approximately 5 mm from the back. Jumpers are needed to make the structure more rigid, otherwise it “walks” when pressed.
Fastening jumpers
Next, you need to cut out a rectangle from drywall that will cover the structure from below. Its width is determined simply - from the outer edge of one sheet of plasterboard to the outer edge of the second sheet. The length is measured with a flexible tape (can be a tailor's tape) or a tape measure with an assistant. We attach this sheet with self-tapping screws to the arch frame. The sheet has to be bent, but read how to do this a little lower - closer to the end of the article.
We attach a strip of gypsum board to the arch
Next came the finishing work: a special corner is attached to the corner, everything is puttied using the usual technology: first the starting joints and corners, then the finishing one.
Operating procedure
- First of all, you need to prepare the surface. It is leveled, then special notches are applied.
- Decorative elements are laid out in the desired order.
- To work, you will need a cement solution or liquid nails. Finishing begins with the walls adjacent to the opening.
- The first element is attached at the junction of the wall and the arched opening. The solution is applied in a thin layer to the wall and to the stone or tile.
- The second part is fixed above the first with an offset towards the opening by the thickness of the tile or stone.
- This alternation is continued to the intended level.
- The opening is laid out with the same offset, which allows you to beautifully design the corners of the arched opening.
- After the solution has dried, the seams are rubbed down in a couple of days.
When using natural stone as decorative elements, it is important to consider the weight of the structure.
Arched opening made of plasterboard: second method (photo report)
This method is good if the thickness of the partition is small: try attaching the profiles if the gap between them is several centimeters, and then attach the jumpers. It all starts the same way: the first wall of the arch is cut out, attached and transferred to the second sheet.
First we also cut out the sides
Afterwards, wooden crossbars are cut along the width of the gap between the two sheets, which are attached along the edge of the arch with self-tapping screws.
Insert wooden blocks cut along the width of the opening
The cut strip of drywall is fastened starting from one of the sides. To make it more convenient, you can fix it with clamps, since the thickness of the wall is small. When attaching the strip, you can use the self-tapping screws that were used to fasten the bars. This way you will definitely hit the crossbar.
Using clamps, the strip can be fixed
Then all that remains is to secure a special perforated corner in the corner and smooth out the unevenness.
A corner is attached to the arch arch, everything is puttied
Putty allows you to hide all the flaws
It is also more convenient to smooth the dried putty along the arch arch with the entire plane of sandpaper attached to a grater. It’s unpleasant that dust falls into your eyes, making it almost impossible to work without glasses.
DIY plasterboard arch is ready
Correction of defects when cutting openings. DIY arch in the wall. Cheap openings.
As practice shows, teams of finishers (and simply “Tajiks”) are not able to quickly and efficiently make openings with reinforcement in load-bearing walls (these are all concrete walls more than 13 cm thick).
This begs the question - why first torture yourself and your neighbors, break an unprofessional instrument, and then still call us? Contact SLOM-SERVICE
.
Please note that if you complete the work without involving certified construction companies, you will not be able to complete the redevelopment.
Attention!
Any openings
in load-bearing walls
must be made by certified companies with SRO approval.
To legitimize openings in load-bearing walls, MOSZHILINSPEKTSIYA requires a work contract, a copy of the approval of the current SRO, an act of hidden work to strengthen the opening, a completed work log (if any), an act issued by the Moszhilinspektsiya filled out by the organization that carried out the work. All these documents must be issued by a certified organization that carried out the work and has SRO approval.
We issue the above documents if there is permission from the Moscow Housing Inspectorate (in Moscow), permission from the administration of the city district (in the Moscow region) or if there is a redevelopment project from the author of the house.
In our practice, there are cases when the customer nevertheless makes an opening or arch on his own, but calls us to strengthen it. At the same time, the savings are insignificant, since reinforcement alone costs more than in combination with diamond cutting of the opening. Finishing a partially made opening costs almost the same as making an opening or arch in a wall from scratch.
How to make an arch instead of a door: method three - typesetting technique
Another way to make arches from plasterboard with your own hands is by typesetting. The arch is divided into segments and assembled from pieces that create a curvature close to the required one.
The arch is assembled from plates cut from plasterboard
They are attached to putty diluted with a mixture of PVA and water. This batch dries quickly, so first we cut the plates and try them on. You can fold it on a table, but the vault will turn out upside down, but it will allow you to evaluate how correctly the plates are assembled.
Side view of the arch opening
Then the plates begin to be attached to the opening, periodically strengthening them with self-tapping screws for reliability. Place washers under the heads so as not to push through the cardboard. Remove excess putty immediately. If it gets stuck, it’s impossible to tear it off. The finished surface is treated with a primer to improve adhesion (adhesion), and then puttied, leveling the arch. To make it easier to display, you can use a template attached on both sides.
A putty arch looks like this
Making sharp bends using this technology is not easy, but for rounded corners and semi-arches it is a great way to do without profiles.
Is it possible to do it in a panel house with your own hands?
The apartment has several load-bearing walls.
To make a redevelopment, you need to contact specialists to find out the possibility of using the wall. Panel houses sometimes require changing the size of the opening, but this work is difficult to do, since you will have to cut the reinforced concrete structure. If you can’t completely remove the wall, but want to expand the space, then an arch is the best option. Drywall is considered a suitable material. It is reliable, practical, economical.
To make an arch in a load-bearing wall, you must first make a portal in it, but leave a small percentage of the untouched surface for stability. The hole is made with a hammer drill, and the width of the passage is made convenient and practical. It is also important to strengthen the opening.
How to bend drywall
One important detail: standard wall plasterboard does not bend well. For curved surfaces, they specially came up with thin ones - 6 and 6 mm thick. This bent part is easier to make from it. With a slight curvature, such a thin sheet can bend easily and without tricks. If you don’t want to buy thin GVL, there are two ways to bend the standard one.
The first is to take a needle roller and roll the cut section well on one side. You need to roll with force so that the plaster breaks. Then the leaf is soaked in water and left for two to three hours. After such procedures, it should bend quite well. You take it, fix it on one side, and gradually press it against the arch frame, bend it, gradually screwing it along the edges with self-tapping screws. The method is not bad, but if there is a lack of experience and insufficient processing of the gypsum, the sheet may burst. You will either have to mask the gap later, or start over.
Roll the strip with a roller with needles
The second way to bend drywall: on one side, make notches with a knife approximately every 4-5 cm. The notches should cut the paper. This strip is also gradually fixed, breaking the plaster as necessary. It bursts along the cut lines with light pressure.
Notches on one side make it easy to break the plaster
Model features
Basically, the design has an asymmetrical shape, which will hide individual calculation violations, which is impossible when installing a conventional arch. Its installation is also not difficult.
A similar pattern is characterized by the fact that a quarter of a circle is used to create the arched vault of a semi-arch in an apartment. For production, special arched plasterboard will be appropriate.
This arch material is easy to bend, curved parts can be created freely. Most often, a semi-arch is used in this way: the opening is blocked by making one rounded corner, and the second remains straight. The diameter of the circle inscribed in the opening is taken and the corner is rounded based on it.
If the diameter is larger than the width of the opening, then the rounding will be small. Anyone who is well versed in making plasterboard arches understands that this type adds style to the space and is suitable for narrow and wide home openings. A semi-arch divides the room into zones, making it lighter and more spacious.
Video description
In this video you will learn a little more about the features of using arches in the kitchen:
An arched opening in the living room is a decorative element. It gives the interior a solemn, formal look. To achieve this goal, complex designs with niches, inserts of additional lighting, stucco molding, and even built-in decorative columns are used.
Spectacular and majestic columns in the arched doorway in the living room Source www.freelancejob.ru
The hallway and corridor always need more space. Therefore, the arched opening should be as wide and high as possible. In addition to the practicality of this design, this will visually enlarge the room.
Video description
A master class on introducing spotlights into an arched opening is presented in the following video.
Illumination using LED strip is also possible. To do this, after covering the gypsum board, you need to make a small hole for the tape in the center of the arch. Next, insert the LED strip. After completing work on the arch, close the opening with an acrylic translucent decorative panel.
LED lighting looks unusual and stylish Source pinimg.com
About overlay elements
Overlay decor for arches is available in various radii of curvature, but not any to order. Therefore, if you plan to finish the arch with curved platbands, skirting boards, etc., you need to select the lining according to the curvature of the arch, or vice versa, and check the compliance with the width of the passage.
The best decorative elements for arches are made from MDF; they are not affected by temperature changes and do not fade in the light like PVC. However, decorative parts made from MDF require careful handling and are installed only after all other work has been completed. The texture of their surface is created by a plastic coating, and it is impossible to eliminate a scratch or dent.
It is also impossible to sheathe a smooth-lined vault with thin MDF, no matter what anyone claims to the contrary. MDF does not bend, and curved parts are obtained from it by pressing the original mass during manufacturing. This is where fiberboard can help out: the sheet is impregnated on the reverse (corrugated) side with a water-polymer emulsion, and the front side, after installation and puttying, is pasted over with self-adhesive to match the trim and/or overall color scheme. The longitudinal lintels in the vault frame should then be spaced in increments of no more than 15 cm. A fiberboard sheet attached along the contour to the frame and to the lintels with a fastener installation increment of 15-20 cm will provide a completely reliable sheathing.