→ Designs
Redevelopment of an apartment or house is a renovation and construction event that is not uncommon today. Many people want to change the layout of rooms by adding or removing partitions. Sometimes, during the work being carried out, it is necessary to block existing doorways. This can be done using bricks, blocks or drywall. The latter material has gained great popularity today due to the simplification of operations. Therefore, the question of how to seal a doorway using drywall is currently very relevant.
Preparation for repair
You need to prepare all the necessary tools and materials in advance before starting work and starting to seal the doorway with plasterboard.
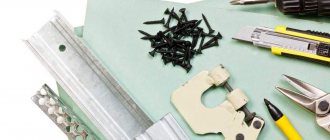
Tools you will need:
- Screwdriver.
- Hammer.
- Metal scissors.
- Sharp knife.
- Plumb and level.
- Saw and crowbar.
From materials:
- Guide profile PN.
- Rack profile PS.
- Plasterboard sheets.
- Soundproofing material (stone wool).
- Self-tapping screws.
- Dowels.
Back to contents↑
How to close a hole in a wall using drywall. Step-by-step instructions with video
Indoor construction or renovation work often involves major changes.
Redevelopment of structures should be approached very responsibly; project approval will be required. After moving the door blocks, you will need to cover the opening in the wall with plasterboard to create a single plane. The use of gypsum plaster boards in this case is more appropriate, since it ensures fast and high-quality implementation of all activities.
Where to start construction
Before you lay a doorway, you need to make sure that you have all the necessary tools and materials.
It is better to do this right away, so as not to interrupt work later due to the lack of any component. You will need the following materials:
Installing drywall on the wall.
- Drywall sheets. You need to choose them taking into account the microclimate of the apartment or room where renovation work is being carried out. Fireproof, moisture-resistant, acoustic - you need to choose what is ideal for your case.
- Guide and main profiles. What material they are made from is your choice. Most often, perforated profiles are used; they are very convenient to work with, they guarantee the strength and reliability of the created structure.
- Mineral wool. One of its undeniable positive qualities is the ability to withstand high temperatures. At the same time, it does not lose its heat-shielding properties. This is an excellent sound insulator, which is used not only for walls, but for ceilings and floors. In addition, it has very high resistance to alkalis, solvents and oils and good water-repellent properties.
- Hammer.
- Drill.
- Self-tapping screws for drywall.
- Screwdriver.
- Screws.
- Spatula, preferably two, large and small. It will be much more convenient to work with two.
- Putty, you can also choose a ready-made mixture, this will save you time.
- Dowels.
- A breadboard knife or a regular one, but sharp enough.
- Primer.
- Fine-grained sandpaper.
Complete closure of the opening
Sealing the hole is done using various materials, but do-it-yourself installation, especially if you lack experience, is recommended to be done using sheet products and metal profiles. The standard instructions include a number of sequential steps.
Preparation
You can seal the doorway according to the following diagram:
After restoring the damaged areas and removing all excess, the next stage begins.
Frame installation
To create a holding system, it is recommended to use a galvanized CW rack profile with a thickness of at least 0.6 mm and UW guides. If a well-reinforced opening is being sealed, then a combination of CD/UD parts can be used for the job.
This technique is used when it is necessary to close a niche in the wall. To better understand the process, watch the video:
Fastening drywall
Fixation of gypsum boards is carried out in the following order:
When connecting several elements, a small gap is left. This will allow you to better seal the joints at the next stage.
Sealing seams
The resulting plasterboard area needs preparation before laying the decorative material.
The presence of reinforcing material will prevent minor cracking.
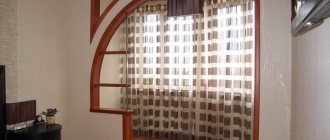
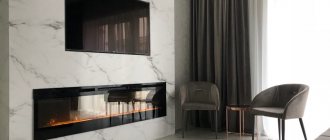
What can slopes be made from?
Slopes can be internal or external, depending on their location relative to the room. When finishing them, two problems are solved: aesthetic and thermal insulation. To do this, you need to choose the right material.
MDF panels
Now for this type of work, in most cases, MDF panels are chosen, which have proven themselves in bathroom renovations. This wood fiber material comes in several types.
- Veneered is a material perfectly suitable for finishing a doorway; it is particularly strong and durable compared to other types of panels.
- Laminated is a water-resistant material that is slightly less durable than veneered MDF. But it is very attractive from the outside: it has a rich palette of colors, and there are also panels that imitate the texture of natural wood. Such MDF is also perfect for finishing a doorway after installing a metal entrance door.
- Painted is a material whose surface is less durable. It is not suitable for this type of work.
We make slopes from MDF with our own hands
If you decide to finish the doorway with MDF panels on your own, then the following materials and tools will be useful to you:
- MDF panels (3 pcs.);
- platbands (3 pcs.);
- decorative bending corner (3 pcs.);
- decorative rail (3 pcs.);
- guides (slats with a width of 10 mm and a width of 30 mm, the total length of the slats is approximately 9 m);
- screws (length 35 mm), approximately 30 pcs.;
- dowels (diameter – 6 mm), approximately 30 pcs.;
- watery nails;
- cement mortar;
- polyurethane foam;
- jigsaw;
- assembly knife;
- chisel;
- brace;
- bit;
- roulette;
- pencil.
To perform high-quality work on finishing a doorway, you must follow the following rules:
- slopes should be located approximately 1.5-2 cm below the level of the box;
- the distance between the external slopes should be greater than the distance between the internal ones;
- To properly install the door and obtain even slopes, you need to accurately measure the dimensions of the doorway.
Stages of finishing a doorway
- Sealing cracks with cement
First, inspect the slopes, seal large cracks and holes with cement or putty (if small), remove any protruding old cement mortar, old whitewash or paint; Seal the gaps between the wall and the door structure with polyurethane foam, and after it has hardened, cut off the excess with a knife.
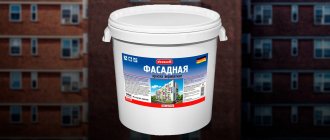
Treat the surface of the slopes with a primer: this is necessary for better adhesion of the plaster to the wall. Level the slopes with plaster or cement mortar; to do this, use a system of beacons (iron profiles fixed to the wall with dowels). Plaster consists of cement, sand, and lime mortar. You can purchase a ready-made plaster solution created for facade work.
securing external corners with mounting profile
Reinforce the outer corners of the slopes with a mounting profile. It must be carefully pressed into the fresh plaster. The base for the slopes is ready. Let it dry completely.
Carefully measure the dimensions of the slopes, pay special attention to the corners in order to avoid inconsistencies later when installing the panels. From MDF panels, cut out two side and one top parts of a suitable size. Cover the entire upper surface of the slope with special glue and press the MDF panel onto it. You need to hold it tightly until the glue sets one hundred percent. The side panels must be secured in the same way. Experts advise using spacers for reliable and high-quality fixation.
What do you need for work?
Self-sealing of openings requires the availability of the necessary minimum of tools and a selection of high-quality materials.
The technology for installing plasterboard sheets requires the use of the following devices:
It is possible to eliminate openings in brick walls that go outside. If the load-bearing wall is significantly thick, the opening from the street is filled with stone blocks, and the internal niche can be filled with cheaper and less labor-intensive plasterboard.
Dry plaster
Drywall is produced in sheets of various sizes and thicknesses. This will make the structure lighter in places where there is no physical impact on the overhead wall (niches, walls hidden behind furnishings, ceilings).
You can select a material with the desired characteristics using the following example:
The number of sheets will depend on the size of the opening in the wall to be sealed. It is preferable to apply a solid fragment cut to size onto the hole on each side.
Profile
The strength and resistance of the structure to periodic loads and vibrations of a residential building will be determined, first of all, by the correct choice of frame components.
It is allowed to make a supporting structure from wooden beams.
However, it must be recognized that wood is less durable than galvanized metal and is susceptible to drying out (loosening screws) and damage by pests.
When assembling wooden fragments, more time and effort will be required to obtain the most even plane for installation of the coating.
The special profile for installation of plasterboard sheets is standardized and is divided into the following grades:
Matching the brand of the product with the selected thickness of the applied sheet will prevent deformation and destruction of dry plaster when a lateral load occurs.
The frame of the passage to be sealed and the crossbar are made of PN. PS racks are placed in increments of 0.6 m, cross braces at a distance of 0.3–0.4 m.
Self-tapping screws
The fasteners must also be suitable in their characteristics to the parameters of all the material used. It is selected by Ø and length:
The frame is fixed to the wall using dowel-nails 6x40 mm in increments of 0.3 - 0.4 m.
The calculation of the required number of screws is made according to the sketch of the frame with a screw-in pitch of 0.2 - 0.25 m.
Slopes made of MDF panels
Necessary materials:
- MDF panels.
- Wooden bars, width 3 cm.
- Dowels.
- Self-tapping screws.
- Liquid nails.
- Platbands.
- Decorative corner.
- Guide strips.
Tools:
- Hammer.
- Drill.
- Scissors, knife.
Installation of MDF door slopes - do-it-yourself installation algorithm:
- Clear the opening.
- Drill holes around the perimeter for the dowels.
- Afterwards, attach the slats and guides.
- Measure dimensions and make templates for parts for slopes.
- Cut out the details.
- Install the top part onto the screws. Check that there are no gaps.
- Install into the side guides: inside on nails, outside on screws.
- Cover the outer corners with a flexible decorative corner to hide screws and irregularities.
- Cover the inside corners with decorative strips and the finishing is ready.
After finishing the work, you need to install the platbands. If there is still wallpapering to be done, they will be installed after the renovation is completed.
Advantages: the finish looks presentable, easy installation.
DIY wall with plasterboard niches
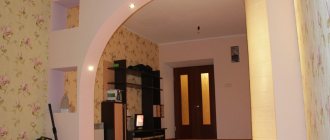
With the help of drywall, you can create arbitrarily curved structures. Therefore, this material is so often used in the interior. If you plan to redistribute the free space in the room, it is better to use a frame structure that can be finished with plasterboard. And part of such a wall can be made into a niche that will serve not only an aesthetic, but also a functional role.
Before you make a niche in a plasterboard wall with your own hands, you should draw up a drawing of a partition that will include all the elements existing in it, including niches and shelves.
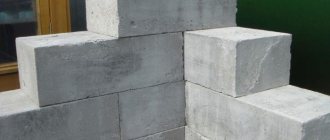
Options for sealing the opening
As mentioned above, you can also seal a doorway in a wall with block materials. The brick disappears here. It's heavy. But blocks made of cellular concrete will be just right. In addition, today you can choose this material to match the size of the opening; fortunately, manufacturers offer a fairly wide range in terms of dimensions. Plus high heat and sound insulation properties of the blocks.
As you can see, it’s not difficult to seal the door opening with plasterboard even with your own hands. Perhaps one of our readers has had experience in carrying out this type of work; I would like to hear your comments on this topic.
What is the advantage of a niche made of gypsum plasterboard
One of the main advantages of plasterboard niches is the ease of their construction. The structures are lightweight, and their design can be very diverse. An additional advantage is the ability to use different materials for finishing. This can be anything from budget paint to expensive natural stone options.
Plasterboard walls, complemented by niches, can provide for the installation of household and electronic appliances, depending on where the structure is located - in the kitchen or in the living room.
Attention! If a home craftsman is wondering how to cover a niche in the wall with plasterboard, he must consider whether there are curved shapes in this design. If this is the case, you can purchase special arched drywall, which is much easier to work with when solving such problems.
Conclusion
It is much easier to build an opening from plasterboard than from any other material, so almost anyone who has the desire to carry out the work themselves can handle the job. The video in this article will help you understand some of the nuances even better, and if you still have questions, write them in the comments under this review.
Did you like the article? Subscribe to our Yandex.Zen channel
October 22, 2016
Plasterboard systems, Doors
If you want to express gratitude, add a clarification or objection, or ask the author something, add a comment or say thank you!
How to decorate a niche in a plasterboard wall
If the plasterboard wall will include a niche, you should think about how to finish this part of the structure. Depending on the room, you should select the material. It can be moisture resistant or intended for use in dry rooms. Among the most common finishing options are:
Plastic, paint and plaster are suitable for bathrooms and kitchens. But the wallpaper can be pasted on a niche in the living room or children's room. Finishing can also be done using washable wallpaper, which is often pasted even in bathrooms.
In the kitchen and bathroom
To work with niches that are built into plasterboard walls, you can use a variety of finishing options. When it comes to bathrooms and kitchens, you can also use:
The stone can be not only natural, but also artificial. In the latter case, the material has less weight and costs less. A brick finish will look good in the kitchen. It can have a modern shade that will fit well into the interior and will not distract too much attention.
In the living room and bedroom
The finishing of a niche in a plasterboard wall may involve the use of:
Don’t assume that tiles are only suitable for bathrooms and kitchens. Today, using this material, a wide variety of surfaces are finished in rooms of all kinds. As for laminate, it can also be used for walls. But PVC panels are a budget finishing option, which is offered in imitation of different materials.
In the nursery
A plasterboard wall with a niche can also be located in a children's room. Such an addition to the interior can be an excellent solution, which also plays a functional role, because books, school supplies and toys can be placed on the built-in shelves.
Several finishing options
Sewn doorways, photos of which are posted by various construction companies, will be very different from the result you get. The fact is that it is not enough to simply lay the opening; it is also necessary to carry out decorative finishing work.
Firstly, you need to putty the screw heads in plaster and the joints of the sheets (if any). This is done in order to create the most even surface possible. The same should be done with the seams between the plaster and the wall.
Secondly, large gaps are quite common between the plaster sheet and the wall. Naturally, they can be laid with cement or putty, but it is much easier, and also more economical, to blow them out with polyurethane foam. The excess is then cut off, and the foam itself is puttied.
Thirdly, the question of external surface finishing remains open. In fact there are only two of them:
- painting,
- wallpaper.
Everything else follows from them. If the front side of the sheet is white, then no questions arise. But in the case of moisture-resistant cardboard, the surface will have a blue or green color. In addition, most putties show up as stains, both on the wallpaper and on the paint. The solution to the problem is quite simple - glass paper. This is a thin white material with high adhesion. Despite the fact that it increases the consumption of paint or wallpaper glue, its properties are very useful, as they significantly extend the life of the wall covering (prevent cracking of the paint).
In order to glue glass paper, it is necessary to treat the surface first with primer, then with liquid PVA glue (for brick only). The paper itself is glued with wallpaper glue. The absorbent effect (and with it the consumption of paint or wallpaper glue) will decrease if the paper is primed.
If saving is not an issue, it is advisable to stick glass paper not only on the doorway, but also over the entire area of the walls (the materials, on average, will last 5-10 years longer).
How to seal a niche in the wall with plasterboard yourself
If the wall has a niche that was decided to be finished with plasterboard, it is necessary to act in a certain sequence. First, preparatory work is carried out, then the frame is installed. The main step will be attaching the sheets. The last step is to prepare the gypsum board for further finishing.
Drawing up a drawing
In order to understand how much material will be needed for the work, it is necessary to prepare a diagram. It will look like a drawing on which the master will indicate the dimensions of the wall and niches in it.
According to the dimensions of the plane to be finished, it will be possible to understand how many plasterboard sheets should be purchased. To do this, you need to find out the area of the niche, and then the area of one sheet. The first value should be divided by the second, which will allow you to understand how much material should be purchased. If the niche is small, you may only need one canvas.
Necessary materials
In order to fill a niche in a plasterboard wall, you should stock up on some materials, among them the following should be highlighted:
If you also plan to finish the gypsum board yourself, you should think about what material will be used for this. Additionally, you also need to purchase a primer to increase the adhesion of the drywall surface and cladding.
Tools
If earlier the interior included a TV in a niche, and now it was decided to seal the latter, you should prepare some tools, namely:
Self-tapping screws will be used as fasteners. In addition to them, you will also need a screwdriver.
Installation process
If the plasterboard partition had a niche that is no longer needed, it should be closed. To do this, you need to choose the base of the frame - metal guides or wooden beams. The latter is less durable and not as strong. In addition, wood dries out over time.
Attention! Wooden slats take more effort and time to install the frame and ensure a level surface. Therefore, experts increasingly recommend using a metal profile.
If there was a door in the wall, and now the panel has been removed, you should also remove the door frame, as well as the trim. All finishing materials should be removed. If the niche is quite wide, intermediate racks should be installed. Next, the cross members are installed.
The frame in the places where the sheets are attached should be positioned in such a way that 2 edges of drywall fit into the central part of the vertical rack. The location of each element should be controlled by the building level.
Once the frame has been made, you can begin finishing the plasterboard niche. It is cut into separate fragments and fastened with self-tapping screws, recessing the fastener heads by 1 mm. The wall can be further soundproofed by installing sound insulation inside. It can be stone wool.
Finishing
Now that the wall does not have a niche with a TV, and the space is leveled, you can move on to finishing. To do this, the joints of the sheets are chamfered at an angle of 45 degrees. The resulting depression is filled with putty, into which the sickle tape is embedded. Cover it with another layer of putty on top and level it well, leaving it to dry.
The recesses from the screw heads should also be filled. After this, the material is left for some time so that everything dries well. Finishing at the next stage involves cleaning the plastered areas. They can be covered with a layer of primer and the entire surface of the drywall can be leveled, covering it with a thin layer of putty.
Such preparation is necessary for the wall if wallpaper is to be pasted onto it. When they are particularly thin, areas of different tones can show through, which is especially true when the drywall has a special purpose and is pink or green in color.
Once the entire surface is dry, you can sand the uneven areas, clean the wall of construction dust and cover it again with a layer of primer. Next, you can do the finishing touches by painting the sheets, gluing decorative stone or wallpaper on them.
Attention! The design of the niche should be determined before arranging the furniture. Otherwise, the finishing material of this part of the room may not be combined with the upholstery or stylistic design of the interior items.
After installing the niche frame and covering this part of the wall with plasterboard, you can begin decorative finishing. One of the material options is artificial stone. The smooth surface of drywall is ideal for laying these products. A little glue will be used, because with its help you will not have to level out the unevenness.
Attention! Repairing ceilings can also be done by installing drywall on the frame. But you should not use wooden blocks, but metal profiles, since only they can withstand the corresponding loads.
In order to finish the surface of the drywall that covered the niche, you should lay out a decorative stone on the floor to understand in what sequence this or that element will be used. You can even number them.
It is better to use liquid nails for such work, as they set quickly and can provide reliable fastening. When a cement-based mortar is used, the layer thickness increases to 6 mm. Although this composition is cheaper, it has many disadvantages compared to glue.
Attention! Before starting work, you should mark the wall by drawing horizontal lines spaced from each other by the width of the decorative stone. The estimated seam thickness should be added to this value. It is necessary to check the horizontality of the lines at the building level.
If it was decided to use liquid nails, they are applied using a glue gun to the back of the stone in the amount of 8 dots. You can use the wave application method.
Finishing should begin from the bottom row. If there is a risk of heavy material sliding down the wall, you need to install a starting rail. It will additionally determine the horizontal position of the masonry. The element is pressed in a little so that the glue comes out around the edges. The masonry may include wide joints. The offset should not be more than 10 mm.
When using regular glue rather than liquid nails, spread the composition with a notched trowel. To ensure that the seams between the elements are even, plastic crosses should be used. The masonry should be carried out in such a way that in the most visible parts of the wall there are solid pieces of stone. Trimmings should be placed on a surface that is closer to the entrance.
In order for the masonry to look harmonious, the seams should be bandaged. To do this, each next row begins with half of the product. At the final stage, you will also need to grout the joints. To do this, select a composition of a suitable or contrasting color. It is convenient to use a special syringe for this. A budget solution would be a plastic bag with a corner cut off.
The grout can be selected so that it matches the color of other surface finishing options in the room. When filling seams, the work should be done in such a way that a relief is created on the surface. To do this, the space between the tiles is not filled flush. This will allow you to achieve additional defects in the play of light and shadow. If excess composition has formed, remove it with a damp sponge or rag.
Source
How to organize the process
One of the most popular concepts of modern interior design is the constructive delimitation of space, allowing it to be divided into several zones.
But if you look at things more realistically, most residential property owners have no time for design. They often need to install a partition with a door in order to allocate, although not large, a separate room for an older child, or a young couple who still have to live with their parents. How to adequately cope with such a rather difficult task?
By searching: “Do-it-yourself plasterboard doorway video,” you can find and watch videos with master classes from professionals. But we think that theory will also not hurt – especially for those who have never encountered such work before.
Required materials and tools
Making a doorway for drywall requires, of course, a certain skill, but before you begin this work, you should stock up on the necessary tools. First of all, you will need two planes specifically designed for working with plasterboard. They are called: peeling and edging: the first one processes the cut line of the sheet, and the second one is necessary in order to cut a chamfer on it at a certain angle.
They cut sheets of drywall with a knife with a reinforced blade, but in some cases they use a special hacksaw, which you see below. To cut the profile, you can use ordinary metal scissors. For the rest, they use general construction tools that every owner has in their arsenal: a hammer drill with drills, a screwdriver, a hammer, a set of screwdrivers.
Hacksaw for cutting drywall
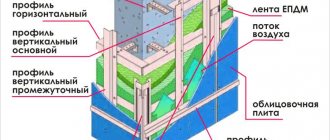
- Sheathing a doorway with plasterboard is the easiest way - the main thing is that the frame is correctly installed under it. The main role here is played by correct marking, which cannot be done without a building level, a plumb line, a paint cord, and a tape measure with a magnetic hook at the end. Professional installers use a completely different tool for this - but their scope of work is appropriate.
- In terms of materials, you will need two types of metal profiles: a guide, mounted around the perimeter of the partition (floor, walls, ceiling), and a rack, on the shelves of which there are stiffening ribs. Domestic profiles are marked PN and PS, while imported profiles are marked UW and CW, respectively.
Note! During the installation process, the profiles are joined, so they need to be selected in pairs - so that the height of the rack shelf matches the width of the backrest of the rail - for example: UW 75 * 40 mm and CW 75 * 50 mm
- The bearing capacity of the profile directly depends on the size of the section, and the longer the span, the thicker the partition will be. It must also correspond to the width of the door frame that is installed in the opening, therefore the standard size of the profiles must be appropriate.
- To strengthen a plasterboard doorway, you will need a couple more wooden beams. Since they will have to be inserted inside the racks framing the opening, the cross-section of the beam must correspond to the size of the profile. And, of course, you can’t do the work without fasteners. To fix the guides you will need 6*40 dowel nails, and to install the sheathing you will need 3.5*25 mm plasterboard-metal screws.
Connecting profiles with a cutter
- Fastening the frame elements to each other is done with small metal-to-metal screws, but if you purchase a cutter for the profile, you can make connections using the notch-and-bend method. The price of such a tool is not that high - you can buy an inexpensive option in the range of 580-980 rubles. But the connections are more rigid, and the work progresses much faster.
- All that remains is to buy basalt mineral wool 60 cm wide, which is used for the internal filling of the structure and, in fact, the cladding material. To mount a plasterboard doorway in a working partition, you need to take a wall gypsum board with a thickness of at least 12.5 mm.
Gypsum fiber sheets (GVL)
Better yet, use not plasterboard, but gypsum fiber sheets (GVL) - they have greater strength, since they are reinforced throughout the mass with asbestos fiber. The width of the sheets is standard: 1200 mm, but the length is selected depending on the height of the partition.
If it is higher than 2500 mm, then it is better to take sheets 3000 mm long - this way you will not have to insert narrow strips along the top. Accordingly, before covering the doorway with plasterboard, the sheet is oriented with the long side vertical.
How to seal a hole in a wall with plasterboard?
© StroyPartner LLC
2009-2018
Quite often, when remodeling homes, consumers choose plasterboard sheets for zoning rooms and sealing doors. This is due to the relatively low cost of the material, the ability to quickly and with a minimum number of “wet processes” perform all the necessary work. But not everyone knows how to close an opening in a wall with plasterboard so that it is technologically correct and reliable, so in this article we will look at this issue in more detail.
Methods for making interior plasterboard construction
Interior arched structures can be made in two ways: “dry” and “wet”. The “dry” method is most often used in cases where it is necessary to create an arch with a large bending radius (from 1 meter or more). In this case, a frame (it can be metal or wood) with a radius element is mounted in the passage.
Then the plasterboard elements are fastened: the rounding of the plasterboard is done gradually (with each screw that is screwed in). If, during the next bending of the plasterboard element, there is a danger that this sheet may break, the plasterboard is slightly moistened and it is continued to be creased.
The “wet” method is used to make an arched vault, the bending radius of which is small (less than 100 cm). Before starting work, plasterboard elements are soaked in water (this gives the material greater elasticity). While the drywall absorbs moisture, a curved profile template is made. A wet plasterboard sheet is placed in the profile: when the plasterboard dries, it takes on the desired shape.
By the way, the design of an arched structure can be very diverse: it can be plastered, and then painted or tiled or covered with wallpaper. There are no strict rules here.
If a doorway needs to be reduced or a hole in the wall needs to be sealed, a home craftsman can safely take on this work. Having carefully studied the recommendations on how to cover a doorway with plasterboard, as well as cover it with decorative material or plaster and paint it on top, he will become familiar with all the intricacies and secrets of performing such work. Having spent a little time, as well as putting in effort and effort, such a craftsman will be able to create a charming design.
What do you need for work?
To seal the opening yourself, you will need the following tools:
You need to dwell in more detail on the choice of building materials.
Drywall is produced in different types according to purpose and thickness. The standard size of plasterboard sheets is 2500x1200 mm. To seal the opening, wall material with a thickness of 12.5 mm is optimal.
GCR is also classified according to its properties - the main types are ordinary, moisture-resistant and fire-resistant materials. So, for living rooms, as a rule, they use ordinary plasterboard with a gray front side. And for rooms with high levels of humidity, moisture-resistant products are optimal; they are greenish in color.
Figure 1. Varieties of plasterboard sheets
Usually one sheet of plasterboard is enough to cover a doorway on one side. At the same time, keep in mind that it is better to apply solid (pre-cut to the size of the opening) fragments on both sides.
Profile
To construct the frame, you can use either wooden blocks or a special metal profile. However, wood is less durable, so preference is often given to galvanized profiles, which are available in standard sizes.
Table 1. Types and sizes of profiles for the frame for installation of drywall
Used as horizontal jumpers, absorbs the main loads during operation
Used for installation around the perimeter of the opening, allows you to create a mounting plane for gypsum boards
Self-tapping screws
To attach the frame to the wall, use self-tapping screws and dowels. To fix the gypsum board to the sheathing, special black wood screws (photo 2) are optimal, which have a rarer thread than metal threads, which are available in different lengths. To attach metal profiles to each other, you will also need short metal screws. They can be either with a drill (photo 3) or without it (photo 4).
Photo 2. Self-tapping screws for gypsum boards and a bit for a screwdriver
Photo 3. Self-tapping screws with a drill for attaching profiles to each other
Photo 4. Self-tapping screws without a drill for attaching profiles to each other
Removing the old door
First, the door leaf is removed from the hinges. If you no longer need the door itself, then its frame can be cut into several pieces with a saw. After that, each piece is torn off from the ends of the opening using a crowbar.
Usually, during the dismantling process, the surfaces of the openings in the places where the boxes are attached deteriorate and do not meet the requirements in terms of technical condition. Therefore, it is recommended to putty the surface.
Since leveling a doorway is not at all easy, it is necessary first of all to pay special attention to the quality of assembly of the metal frame. How it all happens:
- It is necessary to assemble two frames at the edges of the doorway. That is, one will be closer to the wall of one room, the other closer to the wall of the adjacent room. In this case, both frames are usually not connected to each other. These are free-standing elements.
- It is necessary to cut four pieces from the guide profile with a length corresponding to the height of the doorway. They are secured using “quick installation” dowels along the edges of the vertical ends. To do this, each profile must be installed in place, using a plumb line and level, and holes must be made with a puncher every 30-40 cm. The dowels will be inserted there. Please note that each profile is installed slightly deeper into the opening, leaving space for installation of gypsum board sheets. That is, the distance from the wall to the profile should be equal to the thickness of the sheet. It is best to use plasterboard with a thickness of 12 mm.
- Now you need to cut several pieces from the rack profile, the length of which should be equal to the width of the doorway. They are used as crossbars that connect racks made of PN elements.
- On each side, one crossbar must be installed directly to the upper end of the opening, and one to the lower end, that is, near the floor. Intermediate elements are placed every 40-50 cm.
- If there is a need to increase the rigidity of the entire structure, then between the crossbars, right in the middle of the doorway, it is necessary to vertically install sections of the rack profile, which will connect the crossbars. The result is a cellular lattice of profiles.
The frame is ready, you can proceed to installing plasterboard sheets.
Preparatory work
Home craftsmen rarely encounter the need for redevelopment, so not everyone knows how to seal an opening in a wall with plasterboard. Preparation for sealing begins with dismantling the old door. To do this, carefully remove the sash from the awnings, prying it with a crowbar, and remove the platbands. Then they saw the box in several places, pry it up with a crowbar and dismantle all its parts.
Photo 5. Dismantling the door frame
As a rule, the ends on the walls are damaged during dismantling work, so they need to be cleaned with a metal brush. If there are peeling areas of plaster, they are removed with a narrow spatula or chisel. The surface of the walls is dusted with a damp cloth or using a vacuum cleaner.
Tools and materials
Before you start, you should prepare everything you need:
- Screwdriver.
- Hammer drill with a set of drills.
- Grinder or metal scissors.
- Construction knife.
- Level.
- Hacksaw.
- Montage.
- Brush with hard bristles.
- Putty knife.
- Guide (PN) and rack (PS) profiles in the required quantity.
- Two sheets of drywall.
- Mineral wool.
- Polyurethane foam.
- Self-tapping screws and dowels.
- Putty.
- Deep penetration primer.
Preparatory work
First of all, the doorway is cleared of anything that could interfere with installation. The trim is torn off and removed from the hinges of the door leaf. The wooden beam of the door frame is sawn with a hacksaw and dismantled using a crowbar. The entire perimeter of the opening is cleaned with a spatula and a brush to remove old flaking plaster and dust.
At this stage, it is necessary to ensure the strength of the brickwork or concrete framing the opening. If major defects are found in them, restoration is carried out.
Frame assembly
To seal a through opening, it is necessary to build 2 structures from profiles that do not need to be connected to each other. Sequence of work:
Figure 6. Layout of profiles PN 28x27 and PP 65x27
Photo 7. A frame constructed on one side to cover the opening with gypsum plasterboard sheets
If the opening width is more than 1.2 m, it is better to make a more rigid structure. To do this, the frame is supplemented with a vertical ceiling profile PP 60x27 or a rack profile in the middle so that the result is a lattice structure.
The frame assembly process is shown in the following video:
Causes
What could be the reasons for this situation? Essentially there are two of them:
- design features;
- inaccuracy of measurements taken.
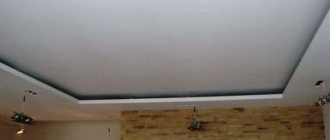
In the first case, there are situations when the door opening corresponds to the height of the ceiling. Quite often you encounter this in bathrooms, storage rooms and even living spaces.
Opening above the door
Drywall installation
Initially, it is necessary to cut blanks from a solid plasterboard sheet that correspond to the dimensions of the doorway. To do this, markings are made on the surface of the plasterboard, then a metal ruler is installed along the marked line or a rule according to which an incision is made in the top layer of drywall with a mounting knife. Then the sheet at the site of the cut is sharply bent and it breaks at the site of the cut. It is recommended to do this on the edge of a table or other suitable surface. The second workpiece is prepared in the same way.
Technique for attaching plasterboard sheets cut to size:
Photo 8. Space filled with mineral wool
Photo 9. An opening in the wall sealed with a single sheet of gypsum board
When sealing, keep in mind that the head of the screw should be recessed into the gypsum board no more than 5 mm, otherwise it must be unscrewed and screwed in again in another place. The pitch between fasteners must be maintained within 100-150 mm.
The process of sealing an opening with plasterboard sheets is discussed in detail in the following video:
Reducing the doorway
If it is necessary not to completely close the doorway, but only to reduce its width, a volumetric frame is made from the profile and fixed, corresponding in size to the section of the wall being built up. In plan it will look like the letter “P”. To do this, parallel lines are drawn on the floor inside the opening, which are a continuation of the walls. The boundary of the end of the future wall is drawn perpendicular to it.
Stepping back from it and the first two lines 12 mm inward, we find a U-shaped boundary for installing the metal frame on the floor. A guide profile is attached to the floor along it. Strictly vertically above it, the same structure is created on the ceiling. Two more guide profiles are installed vertically from floor to ceiling along the edges of the old wall of the opening.
The corners of the letters “P” of the floor and ceiling are connected by vertical posts made of a supporting profile. To increase the rigidity of the structure, they are connected to guide profiles nailed to the wall, with several horizontal jumpers in increments of no more than 50 cm. After this, part of the doorway can be covered with plasterboard and the cavity filled with noise-proof material.
Sometimes it is necessary to seal the opening above the door with plasterboard. In this case, two frames are installed there, consisting of a guide profile attached with anchors to the walls and ceiling. The lower edge of each frame forms a horizontal supporting profile, which is connected at its edges to vertical guide profiles. Both frames are also covered with plasterboard, and the interior space is filled with stone wool.
Finishing
After installing the drywall, you can begin finishing. You can paint, wallpaper, or decorate the sealed opening with any other material. But first it is necessary to seal the joints (if non-solid parts of the gypsum board were used), the places of fastening and the junction of the gypsum board to the wall.
Technology for filling joints and fastening points:
Photo 10. Putty joints, joints and drywall fastenings
If necessary, puttying can be done in 2 layers, but it is advisable to treat the previous layer with a primer. After drying, finishing is carried out.
You can seal an opening with plasterboard in just a few hours. Finishing usually takes no more than 1-2 days, due to the need to wait for the applied layers of primer and putty to completely dry. But as a result, you will get a perfectly flat surface that will not visually differ from the rest of the wall surface.
Quite often, when remodeling homes, consumers choose plasterboard sheets for zoning rooms and sealing doors. This is due to the relatively low cost of the material, the ability to quickly and with a minimum number of “wet processes” perform all the necessary work. But not everyone knows how to close an opening in a wall with plasterboard so that it is technologically correct and reliable, so in this article we will look at this issue in more detail.
Seam sealing and finishing
All joints and irregularities on the front side of the drywall are leveled with the approach to the walls using putty. Before applying it, the surfaces are treated with a deep penetration primer, which promotes good adhesion of the leveling solution. The putty is usually applied in two layers with an intermediate primer. In this case, all screw heads must be completely closed.
It is not recommended to use dyes as a finishing touch for the room in which the opening was sealed. Over time, cracks may appear in this place. You can hide this defect by using wallpaper or wall tiles.
What do you need for work?
To seal the opening yourself, you will need the following tools:
You need to dwell in more detail on the choice of building materials.
Drywall is produced in different types according to purpose and thickness. The standard size of plasterboard sheets is 2500x1200 mm. To seal the opening, wall material with a thickness of 12.5 mm is optimal.
GCR is also classified according to its properties - the main types are ordinary, moisture-resistant and fire-resistant materials. So, for living rooms, as a rule, they use ordinary plasterboard with a gray front side. And for rooms with high levels of humidity, moisture-resistant products are optimal; they are greenish in color.
Figure 1. Varieties of plasterboard sheets
Usually one sheet of plasterboard is enough to cover a doorway on one side. At the same time, keep in mind that it is better to apply solid (pre-cut to the size of the opening) fragments on both sides.
Extending the frame to install the door
In conditions of saving space and the absence of bulky furniture that cannot be disassembled, you can resort to reducing the passage between rooms. For example, in place of a large 90 cm door, install more compact 80 or 70 cm ones. But for this it is necessary to reduce the opening. With the current level of technology, there is no need to lay bricks for this purpose. But how to make a doorway from plasterboard? For this you need a metal frame.
Before you begin assembling the frame for the gypsum board, you need to remove the old door along with the frame, remove the protruding parts of the wall and, if possible, level the slope, knocking down the excess.
The procedure for “building up” a doorway
There are two ways to build up a wall using drywall:
Method 1. Install vertical metal posts for the door frame and cover the resulting space with plasterboard. This method can be used if:
- the slopes are badly damaged, they are uneven, it is impossible to nail a profile to them;
- a layer of plaster allows you to level the drywall with the wall without a difference in the level of the wall plane;
- You only need to reduce the passage by 5 - 10 cm.
First of all, it is necessary to remove a layer of plaster from the wall on the side where the frame will be mounted, at a distance of 10 - 15 cm from the corner. Then mark the plane of the wall on the floor and measure the required dimensions of the future frame, set the profiles so that they are perfectly vertical in two planes, and at all points in height the opening distance is sufficient to mount the door frame.
GCR elements cut to size are glued to the wall with a special adhesive for drywall and screwed to vertical profiles, which must be secured to each other with jumpers for rigidity and distance control.
Method 2. Installation of a small plasterboard structure. This method is used if it is necessary to build up a large section of the wall, combining it with the opening, to zoning a large room into several small ones. This method partially repeats the installation of a plasterboard partition.
- Having outlined the plane of the future wall of the required dimensions on the floor and, if necessary, on the ceiling, you should deviate from this line a distance equal to the thickness of the plasterboard.
- We mount the frame, not forgetting about precise control of the verticals. Metal profiles must be secured to the floor and carefully to the end of the wall.
- The guides must be connected to each other by horizontal jumpers, which will provide the structure with the necessary rigidity.
It should be remembered that when reducing the doorway, it is better to install the plasterboard structure from the side of the door lock. It is also possible to use it from the side of the awnings, but for this it is necessary to significantly strengthen the structure. There is also a high probability of cracks in the finish due to the load on the frame.
GKL partition with door
To assemble a plasterboard partition, special guide profiles with a width of 55 mm or 75 mm are used. Door racks are also formed from them. The peculiarity of installation is that it is necessary to correctly maintain the distance between the vertical posts. It is equal to the width of the assembled door frame + 1.5 - 2 cm per layer of polyurethane foam + thickness of drywall on the slope. In this case, it is necessary to very accurately measure the vertical of the horizontal guides.
Installation of partition and opening
The procedure for installing such a structure is as follows:
- We apply markings to the floor and ceiling, checking the vertical coincidence with a plumb line.
- We fasten the guides according to the markings and insert vertical profiles into them in increments of 60 cm.
- In the place where we plan to install the door, we also place vertical profiles, connecting them together with a horizontal jumper strictly level with the same gap as described above for the side posts.
Afterwards, you can install horizontal wooden beams or a metal profile to increase the rigidity of the structure, lay thermal insulation and cover everything with gypsum plasterboard sheets.