Home / Ceiling design / Design solutions / Options for creating relief paintings and panels from plaster
Many people want to decorate their home in an extraordinary way. For this purpose, many different solutions are used, among which the relief panel created from decorative plaster stands out for its originality. It can be made complex or simple, the mixture can be applied to the surface in different ways and you can create anything you want.
What it is?
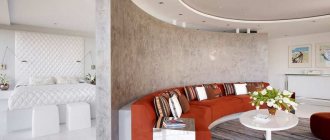
Relief decorative plaster is a finishing material for finishing surfaces. It is based on a binder, to which auxiliary additives are added: various resins, stone chips, lime, and mineral components. It is their quantity and composition that determine the texture and appearance of the future relief plaster.
The use of relief plaster of this type helps to create patterns whose structure resembles wood, granite, orange peel, plants, as well as a bark beetle-style surface (imitation of a wall eaten away by insects). It can be an abstract pattern or a finished painting. In this way, you can treat areas that are located inside, as well as external facades. Don’t let all these patterns and abstractions scare you; applying relief plaster with your own hands will turn out just like any master. You just need to do a little research. Such activities can be classified as art, just like painting on plaster.
And most importantly, you can decorate the walls or ceilings in your apartment using relief plaster with your own hands, without resorting to the services of craftsmen. To do this, it is enough to study some of the nuances associated with the composition of working solutions, as well as how to work with it correctly.
It makes sense to practice on small areas where you can make such plaster. If you do not master the application skill well, then small defects will be visible on the finish coat.
Essence of the method
Fresco painting was already popular in the ancient world, of which a lot of evidence has been preserved in the form of paintings on the walls of residential buildings and temples that have come down to us. In the Christian world, the art of fresco was improved and reached its peak during the Renaissance.
Initially, the fresco technique involved painting walls or ceilings on wet plaster. The term fresco itself in Italian means “fresh”. This is the main feature of the technique: when the lime contained in the plaster dries, a thin and durable layer is formed on the surface, protecting the design from destruction.
Painting on wet plaster is often used in combination with other methods. For example, mixed media allows the use of tempera glue painting. In any case, special importance is attached to the preparation of the walls. The finish will not last long if the plaster layer is made or applied incorrectly.
Differences in mixtures by chemical composition.
The basis of the material is different substances, so this relief plaster comes from components that give it special properties:
- silicone. It is used mainly for external decoration of facades. This plaster is quite elastic and allows steam to pass through well. The main advantage is easy care. The coating is easy to clean, and when finishing the exterior, a little rain is enough to return the walls to their original appearance. However, this type of solution is highly expensive;
- mineral. It is a cladding based on lime or cement, sometimes with the addition of marble chips (the greater its concentration, the more noticeable the relief). It is sold in dry form, so before use the composition must be brought to the optimal consistency by diluting it with water. The mixture is universal. Therefore, it can be used both in the interior and for the facade of a building.
- polymer (acrylic plaster). This bas-relief plaster is completely ready to be applied to the base with your own hands. The filler in the composition is fly ash, glass or marble chips. The composition does not allow steam to pass through well, so it is used for indoor treatment. But it also performs well outside, withstanding the elements;
- silicate. It is a mineral substance with an astringent component in the form of potassium liquid glass. This relief plaster is optimal for processing and creating any surface.
Where is bas-relief used on the wall in the interior?
Many centuries ago, bas-relief was used only for decorating large-scale structures. These were palaces, cathedrals, monuments and other works of architecture. Bas-relief was used more often in the Gothic style.
Currently, the situation has changed dramatically. Bas-relief has become available for decorating apartments, offices and other premises. The scope of application regarding style has also become significantly larger. Now it is not only Empire, Baroque and other pompous, solemn style trends.
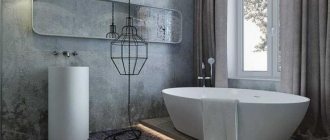
An elegant bas-relief can be seen in a simple studio apartment, in a children's room, and even in the kitchen and bathroom. You can create sophisticated decor yourself.
Differences in mixtures based on the texture of the final pattern.
Do-it-yourself relief plaster paintings differ in texture and pattern. There are several coating options, here are the most popular ones:
- marble effect - this type of plaster is also called “Venetian”. The solution is made from natural marble flour with the addition of water emulsion and slaked lime. The main condition for application is a perfectly smooth wall. Distinctive characteristics: waterproof, no unpleasant odor, fire resistance;
- flock coating is an adhesive with the addition of colored inclusions. The final pattern looks like mosaic chips. The application technology is quite original: first, the wall is smeared with an adhesive substance, and then multi-colored crumbs are thrown on top;
- textured surface - used most often because it does not require special skills. This method involves applying the composition using special tools (for example, a relief roller with a pattern intended for plaster) or improvised means such as plastic film, a sponge, or a spatula. You can even form a pattern with your hands;
- structural ornament, formed from a heterogeneous mass with granular inclusions in the form of granules. Often used for cladding parts of a building, both inside and outside. Due to the fact that it is based on an aqueous solvent, it is environmentally friendly.
- glazing, with the help of which the effect of “old” walls is achieved. This mixture does not contain toxins and is resistant to external influences.
Style solutions
The style of the panel is selected in accordance with the entire interior of the room. This condition is suitable when choosing the color used to cover the finish, highlighting the relief pattern and when forming structural lines. Eg:
- Pastel colors are considered modern. There are no bright, provocative colors here, and the forms, curved and intertwined, are painted in beige, brown, and gray colors.
- The classic interior contains features of clear symmetry. Pink, blue, matte shades are allowed. The panels are limited to baguettes and stucco is used.
- The French style of performance is considered a bourgeois direction. For the art deco style, metallic colors complemented by silver and beige are acceptable.
- High-tech style requires adherence to strict geometry in lines and patterns. There are no motifs from the plant world, no shapeless overflows. The design adheres to monotony, modest contrast - white with gray, red with brown.
Relief decoration with panels and bas-reliefs is gaining momentum not only inside buildings, but also on facades.
Advantages and disadvantages.
Relief plaster has a number of advantages. Here are the most significant of them:
- insulation effect. To achieve it, you need to pre-treat the wall with a primer (before applying plaster);
- the ability to disguise any unevenness and lumpiness at the base of the walls;
- easy operation. Detailed instructions for using any type of plaster are indicated on the production packaging. Usually you can apply relief plaster with your own hands and without difficulty, the main thing is to use the simplest tool (roller, spatula). In addition, it can be used to process almost any coating;
- a wide range of plaster allows you to choose the necessary product that suits the overall design of the room;
- environmental cleanliness. Almost all solutions for relief decorative plaster do not contain toxins, there are no harmful substances;
- aesthetic appearance. This cladding material looks quite original and elegant;
- resistance to external mechanical influences, changes in weather conditions;
- protection against absorption of foreign odors;
- ease of care. If the walls become dirty, you can simply wash them with running water;
- durability.
The only drawback it has is its far from budget price. However, taking into account all the listed advantages, its purchase is a very profitable investment that will definitely pay off over many years of service.
Preparing for work and a couple more tips.
Relief decorative plaster is applied quite simply, but still requires certain skills, basic knowledge about repair work and strict adherence to process technology. Therefore, before taking action, you need to realistically assess the possibilities.
The first step is to check the availability of all the tools, without which relief plaster cannot be applied with your own hands. This must be done in advance so as not to be distracted by searches in the future. So, you will need:
- spatulas of different widths;
- ironing board (better if it is metal);
- spatula for processing corners;
- grater;
- sponge (if the topcoat will be applied with it);
- relief roller intended for plaster;
- container for preparing the solution (if a ready-made solution is not used).
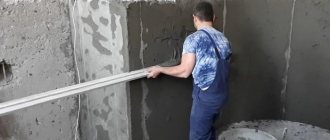
To proceed directly to plastering, you need to first prepare the area to be treated. To do this, remove the remains of the old coating from the walls, simultaneously removing dust, dirt, and mold (if any). When the old layer of plaster adheres tightly, it does not need to be removed. If there are obvious defects, they are leveled using putty and sanded after drying. It is also recommended to tap the walls to check for voids. To avoid contamination, the floor covering is protected with film.
Application cannot begin without first treating the surfaces with a primer solution, which is applied in a thin layer (up to 2 mm) using a conventional roller.
Before doing this, you must definitely find out what the surface of the wall is made of. For example, a mineral-based primer is suitable for treating concrete, but an acrylic mortar is suitable for brickwork. If you don’t have enough knowledge to make a choice, you can always seek advice from a salesperson at a hardware store.
Paint cost
In order to create unique designs and frescoes from decorative plaster, you will need special paints. They need to be selected based on the features of the image, the expected result, and also based on the budget of the planned repair work.
If we talk about the cost of such paints, it completely depends on the manufacturer, composition, as well as the volume of packaging. So, for example, a kilogram of paint can cost 220 rubles, or maybe 3000, so everyone will find a material depending on their financial capabilities and preferences.
To summarize, I would like to say that patterns made from decorative plaster are one of the best ways to make your interior original. At the same time, you can do it on your own and not spend money on design developments. Almost every guest in your home will like this solution, and no additional care for the walls will be required, so don’t hesitate and make a choice in favor of such an unusual room decoration!
How to apply relief plaster correctly.
You apply relief plaster to the base with your own hands, in two ways - using a ready-made decorative composition or with the independent formation of the finishing pattern (improvisation with texture and shades). Let's look at both of them.
Finished plaster. Work algorithm:
- applying the first layer, which acts as a leveling base. If after preliminary preparation there are still minor defects, they are removed at this stage. The seams between the slabs, corners, irregularities and differences should be treated with special care. All actions are performed using a spatula of the required length. The result of this stage is a perfectly flat surface (without depressions, seams, chips or cracks);
- applying bas-relief plaster with your own hands. Now you can approach the process creatively and choose the number of layers and technique for laying the finished mixture (based on personal preferences). Another option is to strictly follow the instructions on the material packaging. In any case, the solution will acquire an original pattern due to its special composition;
- finishing. Includes polishing and painting (if necessary). You can move to this stage only after the material has completely hardened; this usually takes about a day (manufacturers indicate on the packages of the mixtures the exact time during which it dries). To polish the surface to a glossy shine, wax is most often used, as well as other means. Surface painting is not always required, since many ready-made plaster mixtures already contain dyes. If the base is colorless, then select the required shade of paint and apply it in a thin, even layer.
Relief plaster with a structure that can be done independently. Tips for carrying out the work:
- preparatory processes and installation stages are carried out according to the same algorithm as with finished plaster;
- if a combined composition of different shades and textures is intended to be applied, then each layer is prepared and tinted immediately before application, as the process progresses;
- Each subsequent layer of material is laid only after the previous one has completely dried. This rule especially applies to relief paintings made of plaster, formed with your own hands, since it will prevent mixing of colors and smearing of the pattern;
- you need to take into account that the shade obtained when preparing the composition will become 2-3 tones lighter after application and drying;
- as already mentioned, to apply the finished solution to the wall, you can use any available item such as washcloths, brushes, crumpled cellophane, fingers - the options are limited only by your own imagination. If you want a clearer pattern, it is better to use a special roller or stencil;
- relief plaster is formed no later than half an hour after application, since subsequently it will begin to harden and finally lose its plasticity;
- the instruments must be perfectly clean. This will help avoid disruption of the patterned lines and the appearance of foreign color inclusions.
It is worth deciding in advance on the number of layers and application technique. If this is done during the application process, various transitions and inhomogeneities will be visible.
Bas-relief flowers on the wall
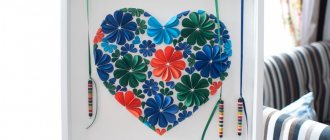
Bouquets, buds or individual flowers are also available to novice artists and decorators - the principle is the same. Lilies look amazing in the interior of a room.
Bas-relief as a work of artSource otdelkasten.com
The sketch is created on tracing paper and transferred to the plaster. You can break the drawing into small squares and copy each section with a pencil.
Forming a contour on plywoodSource yandex.net
Using a palette knife and acrylic mixture, lay out the stems, trying to make the central part the highest in the composition. The petals and middles are drawn out, making the stamens coarsely textured. One side of the petal rises, and the other is adjacent to the wall.
Sample of correct lightingSource mr-build.ru
Then they roll up the entire bas-relief with flowers and the wall with white acrylic paint. The edge of the picture is marked with golden penumbra. The three-dimensional painting is ready!
In this video there are instructions for beginner sculptors:
Creation of relief paintings and decorative panels from plaster.
Do-it-yourself relief paintings from plaster will become a worthy decoration for even the most sophisticated room, not to mention ordinary apartments. Usually such masterpieces are created using stencils.
The technology for preparing the surface and decorative mixture is carried out according to the same algorithm as described in the previous paragraphs. Below are step-by-step steps with a stencil aimed at turning ordinary plaster into a work of art on the wall:
- creating a stencil. It is usually made from paper or other thick sheet material. The thicker the stencil, the more visible the relief in the painting will be;
- Using glue or double-sided adhesive tape, the stencil is fixed to the surface to be decorated;
- the plaster is applied over the stencil. To give the picture a more natural and natural look, it is permissible to draw some elements by hand;
- the stencil is pulled out of the wall at the moment when the solution has already set, but has not yet completely dried. If it is useful in the future, it must be thoroughly cleaned of the solution and dried;
- If the layer is completely dry, then it’s time to start painting the picture in accordance with the original idea.
Backlight installation
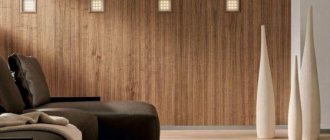
Even if the bas-relief is painted in bright colors, without properly arranged lighting, the depth of the stroke is lost, the texture becomes inexpressive, and the volume disappears. The turned on light enlivens the panorama and highlights the protuberances in contrast.
Before starting to create the object, wiring is installed in the wall, designing the contact output in advance. The design of the lamp should not stand out or interrupt the theme of the sculpture. It is better if it is invisible in the general background or be in the same style as the relief.
Ideal interior designSource topsten.ru
Light directed from below creates the impression of large volume. Top – highlights the main parts. An LED strip hidden inside the relief softly illuminates all the details.
Bas-relief option in the bedroomSource modernplace.ru
Backlight examples:
- Chinese theme – square lanterns;
- Bas-relief in Arabic style - Moroccan lamp;
- Lilies - dotted bulbs in each cup;
- Floral ornament covering the entire wall - framed with LED strip around the perimeter.
Lighting that matches the theme will make the object even more elegant.
Fine work disguised as simplicity of execution Source decorstudia.com.ua