June 24, 2020
The impression of the appearance of a house or apartment speaks volumes. When you come to visit for the first time, you probably pay attention to the interior of the premises. Today, there is a huge selection of materials and finishes that will help bring to life projects that emphasize uniqueness, attractiveness and functionality. The appearance of the house depends only on your own preferences, as well as taste and wealth.
It is not necessary to spend money on expensive building materials, holding the opinion that the quality of analogues will be much worse than branded compounds. For a long time, people have resorted to an alternative solution, for example, making decorative plaster from putty. This is a suitable option for those who do not need professionals for quality repairs. Before you start, you should study information about its types, compositions and tools. In this article we will try to understand these issues.
So what are the differences between “decorative” and ordinary plaster?
You need to understand the idea itself. Let's explain in a nutshell.
The masonry sticks out in all directions, the wall is something crooked, in which case it is simply necessary to level the surface. Simply put, create a base on which any finishing coatings will lie. Cement-sand or gypsum plaster will cope with this task. There will be no question of choosing between decorative and ordinary, because they cope with a completely different list of tasks. It would be more appropriate to compare with wallpaper, paints and other coatings. They form the basis for creating branded interiors and are assistants to many designers.
Why not wallpaper?
It is worth focusing on the qualities and advantages.
- Uniqueness
is the key to successful renovation. Let's look at a common problem. The textured elements in many finishing materials are the same. I hung some wallpaper, and found the same ones at a friend’s place. The choice takes a long time. However, this can be avoided by using decorative plaster. Thanks to the different application methods, the walls will always be different from each other. - No noise
- plastered walls are uniform and have no joints, as a result of which the material absorbs sounds from the outside. This is an obvious plus. - Various application methods
- this point is a direct continuation of the first. Such work includes a creative process that will allow you to experiment with texture. - Safety of the coating/emphasis on environmental friendliness
- decorative plaster does not contain harmful substances, therefore it will not negatively affect the human body.
Types of textures
The variety of options on the market can be confusing. Let's look at the basic issues of material types.
Textured plaster is distinguished according to the following characteristics:
- By type of binder (base used as an independent composition for plaster).
- By type of filler (additional materials that allow you to create a relief with a variety of decorative characteristics).
Interior solutions
If you have previously worked primarily with wallpaper or paint, then most likely plaster appears to be an inconspicuous cement mortar that can hardly be used in finishing.
Let's dispel the misconception.
"Silk" on the walls
- Mother-of-pearl coating, differences in degree of gloss and grain. Adding sophistication to the room. Various application methods, use of almost any color scheme. All of the above is a brief description of this type of decorative plaster.
- Its composition includes rayon, cotton and cellulose fibers, as well as water-soluble glue flakes.
- This is a unique material that imitates a silk surface, while creating the illusion of transparency of the walls. You can definitely create a stylish design, you just have to remember to carefully prepare before application.
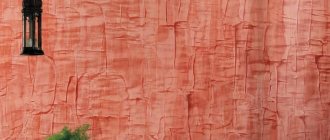
Sandstorm effect
- Externally it resembles sandstone. Apply with a brush. The technique is different, so the drawing depends on your hand. Ideal option for interior decoration.
- The composition most often includes quartz sand, but river sand can also be included. For a sparkling effect, finely crushed shell particles are added. There is a coating with reflective beads. In the interior it looks impressive and unusual.
- Textured sand is resistant to dampness, and the fine quartz included in the composition protects against fungi.
"Travertine"
- This decorative plaster imitates the calcareous tuff used for construction in Ancient Rome. Can be applied smoothly to walls or rubbed in until glossy. The thickness of application is determined by the size of the fraction.
- It contains marble powder to create shine, pigments, binders and slaked lime. The material itself is durable and acts as protection for the wall.
- It can be used to create various designs, such as a world map.
"Texture"
- Masks unevenness and other wall defects. A universal material that is suitable for those who do not want to waste time on perfectly leveling the wall. Can be used to imitate natural materials.
- The composition includes small stones, elements of granite or marble chips, and sometimes cotton and flax fibers are present. Coarse fillers are placed in a thick layer, due to which all defects are covered.
- When applying, stencils, structural rollers are used, and artistic modeling is performed.
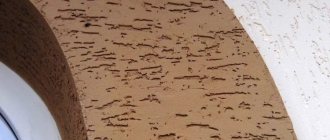
"Bark beetle"
- Currently one of the most popular decorative plasters. The material is used not only for interior decoration, but also for the facades of the house. For this, different factions are taken. The interior looks restrained and sophisticated.
- Consists of mineral filler, granules (of different sizes) and liquid.
- Several application methods: horizontal, vertical, circular.
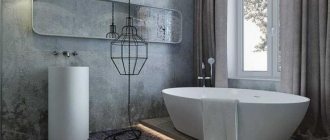
"Fur coat"
- Acts as a protector against sudden temperature changes. Otherwise called pebble plaster. Most often this coating is used in the bathroom and kitchen. Can be applied to concrete, stone, gypsum and cement plaster, drywall.
- Acrylic, cement, silicate are the main components. Texture is achieved through mineral chips.
- Small price. Anyone can handle this finishing method, so professional help is not needed.
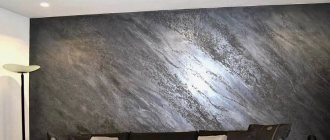
"Home Venice"
- Venetian decorative plaster is a complex and capricious material. However, it can be found in the interior with noticeable frequency. It will be difficult to recreate this type of coating without experience, but the result is worth it.
- Three important components: stone dust, slaked lime and pigments to give color.
- This coating can be single-color or multi-color. It replicates marble with a glossy surface. Sanding can be done by hand or using polishing equipment.
Types of reliefs
There are a huge number of coatings for textured plaster on the market. Special elements in the composition allow you to create the most sophisticated and imaginative patterns.
Below are the most popular textures with the effect:
- Tree bark (bark beetle).
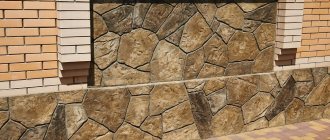
- Antique stone.
- Fur coat (this effect is also called “lamb”).
- Brickwork.
- Fuzzy fabric.
- Geometric patterns and abstraction.
- Silks.
- Concrete.
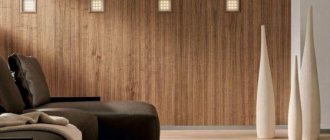
- Tree.
- Cracks.
- Reptile skin.
There are many variations. Choose yours!
How to do it yourself?
We partially examined the compositions of different types of decorative plaster. However, this does not give the full picture. In this part of the article we will take a closer look at the components in order to have an idea of the correct implementation of this type of coverage.
The binder component is the base.
Determines the properties of the working solution. It is important for him to ensure plasticity. Traditionally, lime can be used, or cement, gypsum, silicone, etc.
Filler. Decorative characteristics appear at this stage. Sand fractions, stone chips and shell fragments were previously mentioned. All this is used for mineral bases.
Plasticizer. Any substances that increase the viscosity and elasticity of the finishing composition can be used here.
In addition to all of the above, pigments are used. They are included in various pastes (acrylic, silicone, etc.) for coloring that suits the design. It looks more profitable to use several shades.
The finishing paste is used to make decorative plaster from ordinary putty. The filler contains small particles, so the coating is quite smooth. However, this type of paste has less strength.
When using putty, you get the simplest and most cost-effective option for a decorative coating. It will not be possible to make a catchy structure from it, for example, a “bark beetle”. However, you can stop at thin application in small strokes. To increase strength, it is necessary to add glue or a suitable primer to the PVA composition.
The texture itself will always depend on the added fillers. But it is worth remembering that they should not be more than 70% of the main roster.
A simple way to create decorative plaster is to use a ready-made dry mixture, which contains everything you need. You just need to dilute it with water and add filler. But if this is not your option, then you should familiarize yourself with several recipes for making:
Mix the finishing and starting mixtures in a 1:1 ratio.
The resulting composition has a long service life. This will allow even a beginner to adapt to the chosen application technique.
During preparation, it is necessary to introduce the mixtures into water one by one, and add a plasticizer if necessary.
To obtain a marble coating, mix dry putty with marble chips in a 4:1 ratio. Add water in such quantity to obtain a slightly viscous solution.
The mixture itself is most often not painted during production, but rather the paint is applied to the finished coating.
“Travertino”, “Versailles”, “fur coat”, etc. Take one part of the gypsum mixture with any mineral/polymer fillers, then add three parts of coarse sand. All components are mixed and diluted with water.
Sequentially preparing decorative plaster with your own hands
Textured plaster can be easily made from ordinary putty material. To do this you will need the following components:
- putty;
- water;
- glaze
- varnish;
- dye
- primer.
Preparation:
- Take a deep bucket or other container into which water is poured. Putty and building mixture are also sent there. You can first mix the bulk components and then dilute them with water, or vice versa. In the first option, you need to carefully pour in the water to avoid the formation of lumps and speed up the mixing process.
- For thorough kneading, use a drill mixer.
- If you intend to use any color, then it is necessary to introduce the pigment into the finished composition.
- The mixture is checked for consistency. If it turns out thick, you can dilute it slightly with water yourself.
You should prepare the amount that is required at the moment. The solution quickly hardens and thickens, so it will be impossible to work with it after just a couple of hours.
Surface preparation
This is a necessary step before applying not only decorative plaster. The main task is the elimination of small and large defects. The surface is cleaned and brought to almost perfect smoothness.
It is worth addressing some important points. After studying them, the process of applying the composition will not cause any difficulties.
- No other work should be carried out in the premises. New windows and doors are installed, and ceilings and floors are finished. This must be taken into account so that nothing spoils the design during the application of the decorative coating.
- Insufficiently dense walls are treated with a restorative primer. This helps strengthen the surface and acts as a protection against dampness.
- To avoid cracks, it is recommended to putty the joints. Each layer is covered with deep penetration acrylic primer.
- Fine sandpaper is used for sanding.
- Each applied layer must be thoroughly dried.
For finishes with large relief, there are not many rules for preparation. Minor irregularities are allowed. Many formulations hide them without problems.
The surface material also affects the preparation conditions. For example, some coatings have many pores that will take all the moisture from the finished mixture. This will noticeably spoil the quality. Such pores need to be closed by applying several layers of primer on top.
Calculation of material quantity
When calculating, it is necessary to know what area will be processed; they also take into account the approximate consumption rate of the main component that will be used. Consumption is affected by layer thickness, temperature, and application tool. In the case of homemade products, the calculation is somewhat difficult, because it is impossible to accurately obtain the average consumption of the resulting solution.
When calculating, you need to know what area will be processed; they also take into account the approximate consumption of the main component.
Application of the finished mixture
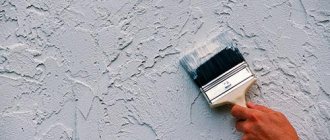
Decorative plaster is applied in a layer of 3 mm. When the top layer has set, various patterns can be applied using available materials. The relief is made using a soft spatula or a figured roller. To prevent the composition from sticking to the instruments, the walls are sprayed with water.
The trowel can be used to create unusual effects. The popular “fur coat” is made by cutting the prepared composition. In this case, the entire surface of the trowel is used.
You can also try to recreate the “bark beetle” design with a roller. The walls are painted with a long-nap roller. The relief surface is created by vertical movements from top to bottom, and then leveled with a smooth spatula.
Improvised means are also used. You can use crumpled paper, foil, even plastic bags. Apply the texture using “blotting” movements. Many patterns can be achieved using brushes. There are no boundaries in this process. It all depends on your originality.
How to recreate a marble cut? The execution technology is not so complicated, but it is still intimidating for beginners.
The prepared mixture is applied with a spatula. The main problem is that the master must repeat the design of the stone: he must recreate all the waves and lines with his hands. In practice, learning how to do this is not difficult. You need to level the wall, dry it, then tint it. This is the process of painting the workpiece. Pigment is added to the finished mixture. To imitate marble, using 2-3 basic colors is suitable. It is worth remembering that mixtures of different shades are in different containers.
Now let's move on to application. Using a small spatula, apply mixtures of different colors onto a large one. They are applied simultaneously, but do not mix.
You can use another technology: first comes the main color in the form of diagonals, then the secondary ones. You can add darker inserts to the wall. It’s easier to do this, but this method will take a lot of time.
Sometimes wax is rubbed over the finished coating for shine, and then everything is polished. But this is not necessary and you can limit yourself to varnishing.
Let us note a couple of general rules for applying plaster:
- You should always follow the manufacturer's recommendations when it comes to ready-mixes.
- You cannot apply cement compounds to plaster, otherwise it will not stick.
The most convenient method of application is “spraying”. Add enough water to the dry mixture to make the consistency more liquid. For this method, a medium-width spatula is used.
Tools for creating decorative plaster
This point was left for last in order to put together all the tools from the article. Based on what we have already read, we can conclude that there is a huge variety of assistants for applying plaster. Many are used in almost all types of work. It is impossible to do without them. This group includes a roller, spatula, and trowel. There are those types of tools that are used in certain cases. We will consider all their capabilities in order to use them fully when working with decorative plaster. This will make the task easier even for beginners.
Rollers
Perfect for creating an original design. This tool has a wide range, so you can always choose something suitable for yourself.
At first, the simplest paint rollers were used to apply plaster, but over time the tool became more suitable for decorating rooms. Some of the most popular are those made from various artificial materials, such as rubber. All types are worth considering.
Textured rollers to create an original design. There are three groups in total:
- Structured
- Perforated
- Foam rubber
The first option has a fairly simple design, so you can create an imitation of completely different materials. The other two are limited by design.
Creating a base plaster layer
According to one of the above recipes, prepare a medium portion of the plaster mixture and spread it over the wall with a trowel, forming a layer 3-4 mm thick.
Attention! Gypsum putty hardens quickly! In order to have time to form the desired texture on the surface of the coating, the composition should not be applied to the entire wall, but only to a separate section of it.
Having used up all the prepared solution, smooth the surface of the wet plaster with a trowel as soon as possible and begin creating the texture.
Trowel, spatula and other tools.
In addition to rollers, do not forget about other tools. There are no special requirements for them, so they can be easily used when creating a unique design.
The trowel helps to level the applied composition. With its help they create a suitable texture.
It is more convenient to use a spatula in combination with other tools, as it levels the material well. Its working surface is inferior, so you can only process small areas. We are talking specifically about creating a design.
A grater is a small plate with a handle. It is used for grouting the surface.
Brush. Don't underestimate this tool just because of its interaction with the plaster. It can be used to create drawings with various strokes. To do this you will need to make the mixture more liquid.
Here it is worth adding relief coloring in several colors. This method acts as a texture enhancer. Another color is applied to the base color using a roller.
Now let's move on to non-standard options. This list of tools is suitable for those people who want to put as much creativity into their work as possible.
There are stencils for decorative plaster. Thanks to them, unusual patterns on the wall are obtained. You can not only purchase a stencil in a store, but you can also make it yourself. Most often, the outlines of flowers are involved. On the wall it looks beautiful and voluminous. The stencil is attached with tape, and the material is applied on top. Then the stencil is carefully removed.
Let's talk about a sponge. It can be pressed against a damp wall, creating a suitable design. This is an original and simple solution when there is nothing else at hand.
You can create voluminous folds on the wall using plastic film. To begin with, a thick layer of putty is applied to the wall. The film presses down on an unleveled surface. This eliminates air bubbles. After a few hours, the film is removed. Afterwards you need to wait for the wall to dry and you can apply the paint with a brush. These are not the only possible options. You can take anything, you just have to be creative.
Recreating an original design doesn't require a ton of experience or a huge investment of money, but it is still a labor-intensive process that requires some knowledge. In this article, we tried to touch on some important points in making decorative plaster with our own hands, and also looked at popular texture options. There is too much information about various compositions and methods of application, it is constantly being updated, so it is not possible to cover everything at once. However, the main goal of what is written is achievable - to show that for high-quality and beautiful finishing you do not always need to resort to the help of an expert.
Tags:
Rate the material:
Decoration using the “washing” method
Using a nap roller, apply a darker color of paint to the wall painted in the base tone.
As soon as the new coat of paint has set slightly (but not yet dried), wipe the wall with a damp cloth or large sponge. By washing off some of the dark paint from the most convex parts of the relief, you will expose the background layer on them, and thereby reveal the structure of the plaster.
To fix the paint composition (after it has completely dried), cover the walls with two layers of water-soluble varnish.
Now, knowing the general rules for making homemade decorative plaster, you can decorate the walls of your kitchen with a beautiful, non-flammable, durable and absolutely harmless material at minimal cost.
Additional accessories
In order to apply the required textured coating to the base, you can use additional materials at hand:
- Foam sponge. It is soaked in a wet solution and applied to the surface. Thus, it is possible to obtain a very interesting texture.
- Comb. Using wavy or straight movements you can achieve an original effect.
- Film. The damp wall is completely covered with film; it must first be specially crumpled, this will allow wrinkles and unevenness to appear. After the canvas has dried, remove the base and sand it. Thus, it is possible to obtain a decor that imitates silk.
How to decorate walls other than wallpaper: 9 stylish options
We will send the material by email
An alternative to wallpaper is a lot of other finishing materials: from tiles, plastic to liquid and decorative plaster. If you have been looking for ways to decorate the walls in your home in an original way, then we suggest you study our ideas. Everyone can choose the option according to their own preferences and depending on the purpose of the room.
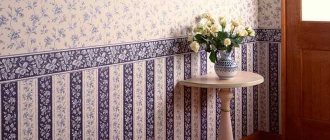
Stencils
A stencil is a sheet of dense material on which a design is pre-cut. It is fixed on the wall, after which a solution is applied on top of it. Thus, it is possible to obtain a convex additional layer.
When using a stencil, you can imitate various textures, and you can also create three-dimensional panels. An excellent option would be to make geometric patterns and floral patterns.
Work algorithm
Stages of decorating walls with textured mixtures:
The textured plaster solution is applied with a wide spatula and stretched over the surface with confident gestures. It is advisable to level it with a grater, work confidently, but without effort, so as not to “pull” the layer.
The rustic texture is formed with special devices, but you can experiment with crumpled foil, convex elements, and a roller attachment with faux fur.
For more details, watch the video of applying decorative bark beetle plaster with your own hands.
Source