Hello readers of my blog! Today we will talk about how to make a plasterboard wall with your own hands. It would seem that the matter is not tricky, but when you are faced with this problem, you have to think about how to do it correctly, what preparation to do, what materials to choose. Thus, I decided that this article would be useful to someone, and I am devoting my efforts to this subject. In it I will answer a number of questions that will arise immediately before How to make a plasterboard wall with your own hands, and some even after that. This topic is quite broad, because before work, thorough preparation is necessary, but how to do this? And this is a separate topic. You can learn about all this in great detail in the article below.
DIY plasterboard walls
In this article we will look at: DIY plasterboard walls: what you needHow to make a plasterboard wall: build a frameMaking a plasterboard wall: sheathing and insulating
The main advantage of drywall is that it is simple and quick to work with - using this material it is quite easy to level walls, insulate them, create beautiful and unusually shaped structures, and even build internal partitions in an apartment or house.
We will deal with the necessary materials, the sequence of work and the intricacies of their implementation.
Beautiful DIY plasterboard construction: types
Plasterboard structures are a kind of box, lined with gypsum plasterboard sheets and decorated with decorative finishing. They are used for arranging interiors indoors. Let's take a closer look at their varieties.
Types of plasterboard structures:
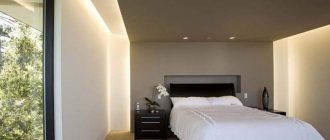
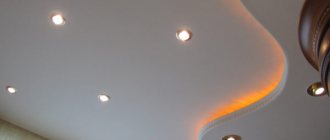
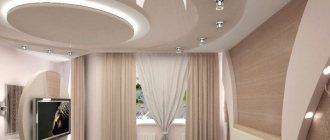
- Ceilings. These designs can be simple single-level, which are used to level the surface, or complex multi-level with shaped elements, lighting, tension fabric, installation of various lighting systems, etc.
- Walls. A simple design is used to straighten curved walls before decorating them. More complex ones are, as a rule, decorative partitions for zoning a room with all sorts of shaped elements. Also, full-fledged walls are constructed from plasterboard to separate one room from another. They can be equipped with a door or a beautiful arch.
- Arches. According to the shape of the openings, interior or decorative arches can be classic (the most common type), romantic (with rectangular arches and rounded corners), as well as trapezoidal (with a trapezoid-shaped arch). The portal arch is rectangular in shape of the doorway, and modern is something between a portal and a classic, with a small radius of curvature. An ellipse arch, on the contrary, has a large radius of curvature, and a semi-arch is an asymmetrical structure, one side of which is made in the form of a portal, and the other is any of the above varieties. Arches and semi-arches are mounted both for zoning and as decoration.
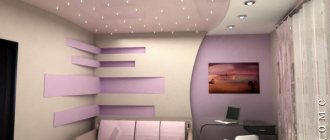
- Furniture. Furniture structures made of plasterboard are most often all kinds of racks, shelves, niches in the walls, etc. It is also quite possible to use gypsum plasterboard to build a mini-wall for the living room for a TV, a wardrobe and a bar counter. Furniture made from gypsum plasterboard is beautiful, original and quite functional: the frame of the structure provides for the installation of doors for niches and tabletops. Moisture-resistant drywall is great for use in the bathroom and kitchen. With proper finishing, you can use it to assemble a niche for a washing machine, a stand for a bathroom sink, and even a kitchen work area (a table with a sink and storage sections).
- Decorative boxes. They are used to hide all kinds of communications: wires, pipes, cables, etc. Drywall is used to level door and window slopes after replacing windows and doors, and to sew up ventilation pipes when moving kitchens and bathrooms.
- Decor. Decorative partitions with geometric niches, figured structures on the walls and ceiling, false fireplaces and columns - all this is considered decor.
Drywall allows you to make a simple redevelopment of a studio apartment or a separate room. Thanks to the installation technology of this material, a wall, piece of furniture or decor can be built almost anywhere in the house.
Profile Options
Before you make a partition for drywall, you need to build a frame. It is constructed from a U-shaped metal profile with zinc coating, which is divided into 2 types:
- Horizontal (guide);
- Vertical (rack-mount).
A profile can have the following parameters:
- Horizontal section – 50x40 mm, 75x40 mm or 100x40 mm;
- Vertical section – 50x50 mm, 75x50 mm or 100x50 mm;
- Length – 3 m, 3.5 m or 4 m;
- Wall thickness – 0.5-2 mm.
When selecting a profile, you need to consider the following factors:
- Structure height;
- Planned load;
- The need to install soundproofing material.
The guides and posts must be compatible with each other.
A vertical product must be securely mounted into a horizontal one. For example, guide structures with a cross-section of 50x40 mm are compatible with rack-mount structures with a cross-section of 50x50 mm.
Decorative plasterboard structures: corner interior elements
Corner structures made of plasterboard include all kinds of decorative shelves and niches for decorating internal or external corners, bar counters, portals for corner false fireplaces, cabinets, mini-walls or shelving. The technology for their installation differs slightly from standard designs, but there is one important condition: the presence of a free corner in the room.
Plasterboard structures for internal and external corners have completely different specifics for installing the frame. This is important to consider when drawing up a drawing.
Let's consider the construction of a corner structure made of plasterboard using the example of a simple decorative niche shelf or rack.
Before you start drawing up a project, it is important to decide on the type of structure itself, which can be:
- Wall-mounted (the frame is fixed directly to the wall, the floor and ceiling are not involved in this case);
- Floor-supported (the structure is attached to the floor and can have any height);
- Fixed to the ceiling (in this case, the shelf-rack looks like a hanging one).
It is also important to determine the functionality of this piece of furniture. If shelves or niches are planned for the installation of an aquarium or similar heavy objects, a suspended structure is out of the question. It is much safer to build it with support on the floor. Any type of design is quite suitable for placing books, photographs, decorative dishes or other lighter interior decorations.
Next, you need to measure the space allocated for installing the rack and draw up a drawing. According to the project, the necessary materials (profiles, fasteners and drywall itself) are calculated and purchased.
Materials used in the work
Profiles are products made of metal or wood, resembling slats or bars. They are mounted on the wall, forming a frame. The sheets of drywall themselves are screwed to the frame. If we talk about the frame material, metal products are most often used. Wooden slats do not last as long, they have less strength and are susceptible to moisture. Wall covering with plasterboard in wet rooms is carried out only on a metal frame.
Important! The cost of metal products is higher. Wooden ones, although cheaper, are not as practical. Therefore, saving money is not worth it.
Advantages of metal profiles:
- resistance to external factors;
- availability;
- long service life;
- light weight;
- possibility of restoration;
- large assortment for different purposes;
- metal does not burn, it is not afraid of mold and mildew.
Before you learn how to cover walls with plasterboard, it is important to understand the variety and types of metal profiles. If we talk about purpose, they are divided into two groups:
- Basic.
- Guides.
The main ones are designated as PS and PP. They are used for areas with increased load. The plasterboard sheet is fixed onto it. But the guide profiles are designated as PN. These are horizontal strips that form the outline for the drywall. They connect the vertical posts.
Product labeling looks like this:
- PS is rack-mount, its cross-section is U-shaped. There are grooves. The base of the product is called the back, and the side parts are called the shelf. The shelves have a size of 50 mm, and the back width is 50-100 mm. Used as vertical posts.
- PN – guide, shelf – 40 mm, base – from 50 to 100 mm. It is used to create a wall frame for drywall or partitions. The products are fixed to the ceiling and floor. It turns out to be a frame on the wall.
- PP – ceiling, shelf – 27 mm, base – 60 mm. It has 3 grooves. Plasterboard sheets are mounted to it.
- PNP – ceiling guide. Size – 27x28 mm. If a suspended structure is being constructed, the PNT is fixed to the wall of the room, guiding the PP.
- PU - corner, which is used to strengthen corners. It can be internal and external. It makes it easy to install profiles under drywall in corners.
- PA – arched, can be concave or convex. Allows you to create arches and other asymmetrical shapes, complex wave-like structures.
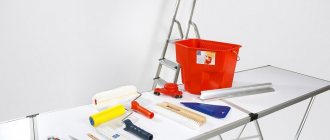
Preparation of materials and tools
Any repair begins with preparing the necessary tools and materials. To create a simple corner structure that is not designed for heavy interior items, you will need a minimum of effort.
Tools you need to have on hand:
- Drywall knife;
- Screwdriver;
- Impact drill;
- Plumb and building level;
- Tape measure, square and pencil;
- Spatulas and construction mixer.
In addition to the drywall itself, profiles and fasteners, you will need tape for sealing joints (serpyanka), a perforated corner for decorating the outer corners and putty (for further finishing, just choose a universal option).
Option 2. Partition with door
Door frames are installed together with the partition frame assembly. The place under the door is mounted like this:
- Where the door is installed, vertical posts (PS profile) are placed to the right and left of it. A beam is laid from them to secure the door frame. The beam is rigidly attached to the profile.
- A lintel is made from the PN profile above the door frame and additional racks are placed 20 cm from the opening;
- The door is part of the frame structure, so it must be installed before the sheathing;
- Additional vertical posts must be installed above the door.
Option 3. Partition with a heavy door (25-100 kg)
In this option, mount UA profiles on both sides of the door frame. The rest remains unchanged. Details: Installing a heavy door into a drywall partition.
Construction for plasterboard: where to start
Any plasterboard product requires the presence of a frame, which is subsequently sheathed with sheets of plasterboard. Before starting installation work, it is necessary to prepare the surface for installation of the structure. If there is old finishing, it must be removed and the walls must also be cleaned of dirt and dust. The last thing you need to do at the preparation stage is to transfer the design drawing from paper to the wall using a pencil.
Sheathing device:
- According to the marks, holes are drilled in the wall for further fastening of the profile.
- To implement the corner shelf, we will need two blanks from the guide profile. From the beginning of the profile, measure the length of the future shelf to the corner, make a cut, then measure the width and cut it in the same way. The procedure is repeated twice so that when the profile is bent at the cut points, a rectangle is obtained.
- The workpiece is attached to the wall using dowels, and the same is done with the second workpiece.
For more reliable fastening and maintaining the desired shape of the shelf, the places where the profile bends are secured with self-tapping screws.
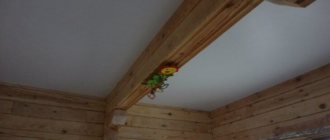
Plasterboard on a wooden ceiling - all the details of installation
At the initial stage you will not have any special difficulties. It is required to assemble a regular metal frame and prepare profiles for its installation. The structure is made from UD (guides) and CD (ceiling) profiles, crabs - connecting elements, as well as suspensions.
The frame is always attached to the wooden base with self-tapping screws. They penetrate into wood without problems and are characterized by excellent holding potential. Never use nails. They simply will not be able to reliably hold the frame.
You have assembled a frame for installing gypsum boards in a wooden house. If you do everything correctly, the whole procedure will take you very little time. It makes more sense to make a special sheathing with your own hands. It is made from 30x40 cm bars.
They are laid across the beams, maintaining a distance between the individual elements of the sheathing of about 35-40 cm. Please note: before installing the sheathing, you need to attach a vapor barrier layer to the beams using a construction stapler. And only then install the prepared bars. On them you will place thermal insulation for the ceiling so that the house is always warm. Such processes are caused by the natural shrinkage of wood, a decrease (increase) in its humidity, and temperature changes in the house.
Plasterboard sheets are not subject to these changes. If you install them on a wooden ceiling using standard technology (using metal hangers and profiles, gluing the seams between products with sickle tape, high-quality putty, primer and painting of gypsum boards), after a while you will notice that cracks and gaps begin to appear on a perfectly flat surface. Here you need to equip a special skeleton - a floating one. Moreover, in such a way that it takes into account the specifics of wooden buildings.
Frame sheathing or how to assemble a plasterboard structure
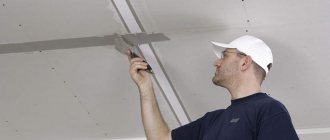
Further actions involve fastening drywall. To do this, first, markings of elements are made on a sheet of drywall, according to the drawing (upper and lower cladding, as well as end parts). Using a level and a construction knife, we cut out the desired element, making a cut with a knife along the markings of one of the sides of the material, then bending the sheet at the place of the cut and cutting through the cardboard on the back side.
It is better to cut the upper part of the shelf in one element in order to achieve a perfectly flat surface during further finishing.
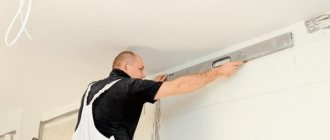
Next, the drywall is attached to the frame using self-tapping screws. At this stage, it is important to ensure that the screw heads are slightly recessed into the material. Once the top sheathing is completed, the bottom sheathing is done, then the ends are sheathed. Next, serpyanka is glued at the joints of the drywall, and perfugol is placed on the putty at the outer corners and a rough finishing of the surface is performed. After the putty has completely dried, you can begin decorative finishing of the shelf, which can be wallpapered, painted, or finished in a combination way.
Related article: Vapor barrier for the walls of a wooden house
Ceiling leveling
The structure of the ceiling frame is similar to the wall one and follows the same principles. Distinctive points:
- In addition to straight ones, extended hangers can also be used, especially for multi-level structures.
- Ceiling profiles are used. Most often, they form a kind of grid that allows you to attach drywall in a checkerboard pattern.
- The pitch between the hangers is 40–60 cm. Reducing it helps prevent sagging of the structure.
- It is convenient to control the position of the supporting profiles using cords stretched between the walls.
- At the intersections of frame elements, “crab” type connectors must be used.
The process of assembling a shelf frame for drywall is described in more detail in this article.
Plasterboard structures: types and step-by-step production
Plasterboard structures occupy a special place in modern interiors, as they are an original addition to any decor. From this material you can make both simple and complex models, ranging from pieces of furniture to partitions and ceilings. Drywall is simple and versatile to work with, so it is quite possible to create unique elements from it with your own hands, without having specific skills for this. In addition, the material is available in various types, which allows it to be used in rooms regardless of their temperature and humidity levels.
Marking
The room must be marked to determine installation points. For marking, it is advisable to use a laser level to accurately maintain the evenness of the planes.
- But, you can get by with a ruler with a cord for beating.
- First, markings are applied to the floor, the partition itself and the area under the doorway are marked.
- Using the drawn lines using a plumb line or a laser plane builder, markings are applied to the ceiling and walls.
Peculiarities
Drywall is considered a unique building material, which is produced in the form of sheets. Thanks to its special structure and flexibility, it can be applied to any surface, decorating the interior of rooms with interesting design ideas. The most popular plasterboard structures are suspended ceilings and arches. Since the material is lightweight, it does not require additional surface strengthening and is quickly installed. To make shaped parts from it, it is enough to first draw diagrams, cut elements according to them and fix everything.
The main feature of drywall is that when wet it easily changes shape. Thanks to this quality, it can be used not only to implement any ideas in the interior, but also to level surfaces.
If we consider the advantages and disadvantages of plasterboard structures, it is worth noting that they have many advantages:
- create smooth coatings; after finishing, the material acts as an ideal base for painting, ceramic tiles and wallpaper;
- allows you to produce parts of various shapes;
- high breathability and environmental friendliness;
- good sound and heat insulation;
- fire resistance and strength;
- affordable price.
Despite its positive characteristics, drywall also has one drawback - it is fragility. Therefore, it is not recommended to install it on walls that are subject to mechanical stress.
Plasterboard structures are boxes lined with sheets and decorated with decorative cladding. They are used for interior design, the result is a beautiful interior, and the rooms are filled with home comfort. Plasterboard compositions can be complex, simple, curved, smooth and enclosing.
Depending on the scope of their use, the following types of structures are distinguished.
- Ceilings. In order to level the ceiling slabs, simple single-level systems are installed. If you need to decorate the room in an original way, then choose multi-level ceilings consisting of many shaped inserts, lighting and stretch fabric.
- Walls. Plasterboard sheets can be used as a simple finish and hide all surface defects, or you can use decor and create chic partitions for zoning a room. In addition, “full” walls are also constructed from this material, which help separate one room from another.
- Arches. Recently, decorative arches have become very popular, which, unlike ordinary interior openings, can have a trapezoidal, rounded or rectangular shape. Arches in the form of an ellipse, as well as those installed in a semicircle, look beautiful
- Furniture. Bookshelves, shelving, and special niches in walls are often made from plasterboard. In addition, it is also possible to create a bar counter, a wardrobe and a small wall for the hallway or living room. Furniture made from such material is not only stylish, but also multifunctional. At the same time, for rooms with high humidity it is recommended to use moisture-resistant sheets; from them you can build shelves for storing things or a niche for equipment in the kitchen.
- Decorative boxes. They are mounted to hide cables and various communications. Drywall ideally levels window and door slopes or covers the ventilation system.
- Decor. Since this building material is easy to finish, it is often used for the manufacture of columns, false fireplaces and geometric niches.
Installation of racks
The racks are usually placed in 60 cm increments.
- If increased load is expected or the wall is higher than 4 m, the distance should be up to 40 cm.
- Rigidity can be increased by installing double racks, consisting of two profiles connected at the ends.
- Do not connect the guides and posts with press washers. This will complicate the finishing process due to the protruding heads of the fasteners.
It is recommended to use a cutter that connects structures by cutting with a bend. During the installation process, the verticality of each support should be monitored.
Dimensions
Typically, plasterboard sheets are produced in a standard size of 2500*1200*12.5 mm. In addition, many manufacturers produce sheets 1.2 m wide and 2 to 3.6 m long. The thickness of plasterboard can also vary from 6.5 to 12.5 mm. To choose the right material, you need to know not only its dimensions, but also take into account the type of surface that you plan to cover with it. For example, to create parts of a complex design, it is recommended to purchase arched plasterboard; its thickness does not exceed 6.5 mm, thanks to which the product can bend to any radius.
In the case when it is necessary to build partitions, niches or level walls , it is better to give preference to wall plasterboard, the thickness of which is 12.5 mm. As for the installation of ceiling structures, ceiling plasterboard with a thickness of 8 to 9.5 mm is ideal for them. It looks no different from ordinary material, but is light in weight.
Installation process
All work when an arched ceiling is assembled is divided into three main stages:
- Preparation of all parts and components of the base, as well as its subsequent assembly.
- Filing the plane of the gypsum board composition.
- Finishing.
The first part of the operations includes the production of curved frame fragments. You can simply buy special profiles that bend perfectly, but they are much more expensive than standard types of such parts. If you purchase a regular profile, it is bent to the desired radius quite simply - by making many cuts on opposite sides of the part.
To obtain an even bend, you must first apply markings in the places where you plan to make cuts. You need to cut at the same distance so that the bend comes out with the correct curvature. The greater the distance between the cuts, the smaller the bending radius you can achieve.
Curved fragments of the base are attached to the base ceiling using anchor suspensions with the ability to adjust the height, in which the installation height is changed with a special rod or using standard direct fasteners. The fixation step of the fasteners is about 60 centimeters.
After installing the curved parts of the frame, the next step is to attach the load-bearing parts to them, which should be located perpendicular to the bend of the base. The fixation step of these components is approximately 40 centimeters. After installation, the position of all components of the frame is checked - they must be located in the same plane.
Next, you can proceed to bending the gypsum board. There are two ways to bend straight sheets: “wet” and “dry”. What distinguishes these two methods is the principle of bending. With the “dry” method, many cuts are made on the part so that they are located across the bend line.
When “wet” bending, many punctures are made on the part to half its thickness. After this, the entire sheet is moistened with water and after a while it bends easily.
Important: arched plasterboard bends without cutting or wetting, thanks to the reinforcement. But this material is more difficult to work with - it is more difficult to screw screws into it and cutting the sheet into separate fragments is also not easy.
After all the ceiling parts are in place, all that remains is to carry out the external finishing of the assembled structure to perfect condition. You will need to strengthen the joints of the sheets and putty the entire surface of the structure.
Colors
Drywall is produced in a wide range; it is considered one of the most popular materials in construction. Each type of product differs not only in its size, but also in its properties and technical indicators. When you go shopping for drywall, you need to pay attention to the fact that it is sold in different colors, which indicate the properties and scope of the material. It is worth noting that the color does not affect the appearance of the finish.
Gray plasterboard, as a rule, is chosen for installing interior partitions and for leveling walls ; it is made from cardboard and gypsum with a thickness of 12.5 mm. It is considered the cheapest option for covering surfaces in rooms with normal humidity and temperature conditions. Green sheets are characterized by an increased level of moisture resistance, so they are recommended for installation in rooms where air humidity exceeds 70%. Red and pink plasterboard is highly resistant to fire; it is used for cladding ventilation systems and fireplace structures. The presence of a yellow color on the surface of the material means that it can be used for cladding facades and bases that are constantly exposed to the negative effects of moisture, sunlight and drafts.
Related article: Which paint is best to use for painting walls
Briefly about the main thing
Installation of plasterboard boxes is a popular way to finish the ceiling space in any room. This solution allows you to implement original ideas contained in the design project, give the room an aesthetic appearance and hide utility lines that pass through the space of the room. To install drywall, you need to purchase high-quality material - gypsum board sheets, galvanized profiles, hangers, fasteners and other elements necessary for assembly. The work is carried out in accordance with the technological map and consists of several stages - preparation, marking, installation and finishing. Each algorithm requires a specific set of tools and consumables.
Style and design
Various structures are made from plasterboard sheets, which not only act as original interior decoration, but also allow you to divide or combine several zones in a room. Recently, arches can be found in many apartments; they are a stylish transition between rooms and, unlike ordinary doorways, fit harmoniously into all design styles. To give this design a complete look, it is additionally decorated with wallpaper or masonry.
There are also many design options for plasterboard niches. Their design can have different depths, sizes and shapes. Various decorations in the form of figurines, flowers, vases and toys will help add aesthetics to the niches. In addition, their finishing includes the installation of lighting and colored glass. In the kitchen and bathroom, walls lined with plasterboard are usually finished with ceramic tiles or material simulating stone or brick.
Various options
Such solutions may look different and differ in the complexity of manufacturing. In some cases, the arch will connect two opposing walls, while in others it will become just part of a larger structure. Arched ceilings are:
- In the form of a half cylinder. This solution is the easiest to assemble and is the most common solution. Here the arch simply connects two opposite walls.
- Vaulted ceiling in the form of a hemisphere. This can be either a dome located over the entire room, or a small separate hemisphere.
- Segmental design. It is distinguished by the fact that individual arch segments have different dimensions and bending radii. Assembling such a composition is more difficult.
How to make a structure from plasterboard?
Drywall is a modern universal building material for constructing various kinds of arches, transitions, niches, design ensembles, building walls, finishing ceilings and much more. As a building material, it has excellent strength characteristics, is resistant to wet environments, environmentally friendly and non-flammable. All these qualities make it widely used in any type of construction.
Finishing the ceiling with plasterboard
What elements are the frames made of?
The fundamental component is a metal profile. Depending on the type of structure being created, it is selected according to dimensions, shape, and metal thickness. In general, when assembling the frame the following is used:
- Profiles – partition, ceiling, guides, rack;
- Connectors – straight (“extensions”), single-level (“crabs”), two-level;
- Straight perforated (universal elements) or anchor hangers;
- Self-adhesive sealing (damping) tape;
- Dowels, dowel-nails;
- Self-tapping screws are universal, as well as sharp with a press washer or with a drill.
There are often cases when a frame made from a profile for plasterboard is assembled without some elements or they are changed in some way. However, they are all sold in stores and are quite affordable. Therefore, there is no need to deviate from known schemes and methods. It is worth taking a closer look at each detail of the metal sheathing.
Metal profile
Almost any metal profile has a U-shape in cross-section. The purpose of the product is determined by the presence of additional stiffening ribs (“rolling”) along the edges. The profiles reinforced by them are called “rack-mount” (or “racks”), the functions of which are to carry the load and join gypsum board sheets.
The guide metal profile connects the structure with the base and serves as a “beacon” indicating the correct location of the racks. A frame for plasterboard without such a basic profile is simply impossible. As a rule, the compliance of the assembled structure with the level and plane depends on the adjustment of this component. Reliability of fastening is very important here, although the rigidity of the “guide” itself plays a lesser role.
The division into “partition” and “ceiling” is associated with the size of the profiles and the thickness of the metal. Since frames are often filled with insulation, their “depth” (thickness) must correspond to the thickness of the heat-insulating (sound-proofing) material. If there is a door in the partition, the dimensions of the door frame, as a rule, determine the dimensions of the metal profile. As for the thickness of the walls, it is obvious that it directly affects the rigidity of the frame for plasterboard made of metal profiles.
Connector
The connectors are made of thick metal and equipped with special tongues that ensure reliable fixation. Their shape and dimensions correspond to the profile parameters, which helps maintain the specified plane. Install the connectors as follows:
- The more massive part is inserted inside the racks “until a click”, connecting them together;
- The fixing tabs are bent at the desired angle;
- Screw self-tapping screws into the existing holes, securing the connection.
Extensions are used to connect two racks along the length. “Crabs” - to create a “grid” (cross-shaped knot) by perpendicularly connecting three or four posts. A two-level connector is used to connect racks located one above the other. For example, when assembling a multi-level ceiling. Therefore, it is extremely difficult to imagine a frame for plasterboard on the ceiling without the use of “crabs”
Instead of connectors, jumpers, “ears”, “tongues” cut from the profile are often used. Sometimes this approach speeds up the assembly of frames and saves screws.
Suspension
Its functions are to ensure rigidity and strength of the structure, as well as plane adjustment. Most often, direct hangers are used - a perforated tape, about 30 cm long, conventionally divided into three parts. The central part is more rigid, and there are fewer holes on it. Its function is to connect the suspension with the base (for example, with an interfloor ceiling). The two outer parts are bent to fix the racks and screwed on, adjusting the profile according to the level (along the cord). The excess is then folded to the side or cut off. That is, the working shape of the suspensions is U-shaped. Such a suspension is used not only to assemble a frame for drywall on the wall, but also for ceiling work.
The anchor suspension does not allow you to adjust the height and level of the resulting plane. Therefore, it is used where the base has already been brought to the desired horizon (or vertical). For example, when installing the lower level in a two-level ceiling. There is no need to bend, adjust, or cut anything - just screw on the suspension and “click” the stand. The time savings are obvious. So if the anchor suspension is only suitable for a frame for plasterboard made of metal profiles on the ceiling, then the U-shaped suspension is suitable for vertical surfaces.
Please note: as a rule, you have to use a lot of suspensions (both of them). On average - 3-5 pieces per rack.
Sealing tape
The damper tape resembles a door seal roll. Its thickness is 2-10 mm, roll width is 2-5 cm, the adhesive side is protected by an easily removable film. The function of the tape is to absorb vibrations intensely transmitted by the metal frame. Thus, this component performs the following functions.
- Reduces the level and quantity of extraneous sounds.
- Reduces the likelihood of “cracking” of the final surface.
- Protects the base to which the “guide” is screwed from scratches.
Damper tape is used to connect profiles to each other, to the base or to plasterboard, gluing them to metal. The tape has not found wide distribution, as it requires a lot of time. Moreover, the effect of its use is not always noticeable.
Please note: there are often frame structures that “ring” from a light blow. The damper helps to avoid such manifestations.
Dowels
The function of dowels is to ensure reliable fastening of guide profiles and hangers. Standard models are used for connection with solid foundations - brick, concrete. Anchor type dowels (“moth”, “moth”, “butterfly”) are used when the base is empty inside.
A dowel-nail is a modification consisting of a plastic dowel and a metal nail with thread. Their use significantly speeds up the process of installing a frame under plasterboard on the wall. However, a standard dowel with a self-tapping screw is usually more reliable. Therefore, it is advisable to fix the critical nodes with them.
The most common model is a 6 * 40 mm dowel-nail; a hole for it is drilled with a hammer drill with a 6 * 110 mm drill. You can hammer this nail in with a hammer, but it’s more convenient and faster to use the same hammer drill (switching the mode). The thread helps to unscrew the product if necessary.
Self-tapping screws
Not a single frame made of a metal profile for plasterboard can do without self-tapping screws. Universal screws are used to connect with a standard dowel. Metal self-tapping screws with a press washer are designed for connecting profiles to each other, as well as for fixing hangers. There are two common types: “sharp” self-tapping screws and those with a drill (special tip). The latter are used when the sheathing is assembled from a thick-walled metal profile, but they fix the assembly less well. Therefore, the “acute” modification is more popular.
Please note: sometimes it is possible to save screws, avoiding negative consequences. For example, when installing a “crab”. But, nevertheless, such savings are undesirable.
Advantages of plasterboard structures
Plasterboard structures have the following advantages:
- They are light in weight. The light weight of both the sheet itself and the frame makes it possible to build partitions between rooms in places under which there are no load-bearing supports;
- Easy to install. To create any structure from plasterboard, no professional skills are required. It is enough to have an understanding of geometry and the ability to solve simple examples. This will be enough even to create complex arches with niches and transitions;
- The plasterboard construction allows you to hide plumbing elements, electrical wiring, and unnecessary niches. This always results in perfectly flat and smooth surfaces.
Calculation of the number of sheets and layers
How much it costs to make a plasterboard partition directly depends on the number of layers and sheets used. The frame can be sheathed in 1, 2 or 3 layers. The more layers, the more durable and reliable the structure will be, and the sound insulation characteristics also increase.
The number of sheets is determined by the area of the partition without taking into account the openings.
- For single-layer installation, the area of one side of the wall should be multiplied by 2 (since the sheathing is done on both sides).
- With two-layer cladding, the area is multiplied by 4 times.
The resulting value must be divided by the area of one sheet of drywall. You should always make a small reserve.
To calculate the reserve, it is convenient to use a coefficient depending on the area:
- Up to 10 m2 – 1.3;
- Up to 20 m2 – 1.2;
- More than 20 m2 – 1.1.
How to make a plasterboard structure with your own hands?
Before you begin construction of the intended interior element, you need to think carefully about the project. You should take into account all the little things that may interfere and which will complement the future interior.
- The first step is to take a piece of paper and make initial sketches of your thoughts.
- Next, to create a plasterboard structure with your own hands, you will need to take a tape measure and take measurements indicating the results obtained on the plan. Also at this stage, you should plan the wiring for lighting and connecting household appliances, if such installation is planned.
- If the base is strong and does not require preparation, then you can transfer the markings from the paper to the wall. If the structure will be built in free space, then it is necessary to mark its main fastening points and stiffeners on the floor and ceiling. A detailed design of the entire structure should be completely ready by this time.
- Installation of plasterboard structures begins with the selection of material for constructing the supporting frame. It can be wooden blocks or a metal profile. Here the designer chooses the one with which he has more experience. But it should be taken into account that when wood dries, its geometric parameters slightly change. And this, in turn, will lead to the appearance of cracks and stakes on your masterpiece.
Decorating a column with plasterboard
Plasterboard structures on the wall are especially popular. Because using this material you can construct a fireplace, beautiful arches with niches, make intricate transitions, steps and columns for subsequent decoration with ornamental plants.
There are special flexible arched profiles that allow you to quickly install the most complex structures.
All do-it-yourself plasterboard structures require maximum attention and the desire to get excellent results.
- First of all, let's draw it on a piece of paper. We choose its shape and design;
- Next, using a level and tape measure, measure its position on the wall. Here it is necessary to take into account the thickness of the drywall sheet on all sides of the future niche;
- A niche is a recess in the wall, so to create it, you need to shorten the room by an amount equal to its depth. If it will be performed in the wall itself, then it is necessary to hollow it out accordingly;
Plasterboard shelves
- Installation of plasterboard structures begins with fastening the UD profile to the floor, side walls and ceiling. But for this you need to apply markings. Here you can use a plumb line. Step back an equal distance from the wall at two extreme points, if it is a straight wall, and use a plumb line to transfer the markings to the ceiling. If the trajectory is curved, then it is necessary to divide the piece of wall into equal segments and apply markings at their end points. In this case, 9 mm thick plasterboard is used to make the walls. It is not covered with a layer of cardboard, but reinforced with fiberglass, which, in fact, gives it flexibility. The profile can be given the required shape by cutting it at equal distances with scissors or a grinder. Then it must be smoothly bent to the required radius. To get a bend in the other direction, you need to make the same element and attach it in place, turning it opposite to the previous one. And so on.
- After transferring the markings, you can begin installing the drywall structure. The UD profile is fastened using anchors or dowels at intervals of no more than 50 cm. Next, vertical supports are installed in it, which are secured to the horizontal profile using self-tapping screws or rivets;
- After installing the main structure, it is necessary to attach pre-prepared pieces of profile for the niche to the wall according to the markings. Transverse structural elements are also installed, which are stiffening ribs and railings for attaching drywall.
To make the installation of the structure faster, we recommend that you learn the secrets of quickly working with drywall.
Frame diagram
It is impossible to correctly build a partition without creating a drawing.
It will be required already at the stage of purchasing material. Yes, and it is impossible to mentally calculate all the subtleties of placing profiles and fastening gypsum boards. The drawing will help you use the material more rationally and avoid unwanted losses.
The dimensions of the future partition are determined as follows:
This algorithm is needed due to the fact that in apartments the floors are rarely even and located at right angles.
The drawing is transferred to paper, the location of the rack profiles and partitions, as well as the doorway, is outlined. The following rules are observed:
To impart rigidity to the structure, the sheets on both sides must be connected on different racks. For example, on the front - on odd profiles, on the back - on even profiles.
The space above the door is further strengthened by at least a pair of guides. At the same stage, the mounting locations for all additional accessories, such as a TV, are determined.
These areas are also reinforced. The number of required horizontal jumpers is calculated. GCRs are joined to them if the partition is longer than their length. But even when the sheet completely covers the opening in height, it is recommended to fasten a couple of horizontal profiles to provide rigidity.
And one more important point. If a sliding door is installed in the partition, the doors of which will drive into the plasterboard wall when opened, the profiles should be arranged in 2 rows
Note! In such a design, there should be no jumpers, wires or any other communications or obstacles along the direction of movement of the door leaves.
A simpler solution. A standard wall with an opening is made, and the sliding door is located outside, on one side.
The frame for the partition with niches shown in the next photo has a more complex design.
Based on the drawing, the required amount of material is calculated. After purchasing it, you can begin installing the frame.