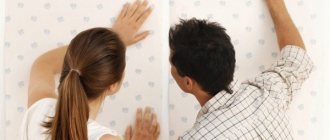
Before gluing wallpaper to the ceiling, you need to carefully prepare, because the final result depends on the condition of the surface being pasted - it must be smooth, dry and free of old coating. Therefore, finishing the ceiling is one of the most important stages of repair, because any, even the most minor, irregularities and defects are very noticeable on it. And wallpaper, thanks to the existing variety of materials from which they are made, is the simplest and most affordable option for decorating a surface. Therefore, by adhering to the basic rules and recommendations, anyone can hang wallpaper on the ceiling, even without special skills.
Necessary tools for work
Before starting work on covering the ceiling with wallpaper, you need to stock up not only with the wallpaper itself, but also with tools that will not only simplify the work, but also help make the final result ideal. List of essentials:
- Paint brushes - one narrow and one wide, they are very convenient for applying glue.
- Construction knife, scissors and painting spatula (35 cm wide) - these devices are used for cutting wallpaper, as well as for trimming excess at the edges.
- Sealing roller - it is convenient for rolling wallpaper at the joints, making them almost invisible. A large bucket and a painting bath - the glue is diluted in the bucket, and from the bath it is easier to apply it to the wallpaper or ceiling.
- A 25 cm wide paint roller allows you to apply glue evenly to the surface.
- Plumb cord for painting - with its help it is easy to mark.
- A piece of soft cloth will be needed to wipe off excess glue from the surface and smooth the glued wallpaper.
- A stepladder or scaffolding allows you to conveniently reach the ceiling and glue wallpaper.
- A paint pencil allows you to mark the direction of the paintings and their order in accordance with the drawing.
- Film that should be used to cover the floor around the perimeter of the room.
- Construction tape - with its help it is easy to measure the length of the canvas, as well as the dimensions of the ceiling.
- Wallpaper spatula – designed for high-quality smoothing of wallpaper.
A special work table is most often available only to craftsmen who carry out repairs. It is very convenient, practical and, as a rule, folds, and when folded it takes up very little space
Joining two strips in the corner
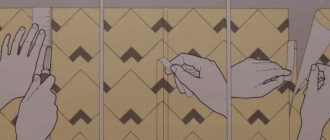
One of the most difficult operations for gluing wallpaper onto drywall is finishing the corners of the room:
- Strips are laid on two adjacent walls so that they overlap each other. That is, they were overlapped. The overlap size is within 3-5 cm.
- The overlap areas themselves cannot be lubricated with glue..
- Press the wallpaper tightly to the corner and use a sharp knife to cut it from top to bottom.
The photo clearly shows how to cut wallpaper in the corners
- Remove the cut strips.
- Apply a small brush to the vertical edges of the wallpaper and wait for it to dry. Thus, in the very corner there will be a butt joint, which will be practically invisible, plus you will achieve one hundred percent verticality.
Pasting the outer corners of the room
Calculation of the required amount of wallpaper for the ceiling
You should always buy wallpaper for the ceiling with a reserve and immediately pay attention to the fact that it comes from the same batch, because even a small discrepancy in the shade on the ceiling will be very noticeable.
Stores sell a large number of different types of wallpaper from different manufacturers, so the size of a roll from one manufacturer may differ from another. Because of this, before purchasing wallpaper, you must first of all measure the ceiling itself and, based on this, count the number of rolls needed to paste it.
Since wallpaper is glued to the ceiling perpendicular to the window opening, the number of wallpapers is calculated according to the length of the wall on which the window opening is located. To do this, you need to measure the length of this wall and divide it by the width of the roll of selected wallpaper - in the end you will get the required number of canvases.
To calculate how many of these canvases fit in one roll, you need to take the total length of the roll and divide it by the length of the second wall and add 10 cm to it in reserve.
Based on the above calculations, you can determine how many rolls will be needed to cover a given surface. To do this, you need to divide the total number of required panels by the number of panels in one roll and add 0.5 - 1 roll for reserve.
When calculating the quantity of wallpaper with a pattern or ornament, it is necessary to take into account that the pattern requires a match and add the length of the repeat to the length of each canvas, adding a report - the distance through which the ornament is repeated (it is indicated on the roll).
Wallpaper with a large pattern should be glued to a wall that is longer, then there will be less waste, but it is better not to do it at the joint, as the seams can be very noticeable
What wallpaper to choose for the ceiling? Features of their gluing
To hang wallpaper on the ceiling, you need to choose materials specifically designed for this - they are denser and heavier, then you can be sure that they will stick well.
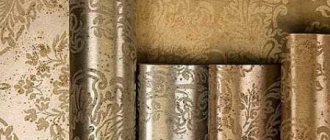
Paper
Paper wallpaper is a fabric made of non-woven fabric with a pattern or ornament applied to it; they can be either smooth or embossed. They should be glued to a carefully prepared surface - perfectly flat and smooth. Since they do not hide even the most minor defects, and also easily tear if handled carelessly.
Paper wallpaper has a variety of colors, but under the influence of bright sun it can fade. Also, this type of wallpaper loses its appearance under the influence of dust, moisture, smoke.
Non-woven
Non-woven wallpaper is a more practical option than paper wallpaper; thanks to its relief structure, it can visually level the surface being pasted. But they are heavy, so it is important to pay attention to their weight; it should not exceed 110 grams per square meter.
This type of wallpaper can be completely non-woven or only on a non-woven base - a backing made of pressed textile fibers; they are often used for painting
Vinyl
Vinyl wallpaper for ceilings is usually produced on a non-woven base, and is covered on top with a vinyl coating - an elastic film made of polyvinyl chloride (PVC). They are dense and durable, as well as moisture-resistant, but their significant drawback is that they are not breathable, so they are best used in non-residential rooms - corridors, bathrooms, kitchens. When gluing vinyl wallpaper, glue must be applied to both the wallpaper itself and the ceiling.
Vinyl wallpaper, due to its embossed texture, easily hides unevenness and defects in the ceiling, but it still needs to be glued to a previously prepared surface - sanded and primed
Fiberglass wallpaper
Fiberglass wallpaper is produced by drawing fibers from glass while heating it strongly. They are very durable, resistant to burning and fading from bright sunlight, and have good vapor permeability. This type of wallpaper is most often used for painting, but more and more often manufacturers are producing samples that are already processed on the front side and do not need painting.
Fiberglass wallpaper can have a smooth surface - this coating is used for final leveling and strengthening of the surface. But most often they stand out for their interesting relief patterns, which are preserved even after repeated repainting.
Wallpaper for painting
Paintable wallpaper is the most common and practical type of ceiling decoration. They are produced on a paper or non-woven basis, as well as on a fiberglass basis. They are very durable and wear-resistant and are most often endowed with the characteristics of the material from which they are made. Therefore, when gluing them to the ceiling, you must follow the instructions provided by the manufacturer.
Thanks to paintable wallpaper, you can quickly and easily change your interior design, because you can quickly repaint it in any desired color
Methods for gluing plasterboard surfaces
The surface of drywall cannot be called presentable. If in a technical room a ceiling formed with their help would be appropriate, then for living rooms one of the possible finishing options should be provided. Preference can be given to decorative plaster or traditional wallpaper. There are two ways to cover plasterboard: by gluing the finishing material to the plasterboard surface itself or to a previously applied layer of putty.
Glue directly onto plasterboard sheet
The simplest and least financially expensive method. Before finishing, the surface is prepared: the joints formed when the sheets are attached are puttied. After the base has been prepared, proceed directly to gluing the ceiling.
This option has one significant drawback. If after some time it is decided to change the design of the room, the plasterboard base will have to be replaced along with the wallpaper. High-quality wallpaper cannot be removed from the plasterboard surface without worsening the condition of the base. As a rule, along with the wallpaper, the gypsum layer will break off from the surface of the gypsum board sheets. That is why the wallpaper itself should be glued on the first try, since it will be quite difficult to fix the defect. Wallpaper is glued to the plasterboard base quickly and firmly.
Glue onto a putty surface
A more costly method from a financial point of view and duration of execution. Before wallpapering, the plasterboard surface is carefully puttied. After waiting for the putty layer to dry completely, proceed to gluing the base.
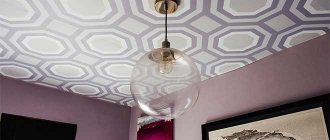
Pasting the putty base
This option deserves closer attention, as it allows for a higher quality of finishing of the ceiling surface while simultaneously increasing its service life. In addition, if you putty not only the seams, but also the entire surface of the ceiling, it is possible to ensure a uniform color of the base if preference was given to thin, light wallpaper, through which color fluctuations on the surface of the base are clearly visible. Even a slight change in shade can be clearly visible under the selected lighting option.
Preparing the ceiling for pasting
Before gluing wallpaper to the ceiling, you need to carefully prepare the surface. First of all, you need to remove the old coating - whitewash, paint or old wallpaper. The paint can be removed using a sander with a wire brush or a special solvent. The surface can be cleaned of whitewash by generously moistening it with hot water and then washing it with a sponge.
If the ceiling is covered with an old layer of plaster, then first of all it needs to be checked for integrity by tapping - the voids must be removed and re-plastered.
After cleaning the previous coating, the surface must be primed, cracks and irregularities must be smoothed over with putty, and treated again with a primer. Only after these procedures can the ceiling be pasted over. But, depending on the material from which the ceiling is made, there are nuances in its preparation.
You can check the strength of the paint using tape by gluing a strip to the surface and sharply tearing it off; if it is clean, then you don’t have to remove the paint, but simply wash it well and rub it with fine-grained sandpaper
Concrete ceiling
Since the concrete surface has a rough and grainy texture, before gluing the wallpaper it requires proper treatment, the minimum - several layers of gypsum primer. Also, a concrete ceiling can be treated with a special compound based on quartz sand - concrete contact. It fills all the unevenness and, after drying, forms a monolithic structure. The main thing is to apply it not in even lines, but in an overlap.
Wallpaper backings are a linen material made from polyurethane or natural cork; it increases adhesion between the concrete surface and the wallpaper. Such substrates are glued directly onto the concrete using special glue, and wallpaper can be glued directly onto them.
Plaster and putty are the most common way to treat concrete walls before wallpapering, especially in new buildings. Plastering fills all cracks and small holes, the subsequent layer of primer makes the surface smooth. After this, you need to apply a final coat of plaster, prime, putty and sand with fine-grained sandpaper.
Sandpaper holder for manual sanding is a very convenient device that speeds up and simplifies the work process
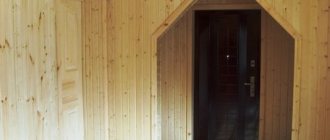
OSB or plywood ceilings
OSB is an oriented strand board made from several layers of compressed wood chips glued together using resins, synthetic wax and boric acid. Since these slabs create a perfectly flat surface, they often serve as a base to which other facing materials, including wallpaper, are attached.
Before pasting wallpaper on an OSB ceiling, it should be prepared. To do this, you need to seal all the joining seams, as well as traces from fastening with self-tapping screws using a fine construction mesh - serpyanka and putty. After this, the surface should be treated with several layers of primer.
Preparing a plywood ceiling for wallpapering is the same, because plywood is also a multilayer board, but consisting of a number of layers of veneer - thin sheets of wood.
OSB boards or plywood must be puttied over the entire surface before gluing the wallpaper to the ceiling, so that the specific pattern of shavings that can appear through the wallpaper
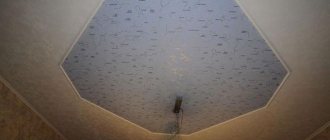
Plasterboard ceiling
Before gluing wallpaper to the ceiling, the plasterboard surface must first be treated with an acrylic primer, which will ensure good adhesion of the surfaces and also prevent the development of mold and mildew. Then you need to seal the joints between the sheets, tightly gluing sickle tape between them, and fill the gaps with putty.
Then sand the surface with fine-grained sandpaper.
Despite the fact that the plasterboard ceiling is perfectly flat, it must be puttied over the entire area and primed.
Serpyanka is a lavsan or fiberglass tape with a special adhesive applied to it. Outwardly, it looks like a medical bandage. It is glued on top of the crack and the putty is pushed through it into the crack.
How to choose glue and how to dilute it correctly
How the wallpaper will stick depends on the correct type of glue. It is necessary to take into account the material and weight of the wallpaper, the humidity and temperature of the room being covered, as well as the base of the ceiling surface. Good glue is quickly and easily diluted with water, it does not form lumps, and when applied to wallpaper, it does not curl at the edges. Excellent glue does not leave stains on the wallpaper and can be easily removed with a rag without leaving any traces; it can also be washed off hands and tools. Glue happens:
- Universal – for any type of wallpaper covering
- Special – a special composition for each type of wallpaper separately.
- For fiberglass.
Universal glue in a concentrated solution, reducing the amount of water by 10-15%, can be used instead of special glue, even when gluing wallpaper to the ceiling.
The wallpaper glue on the ceiling should be thick enough so that it does not drip from above.
High-quality wallpaper glue consists of a base, polyvinyl acetate (PVA), fungicides and bactericides that prevent the appearance of mold and mildew. It should be applied to the surface using a special roller
Preparing materials
To prepare the wallpaper, you need to know the exact size of the ceiling. If the ceiling has an irregular shape, it may be necessary to make a template from which the wallpaper will be cut. Otherwise, the finishing material will have to be “adjusted” in size directly to the surface of the mounted structure. It is advisable to immediately indicate the main line along which the measurement is taken.
Having decided on the dimensions, cut the wallpaper to the required shape. When preparing wallpaper, it is better to provide a few extra centimeters if the surface of the base has an irregular geometric shape. After the adhesive composition has completely dried, the excess material can be carefully cut off with a construction knife.
Removing excess wallpaper
Advice! It is best to cut strips of wallpaper as needed. This will allow you to manage finishing materials more rationally.
The adhesive composition is being prepared. Its characteristics must correspond to the type of wallpaper. As a rule, manufacturers offer compositions for each type of wallpaper.
How to properly glue wallpaper to the ceiling
Ceiling markings
Before you hang wallpaper on the ceiling, you must make markings. Wallpaper panels are glued perpendicular to the window opening - along the light flow, so that the joints are less noticeable. Using a plumb line, you need to draw a line perpendicular to the wall from which the wallpaper strips will be glued; do the same on the other side of the ceiling and connect them together. Parallel to this line, you need to draw another one, retreating a distance equal to the width of the roll.
Experts recommend making markings not only for the first panel, but also for subsequent stripes along the entire ceiling
Cutting wallpaper with pattern selection
Before you start cutting wallpaper, you need to lay a film on the floor or use a construction table. When cutting wallpaper strips without a pattern, you need to add 8-10 cm to the length of the canvas in reserve. If there is a pattern on the wallpaper, then when trimming you need to increase the length of the repeat, adhering to the following recommendations:
- With pattern selection without offset, all stripes should start the same. If the step of the drawing is, for example, 35 cm, and the length of the ceiling is 150 cm, then you need to measure the length of the canvas as a multiple of 35 plus a margin of 5 centimeters. In this case, 180 cm (35*5+5).
- With the selection of a pattern with an offset, you need to do the same, but taking into account the fact that the stripes should be repeated after one, therefore, for convenience, they can be numbered with a pencil on the wrong side.
- Cut the required length of the canvas using a knife or scissors.
A special cutting knife is a reliable and safe tool; it has very sharp blades that are firmly fixed in the knife
Ceiling pasting
It is better to glue wallpaper on the ceiling together; it is very difficult to do it yourself, especially in large rooms. Step-by-step instructions for gluing wallpaper to the ceiling:
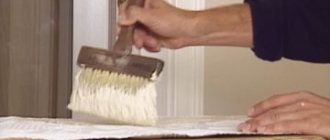
- Place the strip of wallpaper face down and apply glue to it - from the middle to the edges, and then fold the panel in the middle with the wrong side inward - two edges to the center and leave to soak for 10 minutes.
- When gluing non-woven fabrics, the glue is applied only to the surface of the ceiling, and some vinyl ones - to the wallpaper and to the surface of the ceiling.
- Wallpapering the ceiling starts from the wall at the least visible point and you need to strictly adhere to the marking lines.
- A strip of wallpaper, folded into a soft accordion, rises to the ceiling. It needs to be gradually laid out, carefully smoothing it from the center to the edges along the width.
- Walk along the joints of the glued wallpaper with a special rubber roller and wipe off excess glue.
- In the place where the chandelier should be, make a cut crosswise and thread the wires into the resulting hole.
- When gluing wallpaper, you need to make a small overlap on the wall, and then trim off the excess.
- Leave the pasted ceiling to dry for about a day, without drafts.
How to join wallpaper
The choice of method for joining wallpaper strips depends on the pattern applied to the wallpaper, and the recommended method is always indicated when the manufacturer labels the wallpaper. It happens:
- Counter - the canvases are glued in the direction of each other.
- Free - free joining that does not require matching ornaments or patterns.
- Offset - each subsequent sheet is glued onto the previous one, overlapping by 10-15 mm.
- Direct – gluing panels end-to-end.
Uneven edges that form after pasting can be carefully trimmed and covered with a decorative plinth
How to glue wallpaper near a lamp, manipulations with electricity
Before starting work on covering the ceiling with wallpaper, you need to close the windows and doors and turn off the power to the room. After this, you need to remove the chandelier and cover the wires with masking tape. In the wallpaper strip, in the marked place, you need to cut a hole crosswise, taking into account that the decorative overlay of the lamp will cover the cut.
You can mount the chandelier in place only after the wallpaper is completely dry.
Like any aqueous solution, wallpaper paste conducts electricity, so before starting work, be sure to turn off the power to the room and insulate the wires
Gluing wallpaper to the ceiling is simple and not at all difficult; the only requirement that should be adhered to is high-quality preparation of the surface for pasting. If you neglect the rules and procedures outlined above, the result can be completely unpredictable.
Characteristics of drywall and features in repair
Drywall is a composite building material. Its main element is gypsum, lined on both sides with ordinary cardboard. This design ensures good machinability. The material can be painted, wallpapered and covered with textile materials. Allows you to turn the most complex and non-standard design ideas into reality. Drywall is actively used when installing suspended ceilings, hiding base defects and installing partitions.
A distinctive feature of gypsum board is the intense absorption of moisture from the applied wallpaper glue. As a result, the adhesive composition dries before the glued strip takes the desired position and is securely fixed to the base. In addition, it will be quite difficult to dismantle the decorative coating in the future. If the choice is made in favor of a non-woven covering, the dark surface of the base will be visible through the canvas.