Many people who decide to do the repairs themselves are concerned about one important question: is it possible to glue wallpaper directly onto plaster without putty? You can find a great variety of answers. On different resources they can be completely opposite. Therefore, it is very important to get a clear answer and understand, if gluing is possible, then how it is done correctly.
Need more primer!
The first problem is that plaster is more porous than putty and requires more primer to seal those pores.
If the plaster is not primed well, the wallpaper glue will be absorbed into the plaster and the wallpaper will not stick or will stick poorly. Personally, from experience, I primed it 2 times with primer (it flowed from the plaster, there was so much of it) and still the first layer of glue is absorbed and I have to apply a second one. Therefore, the first time we prime the base with deep impregnation soil to strengthen the base, the second time we use wallpaper glue to reduce the porosity (absorbability). You can read more about primer in → a separate article on the website.
You can also walk 3-4 times with deep impregnation primer, but there is no point in this as such - it is an extra waste of primer.
Tips and tricks
When asking the question about what surface you can glue trellises on, experts recommend that you familiarize yourself with the tips and recommendations:
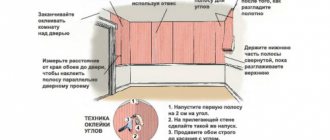
- When gluing the canvas onto plaster coated with a primer, drafts, open windows and doors are not allowed.
- Dry and hot air from the heater causes the trellises to fall off. Therefore, while the surface is drying, it is necessary to limit the use of heaters.
- Plaster has many negative aspects, so the base should be carefully prepared before applying glue.
Knowing these simple rules, trellises on plaster will last longer than usual.
Pasting the rough base without puttying is possible. It is only necessary to carry out a series of preparatory work for strength and durability.
Depending on the wallpaper
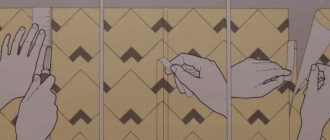
The second problem is that the base for the wallpaper must be almost perfectly smooth. Depending on the type of wallpaper, namely its thickness and texture, flaws that were left on the base will be visible. So, if you glue thin wallpaper directly onto the plaster, small flaws will be visible through the wallpaper.
Making the surface of the plaster perfectly smooth is a somewhat labor-intensive task, almost the same as puttingty in one layer.
Depending on the wallpaper, you can glue it directly onto the plaster, almost without worrying about the quality of the plaster surface, if your wallpaper is thick and textured, and not particularly light. If it is of medium thickness and light, then you need to think about whether it’s worth doing this.
Not all wallpaper can be glued directly to plaster
What glue to use
How well the glue for finishing the surface is chosen depends on the service life of the glued trellises. Each adhesive solution is intended for a separate type of trellis.
If the coating is light, paper, use methylcellulose-based glue. Heavy trellises are glued with PVA glue.
The fiberglass finishing coating is glued with a composition intended specifically for this purpose. Its composition is designed for such coatings. This glue can only be removed with a solvent.
The adhesive composition is produced in dry form. According to the instructions, it is diluted with water and left for a certain time to swell.
Is it easier to putty?
Almost the same thing if you putty in one layer. Anyone who knows how to putty, putty. If you don’t know how to putty, glue it onto the plaster (but you also need to know how to plaster), but remember that it needs to be smoothed out in almost the same way as you would with putty. It may be a little easier, but you don’t need to buy putty.
I recommend: How to plaster a ceiling and how to plaster a ceiling correctly
If you take expensive putties, like Rotband Paste, then even a teenager will putty with such putty after watching 2-3 videos on the Internet, working “to peel off”, without giving a layer. That is, using a spatula, simply spreading the putty over the base with force. There is a separate detailed article about puttying walls, I won’t dwell on it here, → read (with pleasure!).
Preparation
Surface finishing is very important, as a lot depends on it. Successful work will help make the room as cozy and comfortable as possible; a person will enjoy the renovation every day. But incorrect actions can lead to a lot of problems, so you will have to redo your work almost from scratch.
Repair work
IMPORTANT. It is not recommended to apply wallpaper to old plaster, as there is a huge risk that the finish will gradually fall off along with the finishing composition. However, if you cover the existing holes with plaster mortar, everything will be fine.
Before applying new wallpaper, you need to prepare the surface. To do this, you first need to tear off the old layer of previous wallpaper. Many people make a huge mistake when they think that this is the end of all wall treatment. This is far from the case - things are just beginning.
Finishing work
However, in general, paper material can be glued to almost any type of plaster (except decorative). So, to implement this idea, you must adhere to the following recommendations:
- To remove the remaining tightly glued pieces of paper, you need to take a spray bottle and spray the desired area. When it gets wet for 1 - 2 minutes, you can start peeling off the old paper layer using a spatula.
- Anyway, there are some flaws left on the wall. To successfully deal with this problem, you need to take a sandpaper and try to clean the surface in even more detail.
- It is recommended to cover small scratches, microcracks or small holes with putty.
IMPORTANT. If there are nails, staples or buttons in the wall, you must remove them before starting work.
- To further improve the surface and improve the adhesive properties between materials, it is necessary to prime the surfaces. This technological stage is mandatory, as it helps to make the walls perfectly smooth.
- To hang wallpaper without putty, you need to choose a high-quality and well-known brand of glue.
How to prepare plaster for wallpapering
First comes the plaster itself and it can be done in several ways:
- under the trowel,
- under the rule and
- by lighthouses,
but that's not the point. The point is the smoothness of the surface after the work is carried out.
On lighthouses, plastering is done quite well and practically does not require smoothing after work (if the work is done conscientiously). You can read about beacon plaster → by following the link.
Plastering under a trowel (trowel) is practically the same as puttingty, only with a plaster compound.
Plastering as a rule is something between beacon plaster and trowel plaster. You can read about it → in a separate article.
Plaster work can be of different quality
If trowel and beacon plaster provide a fairly smooth surface that practically does not require additional smoothing, then with plaster the situation is usually somewhat more complicated. With this type of work, the surface is made smooth, but it turns out to be somewhat rough (not smooth) and requires the application of a second smoothing layer of plaster.
Preparing a plastered wall or ceiling for wallpapering is carried out in several stages. After the plastering itself you need:
- smooth the surface with a liquid plaster solution,
- sand the surface
- prime with deep impregnation soil,
- then prime it again with wallpaper glue.
Priming the plaster with wallpaper glue is a good thing; the subsequent layer of glue will be less absorbed into the plaster
Finishing work
Wood, concrete, brick, wood concrete blocks are the main types of materials from which the walls of the room are built. Before applying the decorative layer, it is necessary to carry out the surface leveling process. A high-quality type of plaster mixture will cope with this. A wide range of building materials makes it possible to purchase products that do not require finishing putty. An approximate work plan is as follows:
- The walls are plastered until smooth.
- For structures made from plasterboard blocks, specialized gypsum plaster is used, which is applied in a thin layer and dries quickly.
- The resulting deposits are removed.
- The surface is polished.
- After applying the primer, you can begin gluing the facing material.
- Why prime the walls?
In order not to have to start the repair again, it is necessary to glue the wallpaper onto the plaster after priming the wall. The primer ensures a tighter fit of the canvas to the horizontal surface. You can use a heat-resistant or moisture-resistant composition. This will improve the quality of the work performed. That's why you shouldn't ignore priming the wall surface.
For greater efficiency, it is necessary to add PVA glue to the primer, this will save the consumption of wallpaper glue.
Apply the composition using a wide brush or roller evenly over the entire wall area. After complete drying, the primer reveals its properties, which means you can begin the final stage of work.
Smoothing the plaster
Ideally, the surface of the plaster should be like the surface of an egg shell. Small holes or depressions (only small ones, 2-3 mm) are not terrible, but due attention should be paid, on the contrary, to nodules and bumps; it is better to sand them first, before smoothing them, if any, with sandpaper No. 100-180.
We dilute plaster (gypsum) with the consistency of thick cream or liquid sour cream in a small container. The plaster consumption is not high, so you don’t need to mix a lot.
We will need a spatula or a metal trowel (also called a trowel) and a small auxiliary spatula.
Larger and smaller spatula
Using a small spatula, apply the plaster on a large spatula or directly with a small spatula on the wall in those places where there are unevennesses and level them, working “scraping”. We accurately go through all the irregularities that are on the wall. After drying, after 2-3 hours, we remove sagging and unevenness with sandpaper or an abrasive mesh.
I recommend: How to make water radiator heating in a house
As a result, you should get a fairly smooth surface without bumps or sagging of the solution.
Repair work
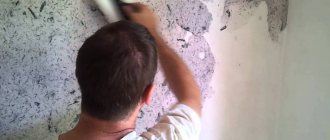
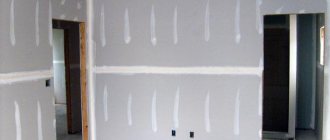
First, remove the old decorative coating using a spray bottle filled with water. To do this, you need to wet the area where the material will be removed and allow the moisture to be absorbed. Then the wall is cleaned. If necessary, a solvent is used (to remove paint). The primary task is to achieve a perfectly flat surface. If lumpiness, voids or cracks are visible, then starting putty is required to be used. The base mixture layer should be 1.5 to 2 cm thick. Next, it is recommended to prime the wall.
Disadvantages of wallpapering plaster
There are many disadvantages:
- Absorbency of the base - it takes a lot of primer to properly hang wallpaper.
- It is necessary to smooth the plaster with a liquid solution to obtain a high-quality surface suitable for wallpapering, or to carry out work on plastering the walls initially with high quality, so as not to smooth it later.
- Not suitable for thin and light wallpaper.
- It's a little difficult to stick, since you can stain the wallpaper with non-white plaster.
Pros:
- No need to buy putty.
- There is no need to putty work, but in place of this you need a high-quality base for wallpaper.
In the end, I would like to say that the work done is 10-20% less than puttying in 2 layers.
In general, if you don’t care much about the quality of the coating and the wallpaper is textured, not light and of medium thickness or more, then you can. Read how to hang wallpaper → here. Leave your tips and comments below. Subscribe to our newsletter. Good luck to you and good luck to your family!
Is it worth priming?
The primer protects the surface and finish.
Firstly, it is protection against mold, mildew, and various insects.
Secondly, the mixture provides strong protection against moisture penetration into the rough base. So the adhesive composition remains unchanged.
Thirdly, the glue applies evenly to the base coated with the mixture and does not flow down. The primer promotes good adhesion.
Before you apply the mixture, you need to select it. There are many types with antiseptics. This option is applicable for the first priming - getting rid of fungus and midges. And also a deep penetration primer that protects the rough base from negative influences.
Under the trellises, during the second priming, they use Pufas - white, as well as “Moment”, “Knauf Tiefengrund”, “Ceresit CT 17”.
The base should be primed carefully, not missing any spots, and not leaving dry corners. If the roller is not enough, use a brush.
Initial finishing
If the apartment is new, only rough finishing has been done, then the situation is a little different. There is no need to get rid of the old finish, but you will still have to prepare the wall.
There are two possible options:
- Described above, implies puttying. Then follow the instructions above, but exclude the items that describe the process of removing the existing trim.
- Disclosed in the second paragraph of the article, it is performed without putty. The method is acceptable, but when analyzing the advantages along with the disadvantages, it is better to focus on the first option.
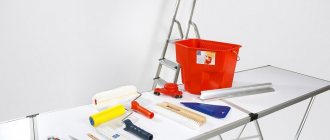
Required Tools
The process of preparing plaster with further layering of wallpaper can be done by ordinary households without knowledge of the construction craft. Of course, a knowledgeable person will cope with the task faster and more efficiently.
However, half of the difficulties and inconveniences will not arise if you immediately make sure that you have the necessary tools and ingredients - then you will not have to rush to the store before closing, spending time thinking about each step.
The list of required tools includes:
- fur roller, bath;
- wide brush;
- primer;
- glue and wallpaper (make sure they can be used without prior putty);
- a tape measure of 5 meters and a sharpened pencil;
- knife and scissors;
- roller for wallpapering;
- plastic grater;
- spatulas;
- trowel;
- level;
- three containers with water - for mixing plaster, for washing tools, for mortar;
- an electric drill with a whisk attachment or a construction mixer;
- container for diluting glue;
- Desktop;
- goat, stepladder, scaffolding;
Features of concrete walls
Speaking about the features of concrete walls, let’s remember what kind of houses are built from concrete. These are panel and skyscrapers. If your house is made of panels, then the walls are made of concrete.
Walls made of this material have the following features:
- Concrete walls are dark or light gray in color. It will appear on the wallpaper if you do not finish the wall surface.
- They have irregularities. Although they are invisible at first glance, they will be very clearly visible on the wallpaper.
- Concrete walls have a grainy consistency, which will also be very visible on the wallpaper.
To avoid this, the walls must be treated with primer and putty.