Plaster has long been used as a technology for leveling walls. But in addition to its leveling abilities, the applied plaster layer must be durable and firmly attached to the wall. Previously, this was often done using hammered nails or shingles attached to the wall crosswise (diagonally). Today we have moved away from these methods. The plaster mesh replaced it.
In essence, the mesh product functions as a reinforcing frame for the applied layer of plaster. Attached to the wall, it holds the mass of leveling material and prevents it from cracking.
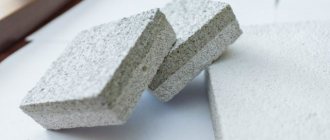
Metal mesh made of galvanized wire
Types of material
Experts distinguish several types of material, each of which differs in performance characteristics, intended purpose and cost. Let's take a closer look at each variety:
- Metal plaster mesh is used primarily for interior finishing work. The product is manufactured with cells of different sizes based on cold-rolled or stainless steel.
- Universal - these nets are made on the basis of polyurethane. In turn, they are divided into three groups depending on the cell parameters (small, medium, large).
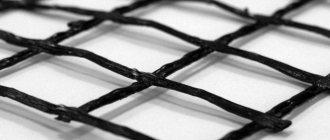
- Masonry mesh – made of polymer material. The cells are small in size - 5x5 mm. This type is designed for working with a brick base.
- Steel mesh - made of steel rods that are soldered at the nodes. The product may have different cell sizes.
- Fiberglass mesh. To make this product, specially processed glass fibers are used, which are obtained by passing molten glass through small holes. The size of each cell is 5x5 mm. This type of mesh is quite popular due to its high strength and resistance to various chemicals and temperature changes.
- Galvanized plaster mesh is a type of material that is produced by soldering galvanized rods into units. Suitable for all types of finishing. At the same time, it is durable.
- Armaflex. The basis of this product is polypropylene. The mesh has reinforced nodes, so it is used when applying a thick layer of plaster mixture. The cells have average dimensions - 12x15 mm.
- Plurima is also made from polypropylene. As a rule, the cells are small in size - 5x6 mm. It is resistant to aggressive chemical components. Used for external and internal finishing works.
- Syntoflex - has a polypropylene base, medium and large cells. Suitable for all types of finishing.
Content
1. Features
2. Where it can be used
3. Forms of release
4. Pros and cons (for fences)
4.1. pros
4.2. Minuses
5. Do-it-yourself installation of a façade mesh fence (step-by-step instructions)
5.1. Type of design (standard)
5.2. How to choose a mesh
5.3. Tools for extra work
5.4. Step-by-step installation process
Conclusion
Benefits of use
- Plastic mesh for plaster prevents the appearance of cracks in the coating and also increases the strength of the finish. In addition, it can become an alternative to metal products.
- Such meshes are not subject to corrosion, which will avoid the formation of rust stains on the finish.
- This material is light in weight, which makes the work much easier.
- In addition, the plastic-based mesh provides high-quality adhesion to the solution and is suitable for finishing both outside and inside the building.
- Fiberglass mesh has a light structure and is resistant to corrosive processes and chemical components. This is a fairly important property, since plaster mixtures are characterized by an alkaline environment, under the influence of which the metal begins to rust.
- Glass threads are treated with special means that make the mesh resistant to the negative effects of an alkaline environment.
- Also, the material does not lose its performance properties in low and high temperature conditions.
- Thanks to its flexibility, the mesh is effortlessly attached to surfaces that have uneven surfaces.
- The metal-based mesh prevents the finishing material from peeling off as a result of its own weight. Due to this property, this product is mainly used when applying finishing coatings to ceilings.
- Plaster mesh for external work on the first floors is also made of metal, since these places are most often exposed to mechanical stress. Such meshes are the most suitable material when working with clay surfaces.
Conclusion
By installing a simple fence made of façade mesh with your own hands using the instructions described above, you can get a structure (decorated if desired) with low windage, which will maintain its given position even in the wind at maximum speed.
Given the fairly good permeability indicators, the mesh will not stretch or break, and in winter it will not become clogged with snow. Therefore, for such operation, facade mesh is the optimal solution without high costs, designed for many years of service.
Features of choice
To make the right choice among such a variety of materials, you should initially proceed from the type of work that is supposed to be performed. Therefore, it is necessary to focus on the thickness of the plaster coating:
- if it does not exceed 20 mm, in this case a mesh for plastering work is not required at all;
- for coating thickness up to 30 mm, it is recommended to use fiberglass mesh;
- If it is necessary to apply a coating 50 mm thick, it is recommended to replace plastering with another type of finishing. For example, on a ceiling that has significant defects, it is more advisable to install a suspended or tension structure.
In order to obtain a high-quality finish after applying the solution, you must adhere to certain rules during the work process. The main aspects include:
- compliance with the required proportions;
- ensuring the required level of humidity and temperature in the room.
In the absence of these conditions, the plaster coating will turn out to be of poor quality. The use of a mesh is a prerequisite when working with walls that have significant defects, as well as with clay surfaces. Because in this case it is necessary to apply a thick layer of plaster composition. The finishing that was done using this mesh retains its performance characteristics longer. This product is also necessary when reinforcing the surface of walls before wallpapering or painting.
Who is the best place to order the installation of the control system?
It must be remembered that the installation of a protective net at construction sites is a mandatory requirement, which ensures the safety of workers, as well as people passing by. Therefore, you should trust the installation process only to reliable and trusted specialists.
The employees of our company are precisely such specialists.
- Quality
We carry out our work with the highest quality, reliability and professionalism. - Technologies
Considering the importance of the issue, we use only modern equipment and parts from the most famous manufacturers in the world. - Experience
All our craftsmen are highly qualified specialists with extensive experience in this field. - Dismantling of the control system
Please note that, if necessary, our specialists also dismantle the control system.
Price for installing a protective mesh by Mergood specialists:
- Installation of
protective mesh ZUS price -
390
rubles per linear meter - Dismantling of
the ZUS protective mesh price -
350
rubles per linear meter
Therefore, if you are interested in installing a protective mesh, you can contact us right now by phone: 8 (800) 700-777-9
, or contact us in any other way convenient for you.
If you have any questions, our managers will be happy to answer them.
Call us right now!
MERGOOD GROUP 390
Installing a protective net is a mandatory requirement at construction sites, which allows you to protect construction workers and people passing by. In this article we will talk about how exactly the installation of the ZUS protective mesh is carried out, and also why it is best to entrust this process to our specialists.
- Dismantling the ZUS
- Installation of ZUS
ZUS testing results
independent laboratory in Spain
Certificate GOST R 12.3.051-2017
System of occupational safety standards. Construction. Designs of protective and catching nets. Specifications
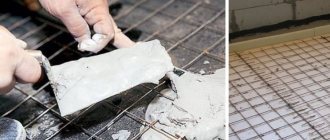
Fastening the mesh under the plaster
The fastening method depends on the method of applying the plaster mixture:
- by spraying;
- by covering.
The bottom layer is reinforced on top of the applied composition using a mesh. The best option would be to attach the reinforcement using special elements to a dry wall.
When finishing small surfaces, a plaster compound can be used as fasteners. In this case, it is applied pointwise, then the plaster coating is evenly distributed over the entire working base.
Where can it be used?
The facade fabric owes its appearance to technologists who developed the material for organizing safe activities.
Fixed vertically, the mesh prevents objects from falling. Over time, the structure began to play a decorative role.
Then it gradually appeared not only on the restored facades, but also in such areas as, for example:
- For transportation of bulk materials and their safety during transportation;
- Shade fencing in the garden and sheltering seedlings from excessive sunlight. As a shady area for balconies and loggias, protection from dust, etc.;
- For zoning space or marking the boundaries of livestock enclosures;
- The canvas can be used as fencing for playgrounds and sports facilities;
- Some types of facade mesh improve the strength of the finishing layer, serve as protection against mechanical damage, and are sometimes used for thermal insulation;
- Rolls up to 2 meters high are used as temporary or permanent walls in personal gardens. They make fences with their own hands in areas ranging from small to large areas, etc.
Procedure for installing metal mesh
This type of product is used when applying a thick layer exceeding 30 mm. The most convenient to use will be a grid with cells measuring 10x25, 10x10, 10x12. The advantages of a metal-based mesh are light weight and ease of use. It doesn't take much effort to cut it. Also, after working with such material there will be no traces of rust.
The work process is carried out in the following sequence of actions:
- Before attaching the mesh to a metal base, it is necessary to carry out pre-treatment and degrease it. This can be done with plain water or a damp rag.
- Next, the canvas should be cut from the mesh. To determine the size, you need to focus on the placement method - along or across.
- If there are rusts on the ceiling surface, the mesh does not need to be divided into fragments. In this case, it is placed as a whole in the longitudinal direction relative to each seam.
- At the next stage, using a hammer drill, you need to drill holes with a diameter of 6 mm. Their depth should be 3 mm greater than the length of the dowel.
- A distance of 25 cm should be maintained between each hole. Thus, 16 holes must be made in one square meter, into which dowels are then inserted.
- After this, the mesh is fixed on the surface of the working base using screws and mounting tape. During the fastening process, do not lose sight of the edges; they should be firmly secured. The canvases are overlapped.
- Finally, plaster beacons are installed on the fixed mesh.
Given the significant thickness of the finishing layer, it is recommended to apply the composition in two stages. First, the first layer is applied to the mesh using a trowel. To ensure good adhesion of the solution and the working surface, the plaster must be applied so that it penetrates through the mesh. To do this, the composition should be pressed. After which the solution is evenly distributed over the base using a grater or spatula. Then you should wait until the first layer of finish dries and treat the surface a second time.
Surface preparation
First you need to determine the condition of the surface before finishing. This determines what kind of reinforcement will be used. If the plane is lumpy, with differences, and the thickness of the cement layer is about 5 cm, it makes sense to use a metal mesh. Plastic is mounted if the plane is flat and a cement layer of 2-3 cm is required.
Before finishing, the walls are coated with a deep penetration primer. If the surface is porous, then the primer will not allow moisture to escape into the wall and the water-cement ratio in the mixture will not change. As a result, the cement layer will gain its design strength. A smooth surface is also primed before finishing for adhesion. It is necessary to prime 2 times with a break of two hours
How to attach fiberglass mesh for plaster
Fiberglass mesh is used when applying coatings from 3 to 30 mm. When purchasing, you should pay attention to the compliance of the characteristics of this mesh with standards. The cells must be at least 5x5 mm in size and also have sufficient density. In addition, the product must be resistant to alkaline substances. Before installation work begins, the mesh is cut into fragments, the size of which depends on the method of arrangement. The product can be placed in a longitudinal or transverse position. If there are rustics on the ceiling, it is necessary to place mesh fragments along each seam. In their absence, the placement method does not matter much. But the mesh must cover the working surface completely. When cutting, it is recommended to leave a margin of 15 cm to strengthen the seams between the ceiling and walls.
Fastening is carried out as follows:
- The first layer of solution is applied to the surface.
- A mesh is placed on top, which needs to be pressed into the plaster.
- Next, the next layer is applied. As a result, the mesh is placed in the middle of the finishing coating. When performing this operation, you can wait for the first layer to dry, but this is not a prerequisite.
When applying a thin layer, it is recommended to fasten using screws and staples. The work is performed in the following order:
- Markings are applied under the beacons, according to which holes are drilled.
- Next, dowels are inserted into them.
- The screws are mounted level on each line of beacons.
- After which the first layer is applied along the width of the mesh.
- Then a mesh is laid on the covering.
- Next, the adjacent canvas is attached. And in this way the entire surface is processed. The canvases overlap each other, the overlap of which should be at least 10 cm.
- Then you need to put on metal beacons and apply plaster. When working with fiberglass mesh, the plaster composition is applied evenly over the entire surface, after which it is smoothed from the middle to the edges.
- To fix the ends of the mesh, use rules or a wide spatula.
Fastening with nails
Nails can also be used as fasteners. This method is suitable for fixing both metal and fiberglass mesh. The plaster mesh for interior work is installed using nails as follows:
- Driving in begins from an angle, from which exact angle it does not matter.
- Next, you should retreat 20-30 cm from the first nail and hammer in the next one. This is how a whole series is formed.
- When fixing the next line, the nails need to be shifted by 10-15 cm compared to the previous row. This way the fasteners will be installed in a staggered sequence.
- A distance of 30 cm should be maintained between rows.
- After all the nails have been driven into the working surface, you need to tighten and secure the mesh. In this case, it is necessary to ensure that the canvas does not sag.
- To increase the reliability of fastening, the top of each nail should be bent. When laying the canvases, they need to be overlapped.
- Now that the installation is complete, you can begin finishing.