Ever since people came up with the idea that they didn’t have to be content with the apartment layout from the developer, active demolition of old partitions and the construction of new ones began. But what to do if the partition is demolished, but the need to delimit zones remains? Such a simple, but at the same time beautiful decorative element as an arch comes to the rescue. The arch delimits the space, makes it visually wider, and becomes the highlight of the room. Constructing an arch is not a troublesome task, so you don’t need to spend a lot of money or hire a construction team to build it. The design of the arch between the kitchen and living room is easy to create on your own.
What are arches for?
Arches will never go out of fashion, so their use in repairs for a long time is desirable. Functions of arches in the room:
- Space zoning
- Increase and visual expansion of space
- Additional space decor
- Adding individuality to standard apartment layouts
Arch design between kitchen and living room
Decor options for arched structures
Modern arches not only allow you to significantly expand the kitchen space, but can also be used as storage areas. On the side racks you can always arrange small shelves, racks, hooks on which small items, keys, and souvenirs will be stored.
The second interesting option for decorating interior arches is the installation of additional lamps. Most often, spot modular lamps or LED strips play this role. This type of lighting is often used to advantageously accentuate the kitchen area, dining table, and small bar counter.
The arch itself can be used as an additional decor if you install an original metal wicker lattice inside. These can also be ready-made plastic inserts or ornaments carved from wood.
Types of openings decorated with an arch
The arch is considered an ancient architectural structure: it was relevant during the construction of massive buildings of antiquity, and is now used as a partition between zones. The modern interior offers several types of arched opening. Let's look at them:
Classic
The arches have a smooth arch and are framed with platbands. There are no unnecessary elements that attract attention.
Classic arch in the interior
Curly
Arches have different shapes, the lines are not always smooth. The emphasis is on decorative elements. Figured arches are divided into many subtypes, which will be discussed below.
Variant of a figured arch in the interior
The classic type is usually used in the design of the arch between the kitchen and living room. She also shares a hallway and a kitchen. The difference between an arch is that it has a radius equal to the distance between the side walls of the opening.
A traditional arch can be made from various materials. This can be budget drywall or metal, tiles and other building materials.
An arch is also considered a classic if it has a different shape, but its decorative elements are close to the classical antique style. In this case, the perimeter of the opening has a platband made of stucco or its imitation. In the center of the vault there is a decorative element that symbolizes the keystone.
Drywall arch: classic version
Arches are available in many options. Let's look at the main ones:
British In another way, such arches are called “modern”. The arc of the vault has a more straight outline, the radius of the arc is truncated. The corners are smooth. Suitable for rooms with low ceilings.
Slavic Rectangular arches with rounded edges.
Thai The shape of the arch has a right angle on one side, and a rounding of any radius on the other. Such arches are now relevant, their photos are found everywhere.
Portal A rectangular arch with various decorative elements: stained glass, wooden carvings.
Niche A projecting arch attached to a wall. Conceals open niches of various sizes. Photos of the arch can be found by searching on the Internet.
Ellipse The arc of an arched opening is presented in the shape of an oval. Can carry a functional load in the form of shelves.
The trapezoid arch is made in the form of a rectangle with beveled corners. This arch will look great if trimmed with wood.
Circle Vaults in the form of a circle, turning towards the bottom into smooth side lines, have proven themselves in rooms with low ceilings. A round arch smooths out sharp corners and makes the transition from the kitchen area to the living room soft.
Finishing an arched kitchen doorway
If you have chosen an arched opening to the kitchen, then you should think about how best to decorate it.
Plaster
The most budget option for finishing an arched opening. This finishing method is very simple and absolutely anyone can handle it. Using plaster, you can imitate any type of finish, which is especially important if the budget for repairs has been allocated small. In addition, you can install lighting.
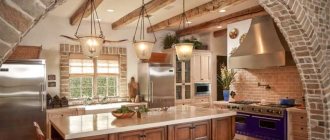
Stone
An excellent finishing option. With the help of stone, the transition from the kitchen to another room will look presentable and quite original. Working with stone will require skill and it is better to hire a specialist for this task. Stone is quite an expensive material, but durable and reliable in use. The stone arch in its appearance will be referred to the Middle Ages.
Brick
A finishing option that will help diversify the classic interior of the room will make it somewhat brutal and contrasting against the background of everything else.
Mosaic
An excellent decoration option. If you already have experience in laying tiles, then dealing with mosaics will not be difficult. The only thing you need to remember is that to install it you will need a perfectly flat surface of the arched opening.
Tree
Wooden trim looks very elegant and impressive. This is the most practical material of all, which is perfect for the kitchen. The only difficulty lies in the actual bending of wooden products, with which you need to be extremely careful. Therefore, to decorate an arch with wooden elements, it is better to hire a specialist who will carry out the work at the highest level.
Materials that are suitable for installing an arch between the kitchen and the living room
Arches can be created from anything. You can make them yourself, or buy ready-made ones, stylized for a certain type of interior. Independent decoration of purchased arched openings is not prohibited. The materials for making arches are as follows:
Plasterboard sheets
Cheap type of building material. Durable and flexible when wet. This allows you to make any shapes of bends from gypsum boards. Easy to install. Drywall can be easily finished with finishing putty and given a finished look. The material is environmentally friendly and can be used to make decorative arches in a house where children live.
Stone, concrete, brick
This type of material is used mainly in large areas, for example, in a private house. It is possible to install such a structure in an apartment, but this will require large expenses and qualifications. The weight of the material is quite large, so you need to take into account that not all old panel houses will be able to withstand the additional load on the supporting structures.
Wood, chipboard, MDF, metal
You can make arches from these materials yourself, but purchasing them assembled is more profitable. The price of the structures is high, however, the purchase will add an additional style element to the combined space. Arches from such materials are made to order in workshops for the individual interior of an apartment or private house.
How to decorate an arch in the kitchen
However, the correct form is not everything. Much depends on how you design the arched opening. What to make an arch from, how and what to decorate it with - these issues are best resolved at the design project stage. Let's look at the most popular materials for decorating kitchen arches.
Most often, modern designers use drywall. An inexpensive material that can take on any shape and color - an ideal solution for decorating interior arches. It is quite easy to install and lasts up to fifteen years.
One of the disadvantages of drywall is its low strength. However, visual properties and low price compensate for this disadvantage.
Less commonly, arches made of stone or wood are installed. Such designs are much more expensive and require special knowledge and experience. They look impressive, but they are not suitable for every apartment - it is unlikely that masonry or an arch to the kitchen with bricks will look good in a small Khrushchev-era building.
Another fashionable material is plastic. It will cost more than drywall, but is much stronger and easier to maintain. Plastic arches are now used even in classic designs - the correct coloring allows them to be disguised as any material.
What to make the structure from
A plasterboard arch is mounted in the same way as all other structures consisting of a frame.
Attention! Install arches only in openings whose height exceeds two meters. The design takes 0.1-0.15 m from the height of the opening.
Before you start installing the arch in the apartment, stock up on tools and materials for construction. To make an arch you will need:
- Metal profiles: guides (28*27) and rack (60*27)
- Screws for working with metal and dowel screws
- Plasterboard sheets for arc and side walls
- Arched corner to strengthen the arced edge
- Self-tapping screws
To perform the zone delimitation action, you will need the following tools:
- Tape measure
- Screwdriver manual or electric
- Metal cutting scissors
- Drill
- Stationery and regular knives
- Marking pencil
- Nail
- Nylon thread
The listed tools and materials are inexpensive. A drill and screwdriver for one-time work can be rented at a tool rental.
Plaster structures in the kitchen
Drywall today is a universal material for forming an arched structure instead of a doorway. It is quite durable and resistant to most factors (moisture, temperature changes).
It is easy to cut out decorative grilles from plaster for romantic arches in a unique design. For installation, you must first level the surface of the opening, and then weld the metal profile.
Sheets of cardboard are attached with self-tapping screws to the profile at several points. The last, but no less important stage is to decorate the surface: opening with varnish, paint, original stencil painting.
First stage of work
Begin work on installing the arched opening by preparing the surface. To do this, dismantle the ceiling between the living room and the kitchen, if this has not been done previously. If there is a door between rooms, remove it from its hinges and remove the frame from the opening. If necessary, expand it to the required size. Clean the surface from any remaining decorative coatings and remove the plaster. Be sure to degrease the surface and make it as smooth as possible.
Measure the width of the opening - X, the distance from the top floor beam to the highest point of the new arch - Y. The measurement results will be used to make some parts of the structure.
Making the side parts
- Cut a strip from the gypsum board sheet equal to the obtained x value (opening width). x/2 – the middle of the central axis. Measure the value on a strip of drywall and use a pencil to mark it with a vertical line.
- Add the y value to the mid-axis value. Measure the result obtained from the top edge of the workpiece in the center of the axis. The resulting point will be the center of the arc circle.
- Use a nail, pencil and nylon thread as a compass. Place the nail in the center of the future circle. Calculate the radius of the circle using the formula 1/2x and draw its boundaries. You will receive a diagram of the side part with an arched cutout.
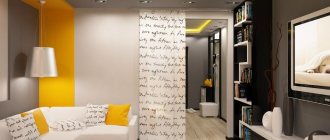
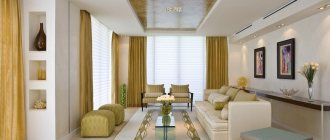
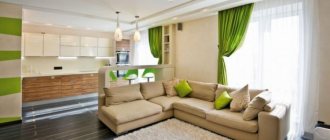
Design of a kitchen combined with a living room through an arch
The interior of a kitchen combined with a living room can be different, the main thing is that it matches the design of the arch. For example, gray stonework will go well with metallic kitchen appliances.
The kitchen must be kept clean: unwashed plates and crumbs can ruin even the best kitchen design. Also, a combined kitchen causes a lot of noise, which can interfere with the rest of the household in the living room. Therefore, it is necessary to arrange furniture and kitchen appliances in such a way as to reduce noise as much as possible.
If a wide arch is made between the hall and the kitchen, then the interior of the rooms should have some elements in common, for example, the color of the upholstered furniture in the living room should match the color of the cabinets in the kitchen.
It is much easier if the arched structure is narrow, then most of the furniture is hidden; you can simply make the rooms in similar colors.
For a living room designed in a modern style, arches with large bells and whistles are not suitable; it is better to use the simplest design. The arch should fit into the interior, and not become its main element.
Preparing drywall
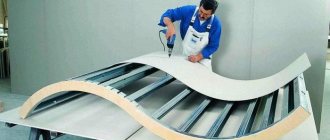
To make a classic opening, you will have to bend drywall for an arc. This is done in two ways:
- Dry. This method is complex and is not always possible for a beginner in repair matters. It consists in making cuts on one side of the sheet, with the help of which further bending occurs.
- Wet. As the name suggests, drywall needs to be wetted. Cut off an element of the future design from the sheet and apply multiple punctures with an awl. Wet the part with water and place it on a template previously made from any materials. As soon as the gypsum board gets into the improvised form, it will take the same shape. The part can be used for further work after drying.
Decorative elements and finishing materials
To decorate interior arches, various decorative options are used: paint, stucco, artificial or natural stone, marble, as well as panels and ceramic tiles.
Often these materials are combined with each other. This is how beautiful arches are obtained by combining travertine with marble or stucco. Moreover, the materials can be arranged both in a clear sequence and chaotically.
Arch made of natural stone
Leveling the room with arches
A bendable plastic corner is also used for decorative finishing. It not only emphasizes the shape of the structure, but also gives it strength. Additionally, the arch is decorated with thread curtains, wooden curtains, etc.
Additionally, the arch is decorated with thread curtains
The decor of the arches in the apartment is made from:
- Polyurethane. Smooth and flexible material is used to create the effect of stucco or pediments. In addition, it can be used to make a frame for arched structures.
- Stone. It looks impressive in the interior, but it is important that the frame of the opening is reliable, since a hollow arch will not withstand the large weight of the stone. More often, the original finishing is made of marble, granite, slate, shell rock or travertine.
- Tiles on an acrylic base. The material is distinguished by its ease of care, low price and effective appearance. It may resemble brick, marble or stone.
- Drywall. He is often chosen to create an arch with his own hands. The material is easy to work with and has little weight.
- Moldingov. They can be metal, marble, wood or polyurethane. The latter are distinguished by their acceptable cost, strength and durability.
- Laminate. It allows you to create the texture of real wood on the surface, but unlike natural wood it is lighter in weight and has a lower price.
- Brick. This design looks unusual. The masonry can be very different - both continuous and made in the form of separate bricks.
- Wood. Wooden arches are often used when decorating premises in a classic style. Their surface can be smooth or decorated with carved elements.
Wooden arches are often used when decorating premises in a classic style
Stucco molding and PVC decor
Stucco molding, as well as inexpensive polystyrene foam products in the form of various shapes and lace will help instantly decorate any arch. Due to their low weight, they are easily glued to the plasterboard base.
Wallpaper
Wallpapering is one of the most affordable ways to decorate arched structures. It will only require more skill and accuracy than on smooth walls so that the seams are not visible.
Plaster
Using decorative plaster, an arched opening can be given a different texture. The end part can be decorated with spotlights.
The photo shows an apartment in a modern style. An arched opening connects the room with a balcony. The interior is decorated with plaster with a wave-like pattern.
Mosaic
Modern mosaics are made from different materials, such as glass, ceramics, stone and others. Finishing can be done only on the inside or extend onto the wall.
Tree
As noted above, a frame is created from wood. It resembles a door frame, only without the door. They are usually made to order, in production. Such a product can no longer be decorated with stucco or stone, except perhaps to decorate the wall next to the frame.
Fits perfectly into the classic style.
Painting
One of the simplest, but nevertheless popular finishing methods. The arch in the wall may differ in color, thereby focusing attention.
Glass
It looks original, expensive and elegant. Most often, a frame is created with windows for glass; the result is a fairly wide arc, decorated with glass inserts.
You should not be afraid that careless handling of the product will damage it; the main thing is not to play with the ball at home.
Wood veneer
Veneer is a material that differs from solid wood at an acceptable cost. It is actively used for finishing rooms of all types and in furniture elements. Veneer is the thinnest wood “sheets” that are glued onto a base of MDF or chipboard.
Its “front” side has a wood texture with a unique natural pattern. Arches finished with veneer look noble and elegant. An original addition to them will be decorative niches, which are painted in discreet colors and provided with lighting.
Mirror design
Mirror is an amazing material. It looks impressive and helps to visually enlarge the room. In addition, the mirror details shimmer beautifully in the light.
Brick
Surprisingly, brick fits any style. For example, Mexican style, loft, Provence, neoclassical or classic, etc. This idea will allow you to decorate a corner without losing precious space.
Decorative rock
Natural or artificial stone will perfectly frame the opening, giving the interior a luxurious and complete look.
Plastic
Budget finishing option. Plastic panels can be miniature, only protecting the corner site, or in the form of wide strips, imitating, for example, a wooden or stone covering.
Gypsum
A plaster arch allows you to turn an ordinary doorway into a real work of art with the smallest details, and the cost will be very affordable. Gypsum finishing can be purchased ready-made or created with your own hands.
The photo shows a living room with an arch of an unusual symmetrical shape. The decoration is made of plaster and complemented with stucco moldings.
Liquid wallpaper
A convenient material for decorating arches made of wood and plasterboard structures. It has undeniable advantages. An arch in an apartment decorated with this type of decoration will remain beautiful for a long time.
- The surface made of plasterboard sheets is leveled and cleared of pronounced irregularities. Treated with antiseptic and primer.
- While the primer composition is drying, the dry mixture for liquid wallpaper is diluted in a separate container following the recommendations of the instructions on the packaging.
- The mixture is applied from the top point of the arc downwards. A small amount of wallpaper is placed on a spatula and distributed over the opening using leveling movements. The pieces protruding beyond the edges are removed with a stationery knife after the composition has dried.
Pros:
Glitter is added to dry mixtures of such wallpaper; after drying, pleasant shimmers will appear from exposure to sunlight. The contrasting color of the arch advantageously focuses attention on it.
- If surface damage occurs, it is easy to repair the damaged area.
- Easy to apply and no preparation difficulties when working with wallpaper.
- A large number of available flowers in stores.
Flaws
- Without a protective transparent coating, they do not tolerate exposure to direct sunlight.
Clinker tiles
The ideal solution would be clinker tiles. It looks like masonry, only the clinker brick is much thinner and will not take up precious space.
However, this option is limited in color, usually it is red-brown, but there are also light beige, sand, golden and other shades in a similar, warm range.
With shelves
The available design option will be part of the open passage, and will allow you to get unaccounted space for storing souvenirs, figurines, and hand-made items.
Varnish finish
If an arch made of solid wood is placed in the opening, with its good texture, this is the best option; There is simply no better solution. The only thing you have to think about is how exactly to make the decor.
There is a large assortment of varnishes - transparent and tinted compositions, in different shades. Some fully emphasize all the advantages of wood, while others can somewhat neutralize the existing disadvantages.
In principle, when installing just such arches, you can show the fullness of your imagination. Even a cheap species can easily be given the appearance of an expensive tree or transformed. There is enough technology; for example, artificial aging, brushing, bleaching and a number of others.
In some cases, it is much easier to cover the arch with a decorative film that imitates a wooden base. A more than good solution if low-grade lumber was used to finish the opening in order to save money.
Cork
Interior arches made of cork are the pinnacle of style. To maintain novelty, it is necessary to add bright touches to the decor.
Textile
Another original finishing method, but it is not practiced very often. Here, a lot depends on the interior of the room, and therefore there is no need to consider this option for arch design as the best design solution.
A significant drawback of any fabric is that it absorbs odors and moisture. This is the main difficulty of this finishing technique; The decor of the arch is largely determined by the place in the house where it is installed. Therefore, there are limitations in such decoration.
For example, at the entrance to the kitchen or hallway, it hardly makes sense to decorate the arches with fabric. In relation to an apartment with a standard layout, the only option is an opening leading to the living room.
With columns
In a large house outside the city or in a spare room, you can inlay the portals with columns. For a small room, such an idea would be inappropriate. When starting to build columns, you need to take into account that they must blend into the existing surroundings. Picturesque columns can be complemented with stucco.
Tile
Rarely used for finishing doorways, since the installation procedure is too complicated, requires special skills and a large number of narrow-profile tools. Ceramic tiles cannot be laid on plasterboard structures due to the large weight of the tiles together with the connecting mortar.
Installation requires thorough preparatory work. The final result, unfortunately, does not make a worthy impression. The arch looks heavy and is outwardly reduced in width. Tile belongs to the category of expensive materials.
painting
Handmade work is valued above all else. A custom country house project is created with hand painting. The style of painting can suit the overall decor and be in tandem with the furniture. In rare cases, it is recommended to attach a cliche.
With moldings
Simple and beautiful. Moldings can be polyurethane, metal, marble, or wood. A large selection of moldings allows you to carry out design work in accordance with the direction. Liquid nails are used to attach moldings. The elements protect corners and hide uneven surfaces.
Polyurethane molding is the most reliable. Advantages: lightweight, looks rich, can be used for a long time.
Backlit
Recessed lights, LED strip and recessed lights are appropriate for decorating the arc on the inside.
Installation plan for a classic arch between the kitchen and the living room
After you have completed all the preparatory activities, proceed directly to the installation. It is not difficult, but requires care and patience. Let's look at the steps:
- Install the profile frame. Strengthen the guide profile with dowels. Make reinforcements on both sides of the top floor. On the side walls of the opening, install similar parts from the top of the structure to the end of the rounding of the arch arch. Fasten the frame parts using self-tapping screws. Next, strengthen the arc elements onto the U-shaped profile. This design needs strengthening. Rack profile strips will help with this.
- Manufacturing of cladding. Take the strip of drywall on which you previously made marks with dimensions. Try it on the opening and if it fits perfectly into the structure, make another similar part. After this, secure both parts with self-tapping screws to the frame of the arched opening on both sides. Place the screws at a distance of 10 centimeters from each other, press the caps deep into the sheet. Cover the inner part of the arc of the arch with a plasterboard strip curved in the shape of the arc. Attach the screws to the profile in increments of 5-7 centimeters.
Important! Mount the frame with a retreat of 0.15 centimeters into the opening depth. This is the distance that the sheet of drywall along with the finishing will subsequently occupy.
At this point, making an arch with your own hands can be considered complete. Now the entire structure requires finishing. Remember that by using an arch as a separation of spatial zones, you oblige yourself to adhere to a certain style in the design of the common space of the living room and kitchen. An arch is a durable element that will never go out of style. Depending on changing tastes, it can be decorated in a new way each time: this can be done together with the existing interior or separately, adjusting it to it. If you get tired of the arch, its dismantling will not be expensive either in time or in finance.
Pros and cons of an arched opening in the kitchen
When starting renovations in an apartment, we think about how to make the design of the room original and at the same time avoid fatal mistakes, the correction of which will lead to large material costs. After all, as you know, rebuilding is always more expensive than building.
If you have chosen an arch for the design of your kitchen opening, you need to carefully study all the pros and cons that you may encounter during operation.
One of the main advantages of an arched opening is the increase in the working area of the kitchen. After all, the kitchen is a common room where the whole family gathers, and, as a rule, there is always not enough space.
Don't miss: What is a Software Tester?
Also in favor of the arch is the fact that the kitchen does not require privacy and the absence of a door will not bring discomfort to your personal life.
ATTENTION! The absence of a door in the kitchen will make the adjacent room brighter and visually create the impression of a single space.
The original design of the arched doorway will make your apartment modern and memorable.
The presence of an arch in the kitchen does not allow air to stagnate and promotes rapid ventilation of the room.
Arched openings help visually divide the room into zones. This is very important if you live in a studio apartment.
Another argument in favor of the arch is cost savings. After all, its design will cost several times less than purchasing and installing an interior door.
The disadvantages of an arched opening between the kitchen and the living area of the apartment include, first of all, the lack of sound insulation. If you refuse a door in the kitchen, you risk constantly hearing everything that happens there from anywhere in the apartment.
Cooking smells can also follow you throughout your living space. But this disadvantage of the lack of a door is easily solved by purchasing a powerful hood.
When installing an arch, you should think about the unified design of the kitchen and the adjacent room, which is very important for maintaining the aesthetic side of combining two rooms into one. And the mess that sometimes happens in the kitchen can no longer be hidden behind a closed door.
Tips for choosing
When choosing methods for decorating an entrance without a door, it is imperative to take into account the characteristics of the kitchen area and the entire apartment as a whole.
Advice: if the walls around the opening are wider than 0.8 m, then you can decorate the projections with shelves and niches - such a solution will greatly increase the ergonomics and functionality of the space.
The color of the finishing panels can be contrasting with the walls, but should not stand out from the overall color scheme; the ideal option is when the passage lining matches the shade of the floor or ceiling. An effective solution would be to use asymmetrically shaped openings, but they will look most advantageous in tandem with plain walls.
Peculiarities
As you know, a kitchen is a room where food is constantly processed and dishes are prepared. Most of the time it is filled with vapors and food odors. All this makes the room damp and quickly dirty, which makes it much more difficult to maintain the doors, shortening their service life, and this is especially unpleasant if they are made from expensive types of wood.
But this is not the only problem - it is known that doors visually make already small rooms smaller. In addition, the need to open the doors reduces the space for arranging functional areas - the designers calculated that a standard swing model hides about 1 square meter. m area.
An open doorway, on the contrary, will visually expand the boundaries of the kitchen and ergonomically combine the kitchen with the living room or dining room.
The advantages of open openings also include aesthetics and a non-standard appearance - with proper and stylish decor, the passage can look very stylish.
The absence of a door leaf blocking the movement of air masses promotes normal air circulation and maintains a favorable microclimate in the room.
However, not everyone likes doorways without a door, since they do not allow the room to be completely isolated.
In fairness, it should be noted that when it comes to the kitchen, this is not critical, unless, of course, the door is needed to separate the room from the bedroom or children's room.
Kitchen arches and doorways to the ceiling
In one article we looked at the topic - is a door needed in the kitchen, or is it better to dismantle it? So for those residents who decided to demolish the kitchen door, today the conversation will begin.
If you are determined to remove the kitchen door, then the doorway will need to be redone somehow. And here another question arises: what is better? Build a beautiful arch, or disassemble a doorway to the ceiling. And thereby give the kitchen a feeling of spaciousness and height.
For clarity, we will show you several photos of kitchen openings. Both with and without arches. And you decide for yourself what you like best and what is suitable for your kitchen.
Photo of openings to the ceiling in the kitchen
Let's start our photo review of arches and openings from the kitchen of a two-room apartment, panel house P44T. As you can see in the photo, if the kitchen opening is removed completely to the ceiling, the kitchen becomes even more spacious and it is visually felt that the ceiling has risen to the skies.
Another photo of a kitchen opening up to the ceiling, taken in the kitchen of a two-room apartment in a vest.
In this photo, a kitchen opening was made in a one-room apartment of a P44T panel house
Here is an interesting job on decorating a kitchen doorway in a two-room apartment. The ventilation shaft was lined with stone tiles on all sides.
The beauty of the doorway was let down by the box running along the wall.
Photo of classic round arches in the kitchen opening
Let's now look at the classics of the genre. And we are presented with a kitchen in a two-room apartment of the line, panel house P44T. The kitchen arch is made in a classic way, creating at the edges the effect of resting the upper semicircle on pillars.
This is already a kitchen with a bay window in a two-room apartment. We see how residents did not build a kitchen arch themselves, but bought and installed a ready-made arch in the kitchen opening.
So, the next photo shows us a classic arch with a semicircular top. But along the edges the arch is made without the effect of resting the upper part on the pillars. Thanks to this, visually, some kind of lightness and freedom appears in the design. It seems that the arch is hanging in the air.
Another example of a classic kitchen arch, without support on pillars. The semicircle is deep. It sounds like something oriental.
Well, here they didn’t make a deep semicircle.
That everything is circles and circles - let the semi-diamond be an arch.
Photos of kitchen semi-arches - in the top five popular styles in the kitchen. One edge of such an arch is smooth, and the other is rounded. Giving the doorway the appearance of a drawn bow.
It seems that in the photo above and in the photo below the semi-arches are identical in meaning. But the difference, as they say, is obvious.
They added some edging around the edges of the semi-arch, and it looks much more beautiful.
Well, the last kitchen semi-arch in our collection.
Photo of kitchen arches with plasterboard shelves - if you’re tired of all the classic arches, it doesn’t matter. Using drywall, you can make any arches to your taste. At the end of the article I would like to show a very interesting kitchen arch with shelves, made of plasterboard material. Such a beautiful arch with shelves was made in a one-room apartment in a P44T panel house
Especially in the evening, when you turn on the arch lighting, it will sparkle in all its glory. And it will delight not only your eye for a long time, but also all the guests who come to visit you.
This is the unusual arched photo report we got. I hope now you already know what your kitchen doorway, or maybe an arch, will look like?
people are interested
What are the sizes of windows on the balcony of a one-room apartment p-44t
Glass table in the kitchen interior photo
Curtains and tulle in the kitchen interior photo
Kopeck piece vest P44T Review of a two-room apartment vest 60 - 64 sq.m. meter Panel house P-44T
P-44t layout with dimensions of a 3-room apartment Overview of the layout of a three-room apartment in a panel house of the P-44T series
At what angle should you start gluing wallpaper in the room?