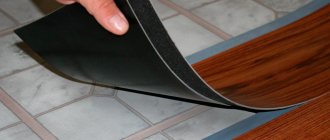
Laying mosaics is quite a painstaking job.
However, it makes sense to spend time on this, because as a result you will get not just a floor covering, but a real work of art.
In today’s article we will tell you how to lay a mosaic of broken tiles on the floor with your own hands. It's not difficult at all - it just requires a little more perseverance and patience.
The main advantages of broken tile mosaics:
- waste ceramic tiles are used;
- it is inexpensive - such a coating will cost you less than using whole tiles;
- looks very original.
You might also be interested in reading: how to make an arch with a gate and a fence on your property yourself
.
The process of laying mosaics on the floor consists of several main stages. In this article we will look at all stages - from beginning to end.
Features of using broken tile mosaics
Mosaic is one of the popular decorative decorations. It is used during:
- arrangement of walls and floors in an apartment or private house;
- decoration of facades of various buildings and structures;
- improvement of garden paths and swimming pools.
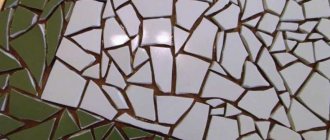
Composition from broken tiles
Unusual and original patterns are made from various materials, the simplest and most affordable of them is broken tiles. It is very often used when decorating bathrooms or kitchens; it fits harmoniously into the interior and complements it.
Every homeowner is capable of laying out beautiful mosaics in their home. In order for the work to be completed competently and efficiently, it is necessary to study all the intricacies of this process. In this article you can find the secrets of experienced craftsmen that they use in everyday life, as well as the technology for correctly laying mosaics with your own hands.
Important! Creating a mosaic is a very complex and painstaking work; its implementation must be taken responsibly and seriously.
Choosing a scheme
Today, assembling broken tiles into a single panel with your own hands is not difficult. Initially, as mentioned earlier, you need to select a laying scheme. To do this, you need to evaluate the existing ceramic parts, or more precisely, their size, shape, texture and color. It is the shade that determines what final decision should be made. The most common type is the possibility of laying out according to a standard layout.
Mosaic drawing
However, in this case, the mosaic is often characterized by its monotony, so it is best to diversify it a little. Broken tiles of different sizes work well for this. In addition, when using ceramic shards, you should divide them according to tone, which can achieve a slight difference in color. There is also no need to exclude the option of painting the tiled elements or covering them with a special film.
Before laying the mosaic with your own hands, you can do several experiments. For example, lay out broken tiles in various options, but do not glue them. Use colorful details to create accents or highlight the entire picture with bright colors. In principle, there are no restrictions in this regard! It is best to lay out the mosaic along a clearly defined trajectory. In addition, it is worth transferring the drawing to paper in advance, where all its advantages and disadvantages will be visible.
Advantages and disadvantages of decorative interior decorations
Tile mosaic has many advantages over other decorative decorations. Thanks to them, original ceramic patterns have been popular for a long period. The main advantages of broken tile mosaics:
- long service life;
- practicality;
Decorating countertops in the bathroom with mosaics
- efficiency;
- the ability to create a variety of original paintings and ornaments (it all depends on the imagination and talent of the master);
- harmonious combination with the interior.
In addition to the advantages, there are also disadvantages. Among them are:
- the need to comply with the technological process (otherwise the mosaic may lose its presentable appearance);
- large time costs, since the work is very painstaking.
Furniture decor
For furniture decoration, it is most convenient to use broken tiles and make a mosaic out of it. If the remaining tiles are intact, they can be carefully broken by placing them in a cloth bag and hitting them from above with a hammer. By selecting pieces of tiles according to size, laying out a pattern or alternating colors, you can achieve an interesting decorative effect. Attach the mosaic with tile adhesive and fill the gaps between the pieces with grout. Even large pieces of furniture can be decorated in this way. You can use mosaics to lay out a kitchen countertop, a coffee table or a coffee table.
For small items such as flower pots, vases or for mirror frames, photographs and paintings, mosaic is an excellent way to decorate. For the same purpose, you can use long tiled borders without breaking them.
Whole tiles are also suitable for covering the countertop. To make the edges look neat, they can be covered with a wooden profile or laid out in smaller pieces.
Preparing to create a mosaic with your own hands
Creating a mosaic is an interesting but responsible job. It requires special attention, talent, as well as perseverance and endurance from the master. To make it yourself, you need to follow several successive steps.
Fragments of tiles prepared for creating ornamental patterns
- Search and purchase of materials for mosaics
The technological process of creating a mosaic consists of several successive stages, the search and preparation of tiles is the very first of them. The necessary material can be purchased at the store (broken or damaged tiles, which are useful in the work, are often sold at cheap prices or given away completely free of charge) or taken from friends, relatives and acquaintances.
Advice. Both very small pieces of tiles and whole products are suitable for work (in the future they will still be crushed).
- Creating a sketch, examples of drawing ideas for the kitchen and bathroom
Before you start creating a mosaic, you need to make a sketch of it. It will significantly facilitate the work of the master and help avoid unnecessary waste of time, which is important in the process of performing such work.
Experts advise creating drawings or ornaments only for those people who have experience in performing such work, but abstract compositions for beginners.
Preparatory stage
The first question that needs to be answered is where to get the right amount of broken tiles? If the panel is supposed to be quite large in size, then quite a lot of material will be required. There are several options for how you can get ceramic tiles and then make shards out of them.
First, check with hardware stores to see if they have substandard goods, the price of which is significantly reduced due to defects, chipped corners or other damage. To create a picture on the wall, you don’t need a whole tile; you still have to break it.
Secondly, find a tiler who often deals with repairs. Old ceramic tiles removed before laying new ones will also work. Or perhaps you have recently done renovations in your home or are planning one, then you won’t have to contact anyone.
Tiles of different colors are preferable to plain ones; they will create a brighter and more interesting pattern. For more variety, you can add broken pieces of dishes or glass vases to the ceramic tiles.
Often patterns require clear geometric shapes, so the resulting raw material must be partially cut with a glass cutter or tile cutter. The rest can be broken into small pieces with a hammer. Wrap the tiles first with a piece of cloth to avoid cuts.
Then you should prepare the surface you will be on. Due to the small size of the tile pieces, they will not be able to mask unevenness. Use cement-sand screed, plaster, putty. Pieces of tiles will also fit perfectly on drywall. After treatment, the surface must be primed.
Preparing the work surface for applying a decorative tile pattern
It is necessary to pay as much attention as possible to the preparation of the walls, since the strength and durability of the mosaic will depend on the correctness of such work.
Surface preparation is very important
The master needs:
- Remove wallpaper or old tiles from the selected area where the mosaic will be located (the wall must be clean).
- Use putty to seal all holes, cracks and crevices.
- Draw a drawing of the future decorative decoration according to the existing sketch.
Advice. To ensure that the applied drawing matches the prepared sketch, you can use a scale grid or a projector.
A little history
The truly ancient Sumerians were the first to reveal their mosaic patterns to the world. They laid out ornaments from baked clay pyramids on an unfired clay base.
Their initiative was intercepted by the ancient Greeks: they invented smalt - dense and viscous glass that could be chipped in a frozen form without cracking. The Greeks laid out their mosaics from its fragments, sintering multi-colored fragments around the perimeter and into layers along the thickness.
As for the name, the Romans gave it to the mosaic, having adopted the art of folding fragments from their Greek neighbors. It was they who gave the glass masterpieces the name “opus musivum,” which translated means “a work dedicated to all the muses at once.”
Then Byzantium took over the baton of development of mosaic art. Its masters made a significant addition to the layout technique: the background and large images began to be designed with intersecting arcs. At the same time, the drawing lost its “pixel quality” if you looked at it from a certain distance, and became similar to an ordinary one, only more voluminous and “live” a picture.
During the Renaissance, mosaics began to be actively studied again in Italy. And the craftsmen of this country achieved the highest results in its production. In Florence, a new installation technique was invented, thanks to which mosaic images gained perspective. And here a unique binder was developed that holds the mosaic parts incredibly tightly.
During the Rococo period, mosaics became Frenchized. And it was the French who began to lay out panels of shells, beads (porcelain, earthenware), beads, using the “reverse laying” technique, in which the elements were first placed on wax paper and only then transferred to the prepared base. The works “a la francaise” turned out soft, precise, with tints of halftones. Using this technique, it was possible to decorate curved and/or small surfaces with mosaics.
In Islamic countries, masters who laid mosaics could not depict something living in their works (like artists working in other techniques), but they brought mosaic patterns to perfection and began to use new materials to create them: ceramics (tiles), eggshells, etc.
As for the “Russian mosaic”, it is inextricably linked with the name of the great scientist M.V. Lomonosov (although many experts are confident in the existence of ancient Russian mosaics, destroyed during the Mongol-Tatar yoke). Mikhail Vasilyevich was not only a brilliant scientist, but also an extraordinary artist. He was seriously interested in mosaics: he developed new technologies for smalt smelting and founded a mosaic manufactory.
Adhesive solution, applying it to the wall
If in the process of creating a mosaic you use not only broken tiles, but also pieces of glass, experts recommend attaching all the elements of the design with transparent glue.
A special adhesive mixture is suitable for attaching mosaics; it is used when working with ceramic tiles. The most popular of them is white; it helps maintain the clarity of the design and emphasizes its beauty and uniqueness.
The adhesive solution is applied with a special spatula
To prepare the solution, you must use the manufacturer's instructions. Compliance with this will allow you to make good glue that will reliably attach all mosaic elements to the work surface. In the process of applying the mixture, you will need to use a spatula; this tool will help make an even and smooth layer of the mixture.
Advice. To prevent the solution from drying out, and to ensure that the pieces of broken tiles stick firmly and reliably to the wall, the mosaic must be applied in small sections.
Grouting joints
This applies to both floors and walls and countertops. Grouting can be done no earlier than one day after finishing the cladding. The mosaic should dry evenly. If the room temperature is too high, cover the canvas with a damp cloth. Before jointing, remove any remaining adhesive and wipe the mosaic with a damp cloth. To work you will need a rubber spatula.
The best choice for mosaic panels is a transparent grout based on epoxy resin with a chameleon effect (Litochrom Starlike Crystal). It will adjust to the color of each piece. The cement mixture is much inferior to epoxy in strength and can literally fall apart.
Apply the fugu with a rubber float, pressing it firmly into the spaces between the pieces. Remove any residue with a damp foam sponge. Epoxy mixtures must be washed off with copious amounts of water, and plaque must be removed with special detergents (Litonet gel, Sopro ESE 548).
Well, now you know how to make a mosaic at home. We hope that the master class served as a starting point. Remember that mosaic requires regular maintenance. Do not wipe it with substances containing phosphoric acid. Use products with a low percentage of acidity, but even after using them, wipe the mosaic with a cloth and water.
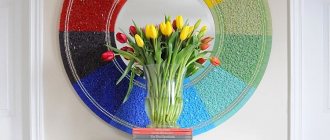
Don't get hung up on tiles, train your imagination and use unusual and interesting objects.
- Glass mosaic in the interior: 19 photos
- Unusual mosaic: 7 ideas with photos
- Choosing mosaic tiles for the bathroom (14 photos)
Applying broken tiles to the wall, tips and recommendations from professionals, examples of finished work
In order for the drawing to turn out neat, beautiful and clear, it is necessary to lay it out correctly. Specialists have several secrets that they use in the process of work:
- Attaching the mosaic must begin from the middle, this will allow you to create an even and proportional picture.
Placing tile fragments - The execution of complex drawings should begin with laying out individual mosaic elements (first, the image of a person, images of animals or plants are applied, and then the background).
- The finished work must dry for at least a day, otherwise the image may be damaged.
The process of grouting Grouting
the seams of the finished decorative mosaic made of broken tiles is the final stage of the work. It is performed simultaneously not along the entire perimeter of the mosaic, but in small areas. When the grouting is finished, the technician must wait 20-30 minutes (until it darkens), and then remove excess material with a damp cloth or suitable sponge.
Stages of work
Let's look at the process of laying mosaics in the bathroom step by step:
- Alignment of walls.
This is the most important stage of the work, since if the wall is uneven, it will cause a lot of problems in the future, and, as they say, the game will not be worth the candle. To check the wall for the absence of depressions (in the absence of a building level), you need to take a flat wooden plank and paint one of its sides with chalk. Next, press the plank against the wall and draw a straight line from floor to ceiling. If the chalk strip on the wall is clear, then you can proceed to further work.
Primer of walls. The color of the primer should be neutral shades so that it does not glow too much from under the mosaic and tiles (our next article will tell you how to properly apply primer to walls).
Take note: if it was decided to combine mosaic with ceramic tiles, then you first need to lay the ceramic tiles, and then glue the mosaic.
Laying mosaics. Ceramic mosaic comes in two types:
- paper based;
- on the grid.
The process of laying mosaics on a grid
They don't differ much from each other. Thus, it is more convenient to glue mosaics on a mesh basis to the wall due to the frame base. Paper-based mosaics do not have such a frame.
Grouting joints. Before you start grouting, remove the protective coating from the mosaic. The oilcloth covering is very easy to remove, but the paper covering does not always come off well. Therefore, before starting this process, it is recommended to wet the paper surface with water, and then use a sponge to remove the paper.
After this, you can begin making the mosaic grout solution. The same grout as for ceramic tiles is perfect for ceramic mosaics.
Before you start decorating the wall, you should come up with a pattern that will then be convenient for laying the mosaic. It is advisable to draw it on a scale of 1:1. And use the paper pattern to lay out the drawing. Then duplicate it on the wall.
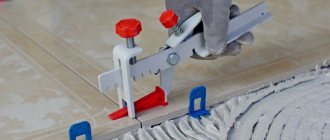
Expert advice: since tiles are not always laid according to the pattern at an even angle, it is advisable to purchase special nippers that are convenient for dividing small squares of the mosaic into various geometric shapes.
Alternatively, pieces of homemade mosaic (made from broken glass, tiles, etc.) can be pre-laid on a special reinforced mesh (you can buy it at any hardware store), and then glue the finished pattern on the mesh to the wall. To do this, you should buy special mosaic glue.
Please note: tile adhesive is not suitable for these purposes, as it is too liquid and will not hold the weight of the decorative coating well. The adhesive is applied directly to the mosaic using a notched trowel.
Its thickness should be at least 1 cm. The mosaic slab glued to the wall should be lightly tapped with a rubber spatula for better adhesion of the glue to the wall
The adhesive is applied directly to the mosaic using a notched trowel. Its thickness should be at least 1 cm. The mosaic slab glued to the wall should be lightly tapped with a rubber spatula for better adhesion of the glue to the wall.
When laying tiles it is important to remember:
- glue the mosaic sheet to the wall immediately in the place allocated for it, since then it will be impossible to move it from side to side;
- you need to start laying it from the corners where it adjoins the ceramic tiles. Since the difference between their thickness is 4 mm, it will be more convenient to take the thickness of the already laid tiles as a guide;
- Since the thickness of tiles and mosaics is different, before gluing the mosaic, you need to make a base coating for the wall. To do this, glue is applied to it in a thick layer and completely dried. And then you can glue the mosaic with the second layer.
After completing the finishing of the bathtub, it is not advisable to use it for a week. Because it takes time for all materials to dry completely.
Watch the video instructions for tiling a washbasin box in the bathroom with mosaics:
See inaccuracies, incomplete or incorrect information? Do you know how to make an article better?
Would you like to suggest photos on the topic for publication?
Recommendations for caring for decorative patterns
- Mosaic tiles should not be cleaned with substances containing phosphorus, wax or oil.
- Abrasive mixtures are also not recommended for use when wiping tile patterns.
- Special substances for cleaning tiles are the most suitable option. They do not spoil the material and easily remove all kinds of dirt.
Do not wash mosaic made of broken tiles with aggressive means.
Mosaic made of broken tiles is an original decorative decoration for the home. Make it with your own hands, and you will be able to independently evaluate all its advantages from your own personal experience.
Where can I get materials?
The first thing that comes to mind is purchasing and then dismembering an entire tile in the backyard of your house. However, this is not at all necessary. Often, building materials stores throw out broken tiles and, when someone wants to take them, they give them away for a small price, or even for free. Of course, the most economical option is old tiles left over after renovation. Even the smallest pieces of it can do a good job, so don’t rush to get rid of them.
You can make broken tiles yourself, or you can get them at your nearest building materials store.
Saving in this case is not synonymous with poverty or consumer goods. It is in this situation that masterpieces are most often born.
Do-it-yourself mosaic from broken tiles: photo
Modernity
Currently, mosaicists are actively using the developments of antiquity. However, they also bring a lot of new things to the technique of creating “pixel” canvases. This applies to new materials (porcelain stoneware, for example), their processing, the creation of adhesive compositions (silicone and PVA, as well as original adhesives are increasingly replacing the traditional chicken egg base) and fixing agents. Mosaics today are becoming repairable. Moreover, they can be disassembled and reassembled in a new place.
As for the artistic side of the issue, the most popular are:
- cubism (as if created as a mosaic);
- pointillism;
- impressionism, etc.
Something special
Many people would like to create something special with their own hands. And mosaic too. In principle, anything can be used as unusual materials for panels, including:
- various push pins;
- pieces of soft wood and pine plywood;
- small pyramids with multi-colored edges;
- matches with ends and other materials.
( 80 votes, average: 4.80 out of 5)
Vinyl siding - installation, characteristics and types of material
Liquid foam - characteristics, scope of application