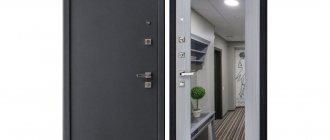
No matter how chic the door you install for yourself, without a decent frame it will look, to put it mildly, unpresentable. The finishing of the entrance door slopes is no less important than its installation. But often people have no idea how to decorate the slopes of the front door. Let's talk about how to refine a doorway, discuss the pros and cons of the most popular materials.
Often it is the slopes that are responsible for the presentable appearance of the doorway.
The importance of slopes in construction
Slopes are the parts of the wall located on top, left and right of the doorway. They perform a practical function and decorate the room:
- cover the bare wall - concrete or brick;
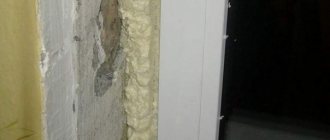
- hide mounting foam, anchors and other elements used when installing the door;
- complement the design of the room.
After assembling the door, the ends do not remain straight, no matter how careful the builders are. Therefore, simply decorating them with wallpaper will not work. In order for the look to be complete and complete, preparatory measures will be required. This part of the room should not be considered as a decorative component. Certain building materials help achieve good heat and sound insulation.
Doorways are sheathed, specially finished, and plastered. The last option is one of the best, since the mortar provides a reliable seal. The coating used must be resistant to mechanical damage, which will guarantee its long service life.
Elimination of defects
And at the end we’ll tell you how to connect the floor plinth with the platband. The latter always reaches the floor. If it rests against the baseboard, the appearance of the door will be ruined.
The plastic part fits together beautifully and naturally. Thanks to the presence of a special side plug. It looks good next to the vertical trim. But if the baseboard is wooden, then it will have to be cut at an angle of 45 degrees. This will align the side that meets the trim with its thickness.
Source
Where to start self-cladding slopes
Any inexperienced amateur builder who does not know how to install an entrance door can refinish an opening. It is possible to make slopes with your own hands if you only know the basics of using specialized materials and construction equipment. First of all, you need to choose one of the finishing options:
| View | Positive properties | Flaws |
| Drywall | Suitable for leveling any surface, painted, wallpapered, decorated with stone. | Repair using drywall is a rather labor-intensive process. |
| Plaster | Combines with other building materials: decorative stone, wood, tiles, paint and varnish coatings. | Good quality requires experience. |
| Decorative plaster | Protects against negative external factors, optimal for external treatment. | The surface to be treated must be perfectly smooth. |
| Chipboard | It has a relatively low cost and is easy to process. | Due to low quality, it is easily deformed and does not last long. |
| MDF | Refers to goods of average cost, does not require special skills, and is considered universal. | Not suitable for treating outdoor areas. |
| Laminate | Has properties identical to MDF. | Does not tolerate high humidity well. |
| Tree | The most expensive and respectable way to improve a door frame. | Additional use of antifungal agents and varnish is required. |
| PVC panels | They are not deformed due to moisture, they are easy to care for, and can be used outside. | They look ordinary. |
| Stone | Practical and reliable. Artificial stone costs several times less than natural stone. | Very heavy, difficult to use and unfashionable. |
| Tile | Durable, practical, easy to clean from any dirt. | Combines only with modern, extraordinary styles. |
Devices for work
The preferred design affects the set of tools for installing slopes on the front door. It can be:
- building rule, spirit level;
- sandpaper, spatulas, brushes, roller;
- beacons, masking tape;
- glue, liquid nails, cutter;
- aluminum corners;
- hammer drill, drill, self-tapping screws, etc.
To protect furniture and flooring from contamination, everything should be covered with oilcloth before starting repairs. It is important to clear the surrounding space to remove all possible obstacles.
Finishing after installation
After installing the door, it is important to properly design the slopes in order to improve the appearance of the entrance to the house as a whole. This can be easily done with your own hands, the main thing is to correctly align the door slopes from the inside
A very interesting finishing option after installing doors is the use of extensions. You can also use the following options.
Natural or artificial stone
This is a rather elegant and beautiful option that plays a decorative role. It is quite expensive, especially when it comes to natural stone. This method has many advantages, since the material is considered to be very durable and of high quality. Natural stone is a completely environmentally friendly option that is resistant to external mechanical influences.
But cheaper artificial stone is not of the same quality. It has a large number of disadvantages, since it is made on a gypsum basis. It is easily damaged and wrinkled. In addition, it can easily crumble or become deformed when exposed to water or high humidity.
Tile
This method of finishing after installing the door is quite complex. Not all tile options can be used for this. In particular, it is better to avoid using glazed models, as they will look very strange and cheap on door frames. It is best to give preference to clinker tiles.
This option can imitate brickwork or natural stone. Therefore, it can be chosen for any stylistic design of the hallway. It is best to select tiles that are not very easily soiled or glossy. This finishing option is good because these surfaces are quite easy to care for. In addition, manufacturers present a wide variety of models for finishing.
PVC panels
A very simple finishing material that is cheap, beautiful, but short-lived. Some low-quality models can be easily pierced, even by leaning on them with your elbow or hitting them hard with your foot.
Decorative plaster
This is a very interesting, but rather labor-intensive installation option. Applying decorative plaster is an art, so it is better to entrust this process to professionals. But in the end, the slopes and the space around the door can change noticeably.
External slopes
External walls are seen by many more people than internal ones. Even here it is possible to do without specialists. This will not be of interest only to those who value energy and time more than money.
The first thing that requires attention is sealing the cracks and gaps formed during the installation of the door. Polyurethane foam sealant is suitable for this. It dries within 24 hours. Then all protruding parts are cut off and the joint is checked for leaks. A burning match or lighter is slowly passed over the sealed area. A flickering flame indicates the need for re-treatment in that area.
The second layer of foam is applied only after the first has dried and additionally moistened.
Once you are sure of good sealing, you can begin assembling the platbands. They must match the existing design and color. At this point the work will be completed if the opening is without a recess. If there is a niche, it is necessary to seal the slopes for the entrance doors. Outside, a cement-sand mortar or a mixture of gypsum is usually applied with further finishing lining. MDF and plastic panels, laminate are allowed in heated entrances.
Stage 2. Setting aside and marking the required dimensions of the extensions
After we have measured the required dimensions of the additions, we set them aside on the blanks of the additional elements. We make preliminary markings directly on the panel.
Using masking tape, mark future cutting lines.
On one blank for additional elements, you can put two parts - the threshold and the upper part of the additional elements.
In the same way, we set aside the dimensions of the second part, make preliminary markings on the workpiece and glue it with masking tape.
We re-mark the length of the extension directly on the masking tape.
If you do not glue the edge of the additional element with masking tape, chips may appear on it during sawing.
Once again we check the correctness of the markings.
Use a miter angle to mark a cutting line perpendicular to the edge of the panel.
Slopes inside the house
Indoors are often taken:
- drywall;
- plaster;
- natural wood or chipboard, MDF, lining;
- plastic.
A wooden jamb successfully complements different interior styles. This is a universal species that does not have strict care requirements. However, you will have to pay a large amount for a strong coating that is resistant to moisture and temperature changes. Analogues with a lower price become unusable every few years, and this is subject to natural deformation.
Plaster is more convenient, since after drying the surface is painted. If you want to change the design, it is not necessary to delete the old layer and make a new one. It is enough to cover it with another paint.
If insulation is needed, special upholstery is used. Some manufacturers produce ready-made models with a layer of insulation. But sometimes it’s cheaper to purchase a simple steel sheet and then add a heat-retaining layer to it. It is worth installing the upholstery along with the door slopes.
Features of entrance door jambs
Door slopes are characterized by the following features:
- give an aesthetic appearance to the internal and external space around the entrance;
- They perfectly “hide” the joints between the walls and the door frame, creating additional protection against burglary;
- When manufactured with high quality, they perform a soundproofing and insulating function.
Slopes are involved in ensuring tightness, sound insulation and thermal insulation, and increase the resistance of the front door to burglary.
Advice: in order for the design to be as harmonious as possible, the jambs will have to be carefully integrated into the existing interior design, carefully selecting the material.
Step-by-step work on slopes
Finishing door slopes after installing an entrance or interior door is divided into several stages: preparation, installation and final processing.
Preparation
The preparatory stage is always carried out, regardless of the selected type of coating. The main goal: to avoid deformation of the walls in the future. The following instructions will help you understand the nuances:
- Cover all visible parts with film to minimize the risk of deformation and contamination.
- Eliminate the protruding parts of the polyurethane foam, make sure that the joints are 100% tight.
- After cleaning the surface, treat it with a primer.
- Wait for the mixture to dry, place wiring if necessary.
Installation
The inside of the entrance door slopes is finished using mortar, glue or a pre-prepared frame. For the latter, use wooden blocks or metal plates. They are attached along the boundaries of the recess and fixed with dowels. Additional placement of boards in the middle part of the structure strengthens it.
When fixing panels or a solid canvas on a frame, it is rational to fill the empty space with mineral wool.
- Have you bought an apartment in a new building? We are doing renovations!
Apartment interior trends in a modern style: the most current ideas from designers (70+ photos)
- Design of a toilet in an apartment: the best ideas and useful tips (60+ photos)
If you choose drywall, recess the heads of the screws when fixing them. Be sure to put a perforated corner on the edges; it will extend the service life of the finished product. Glue all formed joints with serpyanka, putty and level with sandpaper. If MDF is chosen, both self-tapping screws and ordinary nails are suitable as fastenings. They are evenly placed according to the size of the frame. Installing laminate flooring is different from other methods. Here you will have to fix only the first and last lamellas; all the rest are installed in the usual way.
Finishing
Leveling the walls is a mandatory step in finishing the inside of the front door, either with your own hands or with the participation of an experienced craftsman. To make this task easier, it is worth using beacons. They are mounted level and attached to the mortar. Cement and other special mixtures are suitable for plastering. They are sold in any store specializing in goods for construction and home improvement, for example, in a store like Leroy Merlin.
After the mixture has dried, apply a layer of base putty, and after drying, another layer of finishing. If you want to achieve impeccable surface quality, use sandpaper or a special mesh. At this point, the preparatory activities are completed and any type of finishing is applied.
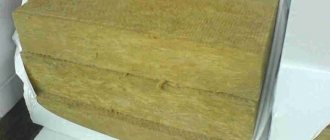
Application of insulation
Decorative finishing of a doorway is not performed without the use of additional materials. When slopes are created, it is necessary to use insulation. This stage is especially important for doors in a private house. In apartment buildings, this technique reduces heat loss.
Foam plastic, polystyrene foam or mineral wool can be used as insulation. In some situations, installing a layer of such material is problematic, since the opening space is reduced. According to SNiP requirements, this indicator must be at least 80x190 cm. If the available space does not allow the use of reliable insulation, then you can take special sandwich panels.
For openings that are too wide, the front door opening is finished using frame technology. If you need to reduce the amount of cement mixture, then use this finishing option. Frame structures have insulation inside. The front side is made of plastic or wood. It has an aesthetic and presentable appearance.
Application of insulation in door slopes
Finishing options
Having decided to improve the slopes on the front door with your own hands, choose the material not only based on the price. Each type has its own negative and positive sides and suits certain interior styles.
Plastering
Mortar is rapidly losing popularity for a number of reasons:
- requires certain construction skills;
- creates a large amount of dirt;
- due to non-compliance with technology, it may crack and crumble.
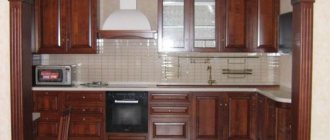
How to choose the right door to your apartment?- Kitchen design in Khrushchev: useful tips for those who have a small kitchen (100+ photos)
Which laminate to choose?
It is considered one of the most affordable and reliable types of coatings, so it is unlikely to disappear from the market in the near future. Sold as a dry mixture, which when combined with water turns into a solution. It hardens quickly, which requires high speed work.
After applying a centimeter layer of mortar, it is necessary to lay a reinforcing mesh; it will prevent cracking in the future. The building mixture allows you to prepare walls for wallpaper or painting. The rough processing is covered with textured putty.
Plasterboard finishing
Plasterboard sheets are appropriate only in two cases: when you need to cover an opening with many deformations and, if desired, change the shape of the structure. This finishing of the entrance door slopes is done only from the inside. Even inexperienced, novice builders can handle it. But the installation process is quite lengthy, since all the formed joints require additional processing.
The drywall is primed and puttied, thereby preparing for the final cladding. Starting putty is enough for wallpaper. If you plan to paint, you should additionally apply a finishing mixture.
MDF slopes
There are several reasons for the widespread demand for MDF panels:
- preliminary plastering or plasterboard covering is not necessary;
- color variations are unlimited;
- subject to special treatment, it is resistant to moisture and mechanical damage;
- service life exceeds 12 years.
MDF panels are always mounted on a frame using self-tapping screws and dowels. Work starts from the top of the opening, then the sides follow. Joints will inevitably form at the corners; they are sealed with a matching decorative strip.
Cladding
Lining is a product of wood processing, and therefore has the same disadvantages as pure natural solid wood. It deforms in conditions of high humidity and does not tolerate sudden changes in temperature. To reduce the degree of flammability, it is impregnated with a fire retardant. They also use various protective agents against insects and possible rotting. Only wide jambs are covered with lining. The basis of the product is a wooden crate. The cost of this is relatively high, but not as much as the price of oak or pine.
PVC slopes
The specifics of assembling plastic panels are similar to MDF. But unlike the last one:
- PVC panels are glued to a perfectly flat surface (after plastering or plasterboard covering);
- they are very thin and fragile.
Liquid nails are suitable as a fastening agent. The color of the panels usually imitates natural wood, but there are also simpler, plain types on sale. The price for such cladding is low. Another advantage is very simple installation.
laminated chipboard
Thin sheets with a thickness of 0.6 to 1 cm are used for cladding door frames. Laminated chipboard is much better than conventional particle board, and is practically not inferior in properties to MDF. At the same time, it belongs to a number of inexpensive, accessible, easy-to-process materials. Laminated chipboard holds fasteners well and can last 10 years or more. The panels are produced in different colors. They imitate wood and stone, come in glossy and matte, and fit into most interior styles.
Stone decor, brick, tiles
In different interior styles, after installing an iron door, the doorway is finished with natural, artificial stone or brick. Tiles are used much less often in the interior, in the kitchen or bathroom.
For work, small elements with an unobtrusive relief are taken. More pronounced transitions will create a feeling of bulkiness and are unlikely to fit even into the industrial-urban style of the interior. Undeniable advantages:
- allow the implementation of unconventional design ideas;
- are restored and do not require repairs for a long time;
- safe for adults and children;
- available.
The main difficulty is preparing the surface; it must be absolutely flat. Each cladding element is glued with liquid nails. When forming seams, colored grout is used.
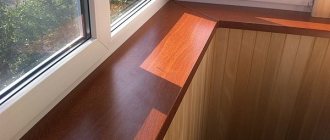
Laminate
Laminate on the walls looks no less solid than on the floor. First of all, you should choose the right color. It should be in harmony with the wallpaper and even the baseboard. There are 3 ways to attach panels:
- The walls are leveled with plasterboard or mortar. Installation of panels begins from the top. Each part is fixed with liquid nails.
- A frame is pre-fabricated, inside which thermal insulation is laid. The laminate is attached to the perimeter slats using self-tapping screws.
- Polyurethane foam is used as an alternative to liquid nails. The principle of operation is identical to the first option.
Saving on raw materials is not rational. A quality purchase will last for 20 years or more. Such an investment will fully pay for the endless expenses on budget analogues.
Wallpaper
Wallpapering is the simplest and oldest method available to absolutely everyone. If you do not want to renew repairs every 2-3 years, you should choose high-quality wallpaper that is resistant to dampness. To make the opening invisible, a design identical to the walls is selected. To highlight it, on the contrary, emphasis is placed on contrasting colors, photo wallpapers, patterns, geometric, simple and complex shapes.
Too light colors are impractical for jambs in the hallway. An unfortunate move with your foot in your shoes or a rolling baby stroller will definitely leave dirty stains. To prevent this from happening, you can give preference to other colors or choose washable wallpaper.
Polyurethane
Polyurethane is a good alternative to expensive and bulky gypsum stucco. It can be given any shape, regardless of the size of the intended product. Suitable for decorating large rooms with high ceilings. The high-grade polymer does not break, is not susceptible to high humidity, is very durable and lightweight. When connecting two parts, the seam is masked with putty and sanded down with sandpaper.
The dimensions of the platbands as a criterion for choosing the desired model
The size of the cashout is influenced by factors such as the dimensions of the doorway and its location, the shape of the platbands and the width of the technical gap between the wall and the frame.
The width of the door frame on different doors in apartments or houses depends on the size of the door leaf, the dimensions of the frame and the chosen shape of the strips. Standard doors with dimensions of 80x200 cm require the installation of platbands with a width of 6 to 10 cm. The most optimal width is 64 mm. It allows you to completely close the technical gap and partially cover the wall. A strip with a width of over 64 mm, even one not exceeding the 70 mm mark, will look rough on standard doors, so most manufacturers still stick to a 64 mm strip width.
The width of the technical gap between the wall and the door frame is an important indicator when choosing the width of the platband. When installing doors of standard sizes, it is not always possible to install a 64 mm opening, so you have to take wider or narrower models. The choice depends on the following factors:
- furniture arrangement;
- non-standard dimensions of the door structure;
- the location of the door opening close to the adjacent wall, or very close to adjacent doors;
- decorative design of a door leaf with a mass of elements arranged in such a way that eliminates the use of a wide strip.
Variety of shapes and sizes of door frames
It is necessary to adhere to the rule that the width of the platband is several mm greater than the width of the technical gap. According to SNiP requirements, this difference must be at least 30 mm. The most optimal option is 40 mm, which allows you to hide all traces of installation and create a beautiful frame for the doorway.
Shape and dimensions of wooden door frames
The width of the cashout also depends on its shape. Flat models comply with the aforementioned standard of 64 mm. Products with a semicircular surface have a width of 70 mm. For shaped strips with a relief surface, it is permissible to install wide trims on doors with dimensions ranging from 85 to 150 mm.
Helpful advice! If it is impossible to completely get rid of the technical gap between the wall and the opening, and installing a wide strip is impractical, then it is best to use a sealant that matches the strip.
Telescopic platbands have their own special parameters. The standard width is considered to be models in the range from 60 to 80 mm. The most optimal width for this shape is considered to be 75 mm. However, the structural feature of telescopic cashing requires the selection of other dimensions, not just width. What matters here is the thickness of the strips, as well as the length of the groove element.
Telescopic platbands are produced in different dimensions, depending on the type and model:
| Platband type | Plank width, mm | Plank thickness, mm | Mounting element length, mm |
| Flat planks | 75 | 8 | 10 |
| 10 | |||
| 8 | 20 | ||
| 10 | |||
| Drop-shaped platbands | 16 | 10 | |
| 20 |
Photo of installation and design ideas
Stage 4. Assembling the accessory box
Before installation, we assemble the extensions into a solid, rigid box.
Using a drill, we drill holes for self-tapping screws - for fastening from the inside. This is a mandatory step so that when screwing in the screw does not split the MDF panel.
We make several holes at a distance of 10–15 cm from each other.
Stage 1. Control measurement of the opening after door installation
We make accurate measurements of the actual dimensions after installing the door - even if we know the exact factory dimensions. It is necessary to measure the width, height of the vertical and length of the horizontal extension.
Door trims are decorative strips that cover the walls of a doorway. They are installed if the opening is wider than the door frame. Most often, MDF panels are used for this.
It is necessary to measure at three points vertically on each side and at two points horizontally (from above).
The additional element must necessarily be adjacent to the door frame, so we measure the length along the width of the door.