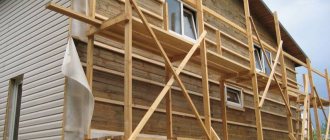
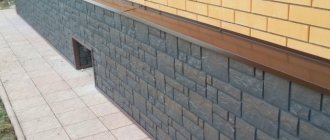
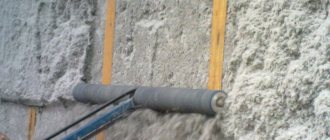
The overhang or eaves of the roof is the lower part of the roof, which usually protrudes from the walls by 40-80 cm.
Its main purpose is to protect the walls and foundation from rain and melt water. The design of the cornice is carried out at the final stage of construction, when the roof is installed and the finishing work on the external walls is completed.
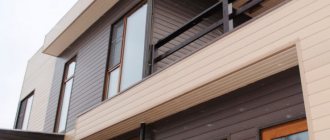
It is recommended to hem not only the eaves overhangs, but also the ceilings of terraces and balconies, and porch canopies. A wide selection of materials allows you to choose cladding for any architectural style, taking into account the type of roofing.
Why is the cornice hemmed?
- After laying the roofing material, part of the rafters and other layers of the “roofing cake” are visible from the bottom of the ends. This does not look aesthetically pleasing - the lining of the overhangs improves the roof, covering all the internal parts, and gives a complete look to the entire structure.
- In addition to the decorative function, hemming the eaves protects the roofing system from damage due to strong winds.
- Another important task is solved—proper under-roof ventilation is ensured, which eliminates the appearance of condensation, mildew and mold. Accordingly, the service life of the structure increases.
Mounting points
In order for the cornice hemming to be correct and have the required aesthetic effect, you should know certain subtleties.
By puff
In this case, the tie rod or the lower chord of the truss can serve as the lower part of the roof structure. In any case, you will need to decide on the pitch of the trusses. The approximate value of the construction pitch is from 50 to 80 cm. In this case, the length of the panel will be approximately 3 meters. If you carry out simple calculations, determine that the panel will need to be trimmed at the fastening points.
To check the evenness of the plane at the bottom of the supporting structure, stretch the thread along them. It should be pulled over the extreme points of the cornice. If in some place the elevation marks do not correspond, they will need to be leveled and this is done by stuffing the slats.
Along the rafter leg
This method is the most common knot. In this case, you need to check the trimming of the rafters for compliance with the level. To fix the cornice, you need to take two strips measuring 10*4 cm. One of them needs to be attached to the rafter leg, and the second to the wall of the building. The bottom of the bar should be at the same level. The planks can also be secured using nails.
If the roof has a slight slope, then the overhang will be flat. For architectural expressiveness, hem the overhang directly along the rafters. This option will help save time and lumber. Only in this case you will need a little more siding than with the horizontal option.
Increase in cornice
If you watch a video of finishing a cornice with siding, it will become clear that in certain cases the cornice line should be expanded. This is especially true when it comes to buildings being reconstructed. In such a building, the elements holding the house together or reinforcing elements should be hidden. What to do in this case?
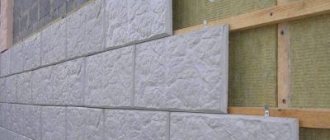
To do this, you need to attach an additional supporting frame to the wall and rafters. Attach eaves siding to such a cantilever structure. The bottom will need to be lined with a perforated panel to improve ventilation. Cover the side of the structure with ordinary panels for finishing the facade.
Types of roof overhangs - what to look for.
There are two types - cornice overhang, another name is horizontal, and pediment overhang. Let's look at how they differ and the features of filing each.
Cornice overhang.
Formed by the lower fragment of a pitched roof. Air masses pass through it into the attic. In the case of a heated attic, air enters the under-roof space from below the slope, passes upward and is discharged through a ridge or aerator, this is how all elements of the “roofing pie” are ventilated.
To properly organize air draft, the eaves overhang lining must be ventilated, not continuous, but with inlet openings. To do this, use one of the following methods:
- The simplest one is to create a gap between the panel and the wall. Based on the material used, the gap size should be: 1-1.5 cm for siding or wooden lining, 0.6-1.2 cm for corrugated sheets.
- Integrate aeration grilles - they are installed directly into the sheathing panel.
- When wooden boards are chosen as the finishing material, you can leave 0.5-1 cm gaps between them during installation.
- A more popular solution is to line the eaves overhang with perforated soffit.
When finishing a horizontal overhang, two important rules must be followed:
- All ventilation slots and gaps must be covered with mesh or grilles. This will prevent debris and leaves, small birds and insects from getting under the roof.
- The volume of the slots should not be less than 1/500 of the entire ventilated area. In addition, each type of roofing material has its own hole diameter. For example, ceramics “breathe”; ventilation gaps are needed with a smaller diameter than for flexible tiles.
What happens if you neglect the ventilation of the under-roof space and tightly close the eaves overhang?
Excess moisture contributes to the formation of condensation, wetting and destruction of insulation and rafters, and the formation of mold.
— Corrosion forms on metal tiles over time, and natural tiles will burst in the cold due to excess moisture.
- overheating of the premises in hot weather and icing of the roofing in cold weather is possible; such a roof will very quickly fail and major repairs will have to be carried out.
Gable overhang.
Formed by the inclined side part of the roof slope. Here the task is the opposite - you need to protect the sheathing and insulation from getting wet and blown out, and therefore prevent the penetration of wind and rain under the roof. In this case, the filing is performed in a continuous hermetically sealed manner.
Rules for working with siding
There are a number of rules that must be followed in order not to encounter problems during installation and further operation of overhang coverings:
- Before attaching the gardening panels, profiles must be installed around the entire perimeter.
- When using plastic siding, the panels are cut 5 mm smaller than the required size. This creates free space in case the material expands when heated.
- It is imperative to maintain air exchange . To do this, you can alternate regular panels with perforated ones. The optimal interval is 1 m.
- screws must not be fully tightened . It is required to leave 1 mm of free space for the movement of material during expansion.
- Before finishing begins, the rafter legs must be cut down one level at a time . To check whether the cuts were made smoothly, you need to stretch the thread between the first and last legs of the rafters.
- On the end side of the roof, the rafters are covered with wind strips . They prevent moisture from entering the space between the siding attached to the gable overhangs and the roof.
Wind slats Source montazh-saidinga.ru
By following these rules, you can avoid most problems in the future.
How to design the edge (end) of an overhang?
Both types of overhang have open elements at the ends. On the side of the eaves overhang, this is the end of the rafter system; on the side of the gable overhang, this is the end of the sheathing. They are closed with special components, which can often be purchased along with the tiles.
This is done not only to give a beautiful appearance, but also to preserve the roofing materials from adverse weather factors.
Sometimes the part for finishing the edge is made of wood, pre-treated with an antiseptic and painted - but this is not the best option.
Additional components are made of metal and are more durable, as they are coated with protective anti-corrosion polymer compounds.
When shaping the edge of the eaves overhang, first the rafters are cut in one line vertically at the same distance from the wall. The ends of the rafters are connected with a strapping front board.
A metal cornice strip (drip tray) is mounted on it. A drainage system is installed along the eaves overhang.
On the side of the gable overhang, the sheathing is cut along one line parallel to the wall. A metal end strip is installed along the gables, covering the edges of the sheathing.
It is also called a wind strip; in addition, it protects the roof structure from strong winds and prevents debris and insects from being blown through the ends.
Optimal size
It is often difficult for non-professional craftsmen to determine what size cornice should be made
This is indeed a very important design decision, because if it is too small, then melt or rain water from the slope will fall on the lining of the external walls, on the foundation blind area, leading to destruction and also damage to the appearance of the structure. When choosing the length of the cornice, the following factors are taken into account:
- Climatic conditions. The optimal size of the roof eaves depends on the amount of precipitation falling in winter and summer. In snowier regions, roofs with wide eaves are traditionally used to protect the walls and foundation from snow. For example, alpine chalets located in the mountains usually have eaves overhangs at least 1 meter wide.
- Roof slope. The greater the angle of inclination of the roof slopes, the smaller the cornice can be made. This is explained by the fact that with a flat roof shape, the trajectory of falling snow and water goes far from the outer walls of the house. If the slopes are steep enough, then it is better to make the cornices wider to protect the structure from splashes of water that can reach the wall during intense snowmelt or rainfall.
- Proportions of the house. A wide cornice with a flat roof makes the building visually lower, squat, distorting the optimal proportions. A narrow overhang with a high, steep roof, on the contrary, elongates the silhouette of the house.
Optimal overhang size
Selecting the overhang width
The main methods of filing roof overhangs:
Along the rafters.
The simplest technology and is mainly used for roofs with a slope of no more than 30 degrees. and a cornice extension of 40-50 cm. A sheathing of timber is built to the rafters. Sheathing panels can be mounted parallel to the wall, perpendicular to the rafters or along the end.
Horizontal filing.
Suitable for roofs with a steep slope. A box is built from the bars, which is attached to the rafters and the wall. In this case, the block on the rafters must be placed 1 cm lower than the block on the wall. This way, moisture that gets on the overhang does not linger on it.
Then the bars are nailed from the corners of the house to the corners of the roof. If the overhang protrudes more than 45 cm, another longitudinal beam is additionally installed. Next, bars are added perpendicular to the wall to strengthen the longitudinal bars. This method allows you to economically hem the overhang; installation does not take much time.
Gable overhang trim.
Regardless of the technology used to hem the eaves overhang, the pediment is always framed using sheathing. The bars are attached to it, to which the cladding strips are then fixed.
Stage V. Important subtleties of using fasteners
Let's look at which mount is best suited for this task. So, to install soffits you need anti-corrosion screws or nails (but only anti-corrosion ones). The fact is that the spotlights will have direct contact with the open atmosphere 365 days a year. And on particularly rainy days, the air humidity is quite high.
The diameter of the head of nails and screws should be no narrower than 8 mm, and the stem – 3 mm. The movement of the panel during the installation process must be free. Whether you did everything correctly can be checked by using an ordinary penny coin, which, if done correctly, will fit between the cap and the panel. And leave at least 1 mm between the fasteners and the surface of the panel:
Try not to drive the nail deep - you need to leave 1 mm between the siding and the bottom of the nail head. It is better to nail the nails at a distance of 40-60 cm from each other - so that the panels can move freely.
Hammer them right in the center of the slot, and never at the end, otherwise you will ruin the trim panel. At all joints and stops at the end of the profiles, be sure to leave a minimum gap of 5 mm, and if you work in cold weather, then all 6 mm.
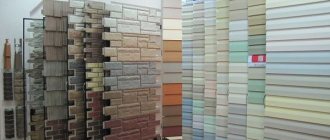
Selecting material for hemming.
Which material to use primarily depends on the overall style of the house, taking into account the decoration of the walls and the type of tiles. An important factor is the price and, of course, the personal tastes of the homeowner. It is worth taking into account the practicality and durability of the material.
Wooden plank.
The tree requires special care. Before installation, it is treated with antiseptic and fire-fighting compounds, painted and varnished. From time to time you will have to repeat these operations, otherwise insects will appear in it, it will begin to become damp and deformed, and the appearance will noticeably deteriorate.
Coniferous species are chosen for lining the cornice. The board can be planed or edged, the permissible width is 2-25 cm, thickness 1.7-2.2 cm. When mounting the boards parallel to the wall, they are fastened in increments of 1 m, perpendicularly - on both sides of the board, with a wide overhang also in the center . For ventilation, leave gaps between the boards of 1-1.5 cm.
Wooden lining.
The material has already been processed, unlike the board. But, like a board, before installation it is advisable to keep it in the air under a canopy for 1 month, otherwise the wood may be too wet or dry, which will subsequently lead to deformation. Installed in a similar way. It is possible to install ready-made ventilation grilles, which are located at a distance of 1.5 m from each other. The lining costs twice as much as the board.
OSB plywood.
The boards must be moisture resistant. Installation is quick, since the dimensions and rigidity of the material make it possible to install large sheets at once. For installation, a box of timber is erected, to which the slabs are screwed. Ventilation is carried out by inserting grilles. This type of filing is not durable and not aesthetically pleasing; painting is undoubtedly required.
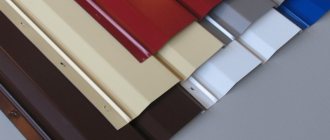
Sheet metal.
It is rarely used, as it has a number of disadvantages: heavy weight, a special cutting tool is required, and anti-corrosion treatment of steel sheets along the cut edge is required. Mostly galvanized steel with a polymer coating with a thickness of 0.6 mm is used. The length of the product can reach 6 m. Rarely do they take copper or aluminum sheets. For ventilation, grilles or perforations are used.
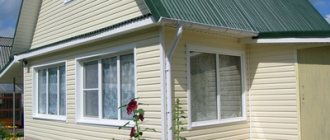
PVC siding.
PVC panels are installed perpendicular to the walls, screwed in several places depending on the width of the overhang. For ease of installation, various additional elements can be purchased along with the siding. To finish the edges, “U” shaped strips are placed, the junctions of the panels are fixed with corners, and there are ventilation grilles. PVC siding is not recommended for installation along the overhang; it does not have sufficient rigidity and can sag. Siding is produced mainly in light shades, its cost is low. If you choose good quality material, it will last for quite a long time.
Profiled sheeting.
It stands out for its ease of installation and durability. Profiled sheet C8, C10 or NS 20mm is used. When designing the cornice, you should take into account the thermal expansion of the corrugated sheet and leave a gap of 0.6-1.2 cm. Fastening is carried out in increments of 1 m. Ventilation is carried out through specially designed grilles.
Soffit.
Soffit is a special siding for lining an overhang. Soffits are made of vinyl or metal. They have a varied texture and a large color palette. For example, wood-look metal soffits are very popular—they accurately copy the wood texture of noble wood species, such as cedar, oak, and maple.
But in comparison with natural wood, soffit does not require maintenance, does not require processing or painting, does not dry out or swell, is not afraid of moisture and temperature changes, and costs several times less. Soffits are suitable for all types of tiles and can be easily matched to any architectural style.
The kit includes all the necessary components, profiles and strips, which greatly simplify and speed up installation. Soffit panels can be of different types: single, double, triple, perforated or solid.
You can complete the overhang with soffit yourself; the installation procedure is very simple: the planks are cut along the width of the overhang and secured with grooves perpendicular to the walls.
Soffit is undoubtedly the most reliable and fastest way to frame cornices and is very popular among owners of private cottages.
Tips and tricks
It is advisable for the home owner to take into account the advice and recommendations of people who have already done the lining of overhangs with siding. These recommendations will answer many controversial questions and help in the work process:
- The distance between fastening elements (screws, nails) along the length of the profile should not exceed 35 cm . A larger number of fasteners will lead to unnecessary costs, and due to fewer, sagging may occur.
- From the moment of purchase until the start of installation work, siding must be stored outdoors under an opaque plastic film . Bars or boards are placed under the bottom sheets so that the material does not come into contact with the ground.
- It is important to work carefully with locks located on profiles and panels. If too much pressure is applied, they may break.
- To cut profiles and plates evenly, a grinder is used . Simple trimming is done using tin snips .
- To create good ventilation, special ventilation grilles . They will ensure air circulation between the siding, insulation (if any) and the roofing.
Ventilation grilles Source itsallfare.com
- Before installing siding, the roof must be insulated .
- Many builders coat panel joints with sealant. There is no need to do this.
If the panels become dirty with dust or dirt, they can be cleaned using a damp cloth with the addition of a singing solution. Do not clean panel joints with metal brushes or strong chemicals.
Do-it-yourself roof lining with soffit.
Let's look at installation using a vinyl soffit as an example. All elements are screwed to a wooden frame:
- The J-profile is placed across the overhang and measured.
- Cut the J-profile with a grinder.
- Attach the J-profile to the sheathing with self-tapping screws.
- When all the profiles are fixed, measure the distance between them and cut the soffit strip to the required size.
- The soffit is installed. To do this, the soffit strip is inserted first into the wall overhang, and then into the eaves. Fastened with self-tapping screws.
- The front part of the cornice is sewn up with J-chamfers or a strip.
You can buy soffit for lining roof overhangs at a competitive price in Yekaterinburg at “Your Roof”. Vinyl and metal soffits from trusted manufacturers are always available. We provide warranty cards and quality certificates for all products. The service life of the soffit is from 20 to 50 years.
Single-color soffits are available in light, bright and dark shades, as well as with imitation of natural wood. You can always order professional installation of cornice soffits.
Dimensions according to standards
The dimensions of the overhangs are quite clearly specified in GOST. According to these standards, as well as SNiP, the optimal overhang size is 40-60 cm, but practice shows that sometimes these rules have to be neglected.
We are talking primarily about buildings belonging to certain architectural styles. For example, for an Alpine chalet it is appropriate to place the overhang at a distance of one and a half to three meters, and for a modern high-tech house it is appropriate to abandon any overhang at all.
As for materials, there are no mandatory requirements, however, there are recommended sizes, the ease of use of which has been confirmed in practice
When choosing planed boards, look for samples that are at least 20mm thick. These are the ones that are best suited for hemming, as they do not sag, do not suffer from the wind, and do not warp.
The length can be any, but it is best if it is equal to the length of the overhang itself (or its width when fastened transversely). This will avoid many joints, and the filing will be correspondingly stronger.
There are no standard sizes even for soffits, although they are specially produced for filing overhangs. However, each of the major manufacturers considers it their duty to offer different sizes than those offered by its competitor, so buyers have the opportunity to choose exactly what they need. Thus, the width of the panels ranges from 30 to 80 cm, length - from 3 to 4 m. The most popular are soffits with indicators of 3.6x0.3 m. As for aluminum soffits, their thickness can be from 0.3 to 0.6 mm. Vinyl thickness is from 1 to 1.2 mm.
Installation features
You can hem the roof with siding only after installing the rafter system. This will help you correctly solve the problem of how to cover the eaves of a house with siding.
The filing process itself is characterized by several features:
- For high-quality sheathing of the cornice, it is necessary to make vertical cuts of the lower heels of the rafter legs. It is important to ensure that the cuts are parallel to the walls of the house.
- It is best to carry out the cladding using special strips that match the color of the roof or the exterior cladding of the house. Using ordinary wooden boards for this purpose will not add aesthetics to the structure.
- The lower heels of the rafter legs are sawed off vertically, since they must be sewn up together with the entire structure.
- It is recommended to insulate the walls before covering the roof overhang with siding.
Lining roof overhangs with siding is done in two ways:
- In the first case, a horizontal box is made from boards, attaching one of them to the wall and the other to the bottom of the rafters. In the place where the roof slopes meet, place the board with the wide part, making even joints. In this case, it becomes possible to create a structure independent of the walls of the house. The planks are fastened using angles and plates.
- The second option is used for pitched roofs; the eaves are hemmed along the rafter line. In this case, when arranging the frame, it is important to take into account that the angle of inclination of the hem should coincide with the slope of the slope. The rafters in the lower part should be as even as possible so that screwing the boards does not cause difficulties. Using this method for a pitched roof requires the installation of two boards on opposite sides at the junction of the slopes.