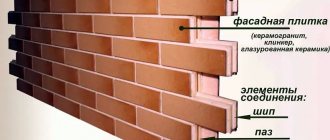
After its appearance, the material revolutionized construction; it has many shapes and shades, looks beautiful, is easy to clean and perfectly performs its functions.
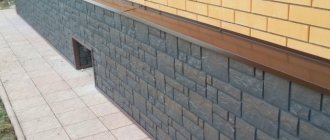
The basement, as the part of the building most exposed to atmospheric phenomena, needs multi-layer, reliable protection, which they can create with the correct installation technology.
Detailed installation instructions
The panels are installed according to a specific plan.
Procedure:
Installing a starter or J-bar. It is attached to the sheathing or wall (if there is no insulation) strictly horizontally, for which a line indicating the edge of the starting strip is first drawn on the surface at the building level. Fastening is done using self-tapping screws in increments of about 40 cm. The self-tapping screws are screwed exactly in the middle of the oval holes. They are not tightened all the way, leaving a small stroke for possible temperature expansions.
CAREFULLY! If the base line is uneven relative to the ground surface, the material needs to be trimmed from the bottom edge. In this case, the fastening is carried out directly to the sheathing, without the participation of the starting strip.
- The material is installed in horizontal rows from left to right and from bottom to top. The first panel on the left is trimmed to create a clean corner edge. It is inserted into the starting rail and secured with self-tapping screws on top.
- The next panel is inserted into the starting bar and turned to the left until it makes full contact with the locking system, after which it is fixed along the upper edge with self-tapping screws.
- All other panels are installed in a similar manner.
- Corner profiles form external corners and protruding parts of the base. They are installed on top of the finished canvas, covering the corner joints, protecting them from water penetration, wind, etc.
- The top edge of the panels is finished with either a finish strip or a J-plank. There are other options using cornice strips or similar elements. The choice is determined by the difference in level between the walls and the base.
Plinth panels for exterior home decoration are stronger and more resistant to various influences than conventional types of cladding. Possessing high performance qualities, they have an impressive decorative effect, allowing them to be used to completely decorate the walls of a house.
The ease of installation makes it possible to cover the house yourself, which means significant savings on the cost of hired workers. A wide choice of colors and patterns of panels makes it possible to create a stylish and respectable appearance of the home, indicating the good taste of the owner.
What is the material for finishing the basement of the foundation of a private house?
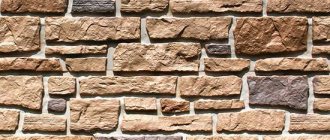
Plinth panels are a decorative material that allows you to stylishly and beautifully cladding the lower part of the house. Panels are produced with imitation of different materials. The most popular products are considered to be “stone-like”, “brick-like”, as well as those with clinker tile cladding. Often, thermal panels, as well as panels made of PVC, are used to finish the basement of a building.
The material has a number of properties that determine the choice of buyers. They are lightweight, which makes them easy to deliver to site , unload and then install on the surface. Due to their low weight, the panels do not exert strong pressure and do not load the base, as is the case with natural stone.
The material can be mounted on any surface, even uneven. This is because you will first have to make a sheathing of wood or install a metal frame made of metal profiles.
A simple mechanism for working with the material allows you not to hire specialists and do the cladding yourself. The panels do not require additional protection from frost, moisture or ultraviolet radiation. They are easy to care for and look very impressive on the base of the house.
Types of base
Depending on the connection with the external wall, the plinth can be of different types: recessed, protruding, in a single plane. According to experts, it is the last option that is the most irrational, since with the same level of the plinth and wall, moisture easily penetrates into the room. The ideal option would be a sunken base.
Among the main advantages of the sinking design are:
- overload protection;
- budget.
The overhanging section of the sinking base will create additional protection of the room from rainwater. It looks attractive. Unfortunately, it is not advisable to use this type of construction in the construction of a house with thin walls.
If the house is built on a strip foundation, then the plinth will be the part protruding above the ground. The columnar base of the house implies a base in the form of walls between the pillars. Otherwise called pick-up. In addition, such a base significantly strengthens the foundation of the house.
Possible errors and ways to eliminate them
If the sheathing is installed incorrectly, the structure can be disassembled and reassembled .
The same applies to the assembly of panels. The material is separated and laid anew if there is a discrepancy somewhere. Panels on wet coupling may be damaged during dismantling.
Nuances:
- panels cannot be bent;
- if there is a protective film, remove it only after installation;
- You can only cut from the inside, not from the rib or from the face.
Installation of plinth panels
You can cover the base with finishing material yourself, even if you are not a craftsman with many years of experience. To do this, you need to know the technology of performing the work and some subtleties.
Preparatory work stage
Before starting work, carefully inspect the surface of the base. If there are protruding elements on it that can be removed, you need to do so. You should also level the work surface if possible.
At the next stage of installing facade panels, markings are applied to the walls with your own hands. Its quality determines the evenness of the fastening of the frame, the starting profile and the entire skin
Please note: the lower edge of the base is placed flush with the ground if it does not freeze in winter. Otherwise, it is raised by 15-20 cm
The marking is carried out approximately 5 cm above the specified level. For this purpose, coated or painted cord is used. It is attached to two self-tapping screws screwed into the outer corners, set according to the level. The cord is pulled and sharply released, “beating off” a line on the wall.
Assembling the frame and laying insulation
To cover the base, it is better to use not a wooden sheathing, but a durable frame made of galvanized profiles. It will withstand the weight of both polypropylene and metal panels with insulation.
The installation of the structure looks like this:
- Special U-shaped brackets are attached to the surface of the wall, oriented towards the markings. The horizontal fastening pitch is equal to ½ the width of the panel, and the vertical step is ½ its height.
- Guide profiles are inserted into the brackets, setting the distance between them and the wall using fasteners.
- The resulting cells are carefully filled with insulation.
- Lay a layer of vapor-permeable membrane (waterproofing).
The frame can be single-layer or double-layer. In the second case, another layer of galvanized profiles is mounted perpendicular to the guides. Metal screws are suitable as fastening elements. Otherwise the technology is unchanged.
If you are finishing your house with thermal panels, then the frame will be single-layer, and the cells will have no insulation. In this case, the waterproofing is laid before the installation of the profiles.
Fastening facade panels
The first row of façade panels for covering the base is attached to the starting level. It is pre-fixed on the lower guide profile.
The panels are installed from left to right. In the upper part they are attached to the frame with self-tapping screws with a wide washer. The finishing elements are joined together using a special locking connection.
Please note: a temperature gap must be left between the screw head and the frame. To do this, screw the fastener all the way and then loosen it half a turn.
The installation of the decorative cladding strip completes the work.
Thus, the variety of facade panels is an opportunity to creatively approach the design of the house outside. The ease of their installation is an opportunity to gain invaluable experience and save the family budget on the services of specialist finishers.
Features of basement siding
You can find various varieties of this material on sale, which are offered to customers at affordable prices. The most popular is plastic basement siding , which is at the same time easy to use, it is not subject to corrosion, which makes it stand out against the background of metal panels.
If finishing work is carried out correctly, polyvinyl chloride panels will not rust or rot. The material will withstand significant temperature changes, and the finish itself will last more than 50 years without requiring replacement or repair.
A distinctive feature of basement siding from similar panels for wall cladding is the increased strength of the material. Improved rigidity indicators are necessary to withstand frequent static and dynamic loads, while the material will retain its original appearance, it does not fade in the sun and provides the walls of the house and the base with the necessary protection.
The advantages of basement siding include the following:
- Affordable price.
- Environmentally friendly.
- Strength.
- Moisture resistance.
- Reliability.
The homeowner can carry out all installation work independently, without using any complex tools and without even having relevant experience in construction.
Facade panels for walls and plinths, what is their difference?
Facade panels are slabs connected in a certain way for the exterior decoration of residential buildings. They imitate a coating made of natural brick or stone. Similar to siding, but characterized by improved performance properties. Among all the variety, panels are distinguished for finishing the plinth - the lower part of the building resting on the foundation. How do they differ from similar wall materials?
- They have great thickness. Usually it ranges from 15-25 mm.
- More resistant to atmospheric conditions due to the presence of special polymers in the composition.
- They have increased strength and are resistant to mechanical damage.
All this is important, since the panels must reliably protect the base from negative external factors. This is frost heaving of the soil, constant pollution, exposure to moisture from precipitation and melting snow.
Due to its performance properties, the material for cladding the plinth can be used to finish the entire facade. At the same time, ordinary facade siding is not suitable for the base.
The cost of PVC panels and the price of installation work in the Russian Federation
Approximate price:
- ordinary vinyl panels - from 550 RUR/piece;
- under the stone - from 650 RUR/piece;
- under the tree - from 650 RUR/piece.
The cost depends on the quality and manufacturer, materials in the composition, texture, characteristics (strength, frost resistance, etc.).
Cost of installation of PVC panels:
- Moscow and Moscow Region - from 500 rubles/sq m;
- St. Petersburg and Leningrad Region – from 500 rubles/sq m;
- Krasnodar – from 500 rubles/sq m;
- Rostov-on-Don – from 300 rubles/sq m;
- Kazan – from 300 rubles/sq. m.
The price depends on the complexity, volume of work and qualifications of the specialist. Prices are indicated according to the price list of private workers, construction companies charge more, but are also responsible for the quality of work, the price tag reaches 2000 rubles / sq. m.
Finishing work
Since the cost of installing plinth panels is quite high, it is much more profitable to do all the work yourself. To understand the essence of the process and get acquainted with its subtleties, we will analyze it step by step (see also the article “Properly arranging vents in the basement - ridding the house of dampness”).
Lathing
An example of creating a sheathing
The instructions for installing plinth panels begin with installing the sheathing, which can be made of either wooden slats or metal profiles.
Basic moments:
- In warm climates, the structure is fixed directly into the ground. In cold weather - at a height of 15 cm from the freezing zone.
- Vertical slats or profiles are located at a distance from each other not exceeding 91 cm.
- Insulation is placed in the spaces between the guides. For this purpose, you can use polystyrene foam, mineral wool or extruded polyurethane.
Insulation with mineral wool
Start profile
Drawing for fixing the starting profile
- Using a cord with special paint or chalk applied to it, we beat off a straight line.
- At a distance of 10 cm from the corner of the building, we mount the product according to the applied markings, screwing it with self-tapping screws every 30 cm. We check its horizontalness with a spirit level.
If the facing panels need trimming, then the starting profile is not installed, and the planks themselves are then fixed with self-tapping screws through the front side.
First panel
- We install the corner part of the siding.
- We apply sealant to its edges.
Installation diagram
- We place the first section 3 mm below the edge of the starting profile.
- Next, we move it, inserting it into the corner element while maintaining the expansion joints.
- We fix them with self-tapping screws so that their heads barely touch the surface.
Next row
We enter the next product through the starting profile and move it to the first section. To obtain a more natural imitation of stone or brickwork, we shift each subsequent row 20 cm to the side.
Correct installation: plinth panels are installed offset
J-profiles
J-profile photo
This product got its name, as you can judge from the image, because of its shape. Used for better fitting of finishing elements. They come with a 19 mm groove, which are better suited for sections imitating brick, and a 28 mm groove, these are more effective when installing “stone” panels.
The color of such fasteners is usually a shade of mortar. It is recommended to have them in sufficient quantities before starting work.
Possible problems
During installation, the following difficulties may arise:
- The sections do not fit well on the sides, which makes it impossible to lock them properly. This may be due to the unevenness of the wall. It is necessary to check all previous panels with a spirit level and, if necessary, level the sheathing.
- Products warp or do not fit tightly to the wall. The reason for such situations may be the lack of gaps between the heads of the screws and the surface of the siding. Review all fasteners and correct any errors.
Main manufacturing companies
Based on the popularity of manufacturers of high-quality plinth materials with imitation masonry, the following companies can be distinguished:
- Hlzplast - produces popular Wandstein panels , which are of excellent quality, and are the product of a Russian-German joint venture. Stone variations are most often made in dimensions of 79.5 x 595 cm. The range of stone imitation is quite large: flat layered stone, various convex and straight stone blocks. Accordingly, there are quite a lot of color options;
- Novik is a Canadian manufacturer . Makes imitation of hewn, field, river, and wild stone. Differs in a variety of colors. Panels can be of different sizes: each type of masonry is different from the other;
- Docke is a German brand with factories in Russia . High quality products, “stone” variations are presented in a variety of colors and textures. The production principle is to cast the material, which ensures a long service life;
- Alta-profile is a Russian manufacturer . Produces the thickest panels compared to analogues. It is one of the most popular in the Russian construction market. The panels are available in a wide range;
- Grand Line - Vox panels. It specializes in Russia, is a sales leader among building materials, and is distinguished by high-quality products.
Each manufacturer systematically modifies production and improves the quality of its own products, has modern equipment and qualified employees.
Technology of finishing the foundation with facade panels
The cladding of the lower part of the building is made using the same technology as the cladding of the facade.
The order of installation of facade panels does not depend on the type of finishing materials. Installation includes the following steps:
- preparation of the surface of the foundation walls;
- frame assembly;
- fastening of plates.
Preparatory work
Make a visual assessment of the destruction of the foundation walls. Based on the inspection, they determine what will be needed to restore and strengthen the base:
- tools;
- Construction Materials.
Cracks in the concrete base are filled with mortar. The destroyed brickwork is replaced with new one. Depressions and chips are smoothed out.
Installation of brackets
The distance between the brackets depends on:
- slab dimensions;
- façade dimensions;
- design features of the frame;
- project.
The brackets are secured to the wall with dowels and self-tapping screws. Holes for fasteners are drilled with a hammer drill or drill.
Special fastening clamps are installed on the brackets
Racks made of durable metal are mounted to brackets. The shape and type of frame depends on the presence of insulation. The base can be assembled from wooden blocks. The planks are impregnated with an antiseptic, compounds that repel wood-eating insects. Often the sheathing is constructed from metal guides with a galvanized surface.
The lathing for the structure is made only for multi-layer canopies with a seal. Typesetting plates are attached to the base. A strong, durable material is used for the frame. Installation on a metal profile frame is easier.
To create body kits of complex shapes, the frame structure is made of bars and metal.
The procedure for assembling the sheathing:
- Measurements are taken and the plane of the foundation wall is marked. The mounting locations for the brackets are determined.
- Install vertical posts (in some cases horizontal strips).
- An additional sheathing is created for the seal.
- The insulation is attached between the strips of the bottom sheathing. A water-repellent layer is glued or screwed on top of the seal.
When assembling the frame, it is necessary to observe the dimensions of the plates.
Laying thermal insulation boards
The sealant layer is made of:
- polystyrene foam;
- glass wool;
- basalt or stone wool;
- mineral wool slabs.
The heat insulator is inserted into the voids between the racks and the foundation wall. Depending on the type of interlayer, adhesive, dowels, and self-tapping screws are used for fastening.
Panel installation
Metal clamps are used to assemble the structure. The plates are fixed using these parts.
Each plate is adjusted close to each other. Be sure to leave thermal gaps. In the sun, the material heats up and expands. If the panels are screwed tightly, they may subsequently become deformed and the fasteners may be pulled out.
If the walls of the basement level are perfectly smooth and insulation is not needed, you can install the body kit parts on:
- adhesive composition;
- cement-sand mortar.
A layer of the mixture is applied to the wall of the plinth. Finishing is installed on top of it. For heavy slabs of porcelain stoneware and decorative stone, a sheathing is also constructed in this case.
In this way, panels are used to cover the foundation:
- vinyl;
- wooden;
- fiber cement;
- metal;
- cement-bonded particles.
Footnote. The installation of the canvas from individual plates is carried out from left to right. The elements are fixed to the frame with self-tapping screws.
There should be 0.5 to 1 mm between the screw head and the plane of the panel. Free space is necessary to avoid damage and deformation of the product after heating in the sun.
A metal profile or wooden blocks are suitable for assembling the frame. Quality control is carried out at each stage of work using a building level. All deviations from the horizon are eliminated immediately.
Specifications
Given the large number of varieties of basement siding, only general parameters that apply to most material samples are given:
- Length - 1100-1250 mm.
- Width - 440-460 mm.
- Thickness - 2-3 mm.
- Temperature range - from -50° to +60°.
- Service life - 30 years or more.
- Panel area - 0.4-0.6 m2.
IMPORTANT!
For some types of panels, the parameters will be different, for example, insulated panels with clinker tiles have a thickness of about 60 mm with a tile thickness of 10-12 mm. All differences in parameters are due to design features and material properties.
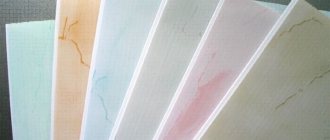
Types of plinth panels
The construction market is saturated with a variety of plinth panels. They may differ in material of manufacture, shape, front design, quality, and method of fastening. There are a huge number of stone materials: they differ in texture, composition, and shape.
The range of any plinth materials is presented in a variety of colors and shades, various patterns and imitation of natural materials. Unlike siding panels, plinth panels are stronger and the sheet itself is thicker, which provides increased strength of the material.
Depending on the material from which the plinth panels are made, they are classified as follows:
- vinyl. The most common type of basement finishing, since the range is quite large, the price is low, and the quality is affordable. Made of polyvinyl chloride, resistant to various temperatures, quite durable, do not require special care. There are quite a lot of options for stone in different colors. The disadvantage of this type may be instability to ultraviolet radiation, so you should choose a material with an additional protective coating. In addition, with frequent exposure to low temperatures, plastic panels become brittle;
- acrylic. No less popular, slightly more expensive than vinyl, but at the same time they have improved quality characteristics due to the content of acrylic resins in the material. They are distinguished by a variety of assortments, are quite durable, sun-resistant and temperature-resistant material. Acrylic plinth panels are not susceptible to chemical or alkaline agents, they are abrasion resistant and durable;
- metal. The material is made from galvanized steel with a multilayer coating of polymer components. The panels have rigidity, high strength, are not affected by the sun: they do not fade, withstand temperature changes well, but can become very hot. The material is fireproof, not exposed to chemicals, and easy to clean. It is believed that the aesthetic disadvantage of these slabs is that the imitation is applied only vertically, which may not always be in harmony with the brickwork of the facade. In addition, the joints of metal panels are not always aesthetically attractive, which violates the integrity of the masonry pattern;
- fiber cement. Due to the presence in this type of sand concrete mixture with the addition of various modifiers and fillers, this type of plinth material is quite heavy (compared to previous types), but also more durable. Accordingly, the price of such slabs is slightly higher, but it is worth it: the material is highly durable, fireproof, and waterproof. Not affected by organic and chemical acids. The range of slabs imitating masonry is quite wide in various textures and colors.
Regardless of what material the stone-look plinth panels are made of, their fastening method involves installing a sheathing onto which the cladding is attached.
IMPORTANT! The purchase of plinth panels should be made from reliable sellers who have high-quality manufacturer documentation.
Products from good manufacturers comply with all relevant standards, safety and quality requirements.
Requirements and selection criteria
To choose the best option, you need to consider:
- Mounting method . Will the panels be glued with a special compound or secured with a lock?
- The presence of stiffening ribs on the reverse side makes the material stronger. It is less susceptible to external influences: wind, hail.
- Coating color . The imitation of materials should be uniform, the color should be even, without gaps or inclusions.
- Form. If imitation stone is selected, the pattern must match; this must be checked before installation. Lay out the drawing on the ground next to the base, for example.
The panels must be designed for external cladding of the building, have the appropriate thickness, thermal insulation capabilities, and moisture resistance.
The main points of finishing work
As a rule, facade panels are attached to the working area without additional structures or require a frame.
As a rule, facade panels are attached to the working area without additional structures or require a frame. Today, two types of fastening are used: visible and hidden.
- Hidden type - connection through grooves existing inside the slabs. A more aesthetic appearance requires additional labor.
- Visible fasteners are nails, clamps, fasteners, and self-tapping screws. It is with them that the sheathing is screwed to the facade of the house.
When starting to work with your own hands, you need to purchase additional elements in the form of profiles, a starting strip, a wind board, external and internal corners, finishing strips, ebbs and soffits.
The technology for cladding a house with panels is simple: installation on a frame, pre-made along the entire facade, or addition directly to the facade slabs - it all depends on the choice of the developer. The work looks like this step by step:
- Measure the area that will be sewn to determine the amount of material, starting strips, profiles and external corners.
- By the way, you will need to purchase material for the sheathing, the same thing will be required for covering the base.
- View the availability of fasteners: dowels, screws. It’s a good idea to take care of direct hangers, which are needed to level the frame in order to clad the building without distortions.
- If insulation is necessary, make sure you have mineral wool and polystyrene foam.
- You will need a working tool in the form of a jigsaw, hammer drill, screwdriver, and measuring level.
- The sheathing is mounted 3-5 cm above the ground level or blind area; the default option is to completely decorate a house where there is a foundation cladding.
- A horizontal frame is made for the base, and a vertical frame for the wall panels. If these are metal profiles, it is better to fasten them with corners; it is better to fasten a wooden frame with hangers, as shown in the photo.
- If insulation will be laid under the outer layer of decor, the level of the sheathing should be at the proper distance from the wall.
All that remains is to take into account the spacing of the ribs, it should be such that the panel sheet is attached in 4 places, install the starting strip and installation can begin. Remember that when covering with siding, the sheets are not firmly attached, leaving a small gap. After the work on installing the decor with your own hands is completed, the cracks are closed with ebbs that prevent moisture from entering.
The tiled basement floor is also covered with ebbs and it is better if the element protrudes beyond the plane by about 3-4 cm to prevent moisture from getting under the cladding.
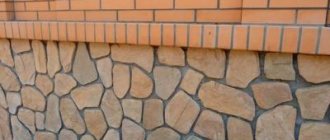
What is a base and why is it protected?
The basement part of the building is the lower, foot part of the walls, lying on the foundation . Often the basement part protrudes beyond the walls of the building. It happens that the base is located level with the wall line.
The basement of any building is the most vulnerable part in relation to dirt, mechanical stress, and moisture . A kind of transitional part from the foundation to the wall should prevent cold and water from entering the façade of the building, so it must be carefully protected and insulated.
A waterproofing barrier is used to protect against moisture. If there is a need to insulate the basement, install insulation. To prevent the influence of external factors, including mechanical stress, the basement of the building is protected with cladding materials.
Plinth panels provide reliable protection for the plinth. In addition, they are able to improve the basement part in terms of decorative design: the building will look neat and stylish.
Porcelain tiles
This artificial material is very common in modern construction and decoration. The list of its advantages includes:
- wear resistance;
- strength;
- resistance to temperature changes;
- low water absorption rate.
Thanks to the presence of the latter indicator, porcelain stoneware is insensitive to frost. Today, the hardware store offers a large assortment of porcelain stoneware:
- matte;
- satin;
- polished;
- glazed;
- aged;
- imitating leather, stone and fabric.
Porcelain stoneware finishing scheme
Considering the process of finishing the base with the selected material, it should be said that it is fixed either to the frame or with special adhesive solutions. The frame method is provided for additional insulation. This method is more labor-intensive, but you can also do it yourself:
- Foundation preparation: cleaning and priming.
- The frame is made of metal slats with existing special fasteners. It is with their help that the slats are secured to the base. As a result, a small gap is formed between the wall and the grille for ventilation.
- There should be a distance of 20 cm from the ground to the beginning of the frame. This will be enough to lift the ground in winter.
- Insulation of your choice is inserted into the resulting gap. It is best to give preference to polystyrene foam or mineral wool.
- Using clamps, the frame is covered with porcelain stoneware slabs.
If we talk about adhesive solutions, then everything is much simpler: glue is applied to the prepared foundation and the stone is fixed on top.
Requirements for plinth cladding
The following requirements apply to the cladding of the base:
- Strength and durability of facing materials;
- Maximum permissible load on the foundation;
- Aesthetic appearance;
- Installation technology.
Not only the quality of the material matters, but also how the installation of the plinth panels was carried out. If gross mistakes were made when working with siding, then no matter how high-quality the material is, the base will soon begin to collapse.
All building materials that will be used for finishing must be of high quality. Chips, scratches or cracks are not allowed on their surface. The work was carried out in accordance with the technology and according to the instructions. It is important to pay attention to the quality of preparation of the base surface for finishing.
Installation of heavy facade panels with your own hands step by step
Installation of heavy facade elements is carried out in a different way. It is impossible to simply attach a fiberboard or porcelain tile to a starting profile without additional fasteners. Therefore, the progress of work is as follows.
First of all, we construct the sheathing. It is necessary to calculate the number and types of profile strips, brackets and fasteners.
Wall surface prepared for fastening facing material
We install the brackets on which the vertical profile will then be attached. The size of the working part of the bracket is calculated from the thickness of the insulation. After laying the thermal insulation, we install vertical profiles. Mount the main and intermediate profile. The main one should be located at the junction of the plates, and the intermediate one in the middle. Calculation of the pitch is carried out based on the architectural features of the building design and wind load: the size between the profiles is usually 40-60 cm. Horizontal planks have a pitch corresponding to the size of the panel.
- The next step is to install the lower ebb at a distance of 40 cm from the ground and attach the starting profile or clamps. Clamps or metal clamps are intended not only for fastening, but also for creating an expansion joint.
- Next, we begin fastening the first row. The thicker the facing material, the more responsible it is necessary to approach the work. Fastening of facade elements made of porcelain stoneware and other weighty structures more than 15 mm thick is carried out using clamps or internal fastenings. The connection of the plates occurs in accordance with the instructions and drawings.
- After installation, all joints are sealed with sealant and thoroughly cleaned. To avoid damage to the surface, the joints are taped with masking tape, which is subsequently removed.
- The design of the top row must be done with the formation of a ventilation gap, which is typical for all ventilated facades. To do this, a U-shaped profile and ebb are installed. The same thing is done below. This will ensure proper air circulation.
The formation of external corners is usually already provided for by the manufacturer. This can be done without seam-to-joint trimming or with trimming. A metal corner may be placed on the corner, which will need to be painted. In any case, the kit includes sealant and paint to match the color of the main cladding.
Installation of corners
How to choose the right one
It is sometimes quite difficult for a non-professional to decide on the choice of material. Having a superficial understanding of the material, it is difficult to immediately understand what points to pay attention to. Only during installation or operation can you notice the deficiencies of the coating.
Here are some tips to help you avoid mistakes when choosing a basement covering:
- during inspection, it is recommended to inspect the joints of the parts : they should not have gaps and have a tight connection;
- you should check the locking parts : easy latching will free you from problems during installation;
- the material must be thick enough and have rigidity due to the specific purpose;
- the front surface of a separate sheet must be evenly painted , must not have chips or scratches, parts of the same batch must not differ in color;
- You should be wary of inexpensive types : they may be of poor quality, which will affect the performance characteristics of the coating.
In addition, it is recommended to choose products from reliable manufacturers; when purchasing, it is advisable to familiarize yourself with the certificates of conformity of the purchased materials and quality certificates.
What are facade panels
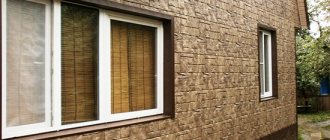
There is no need to confuse facade panels and siding, although their purpose is the same - cladding the external walls of the house. Facade slabs appeared relatively recently and are actively replacing other methods of protecting buildings from atmospheric and other influences. They are thicker and more durable than siding. Materials for the production of such cover for external walls have also significantly expanded the range. Today, facade slabs are used both for the complete covering of the house and for the basement cladding. Their demand is simple to explain: this type of façade design replaces many natural materials, but is much cheaper.
A house finished with facade slabs is protected and beautiful
Types of facade panels
There are numerous types of facade slabs on the market:
Polyvinyl chloride
An inexpensive cladding option that can be mounted on a lightweight frame or directly on the wall, taking into account the ideal surface. The variety of shapes and colors can please any owner. The disadvantage is the lack of vapor permeability and fragility. Frost resistance is not too high, so it is not worth using such cladding in the Far North. Many types of vinyl planks are flammable, and most release harmful substances when burned.
Fiber cement
They are made from concrete and wood fibers using synthetic additives, which are a binding component. Durable, environmentally friendly, vapor-permeable, non-flammable fiber cement cladding of facades has conquered the market in many countries. Imitation of natural materials not only in appearance, but also in terms of quality characteristics. The wood-look material has the warmth of natural wood, but does not burn or rot.
Wood fiber boards
They are used mainly for light country houses and summer cottages, as they have significant disadvantages: flammability, susceptibility to rotting. But these are some of the most frost-resistant materials - up to 100 cycles, they do not crack and are environmentally friendly.
Made of metal with PVC lining
They are made from galvanized steel or vinyl-coated aluminum. Easy to use and install, especially cassette types. Durable, not susceptible to rotting, well protect the house from noise, dust and moisture. Disadvantage: the material does not breathe, the outer coating is prone to burning, and is quite expensive.
From porcelain stoneware
This facade material is highly durable and resistant to all types of fungi and damage. Porcelain stoneware slabs look expensive and stylish. Such facades give the impression of wealth and protect the house from any outside influences. Lack of panel weight. Carrying out cladding alone is quite difficult.
Glass panels
We are used to associating glass facades with large shopping centers or office buildings, but glass is increasingly in demand among those who want to give the walls of their mansion a stylish and sometimes fantastic look. Impact-resistant, often bulletproof glass of class A and B is used. Reinforced glass, triplex glass, and glass made from glass granulate foam are used. The advantages of such walls are their beauty and unusualness. The disadvantage is complex installation and high cost.
Thermal panels
The design of the thermal panel is a thick layer of polyurethane foam or polystyrene, covered with ceramic tiles to protect the material from external influences. Such protective facades have many advantages: high heat and noise insulation, durability, frost resistance, impact resistance. The simplicity of the tongue-and-groove fastenings makes it easy to install such cladding.
Sandwich panels
They consist of two layers of metal, between which a plastic layer and a vapor barrier layer are pressed. This is an excellent sound insulator. Withstands any temperature changes. Such slabs can have different surfaces. Not susceptible to corrosion and fungus. Operating temperatures from -180 to +100 degrees.
Variety of cladding for external walls
Pros and cons of installation
Finishing a building with facade slabs has more advantages than disadvantages, and therefore let’s immediately talk about the disadvantage. The fastening of the facade panel is always carried out on a special frame, and therefore the production of such facades requires knowledge and certain experience. In addition, the cost of many materials is quite high. The advantages of wall cladding with these finishing materials are obvious:
- Protecting your home from high and low temperatures;
- Long term of use from 20 years and above. Most materials have a service life of 50 years or more;
- Protects walls from fungus and rot;
- Resistance to sudden temperature changes;
- Most of the slabs are made of non-flammable and environmentally friendly material;
- Resistant to corrosion.
(no votes yet)
Pros and cons of use
Advantages:
Light in weight.- Simple installation, does not require preparation or leveling of walls.
- They do not allow moisture to pass through.
- Keep warm.
- There are fireproof options.
- Many colors and textures.
- Inexpensive.
- Easy care.
Flaws:
- They do not tolerate mechanical damage.
- When burned, it releases toxic substances and can cause poisoning in a fire.
- Not recommended for northern regions; it may crack in the cold.
You will find a lot of important and useful information about plinth panels and their installation in this section.
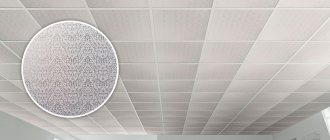
Standard sizes, characteristics and properties of DSP
State standardization took into account the slightest nuances of the production and use of particleboard panels. GOST even regulates the degree of surface roughness of the CBPB. According to its requirements, the product must meet the following parameters:
- roughness no more than 80 microns;
- humidity not more than 1300 kg/m3;
- tensile strength within 0.4 MPa;
- bending strength depends on the thickness of the panel and ranges from 9-12 MPa.
Thickness of CBPB boards
All manufacturers of CBPB offer slabs of standard sizes: 320x125 cm and 270x125 cm. However, the thickness of the products can be different: from 1 to 4 cm. Deviations in the length and width of the panels are allowed, but the total error should not exceed 3 mm.
One of the most important characteristics of cement bonded particle boards is weight. It plays a special role during installation. The weight depends on the thickness and size of the slab, so when choosing a DSP, it is recommended to rely on the table.
| Product size (length, width cm) | Panel thickness (mm) | Panel weight (kg) | Panel area (m2) |
| 270x125 | 8 | 36,5 | 3,375 |
| 270x125 | 10 | 45,5 | 3,375 |
| 270x125 | 12 | 54,7 | 3,375 |
| 270x125 | 16 | 72,1 | 3,375 |
| 270x125 | 20 | 91,1 | 3,375 |
| 270x125 | 24 | 109,3 | 3,375 |
| 270x125 | 36 | 164 | 3,375 |
| 320x125 | 8 | 43 | 4,0 |
| 320x125 | 10 | 54 | 4,0 |
| 320x125 | 12 | 64,8 | 4,0 |
| 320x125 | 16 | 85,6 | 4,0 |
| 320x125 | 20 | 108 | 4,0 |
| 320x125 | 24 | 128 | 4,0 |
| 320x125 | 36 | 194,7 | 4,0 |
Advice from professionals
In order for the erected structure to fully fulfill its functions and serve for a long time, before starting work, it is worth studying several recommendations from specialists in the installation of plastic panels:
- All points of entry and exit of communications into the house must be sealed before cladding begins.
- Plastic panels must be installed at a short distance from the soil level, and not close to the ground.
- Sheathing work always starts from the left corner and goes to the right.
- Fasteners for cladding must have an anti-corrosion coating.
- After completion of work, all gaps and joints must be thoroughly coated with sealant.
To carry out facing work, it is advisable to choose a day when the air temperature is above 0 °C and no precipitation is expected.
Application of PVC products
PVC products are called vinyl. They are manufactured in the form of two-layer parts. Polyvinyl chloride is used in their production. As a result of the two-layer coating, high strength and reliability are ensured.
With the help of one of the layers, the physical properties of the finish are preserved, and with the help of the other, the cladding is protected from the influence of adverse influences. Such coatings have universal characteristics.
You can learn more about PVC products for cladding the base by watching the video:
Installation can be carried out in any part of the structure. Vinyl does not rot and is not affected by mold. Temperature changes are not scary for him. The material cannot be damaged by microorganisms and parasites.
This coating provides good protection against dampness. It does not require constant care. If necessary, the material can be cleaned with ordinary water.
Necessary tools and materials for installation
To install basement panels with your own hands, in addition to siding panels, you will need various building materials and tools.
- Metal profiles;
- Insulation;
- Vapor barrier film;
- Screws;
- Dowels with a length of at least 100 mm;
- Screwdriver;
- Drill with a pobedit drill bit and a drill bit designed for metal;
- Grinder with a disc for cutting plastic, metal and stone;
- Level;
- Scissors.
The canopy over the protruding part of the base can be made from sheets of galvanized steel, plastic, or use special tiles to match.
Do not use wooden beams to create sheathing. For wooden products, the danger is not only high humidity, but also fungus, which is not always noticeable when purchasing.