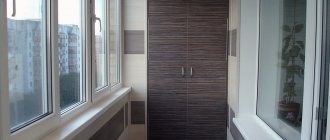
Arranging a warm balcony makes it possible to add additional square meters to the living space, which definitely will not be superfluous. Although the room is not large in size, you can still arrange a functional area here: an office, a bedroom, a workshop, a library, a boudoir and even a mini-dining room. Finishing is the first stage of repair work. You can tidy up your balcony, insulate it and give it a “gloss” using different materials. The construction market offers a wide range, but plastic panels stand out against the background of lining, MDF, chipboard and plasterboard. For domestic consumers, the material has long ceased to be a novelty, but has not lost its popularity at all. There are still legends surrounding the very name “plastic”: about its toxicity, fragility and unreliability. This is exactly what PVC was like twenty years ago, when improved technology for its production had not yet been invented. Modern and old plastic are completely different materials both in appearance and in basic characteristics. Unfortunately, for many consumers, this quality revolution passed quietly and unnoticed, and ideas about the old material remained. Let's talk about how to choose the right material and how to finish the balcony with plastic panels.
About the material
Although the consumer became acquainted with plastic relatively recently, the material was invented at the beginning of the last century. Moreover, the chemist who received the coveted formula did not at all strive to invent something similar. At that time he was working on a completely different project. PVC, like many other inventions that have become famous and have benefited man (take penicillin, for example), can be called the result of a random experiment.
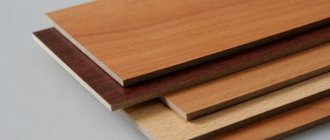
Initially, plastic was heavy and had a porous surface. Such material was not suitable for finishing premises and could not compete with boards based on wood waste (chipboard, MDF). It required improvement, which is what the manufacturers rushed to do, having realized earlier than others that PVC was the future. They persistently strived for perfection, and finally, a fundamentally new technology was invented in Germany (the method of free foaming of PVC), which made polyvinyl chloride a leader in the finishing materials market (and not only). PVC panels have become lightweight, and their surface is smooth. The range of colors and textures began to quickly expand with new designs that imitate a variety of materials: elegant wood patterns, “speckles” and “stains” characteristic of stone, and the rough surface of brick. Panels made of polyvinyl chloride began to replace paint and wallpaper, lining, chipboard and fiberboard, and drywall. Competitors gradually lost ground, and PVC, due to its availability, won the market.
Advantages and disadvantages of finishing and material
So what is good about polyvinyl chloride and what is hidden behind this long, complex name? In fact, everything is quite simple: the pan of scales marked “advantages” significantly outweighs the pan labeled “disadvantages”. This ratio of pros and cons became the key to the popularity of the material. The long list of advantages of PVC includes the following qualities:
- Low cost. PVC panels are ideal for budget renovations. The price-quality ratio in this case has found an ideal balance.
- Resistance to temperature fluctuations. This material is suitable for both warm balconies and cold rooms, where the temperature differs from the outside temperature by only a couple of degrees.
- Self-extinguishing and high combustion temperature. Contrary to misconceptions, plastic used for interior decoration is not so easy to set on fire. MDF, chipboard and fiberboard ignite at lower temperatures and during combustion emit more acrid smoke and toxic substances. The reason for this was the “glue” that holds together the wood fibers and shavings that make up the boards.
- Easy to install. Plastic panels are easy to cut, and the fastening methods will not stymie even the most inexperienced craftsmen.
- Low resistance to mechanical damage. Plastic panels cannot be called fragile, but with a strong impact their surface can be damaged and a dent may form. Such sections of the wall or ceiling can be replaced without dismantling the rest of the finishing material.
- Moisture resistance. Plastic is not afraid of direct contact with water. Because of this feature, the panels are popular not only for finishing balconies and loggias, but also bathrooms and kitchens.
- Easy to care for. The panels can be washed with any household chemicals, since the material is not afraid even of products with an abrasive effect. There are no pores in the plastic into which dust and dirt could get clogged. Because of this, the material does not accumulate “deposits” of mold and mildew.
- A wide range of colors and textures.
- Additional heat and sound insulation. PVC panels will not warm you up in severe frost, but thanks to their cellular structure they will “help” the main insulation to retain grains of heat inside the balcony.
- Light weight. This advantage of the panels plays a special role specifically for balconies, since it is not advisable to overload such structures, especially after partial dismantling of the partition. Another advantage of PVC panels is that there is no need to level the surface of the wall or ceiling before installing them. On the contrary, the material is used to mask defects. As for the service life, manufacturers give different figures: from 25 to 50 years. Perhaps the panels can really last for half a century, but in what form they will meet their old age is a mystery.
Of course, in any barrel of honey there is room for a fly in the ointment. Although the list of disadvantages of PVC panels is much more modest than the list of advantages, they cannot be ignored:
- PVC panels are quite fragile and highly sensitive to mechanical stress. This has already been mentioned briefly above. If you compare the strength of polyvinyl chloride with MDF or chipboard, the material will definitely lose by a landslide. There is no point in drawing parallels with solid wood.
- Toxicity when burning. PVC does not burn, but melts. You should not place hot electrical appliances near it. During melting, the material can release toxic substances, although in lower concentrations than, for example, chipboard during combustion. The toxicity of the material varies greatly depending on the production technology. Low quality products sold by unscrupulous dealers are much more dangerous to human health. High-quality polyvinyl chloride must have a “passport” - a special certificate.
- Burnout. Unfortunately, PVC panels fade in the sun in just a couple of years. The problem is relevant specifically for balconies exposed to sunlight. This is especially noticeable on bright surfaces with patterns. For ordinary white panels, the problem is not relevant, but such material is too boring and monotonous. Recently, manufacturers have been experimenting and creating new samples of material that do not react so sharply to constant contact with the sun's rays.
This list includes one more conditional disadvantage - biased attitude. This applies mainly to domestic consumers, who on a subconscious level associate cheapness with low quality, and the word “plastic” with disposable tableware and low-grade outdoor furniture.
Different purposes of the balcony - which option is better
It's no secret that balconies are often used for domestic purposes. In other words, you can store old and unnecessary things. Therefore, it is worth considering whether to build a storage room where you can increase the living space.
The right balcony design will help you get even a small but cozy room. What can you cook on the balcony? There are several options to consider.
Study. If you find it difficult to find a place to work in a small apartment, a balcony is the perfect solution for you. There will be nothing to distract you here, and you will be able to fully devote yourself to what you are doing. This idea is very easy to implement. For decoration, use simple wallpaper or decorative plaster.
Of course, you will need furniture: a small table, a comfortable chair or armchair, and shelves for documents that can be hung above the table. Be sure to provide good lighting for your work by choosing a desk or wall lamp.
Game room. Suffice it to say that this version is not suitable for very small balconies. If space allows, start designing your balcony now. Apply wallpaper with a bright, clear pattern to a previously plastered wall. You can draw it together with your child. If the room is not insulated, you need to lay a warm, soft carpet on the floor.
Greenhouse. Many women will like the mini-greenhouse. A beautiful greenhouse at home with different flowers, wonderful aromas, making the room a favorite place for the whole family. It is important to choose the right plants with the right flowering time so that you can enjoy beautiful flowers on your balcony all year round.
Flowers of bright colors are more suitable for greenhouse design, as they will harmonize with green plants. You will also need furniture. This could be wicker chairs and a small table.
A place to relax. The balcony is the ideal place to relax. It is enough to carry out a simple renovation by equipping the place with a comfortable chair and table so that you can comfortably drink tea and watch the street during your private hours.
Decoration of balcony windows
If your balcony or loggia is glazed, it is worth hanging curtains or blinds to make them more comfortable.
There are several options. It can be:
- Fabric curtains;
- Roman blinds (adjustable in height);
- Roller blinds made of fabric, wood, plastic, etc.
Blinds can be either vertical or horizontal.
Curtains that are too thick are not needed on the balcony. Choose a light-colored fabric to match the color of the walls.
In addition to their decorative function, curtains or blinds are needed to protect from direct sunlight and glare.
Types of material
Plastic panels have their own classification according to three main characteristics (not counting differences in design):
- Size.
- Features of the coating.
- Preparation method.
- Type of connection (seamless, chamfered, with a relief surface).
Let's talk about each category in more detail.
By panel size
The sizes of PVC panels can vary greatly. Their thickness directly depends on their purpose:
- Panels for wall cladding usually have a width from 0.8 cm to 2-3 cm (there are also denser materials).
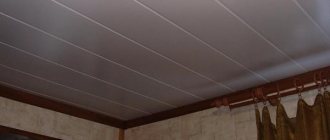
- Ceiling panels are thinner, their thickness varies in the range of 0.5 cm-0.8 cm.
The length of the panels can also be different, but the most common options are 2.7 m, 3.5 m, 5.95 m. The width varies between 0.1-0.5 m.
By type of coverage
Depending on the type of coating, plastic panels are classified into three groups:
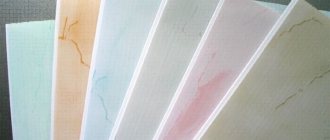
- Simple plain products. Their surface is devoid of patterns, so no additional coating is used. Monotony may seem boring to many. Such panels are most often used for cladding office premises.
- Lacquered. A design is applied to the surface of the material using offset printing or thermal transfer. To fix the image, the top of the panel is covered with a layer of special varnish. The composition refines the plastic, but at the same time makes it more “delicate” and sensitive to scratches that are noticeable on such a surface.
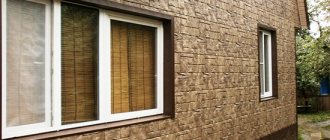
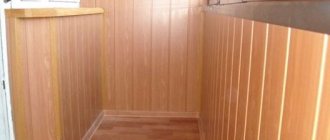
- Laminated. The surface of the panels is decorated with a structural pattern. Laminated material usually reliably imitates the texture of wood or stone.
Although varnished and laminated panels look richer and add variety to the range of finishing materials, they suffer from photophobia and are subject to fading. Unfortunately, “beautiful” and “practical” do not always go hand in hand.
By manufacturing method
PVC panels are produced in three variations:
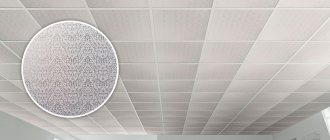
- Tile.
- Lining.
- Sheet material.
The lining consists of long slats that can be placed horizontally or vertically depending on their length and the size of the room. Sheet - modules, the height of which can reach 4 m and width - 2.3 m. They are mainly used for sheathing walls. Just one sheet can cover a large area, so installation will be carried out at an accelerated pace. This option is optimal for “lazy” or hurrying craftsmen.
What to buy from accessories?
Unfortunately, plastic panels alone will not be enough to decorate a balcony with PVC panels. To successfully complete the repair, it is necessary to provide a number of necessary elements:
- External corner;
- Internal type corner;
- Profile F;
- Start profile;
- Ceiling plinth;
- Profile for docking;
- Skirting for the floor.
How to choose the right one
Before you go to the hardware store, take a few useful tips to help you choose quality material:
- Be sure to check the availability of a certificate for the product. Only a certified product can be called quality.
- The thickness of the panel can be checked by simply pressing with your finger. If a dent remains on the material, then its surface is too flexible and is completely unsuitable for finishing a balcony.
- The quality of the material must be checked inside too. You need to squeeze the panel with two fingers and see how the stiffeners behave when cut. If they break, then such material will not last long. The more stiffeners there are in a material, the stronger it is.
- Beware of purchasing panels with a light “mouse” tint. This color of the material most often indicates the use of recycled materials.
If you plan to purchase large-scale material for future use, then it is better to take the panels from one batch, then they are guaranteed not to differ in color by a couple of tones. There should be no dents, scratches or chips on their surface. Be sure to check the quality of the connection: there should be an even, barely noticeable seam between the two panels, and the edges of the modules should fit together like a key and a lock.
How to make calculations
Calculations are made using a simple algorithm. You only need to be aware of two parameters:
- The surface area that will be covered.
- The length and width of the panels, which are multiplied to give the area of one module.
Of course, you additionally need to take into account the type of panel (sheet, tile, lining).
Installation using mounting strips
This method is used if the sheathing is made of plastic profiles. They have a special groove into which the mounting plate is inserted. When pressed, it is fixed inside the profile, and then the edge of the panel is inserted behind the protruding tongue. In this way, all finishing strips are installed sequentially.
The advantages of this option are high speed and low need for additional materials. No additional fastening is required, with the exception of the outer panels, which need to be screwed on with self-tapping screws for rigidity.
Installation methods
There are two ways to mount panels:
- Directly onto the wall surface using special glue.
- On the sheathing.
The first method is more suitable for “cold” balconies, since in this case there is no provision for space for insulation. Let's consider both options in more detail.
Fastening with glue
Panels can only be fixed with glue on perfectly smooth walls. The slightest slope or unevenness will certainly manifest itself on the surface of the panel. You need to buy special glue. It will tightly connect the wall surface with the plastic panel, so it will no longer be possible to carefully replace one fragment of the finish; you can only tear it out “with meat”. The most serious disadvantage of this method is the impossibility of laying a layer of insulation under the material. In this case, the panels simply create the visual effect of a “beautiful finish” and save a little (just a little) the area that could be allocated for lathing.
Fastening with lathing
The lathing or frame has obvious advantages that discredit the method of attaching panels with glue:
- Makes the structure more stable.
- Allows you to add a layer of insulation.
- If necessary, you can easily replace both a separate panel (if it is wrinkled or cracked) and the entire covering when, for example, you have the desire and opportunity to cover the balcony with a different material.
Installing the sheathing significantly complicates the process of covering the walls with panels, but the game is worth the candle, and the result is worth the time spent.
Fastening with clamps
Plastic strips can be installed using clamps. These are fastening elements in the form of brackets, one side of which is fixed to the sheathing, and the mounting edges of the panels are inserted into the other.
Clips are widely used for hidden fastening, since there are no visible parts from the outside. They securely hold the sheathing on the sheathing, but subject to its light weight and stable geometry. For cladding balconies, galvanized fasteners must be used. The use of special plastic clamps is allowed, since the load from the coating is small.
Installation technique:
- The first panel is attached to the sheathing with self-tapping screws.
- The second is inserted with a tenon into the groove.
- A clamp is put on the edge.
- The mounting bracket is screwed to the rail.
- The remaining panels, except the last one, are assembled using clamps.
- The latter is fixed rigidly - with nails or self-tapping screws.
Step-by-step instructions for DIY finishing
So, we chose a more reliable and thorough method of installing plastic panels - with lathing. The entire work process is divided into the following stages:
- First step. Measurements, purchase of materials, selection of tools.
- Preparing the walls.
- Installation of sheathing.
- Insulation.
- Installation of panels.
Now let's look at each stage in detail.
Materials and tools
To work with plastic panels, you will need tools that are already in the “black suitcase” of any self-respecting craftsman. You won't have to buy anything new or unusual. So, you need to stock up on the following materials and tools:
- Tape measure, level, pencil.
- A hacksaw and a construction knife.
- Drill, screwdriver (can be replaced with a screwdriver).
- Construction stapler.
- Dowels, self-tapping screws with rubber sleeves.
- Insulation (foam and polyurethane foam).
- Metal profiles for sheathing.
- Guides for panels.
- Plastic panels.
Separately, to prepare the wall you will need putty and primer. If there are large cracks, they will have to be cleaned using a grinder.
Preparing the walls
Preparing the walls will not take much time. If they are uneven, then the lathing will help correct this defect, and the finishing will not give away this terrible secret. You will have to deal with the presence of cracks yourself. First you need to carefully examine the surface around the entire perimeter of the balcony. If cracks and crevices are still found, they are thoroughly cleaned and then covered with putty. When the composition dries, the wall is covered with a layer of primer. It is better to use products with an antiseptic and sealing effect. They will prevent the wall from becoming damp, the appearance of fungus and mold, and the “leakage” of heat. The primer can be applied in two layers for greater reliability. After the composition has dried (it is better to leave the balcony alone for a day), they begin installing the sheathing.
Installation of sheathing
Wooden slats are usually chosen for lathing. Since a balcony is a potentially dangerous place for wood due to possible dampness, it is better to opt for a metal profile. The slats are pre-treated with special compounds. Then they begin to form the sheathing. Vertical modules are installed using self-tapping screws with plastic sleeves or dowels. Do not immediately drive them close to the wall. Their position may need to be adjusted using a lining if the wall is uneven. The distance between the slats is usually no more than 0.5 m. Experienced craftsmen advise attaching them to the wall in three places: at the level of the knees, waist and shoulders. These areas are considered the most “traumatic”, that is, here the risks of accidental mechanical damage are much higher to cover. Having strengthened vulnerable areas, you need to check with a level how evenly the sheathing is installed. If necessary, the position of the slats is adjusted, after which they are finally fixed, close to the wall.
About insulation
The insulation layer must be carefully laid between the slats. Although the range of materials is wide, most choose cheap, but no less effective, foam plastic. It is ideal for “damp” balconies, as it is not afraid of moisture, like mineral wool, for example. For it it would be necessary to additionally install layers of hydro- and vapor barrier. The joints between the pieces of polystyrene foam are filled with polyurethane foam, after which you can begin installing the plastic panels.
Insulation is needed even on those balconies that are not yet equipped with sealed double-glazed windows, but they are already included in the owners’ plans. Subsequently, the plastic covering will have to be dismantled in order to lay a layer of insulation. To avoid doing unnecessary work, it is better to use it right away.
Panel installation
Installation of panels begins with the installation of guides. They can be of different shapes and differ in purpose. The guides can be secured using a construction stapler or a screwdriver and self-tapping screws. After this, they begin to secure the first plank. You should start from the most inaccessible and “inconvenient” corner. The plank is not fitted tightly right away: it needs to be aligned vertically (using a level) and only then fixed completely. After this, the work will go faster: the new strip is joined to the one that was installed earlier and secured. The areas under and above doorways are left for dessert.
To cut the plank lengthwise, it is better to use a special construction knife. A hacksaw is suitable for cutting across.
The nuances of covering openings
We left the covering of the openings for dessert. Before cutting and installing the last plank, you need to check the quality of the joining and the tightness of the edges of those that are already attached to the sheathing. If a problem appears in the form of a gap, it can be disguised using a plastic plinth placed on glue. In the balcony door (if there is one), you need to make several through holes in a row to ensure air exchange between the room and the balcony. The last to be processed are the joining seams between and at the corners. They are covered with sealant. Instead of transparent, it is better to choose a composition that matches the color of the plastic coating. This solution will look more impressive and beautiful in any interior.
Choosing a balcony style
Like any other room, a loggia or balcony can be decorated in one of the popular interior styles.
Modern
A balcony in a modern style is usually decorated in soothing colors and simple shapes.
Loft
The loft style is characterized by minimalism and pristine materials. The photo above shows a balcony with brick and plaster walls. Glass, metal and plastic were also used in the interior. The loft style does not tolerate unnecessary decorations, everything is raw and textured.
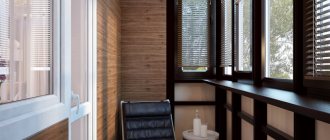
Eco
To recreate eco-style on your balcony, use only natural, environmentally friendly materials. Install wooden furniture as shown in the photo above. Decorative pillows and blankets should be made of cotton or linen.
Country
For a country-style balcony, use wooden or wicker furniture. Small metal basins can be used as plant pots. Hang imitation street lights on the walls. Keep it simple but elegant.
High tech
The interior of a high-tech balcony is characterized by a certain minimalism. Furniture and decorative elements are made of materials such as metal and leather. Shades of white, beige and gray are used.
How to care for panels
The panels do not belong to the category of capricious materials. They are very unpretentious in care: from the surface of the plastic it is periodically necessary to remove small dirt and a layer of dust, which, by the way, very slowly settles on the PVC. To work, you only need a sponge or a special window mop with a soft attachment (if you need to wipe the ceiling) and a cleaning product. The panels can be washed with any composition: soap and water, powder, glass or dishwashing detergents. The main thing is not to overdo it with additives, otherwise you will have to fuss for a long time, erasing the stains. Particular attention should be paid to the dirtiest areas: near the baseboard, next to the windows, under the balcony door.