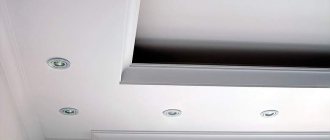
Drywall is screwed using a screwdriver onto self-tapping screws - metal/plasterboard 25*35. In the place where the opening hatch door is located, the drywall is cut off.
Make a hole in the drywall under the door
- Types of shelving for bathrooms
Bathroom design 2022 - 160 photos of the best new products
Bathroom interior 2022: fashion trends of this year, choice of decor and design (80+ photos)
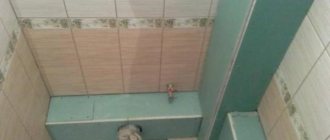
We glue and embroider the tiles. A solid tile falls under the door
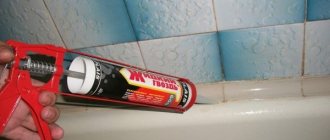
or at least one side of the door was solid. This is necessary so that when closing the hatch the seam does not stand out. After the glue has dried, the seams are unstitched. The joint between the bathtub and the tile is coated with white silicone so that water does not flow under the bathtub, and with white silicone so that it is not visible. When coating with silicone, the joint must be dry and clean, since silicone will not stick to a damp and dusty surface. With this our box is ready. How to make an indentation from the floor under your feet on the screen, see photo .
2 comments
Thank you for the detailed explanation of how to install a box from drywall, your recommendations were very useful to us!
Thank you, I was glad to help you.
Add a comment Cancel reply
You must be logged in to post a comment.
Buy dry mixtures for repairs (payment on the spot) tel 8-913-544-31-82
- Cement 318 rub.
- Plaster from 290 rub.
- Putty from 360 rub.
- Tile adhesive from RUB 210
- Floor screed from 210 RUR
- Drywall from 230 rubles (and everything connected with it)
Insulation and sound insulation
- Extruded polystyrene foam
- Stone wool
- Glass wool in roll
- OSB board 650 RUR
Kitchens to order in Abakan
Stretch ceilings in Minusinsk tel 8-913-544-31-82
Bathroom Design Ideas - 2022DIY bathroom sink cabinet
- How to close the sewer pipe in the bathroom?
How to choose the right materials?
Making a box in the bathroom with your own hands is not technically difficult, but you should take into account the features of this room. High humidity and possible splashes on the walls dictate that the owner give preference to moisture-resistant materials. These include:
Having a low ability to absorb moisture, sheet materials are easy to cut and process. They can be decorated to match the overall design of the bathroom by painting, tiling or plastering if necessary.
It is necessary to fasten the sheet material to the frame, so in addition to gypsum board or other sheets, you also need to select the material for the guides. It is most convenient to use ready-made profiles for installing drywall. These are metal structures, durable and light at the same time. They are easy to cut and attach to each other and walls. Installation of sheet material is carried out using self-tapping screws.
An alternative to profiles can be a wooden block. The 3-5 cm thick planks do not weigh down the structure and are easily connected with self-tapping screws. Their only drawback may be their susceptibility to rotting when exposed to moist bathroom air.
Peculiarities
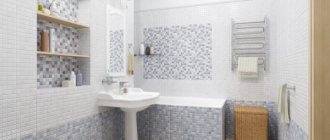
After the bathtub is installed and all installation work is completed, you need to take care of the aesthetic side of the process. This includes hiding the water supply and sewerage system from human eyes, which, in essence, will spoil the entire appearance of the bathroom. The presence of a screen easily solves this problem and is the final step towards creating a cozy bathroom.
The interesting thing is that when you enter the bathroom, it is the screen that initially catches your eye. Lined with tiles, it is the central point of the room. With the correct and interesting selection of color and texture, the screen evokes admiration, creates an atmosphere of comfort, and emphasizes individuality.
The tile does not absorb water and is easy to clean.
How to prepare a workplace?
Before you make a box in the bathroom with your own hands, you need to determine whether it will directly cover the communications or cover the entire adjacent wall. In each individual case, any option may seem preferable. Each of them has its own characteristics:
- How to dissolve hair in a bathroom drain?
- How to close the niche under the bathtub?
- How to drill ceramic tiles in the bathroom?
- If you hide the entire wall on which the ugly pipe is located under the panels of the box, then nothing will interfere with any design decision. A neat, flat false wall can be finished in any way you like. But this method also has a drawback: the panels are located at a distance of about 20 cm from the bathroom wall. It is by this amount that the length or width of the room will decrease. In small apartments this can be significant.
To radically solve the problem, some place an entire storage system for necessary things in the space behind the panels. This bathroom box for pipes turns into a kind of shelving unit with doors.
How to make a box from plasterboard, panels, plywood or other material is a personal matter for each owner. In order to imagine the possibilities of each of the methods, you need to first draw a sketch and use it to draw a rough plan of the situation in the bathroom. Based on the drawings, the amount of necessary materials is also calculated, taking into account the height of the room, the width of the box and the presence of additional parts in it.
After this, you can proceed to purchasing and preparing everything you need; you will need the following tools and materials:
- profiles (bar);
- self-tapping screws for connecting and fastening sheets or panels;
- dowels for attaching the profile to a concrete wall;
- hammer drill with attachments for drilling concrete and metal, with a screwdriver;
- a hacksaw for wood or metal, depending on the frame material;
- plumb line, level, tape measure.
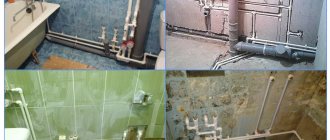
Before installing the pipe box in the bathroom, you need to find out the state of the communications. In a closed space, any minor leak may go unnoticed for some time until an emergency occurs. An undetected defect may result in the need for bathroom repairs in the future, so it is best to identify the problem early and fix it.
Installation and maintenance
Plastic boxes, despite the fact that they have less decorative appeal, can be more versatile.
They are easy to install on any type of surface, including horizontal and vertical areas. A different section of the box will allow you to place the required amount of pipeline and make allowances for future changes or reconstruction. If there is a leak of coolant from the heating circuit or water from pipelines, the emergency area can be found and repaired very quickly, since most often the boxes have a collapsible structure. Plastic boxes are used both in commercial enterprises and to protect pipelines in private homes or apartments. For example, if you are planning another renovation or change in interior design, you can get rid of the unsightly appearance of pipelines by installing decorative elements or ducts.
Pipe box diagram
For the housewife, another critical issue will be keeping the pipeline clean. The cylindrical shape, the presence of additional fittings, turns and structural elements can make it difficult to clean the pipe from dirt, dust or other contaminants. Boxes for heating pipes are usually rectangular in shape, which will greatly please your office cleaner or housewife. If you don’t like the color and would like to brighten up the interior, you can always paint the boxes. This is not always possible with a pipeline, since, for example, to plastic pipes or worn steel pipes, the paint adheres reluctantly and is applied unevenly.
A rational way of heating remains the purchase and installation of plastic boxes. They can be easily installed by almost every construction-savvy craftsman with his own hands. It's no more difficult than installing baseboards or decorative boxes for electrical wiring.
There are plenty of options to hide and reliably protect heating pipes, ranging from plasterboard frames to galvanized and plastic profiles. In each case, you should approach this issue responsibly, since their operational period depends on the attitude towards heating pipes.
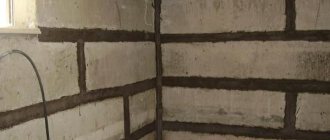
Marking the frame for the box
Most often, the sewerage and water supply risers are located side by side and run vertically in one of the corners. Therefore, you need to start marking the space for the box in the bathroom with your own hands from the ceiling. This will make it possible to subsequently lower the exact vertical to the floor and make the planes perfectly flat.
If you plan to cover the entire wall with panels, then near the pipes in the bathroom with your own hands you need to measure the depth of the space between the wall and the location of the profile for the gypsum board or bar. It is necessary to take into account that the guide must be at least 5 cm away from the communications. Remember the found distance in order to make a mark in the opposite corner. Connect the points with a straight line along the ceiling.
At two randomly selected points on this line, lower the plumb line to the floor. Place marks corresponding to the points selected on the ceiling. Draw a straight line through them on the floor.
It is advisable to perform the same algorithm of actions if the pipes run horizontally. Accurate markings will help make the frame for the bathroom box very neatly and without distortions. In this case, a line on the ceiling will not be needed, so it is better not to draw it, but to place marks near opposite walls. When lowering the plumb line, you will need to mark the points of the front edge of the box on the floor, and the junction of its edges with the walls - on them themselves. The height of the box is determined depending on the height of the pipes above the floor, taking into account a gap of 5-7 cm.
In order to mark the frame of a vertical corner box made of plasterboard in the bathroom, you will have to act a little differently:
- set aside the distance along the ceiling from one of the adjacent walls parallel to the adjacent one, taking into account gaps of 5-7 cm from the pipes to the guides;
- do the same from the adjacent wall, at the intersection of the lines, put a point from which a plumb line will be lowered;
- Using this tool, mark the projections of 3 points (junctions to walls and intersections of lines) on the floor.
Drawing an angle using the marked marks is quite simple. You need to connect the junction point with the intersection point and repeat this from the adjacent wall. The resulting rectangle will be identical to the one drawn on the ceiling.
Frame installation
The marked lines indicate the location of the inner edge of the profile. Cut the material according to the measured lengths of the sides of the parallelepiped, which will serve as a box for pipes in a plasterboard bathroom. Attach the profiles on the ceiling, floor and walls with dowels into the pre-drilled holes. The frame slats need to be aligned according to the markings and additionally checked for their verticality and horizontality, eliminating defects.
The location of rigidly fixed parts will be different:
- For a completely wired wall, install horizontal guides on the ceiling and floor. Then 2 verticals are attached between them on opposite walls. If it is necessary to build shelves inside this space, you will need to additionally install profiles on the wall being closed.
- If you are making a horizontal box in the bathroom, you need to strengthen the planks with your own hands on the floor, on the wall above the pipe and on the walls adjacent to it (vertically and horizontally).
- The vertical frame for the box in the bathroom is assembled with your own hands from racks on adjacent walls and squares on the ceiling and floor.
After the parts adjacent to the walls and ceilings are secured, you can install connecting elements that form an angle or plane. In this case, for a vertical box, the same front post is installed, for a horizontal box, it is secured in the appropriate position. On a completely lined wall without internal space equipment, you will need to install several verticals with a step that will allow you to attach the panels used (gypsum plasterboard, plastic or plywood) along the edges and in the center.
To ensure structural rigidity, cross members are installed connecting long parallel profiles. Their location depends on the orientation of the box itself. In any case, the orientation of the crossbars should be perpendicular to the main guides.
Box lining
Depending on the location of the pipe box in the bathroom, the installation of the casing will differ in each case. This is dictated by the nuances of joining gypsum board or plywood panels. The assembly of plastic parts is carried out using its own special technology.
To install sheet materials on a frame made by yourself, you should cut them according to the measurements taken from it - this is the length and width of each flat part. To make a plasterboard box in the bathroom, it is advisable to use whole sheets so that there are as few joints as possible.
If the pipes have a fitting, tap, or other place where a possible leak may occur, then a convenient hole should be provided in the wall of the plasterboard box. It will give access to a responsible place. In order to close it, a small secret door can be made. It is advisable to install additional crossbars along the edges of the hole.
GKL or plywood are attached to a completely sewn-up wall in the same way as during normal leveling: fasteners are screwed into the corners of the sheet, along the edges in increments of about 20 cm and in the center. In this case, the joint of adjacent sheets necessarily falls on the profile strip. The heads of the screws need to be recessed into the material so that they are not noticeable after finishing.
When covering a vertical frame that covers only the pipes, first install the side parts that make up the box in the bathroom made of plasterboard or plywood. Measuring and cutting must be done so that the outer edges perfectly match the profile angle. If necessary, they can be cut with a sharp knife flush with the corresponding plane.
The front panel must be cut so that it covers the edges of the side sheets. You can attach the gypsum board to the frame with special short self-tapping screws, using a screwdriver attachment for this purpose.
If the pipe is installed horizontally in the bathroom, you must first screw the vertical front panel onto the frame. After this, install the horizontal one so that it overlaps the edge of the previous one. This measure will make the plasterboard box for pipes less vulnerable to splashes when taking a shower and other hygiene procedures. You can tile gypsum board or plywood. The tile will reliably protect the material.
Plastic panels as cladding
Making a plastic box for pipes in the bathroom is much easier. Lightweight, moisture-resistant material will not require additional protection.
To cover the pipes in the bathroom, a box of panels can be made like this:
- install the starting profile on the guides, fastening with self-tapping screws;
- measure and cut the panel, insert into the profile, secure with screws;
- glue or screw the adjacent element to the corner profile and connect it to the installed PVC panel;
- attach the profile to the frame and assemble the other side.
You can purchase a hatch for PVC panels from construction companies. It will be required if it is necessary to make an inspection hole in the panel.
Currently, trade organizations also offer EPS panels that do not require the installation of a frame. They are fastened using an end strip installed on the ceiling and threaded legs that lift and fix the panel.
How to make a box for pipes in the bathroom: 2 options
You can cover the pipes with a box built directly around them, or cover the entire wall with communications, including the pipes. The first option creates a small threshold if the pipes run parallel to the floor or a column if they are vertical. In addition, you can save on the material from which the box will be mounted. The second option reduces the space of the room, but this can be partially corrected by making a niche for storage and niche shelves closed with doors.
Materials for creating a box
The bathroom is a special room in your home, so the materials for installing the box should be:
- moisture resistant;
- environmentally friendly.
To install the box, you will need these materials to be not too thick or heavy. Considering the parameters, you can use the following materials:
- moisture-resistant drywall;
- MDF;
- moisture-resistant plywood;
- plastic.
It is more convenient and reliable to use plasterboard or plastic to create the box.
The nuances of gluing tiles
- lamellas can be installed on a screen made of brick, tongue-and-groove elements, plasterboard or moisture-resistant plywood;
- install decorative cladding using a moisture-resistant solution or liquid nails;
- if using tile adhesive, spread the mixture on the back of the lamella with a notched trowel, apply liquid nails pointwise along the entire perimeter and in the center of the tile;
- start installing the first element from the top corner of the screen and be sure to control the position of the tiles using a building level;
- When laying tiles, insert dividing crosses into the spaces between the tiles;
- be sure to grout the joints with a moisture-resistant mixture - this will prevent moisture from penetrating under the tiles, mold development and damage to the integrity of the facing coating.
Make the screen from a material identical in its characteristics and colors to the lamellas on the walls.
Advantages of using plasterboard for a bathroom box
It is worth making a box from moisture-resistant plasterboard because:
- good resistance to moisture. It has been used in similar spaces for many years;
- it is easy to cut;
- all construction stores sell moisture-resistant plasterboard - there will be no difficulties in purchasing it;
- On top of the drywall you can lay tiles, paint or apply any other decorative coating.
Choosing ceramics for a bathtub panel
To cover a monolithic panel, tiles are used that do not collapse under the influence of moisture and detergents. The outer surface of the decor is covered with a layer of glaze that prevents impacts from hard objects.
Since laying requires cutting tiles, mosaics can be used instead of standard tiles. Small elements allow you to lay out an ornament; there are ready-made mosaic panels on a backing that is glued to a plasterboard sheet or the brick surface of the screen under the bathtub.
Advantages of using plastic for a bathroom box
Plastic panels are also a good option for mounting the box:
- quick installation that does not require a lot of tools;
- excellent moisture resistance if you coat the joints with sealant during installation;
- you immediately get an attractive surface that is easy to use;
- the material is not afraid of temperature changes;
- simple and quick repair or dismantling.
Kinds
- Dull screen. It does not provide the opportunity to look under the bathtub. This is a capital, one-piece structure that does not have a door. Visually, such a screen is good, but in terms of functionality it has one big caveat: the impossibility of repairing the sewer system. Indeed, in the event of a leak or any other breakdown, it is impossible to get to the place where it occurred. You have to destroy the screen to get inside. And the most unpleasant thing is that the breakdown cannot be seen immediately. A water leak can ruin the interior of your bathroom and more. The ceiling of the neighbors living below will also be damaged. You will have to fork out not only for repairs in your own apartment, but also to compensate for the damage to your neighbors.
- Partially open. This type of screen is quite functional and safe. Shelves and niches where you can place detergents or anything else will be a rational solution for a small bathroom. The presence of a door provides unobstructed access to the water supply and drainage system.
- Sliding. You can create such a screen, but the process will be very complicated. Moreover, tile is not a very suitable material for it.
- Screen with a slope. A slight tilt creates a niche in the screen where you can place detergents. This type of screen is ideal for families with small children. It will be very convenient to bathe your baby.
Instructions for building a plasterboard box
- You should measure the walls near which the pipes are located. Make a detailed plan for the placement of connections (places of possible leaks) for the future. Doors should be located opposite the meters and valves. If you want the box to look uniform, then make removable parts of the structure instead of doors.
- Make markings for the future structure on the walls, floor and ceiling (for vertical structures).
If you are installing a box for vertical pipes, then first make guides along the walls. Then the front edge is attached using hangers or a curved edge, and only after that the galvanized profile is mounted on the ceiling and along the floor.
- Prepare the drywall sheets for installation so that there are as few joints as possible.
- Use self-tapping screws to secure the sheets of drywall into place. Don't forget to make a hole for further access to communications.
- Putty the corner or corners of the structure and the joints between the sheets.
- Decorate the box in the same way as the rest of the walls in the room, including installing the baseboard.
- Insert the door to access communications.
At the beginning of the article, we said that even a box that covers the entire wall can be turned into a useful structure. Watch how you can make a niche in the video:
Construction of a removable screen
You can make a removable bathtub panel from moisture-resistant oriented strand board.
Required materials and tools:
- hand or circular saw, jigsaw;
- wooden beam;
- furniture legs (with height adjustment);
- metal corners, screws;
- primer;
- moisture-resistant glue;
- notched and rubber spatula;
- grout mixture;
- facing lamellas;
- OSB.
Screen manufacturing includes the following work:
- take measurements of the bathtub;
- transfer the markings to the slab (make the height of the screen 4-5 cm less than the obtained value, so that there is a gap and your feet can enter);
- cut the sheet to size;
- cut the timber, attach a frame from it around the perimeter of the OSB;
- fix the legs at the bottom of the screen;
- treat the product with a primer, wait until it dries;
- glue the tile to the screen;
- fill the seams with moisture-resistant grout;
- Place the product under the side of the bath and adjust the height of the legs so that the screen is level and motionless.
After completing the work, check the structure for strength; if instability of the structure is detected, make additional stiffeners.
Plastic pipe box in the bathroom
The easiest option for a bathroom box is to mount it from plastic panels. Even if you have ceramic tiles everywhere, this material will fit perfectly into the interior. The main thing is to choose the right color and not to overdo it with the pattern. The best option would be plain plastic panels.
Tools for installing plastic panels
For installation you will need:
- a drill or screwdriver with a tile drill, if you have finished finishing with ceramic tiles;
- self-tapping screws or dowels for the box;
- plastic cutter, grinder or jigsaw;
- roulette;
- level;
- silicone
As you can see, there are much fewer tools than in the case of installing drywall. And if you add the tools for finishing the tiles and the time it takes to lay them, it becomes clear that a box made of plastic panels is an ideal option!
Hatches
No less important components than the boxes themselves are the hatches that are placed in the fences for access to pipelines, fittings and metering devices.
During installation, the following types of hatches are most often used:
Factory made for tiles. They are sold in standard sizes with an opening system and a lid, the surface of which is designed for gluing and holding ceramic tiles. Typically, such hatches have a rigid hinge system that allows them to hold a high weight of ceramics and cover large areas; almost all designs are designed to be torn off by pressure.
Factory made from PVC. These are lightweight hatches, usually white with a frame and doors, great for plastic panels; they are often installed in plasterboard lined with tiles. They are usually opened by turning the doors while pressing from the side.
Rice. 10 PVC and painted steel hatches
Factory made from steel. In everyday life, hatches made of painted steel are not used very often due to their low decorative value and heavy weight (not suitable for installation in a PVC panel); they are opened through recesses in the doors.
Homemade for drywall. The most popular option for installing hatches is to make them yourself from a profile frame and a piece of drywall, onto which tiles are then glued. The tile maker can make a handle in the hatch by drilling a through hole in the tile, or they can purchase a special vacuum suction cup to open it.
From tiles. In a tiled plasterboard covering, openings can be covered directly with tiles by gluing them onto a sheet of dense material (plywood, chipboard, gypsum fiberboard) along with magnets. When installed in a profile niche, the magnets will stick to the metal frame.
You can do the opposite - if the frame is made of wooden beams, steel plates are glued to the tiles, and magnets are screwed to the sheathing. You will have to use suction cups to open tile hatches with magnetic fasteners.
Rice. 11 Homemade hatches
Instructions for building a box from plastic panels
Let's take a step-by-step look at how to make a box from plastic panels:
- Make markings for the box. How to do this, see above, in the instructions for plasterboard construction.
- Install the profile box. It can be made the same as for drywall, or you can dispense with the front edge.
- Prepare plastic panels according to the dimensions of the structure.
- Using silicone, glue the panels to the profile.
- Glue the corner between the panels using silicone.
Options for utility access doors
It is imperative to leave yourself the opportunity to access meters, pipe connections and taps. To do this, you will need a door or several opposite these elements. You can buy it (hatch, blinds, built-in door) or make it. If you make the door yourself, make it from the same material as the rest of the structure. It should be decorated in the same way as the box itself. To make it convenient to use, glue or screw a small furniture handle (these are usually installed on kitchen units). To prevent the door from opening spontaneously, it must be equipped with magnets. You can make an invisible door. How it is mounted is shown in the video below.
Preparatory stage
Most often, pipeline problems occur at the joints. Therefore, the fewer there are, the better. If the box is installed after laying new pipes, care must be taken to ensure that the main has as few connections as possible. If replacing the pipeline is not part of your plans, before hiding the pipes in the bathroom, you need to conduct a thorough inspection of them. Inspect all lines for defects and, if any, repair them.
It is believed that soldered and welded joints can be closed without fear of leaks. But fittings with threaded connections must have easy access. It is necessary to periodically inspect them. Therefore, threaded connections cannot be bricked up. It is also necessary to ensure free access to valves, sewer inspections, meters, and filters.