When planning finishing work, you have to decide on decorating the ceiling, where open communications or other details that spoil the appearance are unacceptable. If you hide them in a box, you can make the interior complete at minimal cost. This design becomes part of a multi-level plasterboard ceiling. The box can be located around the perimeter of the ceiling, in the center or in the form of a geometric figure. Elements covered with tension fabric, LED lighting or built-in lamps can be an effective addition. Let's figure out how to make a plasterboard box on the ceiling. And instructions, useful tips and videos on the topic will help with this.
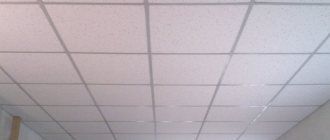
Where are suspended ceilings used?
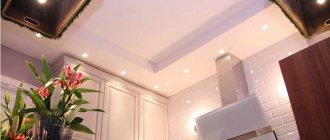
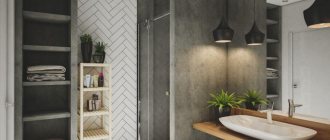
Many people wonder whether these designs are appropriate in an apartment. Ceiling boxes made of plasterboard are used in rooms of any format: they look great in an apartment or in a private house. A plasterboard box on the ceiling in the kitchen will create a certain charm and give the room a modern look. Office premises also use these structures. The possibilities for renovation have become endless since the advent of “mounted niches”. Some do not want to resort to the help of specialists, and make this type of ceiling themselves.
Advantages of plasterboard multi-level ceilings
When home renovations begin, people wonder whether it’s worth making a new fashionable ceiling, or repainting the old one. It’s worth studying multi-level ceilings in detail; they have their advantages:
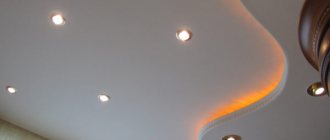
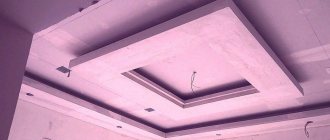
- The ability to create a multi-level solution that will become the center of attention after the renovation. A box on a plasterboard ceiling with lighting has become one of the fashionable solutions of designers this season.
- The installation of ceiling boxes made of plasterboard is convenient, since the material is easy to process and install.
- The box is a practical design; it allows you to place the maximum number of lighting fixtures on the ceiling. Lamps can be installed for different purposes and different powers.
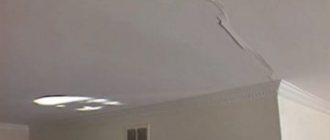
- Installing the desired structure helps hide obvious ceiling irregularities. Defects disappear under the ceiling, which is not embarrassing to show to guests.
- It becomes possible to carry out ventilation by hiding all the components in the box. Also, pipes and elements from the hood remain under it.
- Some citizens prefer a relief design; with stretch ceilings this becomes possible.
- The box allows for zoning of the room.
Positive and negative aspects of the design
Making a plasterboard box makes it possible to turn any design ideas into reality, creating a multi-level ceiling without the need to cut grooves for wires.
In general, the solution has the following advantages:
- Organic placement of multiple light sources, both primary and secondary;
- Hiding all defects and unevenness of the ceiling surface;
- The ability to hide ventilation ducts, pipes and other communications;
- Creating a structure of a unique shape, its combination with the installation of a stretch ceiling, for example;
- Dividing a room into separate zones using a box.
In addition, drywall is an environmentally friendly, versatile and easy-to-process material.
The disadvantages of the box include a slight reduction in space; for this reason, decorating low rooms with it will not be the best solution. It is worth noting that it is quite difficult to make a structure of complex shape yourself, so you may need an assistant during the work.
Properties of drywall
Drywall is used in their interiors by people who care about the environmental friendliness of the products they use. This material has been tested several times and has certificates. It bends well, great for creating special bends and reliefs. You can install a plasterboard box on the ceiling with your own hands.
Drywall interacts well with other materials. Plaster can be applied over it; in some cases, putty is used. It holds tiles well and is also suitable for wallpapering.
How to choose the right one
In order for the planned project to turn out ideal, it is worth paying special attention to the issue of choosing drywall. There are four options for plasterboard sheets to consider:
Types of drywall
Ordinary
Basic type, it is used for renovation of large premises, such as offices. Also used in domestic premises. The sheet is usually gray in color and should be used at normal humidity and temperatures not higher than average. Marked in blue.
Moisture resistant (GKLV)
The material was developed using special technologies; silicone granules and substances to combat fungus were added to it. The gypsum is covered on each side with cardboard, which is neutral to high humidity. This material is good for use in the construction of swimming pools and baths. It is suitable for finishing kitchens and bathrooms. Its leaves are green, with blue inscriptions.
Fire resistant (GKLO)
A clear advantage of this type is its fire resistance. This effect is achieved by adding a reinforcing substance, which increases resistance to open fire. Used in ventilation shafts. Also suitable for attics. It is marked in red, and the sheet itself is gray.
GKLVO (universal)
A universal type that combines the characteristics of moisture-resistant and fire-resistant material. It is widely used in industry; various structures are made from it in buildings.
After the buyer decides on the type of drywall, he needs to decide on the size of the purchase. The material can have a standard length, it usually varies from 2.5 meters to 3 meters. The width most often does not exceed 1.2 meters. There are differences in sheet thickness. It can be 6 mm or 9 mm. The maximum thickness is often used - 12.5 mm. Ceilings are sheathed with such sheets. The height of the plasterboard box on the ceiling is usually selected individually for each order. To make the surface even, thin sheets are used in the bottom layer.
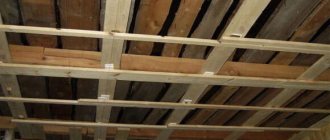
What does the box consist of?
To make a plasterboard box on the ceiling with your own hands, you need to know what it consists of and how it is attached. In order for the material to hold better, it is better to attach it to a metal grid. The result is a lightweight design that is easy to assemble yourself. You can attach drywall to wooden slats. This option may not last long due to its weak strength. It should be taken into account that the wood can, under the influence of temperature, move to the side along with the frame, and also rot over time.
A reliable product will be obtained if you use a metal profile. Galvanized material is not subject to corrosion; there are two types of profiles: main and guide.
The main one fixes the plasterboard panels, it is installed in a horizontal guide, they are shaped like the letter “P”. The main profiles have curved edges, which makes them look like the letter “C”.
To create a frame for a suspended ceiling, take the main profile, its length is from 3 to 4 meters. Sheet size 28 by 27 mm. The horizontal profile is used as a guide.
To create a curved frame, take a curved profile, and it is also used for arched shapes.
To assemble a plasterboard box on the ceiling, you need to purchase a connector. It is two-level, taken to fix elements that run perpendicular to each other. In component parts there is a term “crab”, which refers to single-level connectors. They combine and fix the parts at the same level. They are usually fastened with self-tapping screws, sometimes with latches.
To assemble a plasterboard box on the ceiling, a direct suspension is required. It can be secured with a pair of self-tapping screws. It is attached directly to the ceiling. As a rule, an anchor suspension connects the load-bearing base to the profile. Since the module has a spring, it is used to increase the length of the suspension. It stretches from 25 to 100 cm. It is also worth taking a longitudinal connector. Its function is to lengthen the profile element. Some people replace the crab with a simple corner connector.
Graphic technique
Calculating a plasterboard ceiling box in this way involves creating a visual image on paper. This will allow you to accurately place profiles, count them, and correctly place gypsum boards so that the amount of waste is minimal.
A graphic project consists of several stages:
- Draw a plan for the ceiling, apply a grid on it with thin lines of 10 cm and thicker lines of 1 m.
- Distribute the gypsum board first with whole sheets, then with fragments.
- Round the resulting calculations up for a whole number. If it is difficult to imagine this process visually, it is worth spreading the gypsum board on the floor of the room in which you plan to create a hanging box.
- After this, you need to transfer the result in the form of a diagram onto a sheet of paper. In your head, you can perform the calculation as follows: divide the total footage by the quadrature of one gypsum board (3 m2).
- Then you need to draw the lines for the location of the profiles. These calculations should be approached rationally, guided by a schematic drawing of the placement of drywall.
- Place marks at the mounting points of the hangers. If this quantity is doubled, the required number of dowels will be obtained.
- Cross members made of CD or PP profile are marked. At the points of intersection of the connecting lines of metal profiles, “crabs” should be installed (four 18-mm self-tapping screws for each).
The perimeter of the room is the total length of the PN (or UD-27) profile. Perpendicular and longitudinal PP-60 metal profiles (or CD-60) are calculated. The footage of the profiles is summed up, the number of joints multiplied by 6 cm (the width of the guide) is subtracted. All this should be divided into 3 or 4 m and rounded up.
The guides are fixed at intervals of 25 cm. 4 pieces are required per 1 meter. It follows that the entire perimeter must be divided by 4 and added to the resulting number 8 (fasteners for corners). This simple calculation technique will help you correctly determine the amount of materials needed for a hanging plasterboard box.
Key points for attaching drywall
If you learn the technique of assembling the box, this work will be easy. It is important to consider the main points:
- You should only work on a flat surface; if there are defects, they will have to be eliminated. You can pre-plaster the ceiling.
- The frame must be assembled only from a high-quality profile. It must be galvanized, without white spots.
- If there is a water supply system nearby, then it is worth stepping back more between the profiles. Such actions are necessary in order not to overheat the frame. Then its elements will not expand.
- You should immediately think about access to the pipes.
- If a person wants to lay tiles on top of the box, then they need to secure the screws closer to the wall. In order not to cover the fasteners with tiles, you can use a special plinth that can be easily removed.
- If you have a wooden ceiling, you cannot attach plasterboard with glue. Wood expands from moisture and returns to its original shape after drying. Over time, cracks will appear on the surface, which will negatively affect the shape of the box.
- If a person just wants to level the ceiling, then he can glue drywall, bypassing the stage of creating a frame. In this case, the use of glue and various mastics is allowed. To do a good job, you need to achieve a smooth surface.
Holes for lamps
We mark and, using a special crown and a screwdriver, cut out holes for the lamps.
We make holes for lamps using a special crown and a screwdriver
Choose the location of the lamps so as not to hit the ceiling profile
What you will need during the work
To get started, you should prepare the following materials:
- Drywall - it is sold in sheets. To choose the right one, you need to consider in which room it will be used. Temperature factors during use are important.
- Profiles. It is important to calculate the required number of guides, as well as load-bearing elements.
- You will need a primer. Don't forget about gypsum putty.
To mount a box under a suspended ceiling with your own hands, you will need the following tools:
- Brackets, crab connectors will also come in handy.
- You need to choose the right fixing elements, buy dowels and screws.
- It’s worth checking if you have metal scissors and pliers on hand. A construction knife must be available.
- You should buy a mesh that reinforces the seams.
An important point when calculating the required number of sheets of the required material is that you need to take it with a margin of 3 to 5%.
Materials
When installing the box, the following materials are needed:
- guide profile (UD) – 28 × 27 mm;
- rack profile (CD) – 60 × 27 mm;
- fasteners - dowel-nails, screws for metal;
- dewlaps and crabs;
- drywall;
- acrylic primer;
- putty for seams between gypsum boards;
- reinforcing mesh.
There are 3 types of drywall on sale:
- for dry rooms (gray);
- moisture resistant (green);
- fire-resistant (pink or gray with red markings).
When purchasing materials, you should pay attention to the absence of chips in the sheets and the uniformity of the zinc coating of the metal.
To ensure a strong frame, all profiles should be used for their intended purpose and from the same manufacturer.
Preparing for work
In order to assemble a box for a suspended ceiling, you need to understand the drawings and fastening diagrams. Initially, you should set the thickness of the drywall, as well as the height of the future box. You need to understand how deep it will be.
If a plaster box on the ceiling is planned before installing suspended ceilings, then the surface does not need to be leveled. If a person is going to prepare ceilings for painting, he will have to work hard.
The first step is to remove the previous coating. If the whitewash was chalk-based, you will have to wet the layer with water and carefully remove it with a tool. The remaining layer is wiped off with a rag.
If the ceiling was plastered a long time ago and it is crumbling, then the old layer must be removed.
The next step is to use a primer, applying two thin layers in succession. Some cracks remain and are sealed with reinforcing mesh. After this, putty is applied. It takes time for the ceiling to dry completely. When the surface is ready for further work, sandpaper is used. She is “walked” across the ceiling several times. Afterwards a primer is applied, which penetrates deep into the layers.
The last step is to apply the finishing layer of putty.
How to install the frame correctly
To get a level base, you can first construct a template on the floor, and then copy it to the ceiling. The profile is unfolded, after which it is connected sequentially with screws. With help. A hammer drill makes holes in the ceiling for dowels. The hangers are cut and installed on pre-installed guides. The structure is fastened with self-tapping screws.
When creating the lower part of the box, special attention is paid to laying electrical wires and installing wiring. The height of the box on the ceiling should take into account the laying of wires.
The next stage begins with plasterboard covering. The sheets are cut according to the parameters of the box. The horizontal surface is sheathed, after which they move on to the vertical one. The elements are fixed with self-tapping screws, while taking into account that protruding “hats” should not be left in sight.
Dimensions
If we talk about the size of the box, it will depend on what you want to disguise behind it. For example, this could be wiring, water pipes, gas pipes, ventilation ducts, etc. If backlighting is to be installed, the size must be sufficient to allow installation of a power supply and LED strip.
A properly installed box will decorate the room and will last for many years.
What does the final finishing stage include?
When the installation work is completed, you can proceed to the next stage - priming. It is necessary for better adhesion to the surface. Putty is used to mask corners and seams. At the joints it is “passed” in two layers, after which it is treated with sandpaper.
After the construction dust has been eliminated, lighting fixtures begin to be installed.