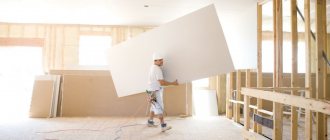
A backlit plasterboard ceiling combines beauty and functionality, so it’s definitely worth spending time studying the technology of its construction. Of course, the process of installing such a ceiling cannot be called simple, but even a beginner can cope with such a task - naturally, if this beginner approaches the process responsibly and begins work by studying the theory.
It’s difficult to make such a design – but it’s possible!
general information
Illuminated plasterboard ceilings are a very popular design solution. It is distinguished by external beauty and practicality. To arrange the electrical part, you can use various combinations of different lighting fixtures. As a result, it is possible not only to change the intensity of the light flux, but also to influence the spatial perception of the room.
Strengths of using a suspended ceiling with lighting:
- Creating an absolutely flat base on the surface of the base without the use of labor-intensive screed and plaster.
- Significant simplification of the procedure for preparing a rough foundation. It is allowed that the same finish, differences, cracks, etc. remain on it.
- The ability to conveniently camouflage various communications under the suspended fabric - cables, wires, pipes, ventilation ducts, etc.
- High decorative possibilities. This is especially true for creating a multi-level suspended ceiling made of plasterboard with lighting.
The designs also have disadvantages:
- Lowering the overall height of the room by about 10 cm due to the frame. This applies to both suspended and illuminated plasterboard ceilings.
- The complexity of the procedure. In any case, you will need an assistant and some experience in arranging electrical systems. If you install and switch lighting fixtures incorrectly, this can have very dire consequences. The resulting short circuit sometimes causes a fire.
When developing a plan for installing a plasterboard ceiling with lighting, it is recommended to pay special attention to the following important points:
- Using multiple lighting zones in a room. As doctors say, for eye health it is better to use several low-power lamps than one bright lamp.
- The layout drawing of spotlights is developed in the most careful manner. In the kitchen, the work surface and eating area need separate lighting. In the bedroom, contour lighting around the bed has worked well. Additional lighting for cabinets, bookshelves and desks is often used. Lighting zoning is also used in the hallway: the hanger, mirrors and ceiling perimeter are equipped with soffits.
- Light imitation of sun glare, northern lights and starry sky has excellent decorative characteristics.
- Lighting fixtures must be positioned in such a way that they do not dazzle the eyes.
- Thanks to the correct placement of lighting, you can adjust the proportions of the room. If you direct light onto the walls, there will be an effect of visual expansion of the space.
- Each group of lamps in different functional areas of the room needs an autonomous switch.
- It is advisable to decorate small rooms with multi-level plasterboard ceilings with LED lighting.
- Before making a plasterboard ceiling with lighting, a detailed diagram of the future structure is developed. It contains information about all sizes, types and locations of lamps.
Placement in the interior
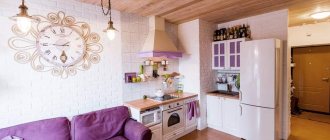
Interior design uses a combination of different ceilings and lighting methods. In the kitchen, two zones are distinguished by lighting: above the working surface of the kitchen unit and above the dining table. They make suspended structures over these two zones and illuminate them with identical spotlights. Another stylish solution is to equip a suspended plasterboard box above the work area with spotlights, and a suspended ceiling with LED strip lighting is installed above the dining area.
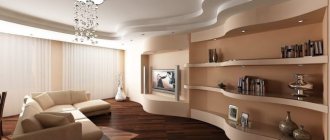
The living room combines several functions: here the whole family gathers after work, receive guests here, and watch TV. It is appropriate to have several types of lighting here. In the living room, along with the bright light of the ceiling chandeliers, an addition will be evening neon lighting placed in a niche for dance parties or movie screenings.
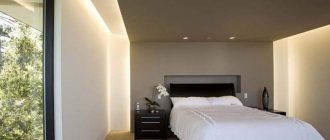
Minimalism in interiors gives preference to a monochromatic design and an almost complete absence of furniture. The color and arrangement of light serves to fill the space. In the bedroom, lighting and ceiling relief highlight the head of the bed area. The color chosen is calm, peaceful tones: blue or purple.
A well-known technique is to place a stained glass window with a floral pattern in the Art Nouveau style or a stretch ceiling with lighting in the center of the bedroom. Illuminated niches on several levels with different types of lighting break up the space of a small room and give it depth and versatility. Depending on the time of day, either a luminous stained glass window is left, or a row of spotlights above the headboard for reading, or a deep niche with an LED strip above the opposite wall.
A spectacular design for a children's room is a “starry sky” made of spot LEDs. You can regulate the lighting of different areas of the children's room by combining different types of lamps and figured plasterboard ceiling levels. Such complex illuminated ceilings create voluminous compositions of the sky and clouds. Kids look at them with pleasure, and parents can choose a comfortable level of light brightness at any time of the day.
For schoolchildren, active allocation of working and sleeping areas is appropriate. The work area is emphasized by a deep relief ceiling made of plasterboard, while the bedroom is decorated with a calm, classic ceiling covering. The lighting solution must also correspond to the function of each area of the room. The geometric structure of a multi-level ceiling with an energetic yellow design is decorated with LED lighting of the same color in the geometric pattern of the suspended ceiling.
Zoning in a teenager’s room is necessary for successful study and proper rest. Preparation of lessons and classes should take place in good lighting and in a calm color scheme. The area for sleeping and active pastime should be highlighted with structural elements and light.
In the bathroom, the area above the mirror and washbasin is traditionally illuminated. In large bathrooms, lighting of different colors on the ceiling, connected to different switches, will provide an intimate separation of the shower area, toilet and washbasin. An illuminated panel above the bathtub will make relaxing procedures more enjoyable.
What types of lamps are there?
In order to make a backlit ceiling, as a rule, the following types of lamps are used:
- Spot
. With their help, night lighting, emergency lighting, room zoning, work area lighting, etc. are installed. This type of lighting is budget-friendly and is suitable for lighting plasterboard ceilings of any configuration. Such schemes are very easy to implement: as a rule, such work is carried out on their own, without the involvement of a professional electrician. To achieve the final aesthetics of the finished structure, it is necessary to arrange the holes in the plasterboard board as carefully as possible, strictly according to the diameter of the lamp. Spotlights most often play a supporting role in combination with the main lighting. - Chandelier (regular or LED)
. Products of this type are presented in a significant variety of shapes and colors. To install them, no wiring replacement is required. In combination with suspended plasterboard systems, surface-mounted and pendant lamps are not always the optimal solution. The fact is that their use further aggravates the effect of the lost height of the room.
- Daylight
. They are mainly installed in non-residential premises. They are inexpensive and easy to install. They consume little electrical energy. The service life of fluorescent lamps, in the presence of a stable voltage, is quite long. - Fiber optic
. These lamps are an innovative development that allows you to create the effect of a starry sky. Installation of fiber optic luminaires is expensive and labor intensive. These systems look best in rooms with high ceilings. - LED strips
. An excellent option for arranging multi-level ceiling systems. These inexpensive lighting fixtures have a number of strengths. They are able to create uniform diffuse lighting, replacing a conventional 200 W lamp. Installing the tape is very simple: one of its sides is specially equipped with an adhesive base. LED strip in a plasterboard ceiling demonstrates high energy efficiency and durability.
Design Features
Drywall is an easy-to-use, economical material for suspended ceilings and a variety of design solutions, especially when combined with lighting. Installation is carried out in two stages:
- a rigid metal frame is attached to the ceiling and walls,
- the frame is covered with plasterboard sheets (gypsum plasterboard).
A special feature is that gypsum boards are mounted on special hangers, so there is no need to pre-level the ceiling.
Ceiling structures made of plasterboard are convenient if you need to hide hidden lighting, communications, pipes, etc.
However, this design also has disadvantages:
- the height of the walls decreases,
- when installing in a bathroom or kitchen, the ceiling must be covered with water-repellent paint, since gypsum boards can get wet, or use special waterproof plasterboard sheets,
- the total cost of all work (including finishing and lighting) is quite high,
- One person cannot assemble a plasterboard ceiling structure; an assistant is needed, since gypsum boards are quite heavy.
How to choose LED strip
Light-emitting diode (LED) strip is a narrow flexible strip no more than 9 mm wide. Conductive tracks, diodes and resistors are applied on top of the product.
When choosing a suitable option for installing a plasterboard ceiling with LED lighting, it is recommended to pay attention to the following points:
- Diode type. The most common diodes are SMD3528 and SMD5050. The first variety (3528) always gives one color of illumination, the second can be white or multi-colored. The SMD5050 diode is more expensive and consists of three crystals, which ensures its durability. SMD3528 tapes last less due to the gradual burnout of the phosphor. This causes the light to appear blue.
- The frequency of concentration of LEDs on the surface of the strip. The most common bands are with a frequency of 30,60,120 light bulbs per 1 running meter. As the density increases, the brightness of the illumination increases. To equip a plasterboard ceiling with perimeter lighting, the density of the SMD3528 tape should be at the level of 30 or 60 diodes. If the goal is to illuminate a stretch glossy ceiling or partially illuminate a room, it is recommended to use SMD5050 tape with a density of 60 diodes or more.
- Shades. To achieve multi-colored backlighting, you need to purchase 5050 strips, the base of which contains blue, red and green diodes.
- Degree of protection. Tapes can be equipped with additional protection against moisture. Such products are covered with special silicone insulation, which allows them to effectively resist flooding from above.
- Equipment. LED strips must be equipped with a power supply. As additional equipment, SMD5050 tapes can contain a remote control system and controller. You also need to choose skirting boards for the LED strip that will optimally fit the ceiling.
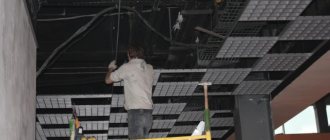
Upper level frame
Installation begins with the arrangement of the frame. Drywall sheets cannot be called a sufficiently durable material. They will not be able to withstand the weight of the new tier, in which they install an LED strip for illumination. For this reason, the frame of the second tier is attached to the guides of the first level directly through the drywall. To do this, they need to be placed exactly where the guide passes, which will form the box with lighting. Both frames are attached around the perimeter of the room.
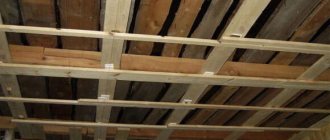
Example of a marked rough ceiling
There should be no problems when installing two parallel guides, which are mounted across the longitudinal profiles on the main ceiling. They are screwed in at a pitch of 400 mm. It is important to follow it strictly. It is important to make it not very large.
Frame for plasterboard ceiling
The other two guides will be more difficult to attach if the longitudinal profile does not pass through them. It must be laid at the moment when the installation of the main frame is carried out. All this work is not difficult to do on your own if you act correctly. The main thing is to carry out installation in strict sequence. Action. Do not skip the most important stages of work.
Table No. 1. Types of drywall used in finishing residential premises
What types of plasterboard ceilings with lighting are there?
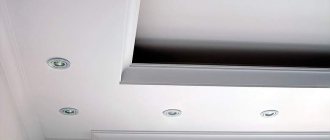
A plasterboard ceiling with LED strip can be arranged in an open or closed way. In the first case, much less work will be required: it is enough to make neat holes in the right places on the slab and mount the lamps there. The main thing is to adhere to the recommendations on the weight of the lighting devices used: the total figure should not exceed 10 kg. This is due to the weakness of the frame structure and sheathing sheets.
The implementation of a hidden plasterboard ceiling scheme with lighting involves the installation of lighting fixtures inside pre-arranged recesses (niches) in the structure of the plasterboard “pie”. In this way it is possible to direct the light flux along the ceiling. As a result of the reflection of light from a suspended surface, very interesting effects are formed. Hidden lighting of plasterboard ceilings is most often used on glass or tension suspension systems.
How many ceiling lamps should I use?
So, you have an understanding of what the ceiling should look like, what kind of lamps and how many there should be, and you are prepared for the most important work. Mark on a sheet of drywall the places where the lamps should be. One device with a power of 20 W per 1 square meter is considered optimal. m, but this does not mean that a 360-watt “spotlight” will be enough for an 18-meter room. It is better to use 1 lamp per 2-3 sq m, so for the same 18-meter room it is worth allocating from six to nine lamps of LED, halogen or incandescent design.
Often people, having seen enough projects in design magazines, install lighting devices only around the perimeter, forgetting about the central part of the room.
Note Meanwhile, the main emphasis should be placed on the center, where the chandelier usually hangs. And one more thing: due to the shades, the chandelier shines not only downwards, but also to the sides. Ceiling lamps, on the contrary, shine downward due to their design and mounting. If there are few of them, twilight is guaranteed.
How to make a plasterboard ceiling with lighting
To install a plasterboard ceiling with hidden LED strip lighting, you will need the following tools and materials:
- Plasterboard boards.
- Components for constructing the frame - guides, wall profile, ceiling direct hangers.
- Fastenings. Dowels, screws, etc.
- Fastening mesh for additional reinforcement of joint areas.
- Metal scissors, pliers, screwdriver, knife, screwdriver and hammer drill.
- A simple pencil, a building level, twine.
- Set of spatulas and putty.
- LED strip kit. In addition to the lamp itself, there is a power supply, wiring with a cross-section of at least 0.75 mm, and insulating materials.
Installation of the frame of the upper level of the suspended ceiling with lighting is carried out in the following sequence of operations:
- An indentation of 10 cm is made from the floor slab and a solid line is drawn along the perimeter of the room being finished.
- The starting profile is screwed along the broken line. It acts as a guide for the main profile, which is fixed to the ceiling using hangers. The fastening installation step is about 40 cm.
- The elements of the main profile are reinforced with additional jumpers, which are cut from the same profile. This makes the frame more rigid.
- The finished structure is sewn up with plasterboard boards using self-tapping screws.
After this, they move on to arranging the lighting box:
- The base surface is equipped with a drawing of the lower level configurations. The applied marking acts as a guide for installing the guide profile. The shelves of the ceiling element should be directed downwards, and the shelves of the wall element should be directed towards the opposite wall. To fix the ceiling guide, the profile of the main frame is used.
- Suspension stands are made from the main profile. When cutting blanks, take the height of the lower level ceiling as a guide.
- One of the sides of the suspension is equipped with a cut (4-5 cm), followed by bending the back wall inward. When calculating the number of hangers, the dimensions of the ceiling are taken into account. Installation step – 1 hanger/50-60 cm.
- The finished elements are mounted inside the guide profile with their whole end. Self-tapping screws are used for fixation.
- The ceiling profile also serves as a material for the manufacture of lintels, the length of which corresponds to the length of the lower part of the box. The number of such elements must match the number of hanging posts.
- The workpieces are immersed inside the wall guide profile, fixing them with self-tapping screws. When joining the reverse edge of the workpiece to the hanger, it is necessary to maintain an angle of 90 degrees.
- The result is a skeleton of a suspended ceiling niche with backlighting and a protruding profile. All protruding parts are decorated with plugs from the same ceiling profile. Plasterboard sheets will subsequently be installed on top of the finished base.
Work order
The work flow is very simple. You need to mark the ceiling, create a metal frame, make wiring, cover everything with plasterboard and install lamps.
Creating a wireframe
The first step is to mark the places on the ceiling where the lamps will be installed. It is advisable to draw a diagram for yourself, indicating all sizes. After this, the place on the wall where the perimeter profiles will be attached is determined. You need to know how much the suspended structure will recede from the ceiling. Its height depends on whether additional insulation or sound insulation will be used. If not, then you can retreat by the standard 8 cm. Otherwise, you need to calculate the thickness of the insulating layers.
After creating the frame, wiring is done
When the lower level at which the illuminated plasterboard ceiling will be located is determined, you need to make marks on the walls. Along these lines, UD profiles will be attached to all walls parallel to the floor plane. Installation is carried out using dowels. When the guides are attached to all four walls, CD profiles are inserted into them in increments of 40-50 cm. They go from one edge of the wall to the opposite, parallel to each other. There is no need to attach them yet.
Suspensions are attached to the ceiling (they act as load-bearing structural elements) in increments of approximately 50 cm. They should be located above each CD profile. This profile is attached to them with metal screws. The hangers themselves are secured with dowels.
Wiring for lamps
The easiest way to do wiring for lamps is to power it from a chandelier. This is easily done using a regular terminal block. Recessed plasterboard ceiling lights can also be powered from another unit. To do this, the wire is laid from the outlet. But in this case, you need to trench the wall, and this is a completely different level of repair, affecting the entire room, and not just the ceiling.
The lamps can be powered from 220V, which is very convenient
All wires must be hidden in corrugation. It protects wiring from mechanical damage and is also an additional means of fire safety. This is a basic protective measure that many people neglect for some reason.
If a wooden frame is used for drywall or there are other wooden structures that will be located near the wiring, then the corrugated sleeve is not used. In this case, it is necessary to take a more expensive metal hose or metal pipe.
The wire cross-section should be 0.75 mm. If you use LED spotlights, then 4 W for each will be enough. The wiring should not hang or lie on anything. It needs to be attached to the ceiling. To do this, special clips are attached to the ceiling, into which the corrugated wire is very easily clamped. The wire for the lamps is connected to the wire from the chandelier.
An example of how wires for lamps should be drawn
The illuminated plasterboard ceiling will have special holes where the lamps will be mounted. Two clips are attached in the designated places for the lamps, and they are also mounted along the entire path of the wire. After this, the wire is fixed under the ceiling, and where there will be lighting, tongues (a loop of wire) are lowered below the level of the suspended ceiling. After this, the wire is led to the place of the next lamp, where a loop is made again, and so on until all the points are completed. At the end the wire is cut so that it also hangs below the level of the frame.
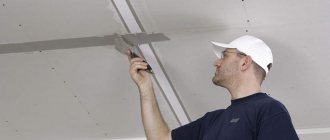
Final stage of work
Sheets of plasterboard are hemmed to the frame. They are attached with self-tapping screws in increments of 15-20 cm. It is important here not to forget where the wiring for lighting is connected. A previously created diagram with all dimensions will help with this. If it is available, it will be easy to make holes in the right places so that the prepared lamps for the plasterboard ceiling are in their place.
The hole itself is made using a drill with a special attachment. There are crowns that allow you to cut a circle of a given diameter in drywall (to fit the purchased spotlights).
Excellent option for connecting a lamp
The loop is pulled out and the lamp is attached to it. You can attach them by simply twisting the wires, which are then necessarily insulated. But if the wires are multi-core, then it is undesirable to twist them, since such fixation weakens over time, which leads to sparking and burning. It would be ideal to use a terminal block to connect all the wires.
The lamp itself has special clamps with which it is attached to the ceiling. At the end, all that remains is to check whether everything was connected correctly, after which you can proceed to finishing work.
If you have already assembled a suspended ceiling from plasterboard, and then wanted to create lighting using spotlights, then this can be done. It is not advisable to do this, but in the absence of a better option, you can resort to the method shown in the video.
Installation of plasterboard sheathing
Pre-prepared narrow strips of drywall are installed as follows:
- Plasterboard elements are screwed along the niche shelves.
- Next, the vertical sections of the structure are sheathed: the sheets here are installed on hanging posts and ceiling guides.
- At the next stage, the horizontal area of the niche is sutured.
- At the end of the procedure, plasterboard strips are used to decorate the end sections of the box, inside of which the lighting will be placed. The upper and lower levels must be separated by at least 50 mm.
Sheathing the gypsum board frame
The next step is to line the frame with thin plasterboard sheets:
- The gypsum board strip is attached to the shelf of the niche.
- The vertical part of the box is covered with sheets attached to the hanging posts and ceiling track.
- The horizontal part of the niche is sheathed.
- The gypsum board strip is attached to the front part of the box - it is behind it that the backlight will be hidden.
Electrical connection
List of operations on how to make lighting in a plasterboard ceiling:
- There are marks on the LED strip where you can make cuts.
- Switching of individual sections of the tape is carried out using a soldering iron or special LED connectors.
- When choosing a power supply, it is recommended to provide a power reserve of 20-30%.
- Installation on metal sections of the frame requires the mandatory use of insulating pads. Before starting installation work, the system must be de-energized.
- When installing a multicolor diode, it is important not to confuse the polarity: the blue and black wires are negative, and the red wire is positive.
- Before final fixation of the tape, it must be tested for performance.
- Long sections of tape are switched differently when connected in series. As practice shows, parallel connection of sections of 5 m or more in length demonstrates greater safety. For this purpose, wires with a cross section of 1.5 mm are used. In this case, the power supply must be more powerful than usual.
Installation and connection of hidden lighting
To install LED backlighting, you should adhere to the following rules:
- Strips with LEDs are cut into pieces only according to the marks on them.
- The strips are connected using both LED connectors and an ordinary soldering iron.
- Fastening to metal parts should only be done with insulating material.
- Under no circumstances should lighting be installed under voltage.
The last stage is the final finishing of the ceiling. For this, putty and primer are used. At the end, such a ceiling can be covered with wallpaper, painted or finished with textured plaster.
What is a suspended floating ceiling?
A stretch floating ceiling is a structure that, looking at it, seems as if it is hanging in the air. This effect is achieved by special fastening of the canvases.
The LED strip is mounted in the gap between the ceiling and partitions. The emanating light seems to separate both surfaces and makes the room high.
A floating ceiling can be combined with all textures, single and multi-level structures. Photo printing in the form of a starry sky looks good.
To complete the look, you can make floating curtains. To do this, the cornice is placed in a hidden niche. It seems as if the curtains are flowing straight from the ceiling.
Tips and tricks
The main point that requires constant attention is the thoroughness and accuracy of the work. You should not proceed to the next step without making sure that all previous steps have been completed completely. In addition, it is necessary to constantly monitor the progress of parallel operations - installation of electrical wiring, platforms for lamps, etc.
To obtain the expected result, it is better to deliberately slow down the pace of work, increasing attention and control. Ultimately, the absence of rework and elimination of errors will speed up the completion of installation
Preparation matters
The work done before installing the metal frame will indicate the strength of the entire structure. Preparatory work includes the following processes:
- The room where a floating ceiling with light lines made of plasterboard is created is freed from objects that interfere with work (furniture, curtains, chandeliers).
- If cracks are detected, reinforcement and puttying are required.
- The entire surface of the ceiling is covered with primer.
Preparing the ceiling and installing the guide profile
Unsealed cracks in the ceiling can subsequently negatively affect the plasterboard structure. If the ceiling is not primed and the house (apartment on the top floor) is cold, fungus will develop, which will also negatively affect the suspended plasterboard structure.