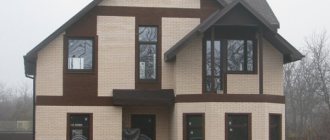
Covering a brick house with siding is the most popular option for finishing the facade. This is a strong, durable material that does not require complex maintenance and is not susceptible to the negative effects of external factors. Siding is used to decorate houses made of wood, brick and other materials.
The structure can be installed at any time of the year. Such buildings will be warm in winter and cool in summer.
Benefits of siding
The main advantage of choosing siding is the ability to cladding the house yourself. The work process will not take much time.
Advantages:
- light weight of the panels, which reduces the load on the foundation;
- durability;
- easy to maintain, just wash the siding with water from a garden hose;
- large selection of color options for panels;
- protection of walls from external factors;
- environmental friendliness;
- additional sound insulation;
- low cost.
Important! The panels perform not only a decorative function, they serve as additional insulation for the structure.
There are several types of siding, each of which has distinctive qualities:
- Plastic – is hydroscopic (does not absorb moisture), resistant to fungus, rot and fire.
- Metal – has increased wear resistance and durability. However, the large weight of the material requires additional strengthening of the foundation.
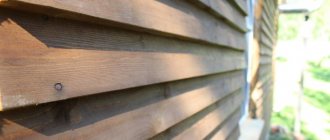
- Wooden is a highly environmentally friendly material with a long service life. However, it requires constant care, treatment with an antiseptic and antifungal agents.
It is best to choose plastic panels, they are more practical and cheaper. In addition, finishing can be done at any stage of construction, as well as during operation. Since metal and wood finishing should be considered in advance, it is necessary to strengthen the foundation, treat the wooden surface, etc.
Useful tips on choosing fasteners and more
Take them into account and strictly adhere to them.
- It is best to lay siding from left to right, from bottom to top.
- The self-tapping screws are screwed in strictly in the middle of the mounting groove perpendicular to the sheathing elements.
- Do not tighten the fasteners too much. It is necessary to leave a small gap in case of thermal expansion of the material.
- If nails are used as fasteners rather than self-tapping screws, then you need to purchase galvanized fasteners.
- Fiber cement siding is attached to the frame with clamps.
- If a wooden frame is finished with siding, then it is necessary to give time (at least six months) for the house to shrink.
Necessary tool for the job
Before starting work, you should calculate the amount of material needed, as well as stock up on a set of tools. For installation you will need corners, main and connecting strips and panels.
Important! Panels should be purchased with a reserve, as they may be from different batches and differ in color.
You will also need metal scissors, a grinder and a building level.
Features of the material
The brick wall itself is often quite difficult to clean. To do this, you have to use various means, which can sometimes have a harmful effect on the brick itself. If the walls are finished with siding, then there is a high probability that dirt will not get on the brick. In this case, cleaning will be limited to cleaning the siding panels, which is very simple to do.
Siding can be washed with a regular rag dipped in water. Chemical compounds do not have a negative effect on it. If severe contamination appears, you can easily get rid of it by any available means.
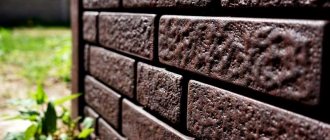
In addition, brick is a rather complex material on which not every type of finishing material can be installed, and siding is best suited.
Tools for installing siding panels.
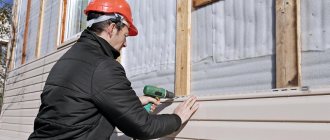
Of course, problems may arise with the installation of the sheathing, but this happens extremely rarely. Let's look at how siding is applied to a brick house.
Before you begin, prepare the necessary tools:
- drill;
- roulette;
- hacksaw;
- hammer;
- stapler;
- screwdriver
Preparatory work
The work algorithm consists of the following stages:
- Preparing the walls.
- Marking.
- Frame installation.
- Siding installation.
Wall preparation includes leveling, filling cracks, holes, chips, and putty.
Important! With proper surface preparation, the service life of siding can be extended to more than 50 years.
During the preparation process, everything unnecessary is also removed: lamps, nails, platbands, etc. The entire surface of the walls is plastered and primed. Only after this can you begin to install the frame.
Installation rules:
- The siding is attached to a pre-installed wood or metal strip.
- Wood slats must be treated with an antiseptic. When using metal profiles, such processing is not required.
- If the guides are installed correctly, installation will be quick and easy.
- In the locations of window and door openings, cables, pipes, materials are installed that protect against moisture penetration under the panels.
- Siding is a finishing material that cannot replace load-bearing walls or the entire structure.
Each panel is installed on the next using a lock. Do-it-yourself siding installation on a brick house should be done gradually and carefully.
Price
If you want to know how much it will cost you to cover your house with siding, the price consists of the cost of the material and components, as well as the cost of paying for the work of a team of installers (if you do not do the work yourself).
The cost of siding for exterior facade decoration is directly related to the type of product. Thus, the price of vinyl panels can be from 4.92 USD/m². You will have to pay a little more for metal siding. Its price starts from 5.6-7.3 USD/m². Additionally, you will have to pay extra for panels with a wood texture or for a popular brand.
If you decide to hire a team of workers to perform exterior finishing work, then when answering the question of how much it costs to sheathe a house with siding, you should take into account the following prices for the services provided:
- Cladding a house with basement panels without insulation costs 13.9-16.1 USD/m². The same work with insulation will cost 19.4-24.2 USD/m².
- Facade work without insulation using metal siding is paid at the rate of 10.5-14.5 USD/m². If insulation is carried out, the price will increase to 12-19.4 USD/m².
- Vinyl siding is the cheapest to work with. For cladding without insulation you will pay 8-13 USD/m². For work with insulation you will have to pay 9.6-14.5 USD/m².
Lathing for siding
This is a load-bearing structural element made of metal. It is attached to the wall using special dowels. It is better to start installing the sheathing from a corner strictly vertically.
You can make the lathing yourself; for this you will need a 50x50 or 40x40 beam, it all depends on the thickness of the insulation. To simplify the work, you can purchase a metal frame in the store.
Important! When constructing a frame from timber, it must be treated with an antiseptic to prevent swelling from moisture.
The direction of the profiles depends on the location of the panels. If they are horizontal, the sheathing should be vertical, and vice versa. Usually, vertical lathing is made for the walls, and horizontal lathing for the base.
Important! A vapor barrier film is attached between the wall and the frame. It will protect the thermal insulation material.
With or without insulation
If the siding is installed without insulation, we check all verticals using a level, and the distances between profiles using lacing. We adjust the location using the hexagon by twisting or unscrewing it.
Most often, siding is installed with insulation. If you also prefer this option, after installing the profiles and corner elements, they will have to be dismantled, leaving the studs and mounting bases attached to the wall.
We pin the selected thermal insulation material onto studs or onto a suspension. Both methods avoid the appearance of cold bridges. After the heat insulator, we pin a wind- and moisture-proof film onto the same studs. Then you can reinstall the sheathing profiles and secure them with a hexagon, as when installing a facade without insulation.
The process of insulating a house
After installing the frame, the house is insulated. Polystyrene foam is usually used as insulation. Mineral wool and extruded polystyrene are also suitable. It is important that the material is environmentally friendly.
Mineral wool in the form of slabs is highly moisture resistant, which is why it is used in places with high humidity. Installation of foam plastic must be done on a perfectly flat surface, otherwise the slabs will break and cold air will leak through them.
The material should be laid from the window and door openings, after which it is necessary to form a starting strip from which further installation will be carried out. It is better to do it at the very bottom strictly horizontally. This will ensure even and high-quality thermal insulation.
The insulation is attached to the wall using glue or dowels. All cracks should be sealed using polyurethane foam, special tape or adhesive tape. This will prevent cold bridges from forming.
Don't forget about waterproofing. It prevents moisture from entering the room. It is attached on top of the thermal insulation. After which the sheathing is installed. It is she who creates intervals for ventilation.
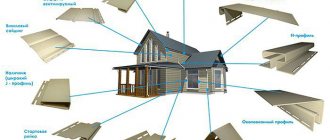
Types of metal siding
The industry produces several types of metal siding, which are designed to decorate and protect your home.
Depending on the installation and design features, the following types of siding are offered in hardware stores:
- Perforated siding;
- Facade siding on a metal base;
- Basement siding (basement siding “under the stone” can be used with equal efficiency both for cladding the base and for finishing the facade of the building in the form of inserts);
- Ceiling siding;
- Metal siding “Shipboard” Eurobrus”,”Block House”;
- Vertical metal siding;
- Metal siding with insulation (a layer (40 mm) of material similar to polyurethane foam is applied to the back side of the siding by spraying).
In addition to design features, the buyer is given the opportunity to choose the color and texture of the finishing material:
- Stone metal siding imitating the appearance of artificial or natural stone.
- Wood-look metal siding.
Panel installation
To fasten the siding, it is better to choose pointed screws with a press washer. Allowance should also be made for temperature fluctuations, which will cause the panels to expand and contract. In order for the finishing of the house to last for many years, the extensions must be 5 mm longer and the panels 5 mm shorter. Self-tapping screws should be screwed into the center of the holes without tensioning the panel.
Work process:
- You should start from the outer corners. The starting bar is installed, the evenness is checked using a plumb line and level, and then it is attached to two self-tapping screws in the upper part. Subsequently, they are screwed in along the entire length of the siding at a distance of 20-30 cm.
- There should be a distance of 10 mm between the panels, and 5 mm at the edges. If you hear a click when installing them, it means the installation is being done correctly. The panels must move from side to side, otherwise the operation is incorrect and everything needs to be checked and reinstalled.
- All subsequent strips are attached in the same way.
- Every two meters of installed panels it is necessary to check the correctness and compliance with the plane.
Important! It is forbidden to fasten the panels closely, as this will lead to deformation. Self-tapping screws cannot be screwed into the edges of the siding for the same reason; it is better to do this at a distance of 30 mm.
Upon completion of the installation of the panels, corner joints are installed, window and door openings, ebbs, trims and gutters are framed.
Installation of internal corner profile
Similar to the outer profile, make sure that there is a gap (3 mm) between the top edge and the soffit, and the bottom is 6 mm below the starting profile. If necessary, the internal element can also be “increased”.
The internal corner piece can be replaced with one or two J-profiles.