HOW TO CORRECTLY INSTALL SLOPES YOURSELF. LET'S UNDERSTAND THE SEQUENCE OF ACTIONS.
After the window sill is installed, we proceed to installing the slopes. If you have not yet read the article on installing a window sill, I recommend that you now follow the Link to read it.
Rules for installing slopes
There are some rules that should be followed when installing slopes. Firstly
, slope material only from sandwich panels. Read about the advantages of sandwich panels here.
Secondly
, sandwich panels are divided into soft and hard. The soft sandwich is sold mainly in such large construction hypermarkets as Leroy-Merlin, Petrovich, Maxidom.
Buy there when you don’t want to waste time searching. Also, if you have to buy a sandwich in one of these stores, for example, only one side, then there is a chance that it will be a different shade.
What does a hard and soft sandwich mean?
The top of the sandwich pie is covered with white plastic, the same one that is covered with a protective film. If you take a soft sandwich and lightly press it with your finger, a small dent will immediately appear. During installation, such a sandwich can easily be damaged.
But the soft sandwich has one small advantage: it is easy to cut with a stationery knife.
A hard sandwich, on the contrary, can only be sawed off with a saw or grinder. The top plastic part is very hard and the sandwich itself is very hard. After installation, such a sandwich can be easily wiped with a cloth without fear of denting it.
The next important rule.
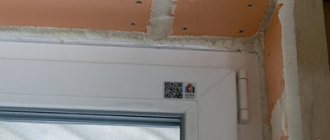
The slope should be installed BEHIND the profile. It can be installed in a starter profile, which is screwed along the edge of the window frame and a sandwich is inserted into it.
But it's better not to do that. Firstly, the integrity of the window frame will be compromised. Secondly, the width and height of the window are creeping, two centimeters in width and one in height. And thirdly, if suddenly the foam presses a little harder on the sandwich, then the edge of the starting profile will bend outward, and this will be very visible. You'll have to glue it with superglue.
One more rule.
All sandwiches are installed only by level. The very brickwork of the window openings is crooked. This is especially observed in brick houses. And if you simply apply the sandwich to the wall, then after completion of the work you may end up with visually crooked slopes. Therefore, when installing slopes, we use a bubble level.
Sequence of installation of slopes
It is important to understand that installation of slopes should begin only after installing the window sill. The sequence for installing slopes is as follows:
- installation of the upper slope
- installation of side slopes
- installation of decorative corners
- sealing joints with liquid plastic
Consider each stage in more detail.
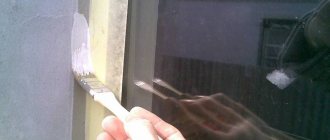
Before installing the slopes, I recommend cleaning the profile from stubborn dirt. Cleaning the profile after installing the slopes will be difficult, since it will not be easy to clean out the dirt at the junction of the profile and the slope.
You can clean the profile either with solvent No. 646, which is sold in any hardware store, or with a special profile cleaner, for example, Cosmofen 10.
You may want to order
window repair in St. Petersburg, then follow the link right now and place your order.
Installation of the upper slope
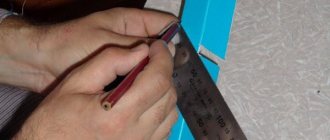
Cut out the top slope. Our first task is to lay down the dimensions of the upper slope on the sandwich panel. It’s not difficult to determine the width of the slope: measure the width of the slope, put it aside for a sandwich and cut it off.
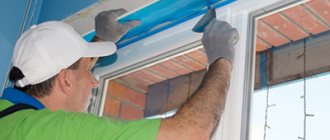
But the depth of the slope needs to be measured as follows. We take the slope cut to width and insert it behind the profile. We press it to the ceiling and draw a line along the edge of the ceiling with a felt-tip pen or pencil. So we will cut the sandwich exactly along the edge of the wall, which part is not even.
Using a saw, we cut off the size we need in depth along the marked line.
After cutting, we place the top sandwich behind the profile and foam the far seam. Next, foam the sides. Now apply a layer of 1.5-2 centimeters to the edge of the sandwich.
The foam should be applied a little further from the edge so that after pressing the foam does not fall out into the apartment. They applied foam and pressed. Of course, you should already have pieces of masking tape torn off in your hands. We attach four pieces of tape to the window, leveling the top sandwich horizontally with a level.
Installation of side slopes
The side slopes are cut in the same way as the top slope. And the installation of side slopes, in principle, is no different from the installation of an upper slope.
When installing side slopes, do not forget to foam the bottom and top of the slope. If these places are not foamed, then after all the work is completed, these places will “walk” - there is no foam there.
Installation of decorative corners
Decorative corners should be placed on polyurethane foam. Gluing corners to silicone or sealant does not give a high result in terms of strength over time.
Just like the slopes, we first install the upper corner. Then the side ones.
We measure the width of the window opening at the upper slope. We put the resulting length on one side of the corner. On the other side of the corner we need to set aside the width of the side of the corner itself.
For example, your corners are 3x3 centimeters. This means that on the other side of the corner you need to put 3 centimeters on each side. This is necessary to overlap the decorative corners at the junction in the corner. We cut off the excess, apply a thin strip of foam on the inside of the corner and install the first upper corner. We press it with tape to the sandwich panel and the wall.
As a result, one side of the corner should overlap the wall, 3 centimeters on each side.
We cut out the side corners and install them in the same way.
Sealing joints with liquid plastic
After the foam has dried and completely glued both the sandwich panels and the corners, it is time to carry out the final stage - seal the joints of the corners.
It is better to seal the joint with liquid plastic Cosmofen. Over time, it does not darken, is easy to clean and firmly glues the joint. In general, Cosmofen is designed for gluing plastic, so it will come in handy at the window joint.
That's all. Good luck to all!
Give it a thumbs up. Subscribe to our Zen channel about window installation and repair.
Our group is on VKontakte - there are many photographs of our work. Add to the group, it will come in handy.
What is a stand profile and why is it needed: dimensions, insulation and installation
More and more owners, caring about the insulation of their apartments, give preference to plastic windows. However, it is not enough to simply replace old wooden frames; it is important to properly insulate the entire window opening. Therefore, it is important for novice craftsmen and those who want to supervise the work of installers to understand why a stand profile for windows is needed and how to install it correctly.
Advantages
The starting profile for PVC windows has several obvious advantages:
- Ability to resist ultraviolet radiation. The profile does not fade even for ten years.
- The material is durable, looks good, and can fit into any interior without standing out.
- Suitable for use both indoors and from the facade.
- Moisture resistant.
- The chalk content in the composition is minimal.
- The semicircular end of the tail allows you to lay the profile on the most uneven wall.
- Hides wall imperfections, levels slopes without the use of other materials.
- The plank can be safely cut, no chips or cracks will appear on it.
- Installation is carried out independently; this does not require special skills.
- No glue is used.
Why do you need a support profile for plastic windows?
The architectural features of modern and old buildings are such that in the area of the lower border of the window, air is pumped under the external tides. In Soviet times, they combated this by placing heating radiators directly under the windows. Now they are often trying to remove them from prominent places, so special attention should be paid to the window sill area and eliminate the possibility of cold bridges appearing there. To solve this problem, a stand profile is installed.
The presence of internal air chambers improves the thermal insulation of the window, and the design of the strip makes it easier to solve several issues at once.
Simplification of fastening of ebb and window sill
There is no need to drill holes directly in the window frame, which, by the way, is prohibited by manufacturers. This can lead not only to water getting inside the frame profile, but also to the appearance of cracks on the frame.
There are other ways to attach these window elements, for example, by placing a window sill under the frame and screwing the ebb to its outer part facing the street. Also, the drainage and window sill can be installed in special grooves, but there are some nuances and difficulties with the placement of the pads when installing the window block, clearing the foam seam, etc. With a stand strip, the process is greatly simplified.
Professionals recommend mounting the external aluminum window sill on a special profile equipped with a “cap”. It will facilitate installation and protect against leaking water.
Improved thermal insulation
It is impossible to properly insulate the seam at the junction of the window frame using polyurethane foam alone, so a support strip is needed.
For high-quality thermal insulation, it is recommended to choose a product with at least 2 air chambers and a wall thickness of 2 mm or more. For regions with cold winters, the best option is 3 cameras. A profile that is too narrow and thin will become the weakest point of the entire structure.
Practice shows that the stand itself, even with 3 chambers, does not provide adequate thermal insulation. Additional insulation and sealing are required, which will be discussed below.
Sizes and manufacturers
The standard length of the window sill profile is 6 meters. But other sizes may vary depending on the model and manufacturer.
As a rule, the width ranges from 2 to 4 cm, the height is 2–3 cm.
The largest manufacturers of plastic windows complete their products with supplied profiles. So the need to purchase them separately usually arises in two cases:
- in case of loss or breakage of a part;
- when the product included in the kit is not satisfactory in terms of characteristics, for example, the number of cameras.
The most common models on the Russian market:
- KBE. For the plastic window system, this company produces profile models 343, 342 and 342R, as well as 142 and Expert.
- Rehau. The Rehau profile model 561013 and 561570 is widely used. It consists of 5 independent chambers - thermal modules. This German company also offers modifications Blitz and Delight.
- Veka. Produces Softline and Euroline models.
The window sill profiles of the following companies have proven themselves well:
Products of the Russian brands Brusbox and Novotex look more attractive in price than their Western counterparts, but cannot always compare with them in quality.
Profile clip 3080 REV (Veka, Montblanc, Whs) white 5.8 m
| Trademark: | Bauset |
| Length: | 5800 mm |
| Shelf width: | 18 mm |
| Product type: | Starter profile clips |
| Color: | White |
| Weight: | 0.800 kg |
REV 3080 profile clips are used as auxiliary and main guides when finishing window slopes.
• Made from high-quality PVC • Gives rigidity to the slope system and allows for complete professional installation of the slope system • Matches the groove of the frame profile of the window block • Used for window profiles: VEKA, Montblanc, WHS • Light and easy to use, does not require specific skills
Dimensions: Length: 5,800 mm
Color palette: White - high quality extrusion
Fastening: Snaps into the groove of the frame profile before installing the window unit in the opening.
The TBM company offers free delivery of goods. We deliver goods on time in cities of Russia and CIS countries.
Conditions for free delivery
Retail purchases for Moscow and Moscow Region:
- Free delivery within the city of Moscow and the Moscow region
is carried out for orders worth at least
3,000
rubles daily from Monday to Saturday.
Wholesale purchases for Moscow and Moscow Region:
- Free delivery within the city of Moscow and the Moscow region
is carried out for orders worth at least
8,000
rubles daily from Monday to Saturday
Retail and wholesale purchases for regions:
- Free delivery to the Client’s address in the Tver, Vladimir, Ryazan, Kaluga, Smolensk, Bryansk regions and in the city of Orel is carried out for an order amount of at least 15,000 rubles, in the Tula region - at least 6,000 rubles, in accordance with the delivery schedule (see . in the table below). If the order amount is less than 15,000 rubles (6,000 rubles for the Tula region), free delivery is carried out in accordance with the delivery schedule to the pickup point in the region (see the table below).
- One-time free unscheduled delivery to the Client’s address is carried out in the Tver, Vladimir, Ryazan, Tula, Kaluga, Smolensk, Bryansk regions and in Orel from Monday to Saturday with an order amount of at least 600,000 rubles and a written request from the Client for an unscheduled delivery delivery.
Installation
There are 2 ways to install a window sill profile.
Method No. 1
With this option, the window sill strip is installed first, and then the frame.
- A piece of the required size is cut.
- It is placed in the opening and leveled using a building level.
- A preliminary fitting of the window frame is done. If there is a gap between it and the top of the opening, it can be eliminated by raising the support bar. To do this, you can place pieces of timber under it.
- The space between the bar and the opening is filled with polyurethane foam.
Mr. Build recommends that to prevent the “bare” bottom profile from becoming a weak point of the entire structure in terms of freezing, it must be additionally insulated. To do this, extruded polystyrene foam, cross-linked polyethylene or other insulation in the form of a bar is inserted into one of its chambers.
Method number 2
Experienced professionals do things differently:
- Detach the support strip from the frame.
- Insulation is placed in the profile chamber.
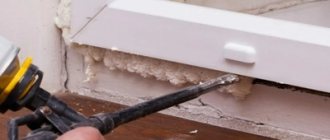
- Glue sealing tape to the bottom of the frame or apply mounting foam to the joint, as shown in the photo. You can use both at the same time.
Let’s assume an option using cross-linked polyethylene, which is located not in the chamber, but at the junction of the bar and the frame. But at least somewhere there must be insulation!
- The window block is installed together with the bottom profile.
Mr. Build recommends the second installation option: it is guaranteed to prevent freezing of the joint and the formation of cold bridges in the window sill area.
The window sill profile will ensure strong fastening of additional elements of the window block, and its high-quality installation will provide thermal insulation. The video below shows how to achieve 100% efficiency during its installation and not leave a single loophole for the cold, using EPS insulation, polyurethane foam and sealant.
(votes: 4 , average rating: 3.00 out of 5)
What is required for finishing
The starting profile is the main component. If the window is standard, you will need 6 meters (the fact is that the panels are sold in lengths of 3 and 6 m). In addition, you will need a drill or screwdriver, as well as metal cuts.
The F-profile is attached using liquid nails. Before its installation, a starting profile is attached. This is easy if the windows are level. Pay attention to the joints: they must be cut to fit exactly together. You need to start work from the side slopes. Insulation can be placed between the wall and the profile.
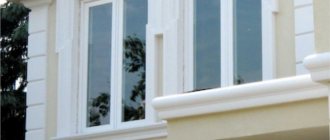
Correct installation of slopes on windows
Installed new plastic windows are not yet a fully completed job. In order for the product to look more aesthetically pleasing and harmonious, one more operation is necessary, namely the installation of slopes on the windows. Beauty and aesthetics are not the least advantage of slopes. They can reduce heat loss by up to 40% and reliably protect the mounting part of the window from dust, moisture and other negative factors. They can also serve as additional sound insulation.
Diagram of a window with slopes.
List of tools and materials.
- screwdriver;
- circular saw or electric jigsaw;
- measuring tape and pencil;
- building level;
- hammer drill or drill;
- metal scissors (or stationery knife);
- plastic strip 8 mm;
- starting profile;
- finishing profile;
- wooden slats 20x40 mm;
- industrial polyurethane foam and gun.
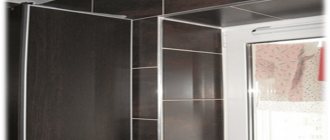
Installation diagram of the internal slope.
Slopes are internal and external. The material used for production is also varied. Plaster slopes, which are made with cement mixtures, are no longer used anywhere. This is due to their impracticality, low thermal conductivity, long finishing times and the need for annual maintenance. Slopes made of plasterboard are more durable, retain heat much better and are not much different from plastic in terms of ease of installation. But drywall is afraid of moisture, therefore, for those who want to “set it and forget it,” plastic slopes are the ideal solution. The undeniable advantages of plastic: durability, heat and noise insulation, ease of maintenance. Slopes can be either hollow or filled with mineral wool, which has additional insulating properties.
Ready solution
The F-shaped profile for slopes is a convenient solution for cladding. It creates a perfectly flat surface, free of imperfections, protects the opening from moisture and sunlight, as well as wind, dust, and other mechanical influences.
The starting profile is attached to a plastic window without the use of glue. The design not only helps to make the slopes visually attractive, but is also perfect for places where different materials meet. The starting profile is most often mounted in this way: one side of it touches the wall, the other touches the plastic structure. If the size of the material does not correspond to the required parameter, it can be cut using a stationery knife; for the same purpose, a grinder or a metal file is sometimes used.
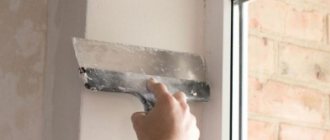
Preparatory work
First of all, we prepare the work surface; we need to remove excess foam and foreign objects. Then it is necessary to secure the guide rails along the inner perimeter of the window opening. They are attached to the wall with long screws. Before final fastening, the slats must be leveled both horizontally and vertically. This is done using a building level, placing chips, plates or wedges in the right places. This design will give the plastic strips the necessary rigidity and ensure correct installation of the slopes in level.
Tools for installing window slopes.
Next, along the perimeter of the installed window, except for the bottom side where the window sill is, you need to attach a starting profile. This is a plastic strip in the shape of the letter “P”; the slope itself will be inserted into it. It is important to note that the guide needs to be fastened with the high side towards the wall and the low side towards the opening. It is screwed using a screwdriver through the groove, directly to the window, using small screws (“bugs”) in increments of 150 - 200 mm. The tip of these screws is made in the form of a drill and there is no need to make preliminary holes. The joints of the starting profile will need to be trimmed in such a way that the sheet being installed does not touch its vertical protrusions; it can be cut quite easily with metal scissors.
Features of application
Finding out the desired profile is quite simple; it looks like the Latin letter “F”. The material is fixed using special plates that are fixed in its grooves. The starting profile for slopes has two important functions:
- Decorates the ends of windows, giving them a decorative look.
- Levels the surface without the use of complex structures and plaster.
Related article: How to beautifully hang curtains on windows
Installation of slopes
The top panel is installed first. To cut a piece of the right size, you need to carefully measure everything. The internal and external length of the segment and its width are measured. When applying markings, you must make sure that exactly the side of the plastic along which the cut was made will be inserted into the profile. Cut with a circular saw or jigsaw according to the markings. If you don't have either, you can use a fine-toothed hacksaw. We install the finished panel in the starting profile. The other edge of the sheet is attached with self-tapping screws to the sheathing slats. In order not to spoil the appearance, screws should be screwed at an angle into the top layer of the plastic panel in increments of 30-40 mm. The side panels are attached in the same way as the top panels and are also screwed to the slats.
Outer slope diagram.
When the panel is inserted into the guide, it must be moved slightly inside the window. The resulting space must be filled with industrial foam. You should start from the window itself, gradually moving forward and reducing the intensity of foaming. In addition to additional rigidity, the slope will be warmer, since the flow of cold air from the window will be reduced. You should only use industrial foam; it has a lower expansion coefficient, which will prevent the slope from bending from the inside.
The final stage will be the installation of the final profile, the platband. Plastic strip in the shape of the letter “F”. It is decorative in nature and also gives additional rigidity to the entire structure. We measure and cut the profile to the required length. The profiles are joined to each other at an angle of 45°. In those places where the profile will rest on the screws, it is necessary to make an incision on the inner longitudinal plate and remove the unnecessary part. The F-profile is tightly installed at the end of the slope and securely fixed in it. All joints created during installation must be treated with white sealant, and the excess must be removed with a rubber spatula or a piece of plastic.
External slopes
Finishing of external slopes is often carried out at heights (multi-storey buildings).
Plaster is used for this. Such slopes are made by the window installers themselves before inserting a double-glazed window. The good thing about this method is that the outer side of the opening is not wide and it can be made quite quickly using gypsum mixtures with the addition of glue. It is important that the composition covers the window itself by 3-5 mm; this will prevent heat loss and moisture penetration.
Rarely does a 2nd coat need to be applied. As a rule, a slope made of gypsum plaster adheres perfectly to the wall with a layer of up to 50 mm. If the aesthetic component is not the least important, plastic corners come to the rescue. They are attached to the window frame with double-sided tape, and to the wall with silicone sealant. The corner reliably hides the installation seams of the window and protects against harmful atmospheric influences.
When the window is not at a height (private house, 1st floor) or opens onto a balcony, there are much more variations. The most common option is to make a slope similar to the internal one from plastic panels. The best way is to finish the window with metal slopes. Sheets of galvanized iron are measured and bent into a “Z” shape, then attached to the window frame. A sound-absorbing layer of rubber is first glued to the inside, which becomes a tangible advantage during rain. Next, all places where the sheets adjoin the walls are treated with silicone-based sealant, and the seams and joints of the sheets are treated with sealant to match the color of the slope.
Slopes, regardless of the type of materials used, are designed to protect all mounting connections and seams on the windows. High-quality installed slopes will protect from cold, noise, dust, rain, snow and other atmospheric phenomena. They can give a beautiful look to even the most inconspicuous window. There are no big difficulties in installation either. Using recommendations and instructions, anyone can install them themselves, saving a good amount of money. But in order for the slopes to perform all the duties assigned to them efficiently, it is best to entrust such work to a professional team.
Selecting window fasteners
Fastening elements used in the installation of PVC structures must meet the following requirements:
- Ensuring rigid fixation of the plastic window in the opening , taking into account wind and shock loads. Taking into account the impact of wind is especially important when installing blocks on the upper floors of buildings. Impact loads on the structure are most significant in large opening systems.
- Compensation of temperature loads arising as a result of seasonal changes. For example, in winter the profile bends into the room (1-2 mm per linear meter), therefore, the fastening should allow the structure to move by this amount.
What determines the choice of fasteners?
When choosing a fastener, first of all, they look at what the opening in which it is planned to install a plastic window is made of. Openings are constructed from brick, concrete, decorative stone, wood, metal, cinder block, shell rock or light porous materials (foam concrete, aerated concrete and others).
The second important factor is the type of structure and technical features of the installation. Balconies, loggias, entrance doors, hallways and windows are installed from PVC profiles.
Competent selection
When purchasing material, first of all, pay attention to the technical parameters. But, as a rule, all sizes are standard. Therefore, it is difficult to make a mistake when choosing. The exception is the use of custom-made cladding panels. In this case, it is necessary to check that their ends fit well into the grooves of the profile.
Types of profiles for PVC panels Source 100panel.ru
Fasteners for PVC structures
Plastic structures are installed using anchors, self-tapping screws (in some cases with dowels) or anchor plates.
Anchors
This type of fastening is available in two versions: a classic anchor and an anchor for hollow materials.
- Classic anchor. Consists of an outer galvanized sleeve, a Phillips screw and a bushing. The principle of operation is as follows: initially the screw and part of the sleeve screwed onto it are inside the sleeve, which expands when the screw rotates in a certain direction, thus fixing the anchor in the seat. A regular anchor is great for fastening in dense materials (brick, concrete, cinder block).
- For hollow materials. In general, this anchor is similar to the classic one - the differences are in the design of the sleeve and the sleeve, which now does not expand the sleeve, but deforms, squeezing along the axis (deformation is possible thanks to special slots). When twisted, part of the anchor significantly increases in diameter, which allows it to be fixed in loose environments. In dense materials, such fasteners also hold up well.
Finishing methods
There are several ways to tidy up your window. These may be the following options:
- Finishing with plaster. This method is quite old. Its main disadvantage is the complexity of the work. Plastering is time-consuming and requires careful cleaning of the area after finishing. When a house shrinks, it may crack.
- Application of drywall. This option is not bad, but it is only suitable for interior work. The room must be dry and warm, otherwise the sheet of drywall will begin to collapse.
- PVC profile for slopes is the best option. It is not afraid of moisture, temperature changes, is easy to install, and can be used both outside and indoors. This is an excellent solution for plastic windows, as it matches them perfectly in terms of material; the PVC F profile for slopes is very easy to install. It is quite possible to do this yourself. With other materials, for example, wood, the profile may not look so harmonious, although you can order wood lamination, and the differences will not be noticeable.
PVC profiles for slopes
How to fasten plastic windows?
The choice of fasteners largely depends on the material from which the opening is made. We will consider below which fastening is most preferable for common types of buildings.
In a wooden or frame house
The best fasteners for plastic windows in wooden structures are anchor plates. The first and most compelling reason for this is the deformation processes to which wood is susceptible depending on changes in ambient temperature and humidity. This is especially true for log houses, even if the house has been allowed to stand.
If the block is fixed with self-tapping screws through the frame, there is a high probability of vertical shrinkage of the opening, which will cause the fasteners screwed into the lower and upper profile to be squeezed out. And it’s good if these are opening sections, since the beginning of extrusion will be visually noticeable. In blind blocks, the problem will only become apparent when the fasteners enter the glass unit.
Installation in frame structures should also be performed on plates. In some cases, the sidewalls of the structure are secured with self-tapping screws through the profile.
Video instruction:
Into concrete
Drilling high-quality concrete (lintels of window and door openings) with a ten-millimeter drill for an anchor is not an easy task. For such situations, it is better to use plates, which can be fixed using self-tapping screws for a 6mm dowel.
In conventional panel high-rise buildings, concrete is more amenable to drilling, and in most cases, anchoring does not cause any particular difficulties. Regarding the installation technical conditions mentioned above, there are a number of points that require special attention.
When glazing balconies or loggias, the structure must be placed almost flush with the outer part of the opening. Anchoring in such a situation is quite dangerous: the edge of the concrete floor or wall may be destroyed. Mounting to plates in such cases is the only correct option.
To the brick wall
Perhaps the simplest installation, but with some caveats. Unpleasant moments arise if the opening is partially destroyed or poor quality brick was used for masonry. In addition, drilling for an anchor in place can be complicated by the displacement of the drill when it hits a masonry joint. Therefore, it is necessary to clearly see the drilling location in order to make a hole in the middle of the brick.
Using plates makes installation a little easier because if a plate hits a seam, it can always be turned slightly. The quarter-snap anchor plates simply slide into a comfortable position.
Most often, installers combine the type of fastener: the sidewalls of blind sections can be safely fastened through the profile with self-tapping screws (6mm dowel and press washer of suitable length), sections with opening doors - a 10mm anchor. Top/bottom - either plates or no fasteners at all, only foam and spacers.
Combined fastening: top and bottom with plates, side with self-tapping screws for concrete
To aerated concrete
There are only two correct options for fastening to porous materials (foam concrete, aerated concrete and the like):
- Ten-millimeter anchor of maximum length (202 mm). The traditional method of fixation is through the profile.
- It is more preferable to fasten with anchor plates. The plate is attached to the profile as usual: either screwed with a screw or snapped into a groove. The other side is fixed with a regular self-tapping screw, but through a special dowel for aerated concrete. For successful installation in this way, you will need a hex key or bit to screw the dowel into the seat.
Besides these two methods, there is another one, but it is difficult to call it correct. Nevertheless, it is actively used by a certain category of installers. The fact is that foam concrete is a fairly loose material, and self-tapping screws can be screwed into it without drilling. This makes it tempting to fasten the blocks with screws without any dowels. Disadvantage: you cannot re-tighten the screw into the same place; low quality of fastening under axial loads on the screw.
Video instruction:
To metal structures
Depending on the design of the opening, the window is attached either to metal screws, or, which happens much less frequently, to anchor plates. The installation process depends on the thickness of the metal to which the block must be secured. A square pipe with a wall thickness of 2 mm, which is common on the construction market, is attached with a press washer and a drill through a pre-drilled profile. If the metal is thicker and a self-tapping drill is not enough for successful drilling, a hole in the opening will have to be made before tightening the press washer.
Types of self-tapping screws for drywall
Gyprock is a common method of covering walls and ceilings, leveling them, laying insulation, as well as constructing suspended structures or podiums. There are different ways to attach the material to the bases, but the most reliable of them is installation with drywall screws.
Table of types of self-tapping screws for gypsum boards
A self-tapping screw is a fastening element for which it is not necessary to pre-drill the base - the presence of a pointed end and applied threads allows the part to independently penetrate into various surfaces.
Important! It is necessary to choose the strongest products, since not only the need for repeated repairs, but also the life and health of the living people depends on the reliability of the fastening.
In the following table you can see the possible sizes of this type of screws, how many batches are measured, and how much they cost:
| Parameters, mm | Packaging, kg | Approximate price, rub |
| 3,5*16 | 1 | 155 |
| 3,5*19 | 1 | 158 |
| 3,5*25 | 1 | 184 |
| 3,5*32 | 1 | 233 |
| 3,5*35 | 1 | 244 |
| 3,5*41 | 1 | 287 |
| 3,5*45 | 1 | 315 |
| 3,5*51 | 1 | 357 |
| 3,5*55 | 1 | 616 |
| 3,8*25 | 1 | 626 |
| 4,2*65 | 1 | 629 |
| 4,2*70 | 1 | 684 |
| 4,2*75 | 1 | 782 |
| 4,2*90 | 1 | 1109 |
| 4,8*95 | 1 | 1129 |
| 4,8*100 | 1 | 1211 |
The presence of a thread at the screw head indicates what type of screwdriver or screwdriver can be used for installation work. The use of phosphate-coated products allows for tight fixation of the sheathing to the wooden frame.
Self-tapping screws for drywall may differ in color, size, type of thread, head size, presence of dowels, purpose, type of coating, tip.
GKL metal self-tapping screws
For installation of drywall to a metal frame, products with or without a drill can be used. The choice is made according to the quality of the metal profile used. For example, the absence of a drill does not in any way interfere with the installation of hangers, but will become an additional obstacle when fastening through a double profile.