What are liquid nails
Working with cement is sometimes labor-intensive: you need to mix the solution and not always in small portions, during the work a large amount of dust is generated, and cleaning takes a lot of time.
Sometimes you even have to resort to specialized construction equipment (concrete mixers).
The solution in this situation may be to use liquid nails. Their use simplifies working with tiles.
“Liquid nails are a polymer-based adhesive solution with the addition of chalk, white clay, and fillers for leveling porous surfaces of bases.
It is placed in a special tube, which is convenient for use in construction guns.” Since the liquid composition is universal, it can be used to glue completely different textures. Such as ceramics, glass, natural and artificial stone.
When hardened, it forms a strong connection that does not lose its properties for a long time. The color range can be varied, but the following shades can be found on wide sale:
- white;
- grey;
- brown;
- transparent and translucent;
- yellow;
- black.
It is preferable to use white nails for work, and use a transparent liquid nail composition to seal plumbing products, since its strength is reduced.
What to do if a tile falls off
Due to various influences and time, sometimes individual slabs can fall off the wall. You can restore the finish by following simple steps:
- Carefully remove the old layer of glue so as not to touch the neighboring ones;
- A new layer of adhesive is applied to the wall;
- The plate is installed in place, you will need to ensure its fixation;
- After 7 days it will be possible to grout the joint.
The plate is installed in place; it will need to be secured.
Laying tiles is a popular finishing method that comes after wallpapering. Previously, it was necessary to use only cement compounds, which produce strong dirt. Now you can carry out the work more conveniently by choosing special liquid nails, which are easy to work with.
Types of glue
Depending on the properties and liquid composition of nails, the following types of adhesives can be found on sale:
- Acrylic. They are based on acrylic in the form of a water emulsion. They are safe, non-toxic and completely odorless. Can be used indoors without harm to humans.
- Neoprene. This type, on the contrary, is unsafe for health, since it is based on polymer components and organic solvents. When using them, do not forget about protective equipment and ventilate the room very carefully. However, their adhesion, compared to acrylic ones, is higher. They are better suited for gluing tiles and other glossy and smooth materials because they do not lose their properties due to changes in temperature and humidity.
What it is
This is a special construction adhesive. The composition is made on the basis of synthetic rubber with the addition of polymers. The substance provides sufficiently high strength and stability after drying.
At first, for plasticity, the composition contained special clay mined in the USA. Later it was replaced with calcium carbonate (chalk). As a result, the quality of the products decreased, and cheaper goods appeared on the market.
Toluene and acetone are added to nails, which have a strong suffocating odor and are extremely toxic and harmful to humans. Later, these components were excluded from the composition and water-based glue began to be produced.
Liquid nails for tiles are produced in two types:
- The basis of the first type of composition is neoprene - an organic solvent. Neoprene liquid nails have a pungent odor that stays in the room for several days.
- Acrylic water-based nails are water-based. They are completely harmless, but are susceptible to moisture and temperature. Used for gluing only porous materials.
Depending on the ratio of components, a line is produced for use only in dry rooms. They produce adhesive mixtures that are waterproof and resistant to fungi, for designated surfaces, with increased strength. All types differ in drying and setting time.
All the pros and cons
The positive characteristics of nails include:
- Compared to tile adhesive or mortar, they are more resistant to moisture.
- They have high strength and fastening force.
- They are the result of a combination of chemicals, which makes the composition resistant to fungi and rust. Doesn't rot.
- To operate, you only need a special gun, which simplifies the process of use
.
Liquid tile adhesive also has a number of disadvantages:
- The setting time is 10 minutes, which requires quick installation of the elements.
- They have a high price compared to tile mixtures or mortar.
- The volume of the tube is small, which causes inconvenience with large volumes of cladding, especially when laying floor tiles.
Advantages and disadvantages
The popularity of these types of nails is due to the ability to use them not only for work in the bathroom, but also in the kitchen. Let us note a number of advantages:
- Water resistance. The polymers included in the “nails” are moisture resistant. The joining seam is not subject to deformation even in direct contact with water.
- Strength. When dry, a durable layer is formed that connects the tile material and the base.
- Immutability of properties. Cement and gypsum mixtures lose their bonding properties over time. Nails have these properties unchanged.
- High adhesion. The ability to withstand weights of up to 80 kg/m2 or more makes it possible to attach large tiles and porcelain stoneware to walls.
- Resistance to negative influences. Not subject to rotting, destruction and mold. Unlike metal nails, they do not corrode.
- Ease of use. Use a nail gun to apply nails. This will facilitate, speed up the process and make the application quite accurate.
- Convenience. Since the nails are completely ready for use, they do not need to be prepared in special ways: dilute them, maintain proportions, or use a special container.
- Purity. The workspace remains clean and dry compared to cement and gypsum mixtures.
Despite the large number of advantages, we note some minor disadvantages. So, due to the rapid fastening, there is practically no time to adjust the connection. The glue sets within 5-10 minutes, so installation should be done quickly and evenly.
And to correct large masonry flaws, experience will be required. “The cost of glue is significantly higher compared to cement mixtures.
It should be noted that if you use only these nails to renovate the entire bathroom, the costs will be significant.
Since “nails” in the liquid version are sold in volumes of only 300-500 milliliters, you will have to overpay for packaging.”
How to use liquid nails: complete instructions
Regardless of the type of product, it is a viscous mass that is distributed over the surface. There are two ways to do this. Let's look at both in detail.
We use a construction gun
This is the name of a special device into which a tube with an adhesive mixture is inserted. The purpose of the tool is to ensure uniform, continuous application of paste to the base. Depending on the method of applying pressure to the paste, there are three types of mounting guns:
- pneumatic;
- electrical;
- mechanical.
Instagram mironova_m_olga
It is most convenient to apply glue using a special gun. It is important to ensure uniform, continuous application of the paste onto the substrate.
In everyday life, where the volume of work is small, mechanical equipment is used. The solution is supplied by pressing the piston with your hand. When working with such a tool, you need to make sure that you press the piston evenly. Otherwise, the glue layer will turn out to be of different thickness. It is also important to install the tube correctly in the gun. This is done in the following sequence:
- We press the locking lever located on the body of the device.
- We move the rod holding the cartridge all the way back.
- Insert the container into the base of the tool.
- We fix it in place with a locking lever.
- Install the dispenser on the neck. We cut its tip at an angle of 45°.
- Press the mechanism start button several times. We do this until the mixture appears in the dispenser.
The gun is ready for use. Important point. There are three types of tools, so liquid nails in suitable packaging are selected to work with them. It can be soft or hard.
Instagram stories_3
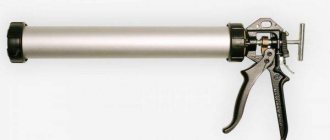
Cartridges for a construction gun. To use the device, select liquid nails in suitable packaging.
We work without special devices
For various reasons, it may not be possible to use a construction gun. You can do without it. But you need to understand that it is unlikely that you will be able to apply the drug evenly. And the process itself will become more complicated. If the packaging is hard, in the form of a tube, proceed as follows:
- We select a round flat object with a diameter suitable for the bottom of the cartridge, for example, a bottle cap. We will use it as a piston.
- We place our device on the bottom of the tube.
- Reinstall the dispenser, if required, and open it.
- We take the handle of a hammer or something similar and press a homemade piston, squeezing out a portion of the solution.
You need to act very carefully so as not to crush the walls of the cartridge. They can be made of plastic or cardboard. The last option is especially fragile. If the walls are damaged, further use of the tube is impossible. If the packaging is soft, you need to carefully make a hole through which to squeeze the paste. In this case, it is impossible to regulate how much mass comes out of the container. The seam turns out very uneven.
Instagram budni_gaechki
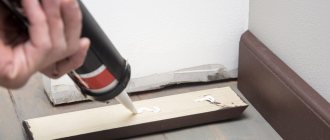
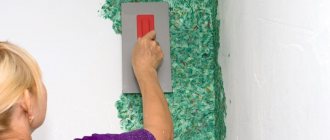
This packaging of liquid nails does not require special devices for application. If the packaging is soft, you need to carefully make a hole through which to squeeze the paste
To correctly connect surfaces with an adhesive mixture, regardless of the method of application, you need to follow the instructions:
- The parts to be glued are thoroughly cleaned of dust and dirt, and degreased with any suitable means.
- Glue is applied to the base. It is applied with a mesh, dotted, snake or continuous sheet.
- We give the elements to be processed the required position and press them firmly against each other. We hold in this state for about two to three minutes.
- Leave until completely glued. This takes on average a day.
You can find out exactly how long liquid nails take to dry by reading the information on the cartridge. Here the manufacturer indicates all the features of using this particular type of mixture. Therefore, before starting work, you should always read the recommendations and follow them. In any case, it is necessary to completely eliminate mechanical impact, especially with force until the composition is completely cured.
Instagram stroysmatom
The glue can be used outdoors, but only at positive air temperatures
Is it possible to glue tiles with liquid nails?
Due to their versatility, liquid nails are widely used in construction and finishing works.
They interact well with porous and smooth materials. With the help of them, ceramic elements can be used to decorate not only walls, but also to cover the floor.
Fine filler fills well the cavities between loosely fitting parts of both large and small weights.
As noted earlier, nails are expensive for finishing entire bathrooms and toilets, but they can be used for some renovation work.
It is not recommended to use glue on areas immersed in water. For these purposes, specialized cement compositions with enhanced water resistance are better suited.
As an option, you can use liquid nails, but be sure to treat the joints with a special moisture-repellent grout.
Rules for removing the mixture
Is it possible to remove the glue? The process of removing liquid nails is much more complicated than the application process. There are several methods:
- Using a special cleaner. Apply to the dried mixture, wash off after 10–15 minutes;
- Using a scraper, a screwdriver with a brush attachment or a drill;
- Heating the surface using a burner. The glue will become viscous and can be easily removed with a spatula. It is important to follow safety precautions (remove flammable substances).
The disadvantage of purifiers is their high price. But they are safer than the third method.
Glue selection
Adhesive for finishing a bathroom must withstand high humidity. Pay attention to the size of the tiles being connected. Porcelain tiles and large finishing elements should be mounted on nails with increased adhesion.
It is better to fasten elements that are glued to brick or concrete with a neoprene compound, and for drywall use acrylic.
When making a purchase, pay attention to the following characteristics:
- speed of drying;
- suitability for internal and external work;
- temperature regime;
- fire safety;
- smell.
Laying ceramic tiles
Installing ceramic tiles on the floor using liquid nails is not an easy task, since the work is considered painstaking and requires accuracy. But if you strictly follow the instructions for use, you should be able to do it with flying colors.
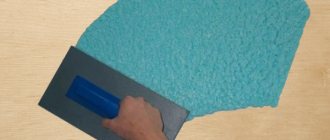
Applying liquid nails to a ceramic fragment
The adhesive is applied to the tiles according to a specific pattern. At the same time, pay attention to the dimensions and weight of the tile itself. If the tile is large and the weight is significant, then apply the adhesive composition with a snake. When light and small-sized fragments are used, the composition can be applied pointwise. This is quite enough.
Important! Depending on the method of applying the glue, tools are chosen, for example: a spatula or a gun.
Installation of tiles on the floor
Installation of the first row on the floor is carried out with emphasis on the rail. Only in this case can you achieve evenness and correct laying of the material. To increase the attachment of the material to the floor surface, you should additionally take a wooden hammer.
Experience shows that a ceramic floor will dry out within a day. During this time, it is recommended to limit walking to avoid damaging the integrity of the coating.
Important! It is allowed to grout joints on the floor surface a week after installing the tiles on the floor.
To see how work with this kind of material occurs, it is worth watching the following video:
Average score of ratings is more than 0
Share link
Comments There are no comments yet, but you could be the first...
How to properly glue tiles to a wall using liquid nails
You can apply liquid nail composition to walls and floors in different ways:
- directly on the wall;
- on the surface of the tile;
- treat both surfaces at the same time.
The latter option is more often used if the tiles are large or heavy. Before you start gluing, decide on the gluing pattern and arrange the rows so that as few elements as possible are used for connection.
Preparing the surface for work
First, prepare the base - remove grease, dust, dirt, and other remnants of previous materials. Fill all uneven areas with cement mixture. For the floor, use a cement screed. Otherwise, the ceramic tiles will lie unevenly.
Next, prime the base at least 1-2 times to improve adhesion and wait until the surface is completely dry.
Gluing tiles
When working with neoprene compound, take precautions: use a respirator and gloves.
Place the bottle of liquid nails in a special construction gun, carefully cut off the tip and make a test squeeze onto the surface. Next, perform the following steps step by step:
- apply nails to the surface in a zigzag, dotted pattern or make a grid;
- wait 20-30 seconds;
- lean the tile from bottom to top;
- fix for a few minutes (according to the instructions);
- tap large tiles lightly with a rubber hammer to ensure even fixation;
- After installation is complete, allow the glue to dry completely and set properly (about a week), and only then grind the seams.
Use spacer crosses to maintain equal spacing between tiles. Three hours after completion of work, they can be removed.
Using glue when working with various tile materials
Liquid nails are used when laying various tile materials. Thanks to its high power characteristics, the adhesive can hold a coating of up to 80 kg.
For ceramic tiles, it is better to use neoprene solution. It is more resistant to moisture. It is important to apply the glue correctly. If the material is wide, the composition is distributed over the entire surface in a “snake” pattern. For laying small parts, spot application is used. The tiles are laid out in rows. Grouting of joints is carried out after a week.
If ceramic tiles fall off during finishing, you need to remove the remaining composition. Then repeat the steps for applying nails and attach to the wall.
The mixture is suitable for attaching the material to the ceiling. When working, it is necessary to take into account the weight of the glued surface. The choice of raw materials depends on this. The composition is applied pointwise.
Laying gypsum tile material using liquid nails is not difficult. It is necessary to clean, process, level the surface. Apply the mixture using a spatula.
Consumption of liquid nails
The consumption of adhesive composition is influenced by factors such as:
- degree of surface uniformity;
- weight and material of the tiles, amount of composition distributed;
- experience and skill of a tiler.
For example, a standard cartridge produces a strip 30-35 meters long with a nozzle-nozzle thickness of approximately 2 millimeters. However, this width will not provide a proper connection. The optimal strip thickness should be 5-6 millimeters.
This is achieved by correctly cutting the tip of the balloon. In this case, there may be enough nails for 10-15 linear meters of tiles of any size.
Rules for using the solution
The tiles are laid on liquid nails in several stages:
- Preparation of the working surface. Grease, dust and dirt must be cleaned. The coating is leveled with a screed;
- Surface treatment with primer. The deep penetration composition will increase the adhesion of the tile and the mixture. Work can begin after drying;
- Taking measurements. Measurements are taken from the first row, starting with the whole product. The next row is laid, cutting off the excess. It would be more correct to put the diagram on paper and proceed to action;
- Applying glue. The composition is applied every 3-4 cm in thin strips;
- Laying process. It is necessary to remember that the mortar sets quickly (10 minutes), so we place the tiles in the correct position, and for evenness, insert spacers between the seams - plastic crosses. Laying tiles on the ceiling occurs in rows from wall to wall. Each part is pressed for 10-15 seconds.
Ease of use, high speed of work with a gun increases the popularity of such tile nails in repairs.
How to remove liquid nails
Liquid nails are quite firmly fixed to surfaces and can be very difficult to remove. But there are some tools to remove them:
- Solvents and cleaners. They are easy to find in specialized stores. They dissolve the applied layer and completely remove it after 15 minutes.
- Scraper. Using this tool (metal or plastic), dried glue can be removed by scraping it from the surface. A metal spatula will also work.
- Screwdriver. Using the brush attachment, residue can be easily removed from tiles and walls.
- Burner. You need to slightly warm up the previously applied layer to about 60 C and remove the residue using a spatula and a rag. A regular hair dryer can serve as a substitute for a burner.
How to remove dried glue
During operation, glue particles may get onto the front side of the tile. To remove them, you can use one of the following methods:
- fresh glue is wiped off with a wet sponge;
- dried glue can be removed with a special cleaner, which is sold in construction stores;
- you can wait until the liquid glue dries slightly and then scrape it off with a spatula;
- You can heat the stained area to 60 degrees, and when the glue softens, remove it with a cloth.
It is better to first try to clean the tiles using gentle methods, and only if they do not help, resort to more aggressive methods. Do not forget that even micro-scratches from a spatula become clogged with dust over time and spoil the appearance of the cladding.
Service life: how to extend
Due to their properties, the service life of liquid nails can be quite long. Let's give some more tips on using this fastening material:
- adjust the size, thickness and other parameters of the seams immediately after the work until the glue sets;
- do not allow the room temperature to drop to +10 C or lower, which may cause the properties of the adhesive to deteriorate;
- Monitor expiration dates and storage conditions, do not let them dry out.
Liquid nails for partial repairs
If your bathroom needs to replace some loose or damaged tiles, there is no better option than applying liquid nails. First, the surface is cleaned of old glue and degreased, removing all contaminants.
Remove mold and treat the wall with an antifungal compound. Remove the plaster and level the surface. “Leveling surfaces is an important stage of repair work, since without this, the tile material will either sag or become convex relative to another surface.
Liquid nails are applied in the usual way. The parts to be joined are fixed to each other, held for a couple of minutes, after which they are allowed to dry completely.”
Types of adhesive joints
To glue tiles to liquid nails, you need to know the types of glue.
There are two types of composition:
- An acrylic one was developed based on a water emulsion. When making fastenings with this connection, it is important to follow safety precautions. Non-toxicity is the main advantage. This characteristic allows it to be used in unventilated areas;
- Organic dyes are components of the neoprene mixture. The strength of the material becomes a plus. Toxicity is the main drawback, but when using protective equipment you can even work with smooth materials, plastic, glass. The room must be ventilated after completion of repairs.
By purpose they are distinguished:
- base solution (standard);
- reinforced (for heavy products);
- universal (interior and exterior decoration);
- waterproof (for rooms with high humidity);
- white (for transparent, translucent mosaic);
- special solution (resistant to frosty weather, high temperatures).
Manufacturers and cost
The cost of packaging such a product depends on the brand and country of manufacture and can vary significantly. On average, the price can vary from 80 to 450 rubles. But you can also find more expensive ones.
Let's take a look at the popular fastening products on the market:
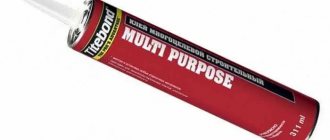
- Titebond Multi Purpose. Firmly holds various materials. The hardening period is approximately 20-30 minutes, which makes it possible for a novice master to work with it. Frost-resistant, insensitive to moisture, practically odorless.
- "Moment Installation Universal." The synthetic resins it contains are well suited for brick, metal, concrete and ceramics. Withstands heating up to +70C and cooling down to -40C. The joints are securely fixed.
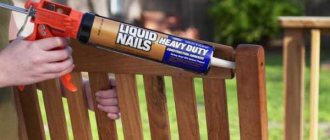
- LIQUID NAILS LN-901. Neoprene compounds based on artificial rubber are ideal for stone and tile. They are used for facade work because they are durable and can withstand significant impact loads.
- Tytan Ceramics and stone. It is based on odorless and solvent-free acrylic adhesive. Eco-friendly. Fast adhesion after application. Possibility to paint immediately after drying.
Once again, we note strength as the main advantage of the adhesive in question, which allows you to work with many types of tile material. No additional care is required, but they are durable and reliable in operation.