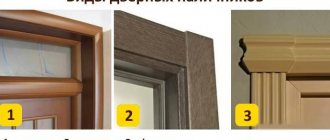
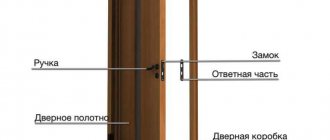
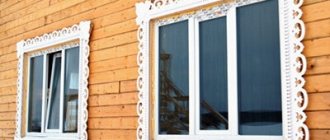
Platbands are decorative elements used in finishing door and window openings. They are used to hide cracks. Thereby they serve to improve the appearance of doors and windows. There are two types of platbands: external and internal. In this article we will talk about platbands for interior doors. They may vary in material, color, shape and method of fastening.
Types of platbands
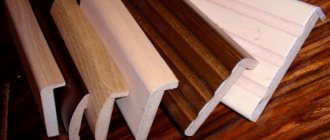
In order to make it easier to choose platbands, or as they are also called - strips, let's figure out what they generally are. The first thing they look at is the material from which they are made:
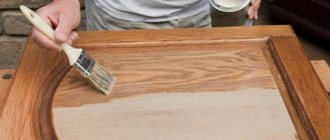
Wooden planks are considered the most versatile, as they can be painted in the desired color. They are attached to liquid nails if the wall is smooth, or to nails without heads.
Laminated platbands made of MDF (fine fraction) are difficult to distinguish from wooden ones. But unlike the previous ones, you won’t be able to paint them, so they choose from ready-made colors. For MDF, any of the possible mounting options. When attaching to nails without heads, it is necessary to drill blind holes in advance.
PVC products are usually used with plastic doors. They are attached either with glue or with a perforated mounting profile.
Metal products are undoubtedly the most reliable and durable. The most common ones are steel and aluminum. However, this type of platbands has a specific appearance and is mainly used on entrance doors.
There are also gypsum, ceramic and polyurethane platbands. But they have an unusual appearance and are rarely used in ordinary residential apartments and houses. They are also not durable.
In addition to the material, platbands differ in the method of fastening: overhead and telescopic. The latter have their own grooves for fastening.
Installation of doors in aerated concrete and in a wooden house
Stages of installing doors in aerated concrete
To carry out such work, it is necessary to prepare welding and buy a metal corner with a shelf width of 3.5 to 5 centimeters (the choice depends on the weight of the door and the expected loads).
Next, it is necessary to trim the metal corner so that when welding the joints of individual parts, it can cover the doorway along the entire perimeter on both sides. To strengthen the two frames together, it is necessary to weld the embedded parts, and the shank must have a thickness of at least 3 millimeters and a width of 5 centimeters. These elements are placed at the places where the door frame is attached. The door frame is fixed using screws on previously installed lintels.
For reliable fastening, you should use 12-centimeter self-tapping screws, which are screwed into each of the tires. It should be noted that the door will also be attached in these places, so the screws should under no circumstances overlap each other. At the next stage of installing doors in aerated concrete, use a building level to align the door frame, and then fix its position using wooden wedges.
The final fixation of the door leaf is carried out using screws up to 15 centimeters long or dowels.
After this, it is necessary to coat all the cracks with sealant or blow out with foam.
Installation of an iron door in a wooden house
You can install a new front door with your own hands in just three steps:
- dismantling the old structure;
- doorway preparation;
- installation of an iron door.
The old entrance doors to the apartment are dismantled like this (mostly wooden):
- Provided that the door leaf worked on collapsible hinges, we pry it open with a crowbar or other lever. This way the panel will rise and jump off the loop. Provided that the hinges are not dismountable: you need to unscrew the screws that hold the door in the frame using a screwdriver or screwdriver.
- It is not difficult to dismantle an empty box with your own hands if it is made of wood. To do this, fasteners (visible) are unscrewed: screws, anchors, nails are pulled out. If the box is firmly held in the opening and cannot be removed, its side posts are sawed off and torn off with a crowbar. After which the lower and upper parts can be removed without any problems.
- If a metal box is being dismantled or a wooden box is attached to the opening with anchors, then it is easier to saw them off with a grinder, just like metal posts.
- Next, the opening is cleaned of old insulation, remnants of plaster, protruding fasteners and other things. Provided that the doorway for the new door has been previously correctly measured, its size should exceed the perimeter of the frame by a couple of centimeters. This is necessary so that there is enough space to align it in the opening. If you made a mistake in measurements earlier, you will have to work hard to widen the passage with a grinder with a circle on the stone. If the opening is too wide, it can be narrowed by additionally applying cement mortar.
A metal frame can be attached to a doorway in two ways:
through technological holes in the box profile;
using special mounting plates.
We put the input structure:
A door frame without a leaf is installed in the opening. Wood wedges are placed under it, which are necessary for fixing, adjusting its position and to ensure technological clearances.
- Having adjusted the position of the box, they begin to drill holes in the wall through the previously made holes in the profile: 15-20 cm deep. Anchors are inserted into the drilled sockets, and the position of the racks is checked again. When positioned correctly, the anchors are twisted and covered with decorative elements matching the color of the box.
- Next, the door leaf is hung on pre-lubricated hinges and all the fittings are attached. The canvas is covered, and the gaps around the perimeter of the rack are checked, which should not exceed 4 mm.
- The functioning of all latches and locks is checked. Inaccuracies are eliminated with wedges. Holes are drilled for the second pillar, which we also secure and check for smooth movement of the door leaf and locks.
- The technological gaps between the box and the wall opening are filled with foam, which must dry for at least 24 hours. After which the remaining foam is cut off, and the surface of the wall is puttied. Installation completed.
Mounting the door block on plates is one of the most common methods and is somewhat simplified for doing the work yourself. Often, metal structures are equipped with mounting plates with prepared holes for fasteners, which are welded directly to the frame.
Types of fastening
Before installing the trim on the workpiece, you must mark the cut angle and the desired length. Using this marking, the plank is cut with a miter saw, or, if it is not available, with a hacksaw using a miter box, which will help cut at an angle of 45 degrees. As in any other case, it is better to use a high-quality tool. This will help to avoid unnecessary irregularities, inaccuracies and, accordingly, unnecessary problems.
Flat platbands are attached at an angle of 90 degrees, wooden and MDF - at an angle of 45 degrees. Let's consider possible fixation options.
Invoices
An overlay platband is the simplest option.
It is a strip that closes the gap between the door frame and the wall in the plane of the wall. Such a casing may come off for various reasons:
- Most often, the clypeus comes off in the absence of reliable fixation. A gap may appear between it and the wall or door frame. During the installation process, an insufficient number of fasteners may have been installed or they may not be of sufficient length. In addition, it is possible that the fastening elements have become damaged during operation (for example, nails have rusted).
- Even if properly secured, the trim strip can come off if the door is slammed hard when closing or opened too hard, as well as if there is mechanical impact on the door (impacts). The casing is not designed for significant mechanical loads and vibration.
- Deformation of the plank. It can occur when the material swells from excessive moisture or shrinks when dried.
- Insufficiently reliable fastening of the door frame or extension. With even small displacements (oscillations), the overlay strip gradually loses its bond with the wall surface, forming a gap.
Depending on the causes and size of the gap, measures are taken to replace or secure the overhead trim.
Finishing nails
Wooden and MDF trims are easier and better to fasten with nails with flat heads. Then, if necessary, they can be easily dismantled. And so that the platbands do not dismantle by themselves and hold tightly, the nail should be driven into the door frame at least 20 - 25 mm. It is better to make the distance between the nails the same. To simplify the task, you can pre-drill through holes in the lantern. At the end, so that the nails do not disturb the appearance, they can be painted over with a wax pencil.
You can also drive nails into the door frame first. Then use pliers to remove their caps. The length of the visible part of the nail without the head should not be greater than the thickness of the strip. Next, having placed the platband against the nails, a wooden beam wrapped in fabric is applied to the plank at the location of these nails, and with a few light blows of a hammer the plank is pressed onto the nail.
Elimination of defects
An unpleasant moment is the visibility of the nail head or screw. They are slightly recessed into the body of the cash, and sealed on top with sealant of the desired color. You can use a wax corrector.
On uneven walls, due to the curvature of wooden planks, joints diverge. During installation, the joining elements are additionally connected with a finishing nail.
Wide strips from 100 to 120 mm help to hide large defects around the door frame.
Liquid Nails
For a flawless appearance, without visible fixation elements, use a special glue - “liquid nails”. However, this method is characterized by weak fixation and difficulty in dismantling. In addition, it can only be used on perfectly smooth walls. But if you decide that this mounting method is the most suitable for you, then apply adhesive to the back side of the casing and lean it firmly against the wall. In the case of an interior door, it is enough to hold the bar in this position for about a minute.
Preparatory work
When installing platbands from the extension side, as a rule, no problems arise. But on the side of the door frame, carpenters quite often encounter a situation where the door block is either slightly recessed into the opening or protrudes outward. In this case, it is necessary to carry out work to hide these shortcomings.
The box is recessed
If the structure of the door block is recessed into the opening, and there is no way to correct the mistake by adding more, a thick platband is taken and an undercut is made in the wall under it. The work order is as follows:
- the platband is attached to the box;
- the line of the platband is marked on the wall;
- using a grinder with a cutting wheel for concrete or brick, an incision is made into the wall along the drawn line;
- use a chisel and hammer to knock out a recess for the platband - no need to be afraid to make the cut deeper or go beyond the line;
- a small amount of cement mortar is made (it is better to use ready-made putty);
- the knocked-out recess is lightly covered with mortar and the casing is immediately applied, as tightly as possible. Excess mortar that appears is removed first with a trowel or spatula, and then with a rag or rag;
- The casing is removed, and the solution is given time to set.
To prevent the solution from sticking to the back of the plank, it is first moistened with water.
The platbands will look strange if the box is slightly recessed into the opening.
The box protrudes
If the box protrudes beyond the wall, a plane and wooden trim will help. The technology is simple: the size of the box is marked on the back side, after which a quarter is selected from the back side of the casing using a plane. You need to work slowly, constantly monitoring the process of selecting a recess for the box.
Attachment by beaks
This one is different in that it does not use any of the above mountings. The casing itself is equipped with a latch, shaped very similar to a beak. Hence the name. This fastener is inserted into a recess on the door frame. Thus, the fastening is not visible from the outside. But over time, the joints may collapse, and then they will need to be treated with glue.
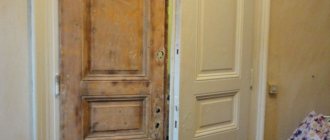
Dismantling
Removal of platbands is usually required when cash is replaced. There is no need to worry about their safety, but the work is done carefully. Taking an ax with a sharp blade and a hammer in their hands, they begin to dismantle:
- To remove the trim carefully, the interior door is placed in an open position. Positioned in the doorway, the tip of the ax is inserted in the upper corner between the bar and the frame.
- The hammer is used to hit the butt of the ax until the blade plunges under the cash.
- By pressing the handle on the ax, the bar is separated from the box. The further procedure consists of similar actions. They use an ax in a circle until the dismantling of the platbands is completed completely.
The procedure must be carried out carefully so that no dents are left on the door frame. Instead of an axe, homemade sharpened strips of durable metal or other similar devices are suitable.
Installation methods
The installation of the trim should begin from the side into which the door opens. This is explained by the fact that the hinges interfere with the fastening of the strip to the door frame. Therefore, you have to make an indent that is the same on all sides.
It happens that the door is in a corner, then the platbands are installed only on two sides. Or you can saw off half the width of the plank and install it from the side of the adjacent wall (as in the photo).
There are also cases when the platband is installed only on one side. For example, when the slopes on other sides are finished with tiles or something else.
Interior doors
As a rule, extensions are installed on the side opposite to the door hinges. But when installing interior door extensions, there may be a case when they will have to be installed on the hinge side. If so, then you need to first check whether the additions will not interfere with the opening of the door.
If, when the door is completely open, there remains a gap between its edge and the edge of the door frame equal to the thickness of the trim with a margin of 2-3 mm, there is no problem: we install the trim using any of the methods described above.
If the edge of the door is adjacent to the edge of the frame, you need to install backing boards, having first knocked down the plaster from the slopes. This should not be neglected: just 1.5 mm of “pressing” the sash to the door will eat up 10 degrees of its opening angle, not to mention the fact that the door will soon be damaged.
Read about the full cycle of installing an interior door here.
Mounting at an angle of 45
This method is suitable for curly and rounded platbands. The procedure is as follows:
Measure the height of the vertical slats from the floor. They are placed on the floor, therefore, their joints with the baseboards will be on the side. The height of the vertical elements is measured from the floor. The planks from below are placed on the floor covering, which is why the joints of the baseboards and door frames are on the side.
Then the workpiece is cut according to the markings using a miter saw, and in its absence, using a hacksaw and a miter box. The top is cut at 45 degrees on the desired side.
Now the side trims are attached no higher than halfway, so that they bend at the top.
The upper loose parts of the platbands are folded back and the upper part is placed under them. At the joints, lines are marked at an angle of 45 degrees, then the excess part is cut off. Now you can secure the platbands in all remaining places.
Do-it-yourself fastening and insertion of fittings: awnings, handles, locks
To attach the hinges to the door, mark 200 mm at the top and bottom of the end of the door leaf. We fix with a pencil the places where the canopies begin. Place the loops between the marks so that the edge of the loop bar aligns with the edge of the end of the fabric.
Having made loops in two places, we draw them along the perimeter of the canopy with a knife.
This marks the boundaries of the loop surface. It is advisable to run the knife several times and go a little deeper. When the contour of the loop is clearly marked, use a chisel to remove the top layer of covering under the canopy.
Do-it-yourself lock mortise and door hardware installation
We do this carefully so as not to damage the coating outside the perimeter of the canopy. The hinge should fit into the recess flush with the surface of the door. Then, having previously marked the holes, we fasten the canopies with “original” self-tapping screws.
We attach the hinges to the box in the same way. At the same time, we take into account that the distance from the top of the frame to the beginning of the hinge will be greater by 3 mm, and from the bottom by 10 mm (these are gaps). We recommend watching photos and videos of installing interior doors with your own hands.
Arched double doors in the living room
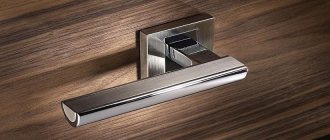
We choose a place for inserting the handle and lock. As a rule, door handles are installed at a distance of about a meter from the bottom of the door leaf. You can insert the lock a little higher or lower for your convenience.
Having stepped back the required distance from the edge, we place the lock body against the canvas. Mark where the door handles will be. Using pens and a drill, we cut out a hole slightly smaller in diameter than the handles.
On the end surface of the door we outline the perimeter of the recess for the lock.
Using feathers (feather drills), we make a recess for the lock mechanism. It should fit completely into this recess. As in the case of hinges, use a chisel to remove the layer around the perimeter of the plate covering the lock.
Massive wooden doors to TV room
When all the holes are prepared, install the handle and lock, fixing their position with screws.
In the same way, but on the box, we cut out a recess for the strike plate and make a recess for the lock tongue. Having attached the bar, we check how the latch works when closing the door. If the calculation is correct, we finally screw the striker. It’s worth watching educational photos and videos on how to attach the fittings to the doors.
Installation of plastic platbands
For plastic trims, glue is used extremely rarely, since the connection with it is not reliable. The most commonly used mounting profiles are:
- The mounting profile is cut to the size of the door frame (a little smaller if possible).
- The joints are sawed off at an angle of 45 degrees.
- The profile is fixed with self-tapping screws to the door frame. If the door is cheap (Chinese), then the mounting profile is fixed to the wall, since it will not be possible to securely tighten the screws into such a door.
- The profile is screwed from the middle in two directions. At the same time, they monitor compliance with the level.
- Then measure the height of the side parts and cut off their tops at an angle of 45 degrees. Next, the workpieces are inserted into the grooves of the vertical profiles, where they can move.
- A fastener is inserted into the cut of the planks - corner fittings. The top is measured and cut at 45 degrees on both sides. The product is connected to vertical platbands, fixed in the mounting profile.
Step-by-step installation instructions
Experts advise that before installing an interior door correctly, you should decide on additional elements, such as trim and fittings. After all, the type of trimming and further work with the installation of the canvas depend on their configuration. Therefore, before installation, you must carefully study the following instructions:
Door handle installation
In order to carry out all the work on installing handles correctly, you need to know exactly what type of this element of fittings you purchased. After all, for each type there is a certain installation technology, and it should be followed. Let's look at how different types of door handles are installed.
Installation of handle-bracket
To complete the work you will need: an electric drill, wrenches with a diameter of 10 and 13 mm and fasteners. The procedure is as follows:
- The distance from the floor to the handle should be about a meter;
- Using a drill, drill through holes 1 mm larger than the diameter of the studs;
- The nuts are screwed onto the studs and special inserts are inserted;
- Put on the bushings and install them in the hole located on the outside;
- The nuts should protrude beyond the end of the handle by 1–3 mm;
- Install the gasket, tighten the bushings, inserts and tighten everything;
- Attach the inside of the handle;
- Use a wrench to turn the plug, pulling it toward the door.
Installation of the pressure element
Let's look at how to install a latch handle on an interior door with your own hands without outside help. To do this, perform the work in the following sequence.
Mark the height of the handle and the center of the end from which the field for the latch extends. Drill holes for both elements, which are always located on the same axis. Using a chisel and hammer, knock out the platform for the face plate. Insert and secure the latch using self-tapping screws.
The decorative trim is screwed off from the handle, the latter is installed on the inside of the structure and secured to the door with screws or self-tapping screws. Screw the cover onto the base of the handle itself. The inner part of the structure is inserted into the door by 25 - 40 mm and directed towards the screw, which must necessarily fall into the groove. Then they move on to installing the lining, for which they mark the middle of the hole along the latch line, but already on the box.
To determine the installation location of the strip, lubricate the tip of the latch with toothpaste or chalk and, pressing the handle, close it with some holding, and then release it. In this case, the latch should touch the box. After the door is opened, a mark appears on it and there is a place where the bar is installed. They trace its outline, and for the “dog” they make a hole with a chisel and screw on the bar.
Knob handle installation
To learn how to correctly and correctly install this type of handle on an interior door yourself, watch the video below.
First, measure the thickness of the door leaf and mark the center of the end. Drill out a place for the latch pad. Drill a hole for the latch (2.3 cm) and for the handle (5 cm).
Next, knock out a groove for the bar and install it at the same height as the latch so that the additional tongue works properly. The inner half of the knob is disassembled: the ball and the pad are removed. Then move the square bushing to the 60 or 70 mm position. Place the latch in the groove and secure it with screws.
If you follow these simple rules, the doors will become an interior decoration and will add coziness to your home. You can learn more about how to install an interior door without outside help by watching numerous videos on our portal. If something is unclear or you lack skills, then it’s easier to turn to specialists who will not only do everything quickly and efficiently, but also help you choose high-quality doors and fittings.
Joining the platband with the plinth
Some people think that the trim at the bottom needs to be cut because the baseboard should go there. It is not right. You need to cut the baseboard itself, otherwise it doesn’t look nice. Therefore, at the very beginning of the article, we said that platbands are installed before baseboards.
Plastic skirting boards have decorative plugs that allow you to make the joint of the skirting board with the platband neat.
A 45 degree cut is made on the wooden plinth. This allows you to equalize the thickness of the plinth with the thickness of the platband.
Thus, in this article we examined the topic of platbands for interior doors. By following our tips and recommendations, you can easily choose the methods of fastening and installing the planks yourself and implement them at home.
Required set of tools, materials
Before installing decorative strips, you need to prepare everything you need. The set of tools, equipment, and consumables depends on how the installation is planned. The following materials and tools will be useful:
- miter box;
- hammer;
- screwdriver;
- jigsaw;
- roulette;
- construction square;
- chisel;
- wax and construction pencil.
Telescopic
The telescopic platband has a more complex L-shape and is attached by connecting using a tongue-and-groove system on the door frame or directly on the door frame.
It not only masks the gap, but also closes the step that occurs when the thickness of the wall exceeds the thickness of the box along with the extension. This connection system increases the reliability of the element, but the telescopic trims are also capable of moving away with the formation of cracks. Taking into account the specific design, in addition to the specified circumstances, the cause of the defect is the incorrect insertion of the edge of the platband into the groove of the additional element or door frame. Most often, the problem occurs when cutting a groove yourself. It is important that its width matches the thickness of the edge of the step of the casing. A groove that is too wide simply will not fix the platband.
No less important is the accurate calculation of the width of the side shelf of the platband - its main strip should fit snugly against the wall. This is achieved by selecting the thickness of the extension. It is best to use a special additional element that already has a groove for the platband.