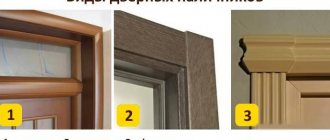
There is so little space in a small apartment that even the opening of the interior door creates inconvenience. Sliding systems help to partially solve the problem, but the canvas extending behind the partition interferes with the installation of furniture. The best option is considered to be a cassette design, which provides for the sliding door to be rolled back into the wall using a pencil case.
Application of a door built into a niche
Built-in doors are suitable for arranging the entrance to rooms and other living spaces that require saving space. In families with active children, there is a need to open and close doors frequently. For such purposes, sliding mechanisms will be more practical.
Thanks to the original design, hidden doors fit harmoniously into any modern interior. They are considered the best option for narrow corridors. If there is a niche in the hall or bedroom, doors hide built-in wardrobes and separate dressing rooms. By experimenting with a variety of materials, the door leaf can be made multifunctional, for example, used as a mirror.
In large rooms, warehouses, accordion-type systems are installed in a wide doorway. It is used as a partition to divide space into several zones. If you need to decorate both a wall and a passage, you will need several sliding panels. With this solution, all panels are moved one at a time using a cascade principle.
Sliding structures are used for glazing terraces and special seating areas. With their help, the room can easily be transformed into an open space in the warm season.
Standard equipment
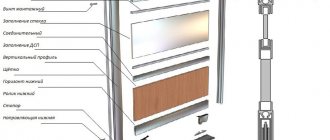
When ordering and delivery, pay attention to the completeness of the package:
- aluminum box (configuration and parameters must correspond to the specifications that you agreed upon at the time of purchase);
- door leaf (with finishing, without finishing, with or without aluminum end, all depending on your order);
- lock mechanism (usually magnetic AGB);
- hidden door hinges adjustable in 3 planes;
- hinge protection;
- seal;
- (attention!) mounting kit of angles and plates (often “lost” during delivery or on site;
- technical data sheet, instructions for use and care.
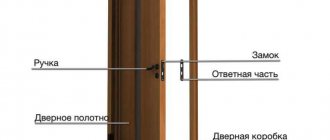
Key features and delivery set of hidden doors
Standard equipment for installing a hidden door
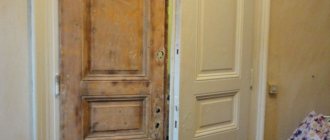
Sliding systems with pencil case
The design of hidden sliding doors with a pencil case looks like a box integrated into the wall. The rails with a roller mechanism are located in a cassette that protects the door leaf from possible mechanical damage and contamination during operation. In the open position, the sash does not take up space, which increases the usable space for arranging the room.
The thickness of the partition must correspond to the parameters of the pencil case so that the boundaries of the structure on the surface of the interior partition are not visually visible. To do this, it is necessary to take into account in advance the dimensions of the door, the thickness of the cassette racks, and provide indentations to ensure free movement of the door in the pencil case. After installation, half of the cassette is disguised under drywall.
The method of constructing the niche in which the canvas will be placed will depend on the characteristics of the wall with the opening for the door. Violating the load-bearing partitions of the building is unacceptable. In such cases, the niche needs to be completed parallel to the interior partition made of a metal or wooden frame. At the final stage, the structure is covered with sheets of plasterboard and prepared for further finishing. Wallpaper is glued to the new wall or paint is applied to match the main part of the room.
Design examples
As already mentioned in the last section, the easiest way to hide entrances in an apartment or house is by finishing the canvas to match the walls. For this, the same wallpaper, paint or other material is used.
Even laminate, slats or other wood trim are fixed to the interior fabric. The main rule in this case is to decorate the wall at the same time as the door in order to install it in a single contour.
Important! Experts usually do not recommend gluing heavy tiles or porcelain tiles onto the opening panel - this will put additional stress on the hinges and can damage them.
Additionally, you can use original decorative options: paint the wall with the door up to half the height, make chaotic strokes of paint, catching both surfaces.
Advice! It is not necessary to repeat the finishing of the walls - for high doors you can use materials for the ceiling on top and floor materials below.
The photo shows a decor option for a children's room
A convenient option for the corridor is mirrors. Secure several panels, one of which will be on the door. This way you will simultaneously hide the entrance and make the space visually larger.
If there are paintings or other decor hanging on the wall, attach it to the canvas as well. This technique will further disguise the opening and literally dissolve it in space.
Sliding door in the wall
If the partition is non-load-bearing, then it is necessary to destroy part of the wall to form a false wall with a niche. The dimensions of the niche must correspond to the parameters of the door leaf. Such designs allow you to build both single-leaf sliding doors into the wall and double-leaf ones. This installation method allows you to leave the thickness of the partition unchanged, preserving the primary area of the room.
Pros and cons of using sliding doors
Sliding mechanisms are very popular. Designs with an internal niche for a door have the following advantages compared to hinged doors:
- Sliding curtains save space in rooms of any purpose.
- Minimal risk of injury if doors are suddenly opened from the opposite side or through negligence in the dark.
- Mobile systems last longer than standard hinged mounts. The weight of the sash is evenly distributed on the rollers, ensuring a more stable and stable position of the entire frame.
- The absence of unnecessary details creates the impression of free space.
- A variety of decorative methods make it possible to experiment with style and complement the overall design of the room.
Among the disadvantages, one can highlight the considerable cost of the structure. Good quality parts and mechanisms are expensive. The main cost is buying a ready-made one or assembling it yourself, which is difficult to install without outside help. Therefore, you should add to the total amount the costs of paying specialists performing installation.
The disadvantage of mobile door systems is considered to be low sound insulation characteristics. Doors cannot function properly without gaps at the top and bottom of the door leaf. This nuance must be taken into account at the planning stage of specific zones separated by a partition. As a solution to help eliminate odors from the kitchen, a more powerful hood is used. Soundproofing brushes hide the cracks of doorways and get rid of extraneous sounds in the room.
Additional equipment
In addition to the standard configuration, there are a lot of additional options on how to improve the functional qualities of the product. These additions include:
- hidden threshold. A unique development of a door threshold that is mounted in the door leaf and is activated only when the door is closed, completely protecting you from drafts. Relevant for children's rooms, when babies like to crawl or play on the floor;
- hidden hinges with a closer. A handy feature when you like your doors closed, or for rooms where it makes sense to close the door behind you;
- lock mechanism with hidden handle. If you really decide to make invisible doors as invisible as possible. Not very familiar in everyday use, but definitely an interesting design solution;
- concealed mounting stopper. A real find when you need to prevent the door handle from hitting a nearby wall;
- electric deadbolt lock. Obviously not for home use, but for offices, hotel-type premises - a convenient addition to the standard package;
- mounting grid. Be sure to use it when finishing installation gaps. Without it, there will be trouble - the finish will crack at the joints of the wall and the door frame. It is supplied as an additional set, only because the installers do not do the finishing work, this is done by your craftsmen. Check with them if they have this mesh or if it is better for you to order it along with the doors.
For clarity, study and decide for yourself one or another additional function.
Additional equipment options for installing hidden doors
Installation of the structure
Before installing the pencil case, you need to determine the width of the door opening, which depends on the type of sliding doors. Designs with one door are usually installed in small bedrooms, kitchens and bathrooms. A block of several doors fits perfectly into spacious rooms. They consist of two combined single-leaf systems.
Stages of installation work:
- Determining the type of wall (load-bearing/non-load-bearing), checking for the presence of internal wiring and pipes.
- Selecting the type of sliding mechanism (rails at both ends or only the top type of fastening).
- Installation of the structure inside or along the partition.
- Closing the pencil case with subsequent masking of the installation area.
Important nuance! Installation of cassettes is possible only after completion of finishing work on the floor surface, taking into account the thickness of the future coating.
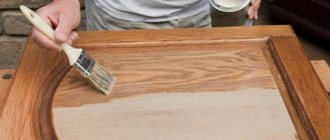
Painting an aluminum box
Additionally, you can order painting of aluminum profiles in the required color. During installation, you will have to adhere more strictly to the rules and be careful so as not to damage the coating. But such a decision is often justified if the basis is an interesting design concept.
Painting options for aluminum door frames for hidden installation
How to make a sliding door in the wall with your own hands
Using the step-by-step guide, you can make your own interior door in the wall. First you need to make the necessary calculations and display them on the drawing. Using the finished diagram, the sections of the wall to be dismantled are marked.
To correctly calculate the parameters of the pencil case, you need to select the width of the sash. The rail measurements will be equal to twice the width of the door panel. The length of the rack is determined by summing the measurements of the lintels, guides and an additional 10 cm for gaps on both sides of the sash. Standard dimensions of a pencil case: width is 2 cm larger than the panel, depth - within 8 cm.
Then they begin to prepare the profile for the false wall. If you plan to install a cassette with the removal of part of the wall, you will need a double row of supports. For fastening along the partition line, a single profile support is sufficient.
The jumpers with guides for the rails are attached first. Placing special rubber bands under the rollers helps absorb noise when the panel moves.
When all the fittings are installed, you can place the panel on the rails, attach the sash stops and check the operation of the system. The door leaf should move smoothly into and out of the pencil case. If everything is in order, the installation work is completed by finishing the exterior and closing the box.
Hidden door mechanisms are a multifunctional solution for any interior. For long-term and comfortable use, you should choose high-quality blocks. It is most convenient to order a one-piece design from a direct distributor of the factory. Self-assembly and installation requires skills in carrying out such work.
Varieties and features
All sliding systems are identical in design. They may differ in dimensions, material, design of rollers and guide rails . The dimensions adhere to standards that imply a door height of 1.9–2 m and a width of 0.6 to 1 m. For large openings, built-in double compartment doors are installed in the wall. If you need to deviate from the standards, the cassette is made to order in the required sizes.
The factory design is supplied in its entirety. The pencil case is already folded and ready for installation. When manufactured independently, the cassette is assembled from a thick board, timber, or galvanized profile. The door leaf can be adapted to any suitable size.
Of the additional devices, the system is most often equipped with a door closer . The mechanism creates a smooth closing of the sash. For complete convenience, the sliding interior door, hidden in the wall, is equipped with automation. The canvas opens when a person approaches and closes after he passes through the doorway. The automation is triggered by sensor signals. The canvas is moved by an electric motor.
Automation is rarely installed in residential premises due to cost and impracticality. Autonomous systems are in demand in stores and other buildings where a large flow of people passes through the day.
Door care instructions
Subtotal. We have covered in detail all the stages of installing hidden doors. If you have studied it carefully, you can safely proceed, the manual is before your eyes.
Still, I must note that experience is important in every business. Installation specialists install hidden doors every day and know all the nuances of each manufacturer. They can solve on-the-spot the most non-trivial problems that suddenly arise; this happens when mistakes are made at the stage of measuring or preparing an opening.
Therefore, I recommend using this instruction not only for self-installation, but also for supervising specialists at the repair stage, when openings are being prepared, doors are being installed, and finishing is taking place. Installation specialists only install the doors, but the preparatory and finishing work is carried out by your repair specialists.
Now you know the nuances of installation, be demanding and attentive at the stage of accepting work, the result will please you.
Order a measurer along with installation from our company, we work so that you have fewer problems and more free time.
Forming a frame for the opening
The doorway should be properly designed at the stage of assembling the frame.
The part of the frame that forms the doorway is the most critical in the entire structure, as it takes on the main load.
To understand how to install a door in a plasterboard partition with your own hands, you should strictly follow the procedure:
- Two vertical posts are attached to the profiles laid on the floor and ceiling, which will be the side boundaries of the opening.
- The thickness of the metal profiles should be 0.4-0.6 mm; thinner metal is unacceptable, since the screws will turn in it.
- If the ceiling height is more than 3 m, the vertical posts should be reinforced with wooden blocks inserted inside the profiles or with double profiles.
- The distance between the posts is equal to the width of the door frame plus 2–3 cm of margin on the sides on each side.
- Next, set up the remaining vertical posts in increments of no more than 60 cm.
- Now we form the letter “P”. Between the vertical posts on the sides of the opening, we install a jumper at a height equal to the height of the door frame plus a margin of 2–3 cm.
- Then we strengthen the lintel with additional vertical posts, connecting it to the ceiling, as in the photo above.
- We install horizontal jumpers between the remaining racks.
Advice! If the wall is large and the ceilings are high, you can use reinforced profiles, which are offered by almost all modern manufacturers. Yes, this will lead to an increase in the cost of the structure, but it will also serve longer and more efficiently.
At this point, the installation of the frame can be considered complete. Next, the plasterboard sheets are installed, the plasterboard is puttyed and finished. We will not dwell on these stages in detail, since there are separate articles on this topic.
Preparation
One of the important steps in constructing a false wall is preparation. It contains a choice of materials and tools. As mentioned above, drywall accumulates water. This means that if a false wall is installed in order to hide water pipes or quite significant temperature changes are expected in the room, then you should choose hydro-resistant plasterboard. If this seemingly trivial fact is not taken into account, then this will lead to the wall being deformed.
The third stage - installation of drywall
Now that the frame is prepared and securely fixed, you should begin covering it with plasterboard.
- Prepare the sheets in the room, clear the work area so that nothing prevents you from attaching the material.
- Start working from the doorway or window.
- After attaching the first sheet, do not drill holes, but use self-tapping screws with a drill at the end.
- Screw in the screws at intervals of every 15-25 cm.
- Try to recess the caps so that they do not stick out.
Behind this false beam there is a riser hidden, which spoils the entire interior of the room.
Grouting joints
The very last process before finishing is grouting.
It is necessary to ensure that the surface is smooth and without damage.
- Using a primer and a roller, you need to work over the entire drywall to prepare the surface for applying putty.
- Take the grout mixture and apply it to the seams and screw heads. Then you need to sand the walls using fine-grained sandpaper.
- Clean the surface again with primer.
Now the plasterboard wall is ready for finishing. Look at the result of the work in the photo and compare with yours.
Seams and screws should look like a single strip of putty; it is advisable to cover up small dents in drywall
The opening for the doors must be laid into the partition at the installation stage . If this is not done, sooner or later it will be necessary to dismantle part of the partition, as well as the profile. And this costs both time and money.
- A door against a wall is a frame element that is mounted on the floor and lies on one side to the edge of the opening.
- Door in the middle - two elements of the required length are cut, which are installed from different walls to the opening. They are mounted in the same way as a ceiling profile.
back to contents In another room it was very inconvenient to install a swing model, there wasn’t enough space, so I had to think about a sliding version. As it turned out later, it came into place with its stylishness and functionality. We decided to make a sliding door that fit into a plasterboard partition and did not have a bottom track, since over time it could become clogged with small debris and interfere with movement.
Before starting installation, it would not hurt to remember a few nuances that may create difficulties in the future if you do not know them.
Marking
The next step is marking the walls for installation. To do this, use a paint cord to mark the floor and ceiling. At the required distance from the wall to hide the pipes, two strips parallel to each other are cut off. One goes along the ceiling, the second goes along the floor. Usually, a distance of 10–15 cm from the wall is enough. Then, at a distance of 60 cm from each other, you need to beat off a series of vertical lines parallel to each other. Fastening elements will be installed on them later.
Final work
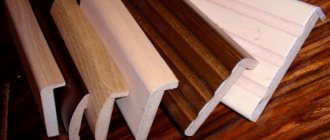
Don't forget about the platbands.
To finally complete the process, the door should be refined and decorated. Platbands are used for these purposes. It is best to select platbands immediately, especially those that come with the door in the set.
If there are none, you will have to select them by color. It is better to refrain from all kinds of drawings and patterns if you are not an artist or designer.
The platbands are nailed with flattened nails to the frame to close the gap and foam. The planks are cut so that they are joined end-to-end at 45° each, resulting in the desired 90°. It's simple.
If the price of cutting in the store is low, it is better to cut the planks immediately upon purchase. Otherwise, you will need a guide template or manual precision, because any deviation from the given angle can result in damage to the plank.
We nail the trims with a hammer around the perimeter of the door with a fastening pitch of 20–25 cm.
Step-by-step instructions for installing hidden doors along with the leaf
Just above we looked at the types of doorways and the features of their preparation before installation. Now we will install the doors step by step.
Concealed doors are installed before the walls are finished.
It is also absolutely important to have a final clean floor level at the time of installation. We control the gap between the door leaf and the floor at 1 centimeter (10mm.)
Main stages of installation
At the first stage , the aluminum frame is installed together with the door leaf.
At the second stage , we remove the fabric from the loops. This is done in order to avoid damage to the canvas during finishing work. We seal the loops themselves with masking tape.
At the third stage - finishing work, during which we close all the installation gaps, adjusting the finish to the very edge of the door frame. The hinges must be in the door frame - this is important.
At the fourth stage , the door leaf is installed back. The gaps around the perimeter are adjustable thanks to hinges in three planes.
We do not recommend it, but we must mention that it can be installed in one stage, without removing and reinstalling the door leaf. But in this case there is a big risk of damaging the canvas during work. If you are not ready to take risks, wrap the canvas tightly with thick plastic film, not a 100% guarantee, but it’s safer.
Sequencing
- Attach the mounting plates to the box; we do this before installing it in the opening.
Mounting plate attachments
- Use pre-prepared wedges (they are not included in the delivery) to secure the upper part of the box. Strictly parallel.
Use wooden wedges to set the level
- After the top jumper, we align the loop side. Check the level in two planes.
- We adjust the box at floor level. Using the same wedges, we fix the side of the box opposite to the hinges.
Fixing the position of the box in the installation opening
- Foam the box on all sides. At this step, do it point by point, as you may have to make further adjustments.
We foam it point by point and fix the box in the installed form.
- We wait. When the foam has dried, we perform a control check of the level and plane. As a result, when the door is slightly open, the door leaf should be fixed in any position and not close or open arbitrarily.
- We completely secure the box, filling all the gaps with foam.
Attention! The foam expands when it dries. When filling gaps, carefully dose the foam without excessive amounts. To avoid deformation of the door frame elements and loss of level, close the door leaf. Between the canvas and the inside of the box we insert cardboard or thin wooden planks of equal thickness. This will ensure that the gaps between the canvas and the box remain unchanged.
- Let the foam dry completely. As a rule, this is at least 12 hours.
- When the foam has dried, carefully, controlling the effort, remove the wedges. Sometimes it’s easier to cut them off, which is also allowed.
- Additionally, using mounting angles and plates, we fix the box.
It is important to ensure a reliable, complete fit and connection between the wall and the frame. Eliminate any possible backlash. If you do something incorrectly at the previous stages, play remains or appears over time, this will lead to cracking of the finish at the points where it connects to the frame.