Installing an interior door frame is a responsible job for which you need to have certain skills and have a set of special tools on hand. If this element of filling the opening is installed incorrectly or is not fixed firmly enough, then the operation of the door will be very difficult. Therefore, if a home craftsman has decided to install the door frame on his own, he needs to study a detailed algorithm of actions when performing this work and become familiar with the nuances, the observance of which will eliminate serious mistakes.
Rice. 1. Door frame installed in the opening
How to choose a door frame
As a rule, manufacturers who have been working on the market for a long time offer clients a comprehensive solution to the problem of filling the opening. In general, a turnkey door block is sold with a frame, leaf, extensions, platbands and fittings. However, if you need to purchase this item in a disassembled state, you need to take into account the following features:
- The opening in the wall after installing the supporting frame should have mounting gaps of 30 - 40 mm, which are subsequently filled with foam.
- The thickness of the box should be selected so that it is completely hidden in the wall alignment.
- With a thick wall, it is better to order the load-bearing frame of the door together with the extensions after taking the dimensions from the opening.
- All linear elements of the box must be straight. This parameter is especially important when installing a wooden frame. If there are manufacturing defects, the use of low-quality raw materials, or due to unacceptable storage conditions, the wood may become deformed, and it will be much more difficult to install such an element.
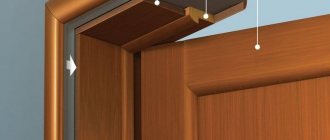
Rice. 2. Parts of the supporting frame
As a rule, the supporting frame consists of 3 elements - 2 racks and a lintel. If it is not possible to purchase the product assembled, the parts intended for further assembly should be slightly longer than the dimensions of the opening to allow trimming.
Embed the lock
- Turn the canvas over so that the loops are on the floor, and the opposite side, where the lock will stand, is at the top.
- Position the lock correctly - in the center of the door. The square hole for the handle should be at the top, and the beveled part of the latch should be directed towards the closure. If necessary, the tongue can be easily turned over by simply pulling with your fingers.
- Measure the length and width of the lock mounting plate, as well as the thickness of the door. Make a mark and place the bar strictly in the center of the canvas.
- Turn the lock around and apply it to the door. Mark the center of the location of the mounting holes, drill, and screw in the screws.
- Trace the plank along the contour with a pencil and carefully cut the film with a sharp knife to clearly mark the boundaries of the selection for installation and not damage the edge.
- Remove the lock and separate the cut film from the canvas with a chisel.
- Attach the mechanism to the door, aligning it with the planned location, and mark the width of the body. Measure the thickness of the lock at its widest point and mark it on the canvas.
- Draw boundary lines 2 mm from the edges of the groove on both sides.
- Using a drill with a diameter of 6–7 mm, make holes along the contour of the hole for the lock mechanism. To use the maximum area, arrange the holes in a checkerboard pattern. Act carefully and do not protrude beyond the boundaries of the markings.
- Slowly cut off the drilled wood with a chisel and trim the edges of the groove so that the lock fits freely, but does not dangle.
- Use a chisel to remove the wood little by little until the mounting strip is flush with the wood. Check by applying the lock with the back side rather than pushing it into place - otherwise it will be difficult to remove.
- Place the lock on the side and use a pencil to mark a square hole for the pen shaft. Make a mark on both sides and remember that this figure should be on top and not below when the door is installed.
- Insert a piece of wood inside the groove as a support and use a drill with a diameter of 20 mm to make a hole on one side and then on the other.
- Place the lock in place and secure it with screws, having previously drilled holes for them.
How to prepare an opening for installation
In order to mount the supporting frame to fill the opening in the wall, it is necessary to carry out preparatory work. This procedure is performed in several stages, namely:
- In case of replacing a door that has become unusable, the old supporting structure for the door leaf installed in the wall must be completely dismantled with all sealing elements.
- If it is necessary to change the width or height, the master makes an expansion by dismantling part of the wall, or narrows the opening.
- If the edges of the opening are uneven, they must be plastered, maintaining the orthogonality of all 4 corners.
- After the preparatory work, you need to take measurements for the subsequent order of the box. In order to prevent errors, the obtained parameters should be transferred to paper, drawing up a primitive drawing. This figure should indicate dimensions such as the height and width of the opening, as well as the thickness of the wall.
- If the wall element has deviations, then the listed dimensions must be taken at several points along the height, width and thickness of the future box.
- Based on the received sketch, taking into account installation tolerances, the supporting frame is selected and ordered.
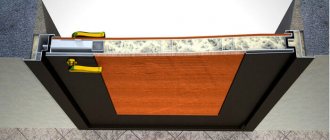
Rice. 3. Measure the opening before installation
After purchasing the door frame, it is necessary to ensure its assembly and installation in the opening. It should be noted that when ordering parts, the master must understand the direction of movement of the canvas when opening or closing, since the position of the box relative to the thickness of the wall depends on this.
Briefly about the main thing
Installing an interior door is not the most difficult stage of repair; you can handle it yourself. But there are many nuances that you need to know before you start working. All actions are performed in the following sequence:
- taking measurements;
- preparing the opening for installation;
- choosing a model based on opening method, size and material;
- box assembly;
- installation of hinges;
- hanging the door;
- threshold setting;
- installation of handle and lock;
- fastening of platbands.
Only correct and careful execution of all actions guarantees a successful installation result.
Ratings 0
Materials that may be required to fill the opening
Installing a door frame requires the availability of certain materials or ready-made structural elements for successful installation. So, when purchasing a door set, you need to consider the following nuances:
- The supporting frame can be made of different materials - natural wood, veneer, MDF with laminated film, aluminum or plastic. To select a specific material, it is necessary to take into account the style of the room, temperature and humidity conditions and the nature of the use of the doorway.
- It is better to purchase a box complete with trims and platbands with a similar texture and shade. To connect elements together, it is better to use telescopic factory parts, which are assembled with high precision according to the principle of a designer.
- After installing the load-bearing element of the door, visible fastening elements or defects from careless handling of the tool may remain on its surface. In such cases, you may need plastic plugs and a wax pencil to match the main material of the box.
Rice. 4. Decorative plastic plugs
Depending on the material of the door frame and the wall structure in which the opening is arranged, the methods of installing the frame, as well as the fastening elements, differ from each other, and to select the necessary hardware, you should listen to the recommendations of the sales consultant at the point of sale.
Why jambs bend: all the reasons
You know that door frames are made of wood. And, as you know, wood perfectly absorbs moisture. Of course, the outside of the jambs is varnished. And this, in theory, should protect the material from water. But the fact is that the varnish perfectly allows moisture to pass through.
The result is the following diagram. By absorbing moisture, the tree increases in size. And when it gives it away, its size decreases. The process is natural - but unpleasant.
Installation of jambs
Since wood has a non-uniform structure, it both increases and decreases non-uniformly. As a result, the jambs bend.
This is the main, only and main cause of the problem. How to solve it? Yes Easy! The jambs should be properly secured. Then they will remain in their place in any case, even when exposed to external factors.
What tools and consumables may be needed for installation
Installation of the load-bearing element for filling the opening cannot be carried out without a set of certain tools. Considering that the work is carried out in several stages, each of them will require the following equipment:
- Taking the dimensions of the opening, as well as marking the structural elements of the box, is done using a tape measure, a construction angle, a ruler and a pencil.
- To trim linear elements for subsequent joining, you need to use a hacksaw with a fine tooth and a miter box, an electric jigsaw for wood, a hand-held circular saw, or a professional miter saw with an adjustable bed. In some cases, craftsmen resort to using a standard grinder with a cutting disc.
- The box is installed using anchor bolts fixed in pre-drilled holes. For these purposes, you need a hammer drill with drills, a hammer, anchor bolts, a screwdriver, or a screwdriver and a wrench if we are talking about tightening spacer hardware.
- To position the supporting frame in the opening, taking into account the installation gaps, you need to purchase a set of spacer dowels and one or two cans of polyurethane foam with a gun to be able to apply it.
- To fix the position of the box after installation, masking tape and spacer bolts are used. To remove excess parts of the foam after hardening, you should have a construction folding knife at hand.
- To check accuracy when installing the door frame, you will need a plumb line, a building level (regular or laser) and a square.
Rice. 5. Cross-cutting machine with adjustable bed
If it is necessary to dismantle the old frame, the master must have a crowbar, a nail puller and a household ax. The principle of performing this work depends on the material of the box, as well as on the need to preserve the old structural element and reuse it in another place.
Mount the handles and strike plate of the lock
- Using the supplied hexagon, loosen the locking screws at the bottom of both handles and insert the square rod into them until it stops. Attach the assembled structure to the door. The distance between the handles should be less than the thickness of the blade. If it is larger, shorten the rod slightly with a hacksaw or grinder.
- Remove the decorative rosettes from the handles by unscrewing them counterclockwise along the threads. Insert the handles into their places so that the locking screw is at the bottom, and mark the locations for fastening with a pencil. Drill holes and screw in screws. Replace the decorative rosettes.
- Close the door and mark the top and bottom of the latch on the frame with a pencil. Measure the distance from the edge of the canvas to the outside of the tongue. Mark this measurement on the frame and draw a line to the latch boundary marks.
- Turn the striker over and align it with the center of the tongue mark. Drill holes and screw in screws to secure the strip to the frame. Trace the contours with a pencil and cut the film with a sharp knife, as you did with the lock.
- Remove the bar and use a small drill to make holes along the contour of the future groove for the latch, and use a chisel to make a hole. It’s okay if the sample slightly protrudes beyond the boundaries of the marks; after installing the bar, all the gaps will close.
- Using a chisel, carefully remove the film along the outer contour of the striker to make it flush with the door frame. Secure the strip in place with screws. Check: if everything is done correctly, the closed door does not hang loose.
Instructions for dismantling an old door frame
If we are talking about replacing doors in an apartment, residential building or office, then before starting work it is necessary to dismantle the old supporting frame. If there is no need to preserve the box, then it can be cut into pieces and removed from the opening with an ax. However, for some people these parts are valuable, and destructive dismantling methods are out of the question. In such cases, to remove the door frame, you must follow the recommendations below:
- The craftsman carefully removes the trim from the door, cutting off the remaining adhesive from the wall.
- The door is removed from the hinges, after which each fastening element of the suspensions is unscrewed using a screwdriver or screwdriver. If the old screws cannot be removed. They will have to be ground off with a grinder and an abrasive disc.
- Foam is removed from the installation gaps between the door frame and the opening wall until the steel anchor elements are in sight.
- Next, take a grinder with a large-diameter disk, insert it into the installation gap, and carefully cut each anchor.
- The assembled supporting frame is removed from the wall section, after which it can be easily disassembled into its components.
- The opening is cleaned from the inside and, if necessary, the master changes its dimensions.
Rice. 6. Dismantling process
Dismantling work must be carried out with extreme caution, as old elements can crack or break at the most unexpected moment. In order to protect your health, the master should use safety glasses, gloves and a respirator.
Decide on the opening and hanging side
If the canvas is installed flush with the wall in the corridor, then it will open into the passage. If there is a wall in the room, then the door will open there. Think about what is more convenient and take this point into account.
To open to the right, the hinges must be hung on the right side, and to open to the left, on the left. To avoid mistakes, stand in front of the door and imagine that you are swinging it open towards you. If it has glass, then the matte side should face the corridor, and the glossy side should face the room.
Step-by-step instructions for assembling a door frame
Before installing the element in the opening, it must be assembled into a finished frame of the required dimensions. This work is performed in accordance with the following algorithm:
- If the box element was manufactured at the factory taking into account the upcoming docking, it can be equipped with a special spike at each end of the jumper. When assembling the frame, this structural part fits exactly into the groove in the vertical post, resulting in an even and reliable connection. To fix the position of the orthogonal posts and jumpers, several self-tapping screws are installed on the outside of the frame, which will be securely hidden after installation.
Rice. 7. Tenon assembly
- If the homeowner decides to join the door frame elements at 90 degrees, and the parts do not have factory slots, then such work is done gradually.
First of all, each vertical and horizontal element that makes up the box is trimmed with a cross-cut saw or hacksaw using a template at a right angle. Next, the master carefully selects a seating groove in the jumper, working with a chisel.
The result is a mating part with a manually formed tenon.
Rice. 8. Docking at 90 degrees
- The most aesthetic, but at the same time complex type of assembly of the door frame is joining its elements at an angle of 45 degrees. To trim parts, in addition to a cross-cutting machine with the ability to tilt the working part, you will need a miter box with a wide landing area. After filing down the edges of the part, you must try to assemble the box on the floor in a horizontal position and, if gaps form as a result of joining, they must be finished with a file or a fine-grained abrasive disc.
- Upon completion of assembly, all elements are attached to each other with self-tapping screws. Please note that metal hardware can easily split soft wood or MDF. To prevent this from happening, it is best to screw the fixing element into a pre-prepared hole of a smaller diameter.
Rice. 9. Pairing at 45 degrees
- To simplify further work, it is recommended to embed hinges into one of the racks to secure the door.
The suspension elements are placed in the right place along the length of the part, outlined with a pencil along the perimeter, after which the craftsman, using a router or chisel, selects excess wood to a depth corresponding to the thickness of the hinge plate.
Next, the hinge element without a mating part is fixed with self-tapping screws into the created recess with preliminary installation of small-diameter holes.
If the interior door has a small mass, for its normal functioning it is sufficient to install two hinges - at a distance of 20 - 25 cm from each end. If it is necessary to install a heavy structure, it is recommended to add a third suspension, offset to the top of the rack at a distance of 40 - 50 cm from the center of the height of the product.
Rice. 10. Installation of suspensions
After assembling the box, the master checks its dimensions, mating angles for perpendicularity, as well as the quality and reliability of all fasteners. If the result is satisfactory, you can begin installation work.
Door selection
Choosing a door is not as simple a question as it seems at first glance. A large assortment of different models allows you to think critically about each proposal. The main criteria for finding the optimal option:
- According to the opening method . Designers offer folding, sliding, swinging models, but swing options are still the most popular. They are the most reliable and easiest to use.
- By design . Swing models are divided into double-leaf, single-leaf with left and right opening methods. When choosing, pay attention to the dimensions of the room and the size of the doorway. If the opening width is more than 1 meter, it is impossible to find a finished product, since standard products have dimensions from 70 cm to 1 meter.
Types of interior doors Source www.dverimariam.ru
Advice ! If the house has small rooms (up to 10 sq.m.), then you can specially widen the opening and install a double-leaf structure. It will cost more, but in the future the open door will not take up too much space in the room.
- According to the material. Everyone focuses only on their own budget. All materials (MDF, veneer, solid wood) are designed for many years of use. The more expensive the material, the more carefully it needs to be handled. Restrictions apply only to bathroom doors. They must withstand high humidity and temperature changes.
- By design . In this matter, the owner is limited only by the fact that all doors in the building must be in the same style and the same color.
How to install a supporting frame
Installation of a pre-assembled door frame into the opening prepared for it is the most critical stage of work, on which the quality and service life of the door leaf will depend. In order to obtain the desired result, all work is carried out in accordance with certain stages:
- The finished structure is installed in the doorway so that an installation gap is formed on all 3 sides, and one of the edges of the frame is in plane with the wall.
- Next, the supporting frame is verified vertically and horizontally, as well as to ensure that the orthogonality of the angles at the junction of the racks and the lintel is maintained.
- If the structure has assumed the design position, wedges are driven into the mounting gaps until it is firmly fixed in the opening. Considering that the door threshold is not always arranged, an incomplete rectangle may lose its shape due to the spacer force. In such cases, you should use a mounting crossbar at the level of the bottom of the box.
Rice. 11. Arrangement of wedges
- After driving the wedges, you should once again make sure that the geometry of the structure is not violated. Thus, it is necessary to check the verticality of the racks, compliance with all 4 angles, as well as the straightness of the vertical structural elements, since when wedging they can become deformed, and it will no longer be possible to place the door in such a frame.
- If the geometry turns out to be broken, then it is worth adding 1–2 wooden crossbars along the height of the structure to compensate for deformations and create reverse force.
- If the structure is installed in a load-bearing wall made of stone materials, it must be fixed with self-tapping dowels, available in a wide range at any hardware store. The master drills holes along the height of the stand at a distance of 50 cm from each other, after which dowels with screws are inserted into them through the vertical element.
- Next, you will need a screwdriver to secure the hardware into the body of the wall. To ensure that there is no visible part of the screw head on the surface of the stand, before screwing it in, you should select a conical recess to a depth of 2 - 3 mm from the visible surface of the box. This action is performed with a drill with a thick drill, the diameter of which corresponds to the dimensions of the screw head.
- In order to give stability to the entire structure, before installing fasteners, wooden plugs should be installed in the mounting gap, which will add additional rigidity and prevent the elements from deforming.
- Upon completion of the fixation, the installation gaps must be filled with construction foam and the opening must be left in this state for several hours or a day.
Rice. 12. Filling with construction foam
- After the foam has hardened, the spacer structure must be dismantled, and the excess foam is carefully cut off with a construction knife.
- At the final stage, all that remains is to install plastic decorative plugs in order to hide the fastening elements, after which you can begin installing the door leaf, additional strips and trims.
Some novice craftsmen make mistakes when installing skirting boards, trying to bring these elements to the door frame. This decision is incorrect, and the plinth is installed only after installing the “cash-out”.
After completing the installation of the box, the craftsman should hang the canvas element and test it in action. If installed correctly, the blade cannot open or close under the influence of gravity, which indicates misalignment. In addition, the distance from the clean floor to the door leaf must be constant throughout the entire opening amplitude, and when closing the door must enter the rebate element without effort, followed by a latch.
Rice. 13. Installation result
Connecting frame strips at an angle of 90 degrees
In this case, the top strip of the box is attached on top of the side strips. The length of the vertical frame elements should be 6 mm greater than the height of the door leaf with the threshold (two gaps at the top and bottom).
Most often, a threshold is not installed in interior openings. Therefore, in this case, the length of the vertical strip = the height of the canvas + the upper gap (3 mm) + the lower gap between the canvas and the floor base (1 cm).
The structure is assembled on a floor base. The top panel of the box is placed on top of the side elements and screwed to them with screws perpendicularly.
If it is necessary to reduce the passage in the wall, additional elements (building timber) are used, which are inserted between the box frame and the wall. The additional detail will then hide the casing. This installation technique can be used if the opening itself is even in height and its width is slightly larger than required.
conclusions
Installing the supporting frame of an interior door with your own hands is not as simple a process as it might seem at first glance. As a rule, it is difficult for beginners to cope with such a task, especially if an expensive massive door is to be installed. In such cases, the best solution would be to contact professionals who have the necessary experience and a set of tools for quick and high-quality installation. It is worth remembering that inaccuracies that may be made when constructing a door frame in the absence of skills can lead to irreparable consequences, and the supporting frame will have to be dismantled.
Preparatory work
Preparatory work for replacing interior door frames consists of several stages:
- the doorway is measured;
- the door block is selected;
- materials and tools are purchased;
- the old box is dismantled;
- a new door frame is being assembled.
Taking measurements
To take measurements, you should have a tape measure, a sheet of clean paper and a pencil (pen) at hand. Measured:
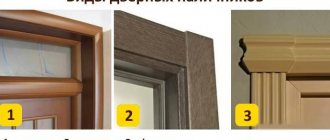
- opening height - the distance between the floor and the ceiling (position 1 in the figure);
- width (2) - the distance between the side elements of the opening;
- wall thickness (3);
It is also noted in which direction the doors will open. The height is measured along both side slopes. The smallest value is taken. The result obtained is also rounded down to the nearest centimeter. The width is measured in several places (see diagram) - only in panel houses the width of the opening is the same along the entire height. As in the case of height, the size of the narrowest part of the opening (indicated by a green line in the figure) is taken as a basis.
Box selection
When ordering a door block, you need to remember that there is a direct relationship between the width of the doorway and the width of the door leaf - this is the main indicator in door sizes. For example, in an opening 93 cm wide, it is even theoretically impossible to insert a door with a leaf of 90 cm. For doors with a leaf of 70 cm, the opening will be too wide. The ideal option is an 80-centimeter canvas.
We will summarize the dependence of the door leaf on the size of the doorway in a table.
| Doorway width, mm | Door leaf width, mm |
| 670 — 700 | 600 |
| 770 — 800 | 700 |
| 870 — 900 | 800 |
| 970 — 1000 | 900 |
From the given figures it is clear that with the lower value of the opening width (67 cm, 77 cm, etc.), it will be difficult to push the door frame into the doorway - there is only 10 mm left (60 cm panel + 6 cm, 3 cm each each, racks).
It is most convenient to work when there is a gap of 3 cm on each side between the wall and the box.
For information: the frame and the door leaf do not have to be made of the same material. For the box, it is preferable to buy timber made of natural wood, and MDF canvas covered with eco-veneer.
Installation methods
Metal ones are attached in three ways:
The latter is a permanent welded joint. The box is welded to a pre-assembled edge of the doorway from a metal corner.
Fastening to the mounting plates and to the end of the door frame is carried out using two methods:
- Holes are made (or drilled) in the eyelet or in the door frame, opposite which holes are drilled in the wall. An anchor bolt is inserted into them and driven into the wall. The head of the bolt is wider than the hole in the mounting plate or in the end of the box. At the last stage, the anchor bolt is tightened and the box is secured.
What is the fixation used for?
The reliability of the entire structure depends on fixation to the load-bearing wall , which is why it is important to know how to secure a metal entrance door. Types of fastenings:
- One-piece:
- “grip” fastening;
- reinforcing rod.
Anchors are used:
- Mechanical:
- wedge;
- mortgages;
- driving;
- spacer;
- frame;
- façade;
- hairpins;
- springs;
- ceiling;
- bolts with hook or ring.
- Chemical:
- For interior and exterior use;
- vibration-resistant;
- monolithic fastener;
- for thin-walled and loose bases;
- for long-term use.
- For foundation construction.
- Plastic.
- Height adjustable.
- Ground.
Categories
- 3D apartment projects
- Repair video
- Apartment design
- All about repairs
- Doors
- Window
- Ceiling
- Walls
- Plaster and putty
- Drywall
- Furniture
- Other about repairs
- Floor
- Leveling the floor
- Cement strainer
- Dry floor screed
- Semi-dry screed
- Self-leveling floor
- Flooring
- Warm floor
- Electric floor
- Water heated floor
- Floor coverings
- Tile
- Laminate
- Everything about plumbing
- Water pipes
- Bath, shower
- Faucets
- Toilet
- Heating
- Everything is electrical
- Wiring
- LED in everyday life
- Ventilation
- Construction materials
- Tools
- Materials
- Construction calculators
- Repair of a country house
- Miscellaneous articles
- Top review
- Question answer
- News