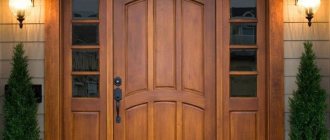
The main function of door frame trim is to hide unsightly spots that form during door installation. The second advantage is the appearance - with platbands the door looks beautiful, emphasizing the subtleties of the interior of the room, making the door durable, powerful and inaccessible. Fastening platbands can be done in several ways. To do this, you must follow the instructions for installing the door and do not rush, but check each fixed element for evenness and strength.
Existing types of door frames
General rules for installing doors
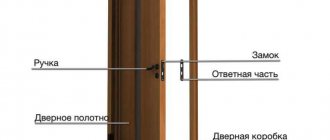
A door block is a prefabricated structure consisting of a frame, a leaf, installation and connecting units, and fittings.
The box is mounted in the opening and consists of vertical profiles and a crossbar. The sash is installed on one of the profiles using hinges. The profiles are made of durable wood. Sometimes the box is supplemented with a threshold and seal for sound and thermal insulation. In installer slang, a door frame is called a “ludka”.
A movable panel made of wood, veneered with MDF, PVC or metal, closes and opens the opening. Lightweight frames with honeycomb filling or reinforced frames made entirely of wood are sold.
Component elements include platbands and extensions. Framing strips perform a decorative function and cover the joints of the canvas and the box. Extensions cover slopes and joints with walls. Elements come in a special format: for decorating arches and non-standard doorways.
The category of fittings includes all possible latches, handles, hinges, and crossbars. This group includes door closers, opening angle limiters, seals
.
To install a door system yourself, you need tools and basic skills. The quality of installation is affected by the accuracy of measurements: from minimal misalignment of parts, system defects will appear in the future: cracks will form or jamming of the canvas.
The dimensions of the frame must be smaller than the size of the opening, otherwise it will need to be expanded. Professionals consider the optimal size of gaps to the wall to be 10-40 mm.
Door blocks are presented on the construction market in disassembled or assembled format. In the first case, the installer's work will be more complex and time-consuming, since the box will need to be assembled.
The general procedure for attaching an interior door frame looks like this:
- Installation of a disassembled box.
- Equipping all elements of the door block with the necessary fittings, fastening the door leaf to hinges.
- Installing the frame: the door frame is fixed in the opening using hangers or anchors, the gaps are filled with foam
- The sash is hung on the fixed “bowl” and adjustments are made.
- Platbands and extensions are installed.
Platbands are a mandatory decorative element of the door structure to design the opening around the entire perimeter. Extensions are purchased if the opening in depth exceeds the dimensions of the frame. The protruding surface of the wall is hidden under decorative strips.
Installation instructions for wooden trims
You can finish the door not only with the help of a master, but also with your own hands. To avoid mistakes, strictly follow the algorithm.
Stage 1. Preparatory work.
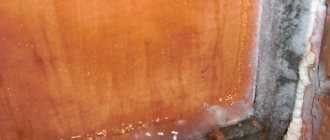
Using a construction knife, clean the surface of the doorway from protruding polyurethane foam. Then walk with an even strip along its entire perimeter, look at the position of the wall and the box. Existing problems will be resolved during installation of the frame.
Step 2: Mark the location of the trim strips.
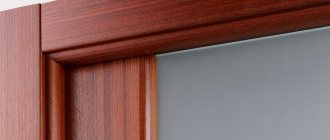
Overlay strips are installed in such a way that the rounded corners of the door frame remain visible.
Platband installation
And the straight lines from the side of the extension should coincide with the corners of the decorative element.
Pay special attention to ensure that the platbands do not interfere with the operation of the hinges and the door lock screwdriver. Attach the strips and use a pencil to make marks above the box above the joint angle at a distance of approximately 3 mm. The marked places show the height of the vertical and width of the horizontal decorative elements at the lower connecting corners.
Sometimes during installation, the extensions receive numerous damages. To hide them, experts advise placing marks on the door elements two millimeters below the corner. If there are no defects, then install the planks flush with them.
Stage 3. Attach vertical strips to the marks and place marks on them at the desired height.
Markings for installation of platbands
After measuring the platbands, number them and put the numbers on the wall in the appropriate place. This will prevent them from being mixed up during the work process.
Step 4. Trim the vertical parts of the structure at a 45˚ angle.
The cut should be smooth, without chips. When cutting, consider the width of the cut, as in some tools it can be up to 3 mm. Therefore, make an appropriate indent from the label.
Vertical planks are trimmed taking into account the width of the cut
Step 5. Attach the vertical and then horizontal elements.
The vertical strips are fixed first, and then the horizontal ones.
Main types of platbands
Door trims vary in installation method, material of manufacture, shape, color and style. The type of product determines the choice of further installation method. Different materials are used to produce parts:
- tree;
- metal;
- MDF;
- PVC.
MDF trims are considered the most popular and budget-friendly for finishing interior doors. The undoubted advantage of wood planks is that they can be installed using any type of fasteners.
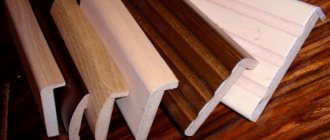
Varying in style and shape, the planks are:
- straight (flat);
- with bevel;
- teardrop-shaped;
- rounded (semicircular);
- carved and figured;
- typesetting.
An additional element is sometimes installed above the top bar - a capital. Occasionally, the part is used for the lower part of the door frame. The detail plays a deliberately decorative role and is appropriate only for rooms in a classical style.
Based on the method of fastening, the planks are usually divided into overhead and telescopic. The first format is fixed using the chosen method directly to the surface of the door frame, the second is equipped with mounting grooves.
Cashing options: what types of cash are there?
Platbands are decorative strips. They are installed around the doorway. Close the installation gap between the wall and the door frame. It depends on them what the door in the passage will look like. They give the structure a complete look. The set consists of side trim and top trim.
Before attaching platbands to interior doors and entrance doors, you need to understand what types of such products there are. This will help you choose the right version of the plank and install it correctly.
Manufacturers produce products in a wide variety. According to the material of manufacture and features of the strips for interior doors, there are:
- wooden;
- from MDF;
- plastic;
- gypsum;
- ceramic;
- telescopic;
- metal.
According to their shape, the planks are divided into flat, semicircular, teardrop-shaped, with decorative stucco molding, and figured. These features of cashing must be taken into account before attaching cashing to interior doors.
Wooden
Wooden trims are the most common for door blocks. They are characterized by attractiveness, environmental friendliness, durability and reliability. Pine is usually used to make them. In rooms with temperature changes, it is better to use oak or maple options. Decorative planks made of wood are suitable for structures made in different styles. They complement the look of the door. Available in standard and atypical designs. There are smooth, embossed, carved and semicircular products.
MDF
MDF planks are a cheaper analogue of wooden planks. They look like they are made of wood. In terms of performance characteristics, they are no worse than wooden planks, and in some respects even better than them. For example, products made from MDF are not subject to rotting. This has a beneficial effect on their service life. One of the disadvantages of such products is their low resistance to water. MDF planks absorb moisture and swell because of this. Therefore, they should not be chosen for door leaves that are installed in rooms with high humidity levels. MDF planks are mostly produced in flat form. Some products may have slight roundings.
Plastic
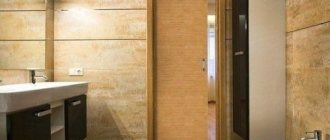
Plastic products can be called one of the most practical. They do not fade in the sun and are resistant to high humidity. They do not deform over time. These planks are very easy to maintain: clean with a cloth, water and soap. Plastic products withstand temperature fluctuations well. They are often chosen for finishing doorways in bathrooms and kitchens. Plastic slats are available in different colors and textures. There are options that accurately imitate wood. Plastic trims are inexpensive.
Plaster
Gypsum products are used in rooms whose design is dominated by wall and ceiling stucco. They have an attractive appearance. They are usually made to order seamless. Plaster strips can be painted in the desired color. But they are difficult to attach. Therefore, the installation of plaster door frames should only be trusted to a specialist. Not everyone knows how to install cash on interior doors correctly with their own hands and make serious mistakes. This leads to damage to the planks and inaccurate fastening. Among the disadvantages of gypsum products, it is worth highlighting the low resistance to mechanical damage and the complexity of restoration.
Ceramic
Ceramic planks look beautiful. But they are not particularly popular. This is due to the limited scope of their application. Such products are usually used to decorate doorways in rooms lined with artificial stone. They also look good in bathrooms. They are used to trim the doorway from the inside. They allow you to create an interesting composition.
Telescopic
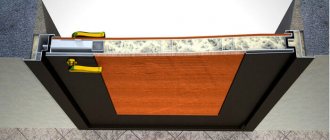
Telescopic platbands are products with a protrusion with a locking connection. They are firmly fixed in the shared grooves of the end surface of the box. Telescopic trims must be fastened correctly. Then they will be practically invisible, and the door will take on a complete look.
Made of metal
Metal strips are usually used for finishing entrance doors. They are installed on the outside of the opening. Sometimes such planks are used for finishing interior doors and passages. They are perfect for interiors designed in loft, minimalism, and hi-tech styles. Metal products are usually made from aluminum or stainless steel. They are resistant to water and mechanical damage. Durable and fireproof.
Rules for marking and processing platbands
Installation is carried out after finishing the walls, but before laying the floor plinth.
Preparation of planks consists of correct marking and quality cutting. Vertical trims must be of equal length and correspond to the dimensions of the door frame and opening. When cutting a horizontal crossbar, a small margin is left for perfect adjustment of the corners.
To cut trim made of wood or MDF, you need to use a miter saw. The cut should be made from the reverse side of the product. This method will avoid unevenness and chips. The cut is made using a miter box. Docking at an angle of 45° allows you to join the fragments together perfectly evenly, leaving no gaps.
When marking, lines are drawn with a pencil or a special marker. It is important that the markings are easily erased and not absorbed into the top layer of the material.
Also common is the option of installing platbands at an angle of 90 degrees with an imitation of a lintel. In this case, the elements are used in a flat shape. When marking, the vertical casing is extended by the width of the horizontal one. The cut areas are painted over with paint or varnish to match the color.
Installation instructions for plastic trims
To make your own plastic trim, strictly follow the diagram:
- Measure and mark the mounting profile - this is a plastic product with latches for attaching the front profile.
- Cut the mounting profile blanks at an angle of 45 degrees with an electric saw or grinder. The mounting profile can be made 10 mm shorter than the front one. This will make it easier to take measurements.
- Attach the mounting profile to the wall using self-tapping screws.
- Measure the front profile from the floor covering to the corner of the box. Please take into account the thickness of the connecting elements. Most often it is about 3 mm.
- Cut the vertical plastic strips at an angle and fix them in the mounting profile.
Plastic trims are fixed in the mounting profile - Insert connecting elements into the cut ends of the vertical trims. Saw off a horizontal board from one end, insert it into the profile and measure out the area for cutting the opposite end.
- Cut the face profile at a 45˚ angle and install in place.
The fittings make the joints look beautiful, so there is no need to use sealant to close the gaps.
Methods of attaching platbands to interior doors
To attach platbands to interior doors, 4 common installation methods are used. The following materials are used:
- nails;
- self-tapping screws;
- special glue “liquid nails”.
The installation of parts using the tongue-and-groove joint principle is widely used.
Door trims for compartment doors have no external and functional differences from the finishing of a regular swing frame. They have standard widths and similar fastening methods.
Using finishing nails
Using nails to install platbands is the most traditional method. To disguise fasteners, special small finishing nails with mini-hats are used.
To properly fix the parts, you need to align them using a level. Given the microscopic size of the caps, it is important not to damage the surface of the planks themselves. For hammering, it is better to use a small hammer, and lightly mark the joints in advance with the tip of an awl.
Hammered nails are well masked with mastic or grout of a suitable shade. Light damage to the planks can be painted over with paint, a pencil or even a felt-tip pen.
Application of liquid nails
Installing platbands with liquid nails is considered a quick and simple method of fastening. The rigid adhesive composition provides high-quality adhesion to any surface.
First, the correct position of each part is determined. Then a small amount of liquid nails is applied pointwise to the back side of the casing. When pressing, you need to make sure that the glue does not bleed through. If this happens, you need to fix it immediately to avoid spreading; usually only a few dots are applied to the bar.
You can combine the two methods and install the casing first with liquid nails, and then secure it with finishing nails. The combination of fasteners will give the door structure additional strength.
Use of self-tapping screws
Long-term operation without nails will be ensured by installing platbands using self-tapping screws. For wooden planks you will need self-tapping screws about 2-2.5 cm long, a screwdriver or screwdriver, and an electric drill with a wood attachment.
The hole points are marked on the strip in increments of 50 cm. The head of the self-tapping screw must be recessed into the surface. On the front side of the cash, the hole is expanded with a nozzle of a larger diameter to a depth of 1–1.5 mm. Tighten the screws so that the cap is immersed in the recess as much as possible. Then the place of fixation is masked or tinted.
Using clasps with a latch
Snap-on trims are also called telescoping or “beak trims.” The peculiarity of fastening telescopic platbands for interior doors lies in the provided design. To connect the elements, the “tenon and groove” principle applies: the protrusion of the strip is tightly attached to the groove of the door frame, then by adjusting the size of the recess, the required distance is set.
The disadvantage of installation with “beaks” is the inevitable gradual delamination of the structure. Over time, the platbands begin to loosen at the joints. In the future, there may be a need for additional adhesive reinforcement.
The role of platbands in the interior
If previously the gaps formed between the frame and the wall were plastered, then painted or covered with wallpaper, today all this is hidden much easier and faster using platbands.
They are installed around the perimeter of the interior door and are strips that give the opening a stylish appearance. You can install platbands on interior doors yourself, but the quality of the installation will depend on the type of door itself, so this matter must be approached with full responsibility. If everything was done beautifully and smoothly, then the platbands will allow:
- Visually make the box smoother, especially if mistakes were made during its installation;
- Beautifully hide all the gaps formed during the installation of the structure;
- Complement the style of the room;
- Hide wires or cables.
Some nuances when installing a decorative door element
Experienced professionals installing interior doors willingly share their secrets on the Internet. We offer a few simple tips that will greatly simplify the process of installing finishing parts and help you avoid mistakes and defects:
- You should not perform fastenings in small increments of 10-15 cm. To properly secure a two-meter casing, 5 mounting points are enough.
- If flaws and gaps are visible at the joints, they can be filled with sealant.
- The width of a standard platband is usually 12 cm. If the overlay cannot cover the problem area with its dimensions, the products are ordered according to individual measurements.
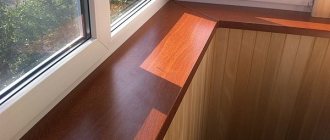
- The vertical platband should reach the floor itself, and not rest against the baseboard. If you do not follow this rule, the installation will look unaesthetic.
- Plastic skirting boards have decorative plugs for proper connection with other parts, including platbands.
- Sliding doors, when closed, partially cover the cash flow, so you should not purchase narrow slats; it is better to install them as wide as possible.
Docking at an angle of 45
To cut decorative strips at an angle of 45º, use a special construction tool - a miter box. A similar technique of connecting two separate elements is used if they have an indirect shape.
Nuances of installation work:
- The height of the vertical panel from the floor base is pre-calculated. The lower end of the platband is placed on the floor covering, respectively, its joint with the baseboard is on the side;
- When installing decorative strips on the door hinge side, it is necessary to take into account the width of the indentation. The resulting indicator is applied to the workpiece - this is the lower mark of the 45º angle;
- Next, the bar is inserted into the miter box, and a cutting line is drawn from the marked point at an angle. The excess part of the casing is cut off;
- The pre-cut workpiece is nailed in 2 places; it should bend at the top. Using pliers, cut off the heads of the nails. One nail is driven a little higher from the floor base, the second - a meter from the floor. The length of the nails used should exceed the thickness of the casing by approximately 5 mm.
Features of installing extensions
In order to install high-quality extensions, you first need to accurately calculate the dimensions of the door structure. Measurements are taken from the box to the edge of the wall, top, bottom and middle: the width of the additional parts will correspond to the maximum value.
If the platbands are telescopic, then you will need such a number of strips that their total width is the required value. The elements must be made of the material that makes up the remaining fragments of the door system and match in color.
Installation work is carried out in the following sequence:
- the product is cut in accordance with measurements;
- the door frame is cleaned;
- the upper additional part is being installed;
- polyurethane foam is blown into the gaps;
- side additional elements are installed.
Self-tapping screws are used to secure the finish. Mounting holes with visible screw heads are decorated with plugs to match the additions.
Finishing nails
Wooden and MDF trims are easier and better to fasten with nails with flat heads. Then, if necessary, they can be easily dismantled. And so that the platbands do not dismantle by themselves and hold tightly, the nail should be driven into the door frame at least 20 - 25 mm. It is better to make the distance between the nails the same. To simplify the task, you can pre-drill through holes in the lantern. At the end, so that the nails do not disturb the appearance, they can be painted over with a wax pencil.
You can also drive nails into the door frame first. Then use pliers to remove their caps. The length of the visible part of the nail without the head should not be greater than the thickness of the strip. Next, having placed the platband against the nails, a wooden beam wrapped in fabric is applied to the plank at the location of these nails, and with a few light blows of a hammer the plank is pressed onto the nail.
Elimination of defects
Even with experience and skills in decorative finishing of doorways, you can make annoying mistakes. The following tips will help disguise minor installation defects.
1. If the wall is uneven, the wooden frames may bend and the joints may diverge. To avoid this, during installation the joint is additionally secured with a finishing nail.
2. Significant defects in the wall around the door frame are covered with wide planks (10-12 cm).
3. To disguise nails when installing planks of unsaturated colors, it is good to use light furniture wax or sealant of the appropriate shade.
Why do we need platbands - advantages of use
When the installation of the door leaf is completed, there are always gaps between the wall and the frame. And the platband on the door allows you to hide these defects. The racks are installed on the wall on all sides of the doorway. They cover up all the sloppiness, and the result is a beautiful composition. Advantages of use: 1. Allows you to smooth out the loss of verticality, if there were shortcomings during installation - it visually makes it smoother. 2. Hides communications (cables, wires) in different rooms. 3. Hides cracks and hangers that appear at the edge of the frame and wall. 4. Acts as a decorative element. For example, curly or teardrop-shaped ones emphasize different interior styles.
Important! Installation begins after the door is installed, but before the baseboards are installed.
Tools for work
Before you begin attaching interior door frames, check in advance that you have the necessary tools and parts at hand. To finish the door structure you will need:
- drill (screwdriver);
- screwdriver;
- small hammer;
- self-tapping screws;
- finishing nails with small heads;
- fixing glue “liquid nails”;
- wood drill with different attachments;
- pencil or marker for marking (erasable).
These items are enough to install the trim using one of the installation methods. Naturally, each fastening method and specific products require that the necessary tools be at hand.
Did you manage to solve your problem using the recommendations from the article?
Yes!
46.83%
No. More answers required. I'll ask in the comments now.
37.24%
Partially. There are still questions. I'll write in the comments now.
15.94%
Voted: 709
Attachment by beaks
This one is different in that it does not use any of the above mountings. The casing itself is equipped with a latch, shaped very similar to a beak. Hence the name. This fastener is inserted into a recess on the door frame. Thus, the fastening is not visible from the outside. But over time, the joints may collapse, and then they will need to be treated with glue.