The number of cars painted with metallic paints is growing, but for some reason they suffer in accidents just like the rest. But in repair painting, such coatings are not so simple; for a high-quality result, the painter must have certain qualifications. The reason for this is that the metal particles contained in these paints are insoluble foreign bodies that can behave completely unpredictably in the paint layer.
Therefore, to successfully work with metallized enamels, the painter must not only hone his application skills, but also understand the theory - understand the most important properties of “metallics”, the principles of the “behavior” of these paints.
Preparing for work
Let's say that a car painted in light silver metallic was damaged in a traffic accident. The damage was then repaired and the car was prepared for painting.
We will not delve into the nuances of repair or replacement of this or that part. Let us dwell on the fact that the restored parts are primed over the entire plane, carefully sanded (for metallic this is done with abrasive material P400-P500 “dry” or P800-P1000 “wet”) and are intended for complete repainting. This point is important, since in this case there is a question about the accuracy of the selection of paint color, or the need to make a smooth transition to adjacent body parts.
By the way, for our example, metallic silver was chosen for a reason. Light and silver colors are more difficult to repaint than dark ones, since they contain a lot of aluminum grain and reflect light fluxes very unpredictably.
The result here depends on many factors: at what pressure to spray, whether the proportions of mixing with the thinner are observed, what thickness of the layer to apply, what pause to maintain between layers, etc.
If we make serious mistakes at the stage of preparing or applying paint, this can reduce all our efforts to nothing, up to the need for complete sanding and repainting.
For example, if we try to “save money” and use a third-party thinner when painting, the metallic color may fade significantly!
The fact is that branded thinners for metallic paints are specially designed so that during their evaporation the aluminum particles “sink” to the required depth and take the correct location in the paint layer (its shade depends on this). If you replace the thinner, for example, with a faster evaporating one, this can lead to a change in shade to a lighter one and the appearance of such unpleasant defects as streaks and “clouds”.
To help avoid such mistakes, careful attention to the manufacturer’s recommendations for the use of materials: proportions of their preparation, choice of thinners, working viscosity, application conditions, etc.
To dilute the base, only the original thinner should be used, and its type and evaporation rate must correspond to the temperature at which painting will be carried out.
But it will be even more offensive if the work has to be redone due to defects caused by one’s own carelessness. These may be fat craters (poorly degreased), coarse inclusions of dust (not blown), bubbles and other defects.
To minimize the risk of such defects, before painting, be sure to thoroughly degrease the surface and then remove dust using compressed air and a special adhesive cloth.
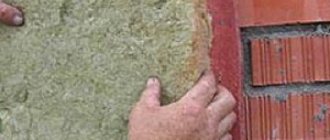
Let's return to the hero of our article. Here it is, my dear: pasted over, degreased and ready for painting.
You can pour paint into the tank of a spray gun and... Speaking of the gun.
Do-it-yourself car painting
First, wash your car. This will make it easier for you to find damage to the body. In addition to corrosion, the bottom and body receive defects during movement from grains of sand, small stones and other abrasives. The painting procedure can be spot, partial or complete, depending on the body damage. We will talk about a radical change in color.
Remove locks, moldings, seals - they will interfere with work. If you decide to leave them and seal them with tape, the moisture accumulated under these elements will cause irreparable damage to the car. The body must be cleaned, covered with primer and puttied. The old coating is completely removed, and corrosion areas are carefully treated. If necessary, welding or straightening of the body may be necessary.
Use materials from only one manufacturer. Often compositions produced by different companies are rejected from each other. Paint applied to such an unstable preparatory layer may fly off.
Scheme of the main stages of work:
- Car wash. Using car shampoo, remove dirt. Make initial preparations.
- Degrease the body, remove grease, bitumen stains, etc.
- Destroy pockets of corrosion, clean off the old coating with abrasive grinding. The sandpaper should be used so that the difference in the size of the abrasive grains does not exceed 100 units. Treat the surface sequentially in five stages. Otherwise, the material will sag, and stripes and scratches may appear after painting.
- Apply the first and second primer, which will create an anti-corrosion coating. The soil will dry in approximately 3-4 hours.
- The main stage is applying paint.
- The last operation is varnishing the surface.
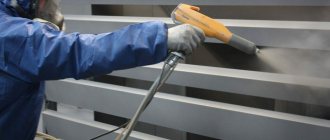
Metallic paint gun
For high-quality application of modern base enamels, spray guns with low air outlet pressure (HVLP or LVLP) are required. Cheap conventional pistols are not suitable for this. They have high pressure, which, although sometimes allows you to get a wide torch, when applied, “knocks out” a lot of solvent from the paintwork material, as a result of which the paint lies on the surface practically without it. On metallics this inevitably leads to streaking and clouding, especially on silver colours. Here, enjoy...
If we use more advanced spray guns of the HVLP or LVLP systems, the risk of such defects is significantly reduced. The low outlet pressure of these guns makes it possible to transfer enough solvent to the surface so that the metallic grains fit correctly.
Before painting, do not forget to make sure that the spray gun provides a sufficiently wide and uniform spray pattern over the entire width, and that the pattern of the spray pattern has the correct outline.
To apply base enamels, it is recommended to use a gun with a nozzle diameter of 1.3-1.4 mm. The air pressure must be accurately set directly on the gun (usually 2-2.2 bar) and not fluctuate during operation. The air must be cleaned of oil and moisture.
“Can you paint metallic?” In the 90s, this question was asked to any painter who came to get a job at a car service. Today, painters can easily cope with ordinary metallic paints, so new requirements are placed on their qualifications: for example, skills in working with light metallic paints.
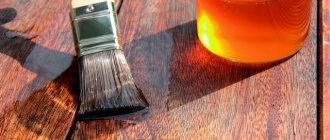
Necessary materials
The technology for painting a car with metallic paint is no different from painting a car with other types of paint. The process differs from conventional painting only in that metallic has a two-layer base, unlike standard painting. Find out which paint is the best for cars.
Basic basis
Applying the base
The base base is a nitro-based paint, which essentially imparts color and subsequently provides the desired effect. The base has no shine and does not have weather-resistant properties. Drying time between coats is approximately 20 minutes. It is important to apply the paint at a temperature of about 20 degrees, and if it is below 10 degrees, the drying time will deteriorate significantly and the quality of the base will not be as high.
Varnish
It is made on an acrylic base. This second layer is the most important when painting a car metallic. The varnish acts as a protection for the painted body. There are and are used two types of varnish for painting cars metallic:
- MS varnish, called soft. It must be applied in three layers, and its distinctive features include ease of polishing. Disadvantages include lower efficiency and durability.
- Varnish NS. A solid version of varnish that can be applied in one and a half layers: light first and solid second. When painted, it leaves almost no smudges, is durable, but difficult to polish.
When painting a car metallic, traditional materials and painting equipment are used: spray gun, primers, putties, etc.
This is interesting: We install and connect the DVR ourselves
Technology
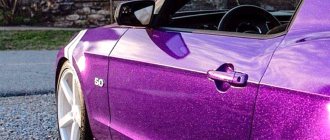
In enamels with a metallic effect, light reflection plays a vital role. As you know, these paints, in addition to color, also contain effective pigments - aluminum particles. They act as a kind of tiny mirrors that reflect the incident light, which gives the coating a sparkling effect.
Moreover, if you look at a metallic-painted part from different angles, you can clearly see that the intensity of this shine is not constant - it either decreases or increases. For example, we look at a car from a certain point at which the coating glows brightly and sparkles, then the car turns (the viewing angle changes) and the coating gradually darkens. These changes in hue, from light to dark and back again, are called the flop effect.
The main and most difficult task for a painter when working with metallics is to correctly “lay” the aluminum particles on the surface. Correctly means parallel to the substrate and to each other. If we can orient these particles in this way, the coating will then have optimal optical characteristics.
But if the “silver” lies chaotically in the paint layer, it will scatter light in different directions, which will lead to disruption of the flop effect, color distortion and the appearance of stripes and “clouds” characteristic of metallics.
As we already know, silver colors are especially capricious in this regard, since they contain almost no color pigments. Their color is provided almost exclusively by the aluminum grain, which is responsible for the flop effect. When working with such colors, the painter needs to be especially careful; he must clearly understand how aluminum particles behave in the paint layer.
Factors affecting metallics. Layer thickness and others
The orientation of aluminum particles is influenced by many factors. All these factors are in one way or another related to the rate of solvent evaporation and the depth of “burrowing” of the aluminum grain in the paint layer.
First of all, for uniform decomposition of the “silver”, it is necessary to avoid either applying the base too wet or too dry.
A layer that is too thick will contain more solvent, which will take longer to evaporate into the surface. Accordingly, a thick layer will remain liquid longer. In this case, the aluminum particles will “sink” into the bottom of the layer and be oriented vertically relative to the substrate before drying. A deeply sunken grain almost completely loses its ability to reflect the light falling on it, which leads to a distortion of color - it darkens.
And vice versa. If the paint is applied to the surface too dry, there is less solvent in such a layer, it evaporates faster, and the aluminum grains do not have time to sink to the “correct” depth and take the desired position in the paint layer. They remain on the surface of the layer, reflecting too much light, which leads to lightening of the coating and loss of color saturation. In addition, the base, which lies on the surface like a hedgehog, leads to increased consumption of varnish, its uneven shrinkage and a decrease in gloss after drying.
In both the first and second cases, the formation of stripes and “clouds” is also possible.
The thicker the metallic layer, the longer it will remain liquid, the deeper the grain will have time to sink into it and the darker the overall shade of the coating will be. And vice versa.
A properly applied metallic coat is a medium thickness coat, neither dry nor greasy. In such a layer, the aluminum grains lie at the required, standard depth, oriented parallel to the substrate. This ensures the best manifestation of the “flop effect”, color uniformity and good paint coverage are achieved.
All other factors, as well as the layer thickness factor, depend on the rate of solvent evaporation and the depth of occurrence of aluminum particles.
For example:
- When the recommended application pressure is exceeded, more solvent is “knocked out” from the paint torch, which means less of it will be transferred to the surface, it will evaporate faster, the grain will remain in the layer above, and the coating will acquire a lighter shade.
- The lower the viscosity of the applied paint, the thinner the layer and the faster its evaporation. Accordingly, in a shorter time the grain will have time to sink to a shallower depth, and the coating will be lighter.
- The higher the air temperature in the painting room, the higher the rate of evaporation of the solvent, and the lighter the shade of the coating will be.
- The greater the distance from the spray gun to the part to be painted, the less solvent is transferred to the surface. This means it will evaporate faster and the coating will look lighter.
- The faster the passes, the less solvent will be on the surface, and the lighter the coating will look.
- The faster the thinner is used, the higher the rate of its evaporation, which means the grain in the layer will remain higher and the coating will be lighter.
And so on.
Methods of influencing metallic shade. Understanding these relationships in practice can help level out small differences in shade and “stretch out” the color
The figure below schematically shows how the depth of aluminum particles affects the overall shade of the coating.
The diagram shows that with the correct arrangement of the grain, our eye perceives both the color of the coating, for which color pigments are responsible, and the grain, evenly distributed in the layer (Fig. A).
If the grain did not have time to sink to the required depth and remains in the upper part of the coating, it “blocks” the light from the color pigments, and our eye sees only the light reflected by the grain, which is why the coating is perceived as lighter (Fig. B).
The deeply sunken grain is covered with color pigments and almost does not reflect light, resulting in a darker shade of the coating (Fig. B).
Watch your hands! Application technique
When applying metallics, spray technique is critical. It is important to hold the spray gun correctly and maintain a uniform speed. If you stop moving for even a second and a layer of paint is sprayed thicker than next to it, streaks and “apples” cannot be avoided.
The gun must be held strictly at right angles to the surface to be painted. Otherwise, when tilted, in the upper and lower parts of the torch, the distance to the surface will be different, which means that in one place the layer will be thicker, in another - thinner.
Uneven thickness of the paint layer leads to different orientations of aluminum particles in different areas of the layer. This causes a defect that is usually called "clouds" or "apples"
Number of layers and interlayer drying
So, to achieve the best result, metallic painting should be done in uniform “semi-wet” layers: not dry, but not too wet. Number of layers?
Depends on the coverage of the base, but most often the classical technology is used: 2+1.
That is, two covering layers are applied (they can be applied a little more wetly), after which the so-called drip layer is sprayed (also spectacular, smoky, leveling, etc.) - it is needed to correct the shade and eliminate the “apple-appearance”.
The drip layer is applied as follows. We lower the inlet pressure on the gun to 1-1.5 atm. (with the trigger pressed and without changing the feed, or with a slightly increased feed) and after the last layer of the base has matted, from a slightly greater distance (approximately 30 cm) we spray a semi-wet drip layer. This layer, like “rain,” should gently and evenly cover the surface with droplets. After application, the resulting droplets will quickly stretch and the coating will become smooth.
Usually 2-3 layers of base are enough, but for poorly covering flowers, sometimes not only three, but even five layers are not enough. In this case, tinted soil will help, which needs to be taken care of in advance.
And don't forget about interlayer aging. Insufficient rest can cause cloudiness and other defects, so apply the next coat of base only after the previous one has become matte. Usually this is 5-10 minutes (at 20 °C).
Applying varnish
So, we have applied the base enamel, but, nevertheless, our car still looks pretty bad. To bring the matter to its logical conclusion, all that remains is to apply a clear varnish over the base. After this, the coating will not only become fabulously beautiful, but also resistant to external influences (the base itself is not weather-resistant).
Unlike the single-layer metallic paints of the first generation, modern “metallics” are a two-layer system: a clear varnish is applied over the base enamel
The main question is: how long before you can apply varnish?
Here it is important not to miss the moment, since the base enamel retains the ability to “absorb” subsequent layers not as much as desired, but for a strictly defined time. If this time is missed, the adhesion between the base and the varnish will be impaired, and during operation the varnish from the overdried base may peel off.
Sometimes painters make a grave mistake: they apply the base in the evening and apply varnish in the morning, arguing that the paint will probably dry out overnight. With metallics, this approach is completely wrong!
It is best to coat the base with varnish at normal temperatures after 15-20 minutes. This is optimal. During this time, the solvents will evaporate from the base, it will become dull and will be completely ready to accept the varnish.
But if you rush and varnish a still wet base layer, this can cause subsequent dulling of the paintwork, as well as the appearance of “clouds” (the grains seem to “stick together”, reflecting light unevenly). Therefore, in low temperature conditions, the exposure time must be increased (until the base is completely matte).
The maximum time during which the adhesion between the base and the varnish does not break is necessarily indicated in the technical documentation for a particular enamel. This time may vary for different manufacturers, but in general, practice shows that if we do not coat the base with varnish within an hour, maximum two, then we will no longer have maximum adhesion.
Therefore, if you are late, the base coat must be matted and repainted.
Read more about applying varnish here.
Before applying clear varnish, the base layer must be treated with a tack cloth to remove dust, dust and lint.
Diluent
To thin metallic paint, a special base thinner must be used. Universal thinner for acrylic products or different solvents will not work. The evaporation rate of the thinner must correspond to the temperature in the workshop. A fast thinner will evaporate too quickly and the metallic particles will not have time to lay down as they should, which will give a lighter shade. If the thinner is too slow, the metallic particles will sink into the paint, making the paint shade darker. In addition, too slow a thinner can cause spots and streaks to appear, since metallic particles will float in the paint for a long time and are located randomly.
Upon completion of work...
There is another important point in the work of a painter, which is usually not given due importance. This is washing the gun after working with metallic. If this operation is performed carelessly, then particles of “silver” may remain in the gun, which then either clog the nozzle and spoil the shape of the torch, or fly to the surface during the next painting.
Therefore, upon completion of work, take care of the cleanliness of the tool. Rinse the spray gun thoroughly with solvent and blow with compressed air. Don't waste your time and energy on this.
Sincerely admiring the shine of a freshly painted wing or hood, and even metallic, and even silver, and even without “apples”, and even... (sorry, I got carried away) you begin to experience the genuine joy of owning a car. It is so beautiful, shiny, smooth, fresh, inimitable, perfect, corrosion-resistant, on four wheels, five-speed gearbox... Sorry, we got carried away again...
Apply the base layer
Applying the base
Applying the base coat is the next important step in painting a car with metallic paint. This stage is recommended to be performed in strict accordance with the technology. In particular, you cannot save when choosing a solvent for enamel. It is better to select solvents according to the recommendations of enamels manufacturers. Light-colored metallics are the most sensitive to solvent effects. An unsuccessful choice of them leads to the fact that the metal shavings of the paint lie unevenly and form spots.
The next important point when choosing a solvent for enamel is the time of year and the temperature that needs to be maintained in the paint booth. There are certain recommendations in this regard:
- at low temperatures, quick-drying solvents are used;
- the solvent or elements to be painted must not be heated;
- The temperature of the solvent and the machine, as well as the temperature in the spray booth, must be the same.
Recommendations from experts regarding painting a car metallic with your own hands
Please note that when choosing metallic enamel, it is correct to follow only the manufacturers’ recommendations; the same applies to the choice of solvents for enamel. If the solvent is too aggressive or simply not intended for use with metallic, then the sparkling shavings may lie unevenly on the surface or even form spots. Light metallic shades are considered the most sensitive to this factor.
Also observe the temperature conditions for applying paint:
- if the ambient temperature is low, it is necessary to use quick-drying types of solvents;
- the temperature of the surface, solvent and environment should always be the same;
- Under no circumstances should the solvent or surface be heated.
Also ensure that you follow the recommendations of the manufacturers of the products you use; as a rule, all the details of application are outlined there, down to the thickness of each layer and the permissible spray distance.
Never violate the technology of working with metallic paint, observe the smallest requirements for cleaning the surface and applying paint. Also keep in mind that working with metallics involves painting in a special room; doing this outside is unacceptable.
Moscow Automobile and Highway State University, Moscow. Level of education: Higher. Faculty: AT. Specialty: Special engineer Cars and automotive industry. Experience in the automotive industry (master consultant...
Silver paint, apple and stripes
Painting with silver, let's highlight this subsection and consider what problems may arise when applying silver and how to avoid them.
Painting a car with dark colors is much easier in terms of application. Even a less experienced painter can do this quite well. But painting with light silver metallics and some other colors, say golden, requires experience in applying such enamels. Many people have problems when working with silver.
The main defects that appear when painting with light metallics are: spots (apple-colored) and stripes. I think every novice painter has encountered this.
The main causes of apples and streaks when painting metallic are:
- Enamel is not thinned correctly
- Faulty spray gun (uneven spraying of material)
- Incorrect technique for working with a paint gun
As a result of all of the above, such defects occur.
Metallic, especially light colors, has the following properties: The “fatter” the layer, the darker the paint becomes and vice versa, the thinner (sprayed) the color changes in the other direction.
That is, you applied an uneven layer of silver, somewhere it’s thicker and somewhere drier, and this is what causes spots and stripes.
How to remove the apple-like appearance when painting metallic?
- It is necessary to have a working spray gun with an even spray of material
- Correct adjustment is also important, the material feed should be “medium”
- The distance to the surface to be painted should not be too close, at least 15 cm.
- Passes with a spray gun should be uniform and identical.
- Do not pour paint, layers should be semi-wet
- And the most important thing (decisive action) is SPRAY. Once the last layer has matted a little, spray on the finishing (leveling) layer. You can leave the feed as is or reduce it a little, raise the pressure a little, hold the spray gun much further at a distance of 30-40 cm and spray a light layer. Movements can be different diagonally, across or lengthwise.
Just don’t overdo it, there shouldn’t be too much pollination. All settings mentioned above can be changed (depending on the situation) with the exception of the distance to the part to be painted.
Knowing all these subtleties and nuances, painting a car body with metallic will become an easy task for you and all the work will be done efficiently and without defects.
Finally, a video about painting metallic red fenders and bumpers.
Which paint is better to choose?
Metallic paint can be of three types:
- single layer;
- two-layer;
- three-layer.
Single-layer paint is rarely used because applying it requires expert skills. Using three-layer paint, effects such as mother-of-pearl, chameleon, etc. are obtained. Three-layer painting technology includes the application of an additional layer of mother-of-pearl, which increases the cost of painting.
Two-layer paint is the most popular and widespread. The technology for applying such paint is much simpler than that of one- and three-layer coatings.
Metallic paint can be found in stores in several forms:
- Aerosol. In these cans, the paint is already mixed with varnish, which is an advantage for those who are painting for the first time. There are also cans in which the paint is separate from the varnish. This option is suitable for more experienced people, and the result of such painting will be of better quality.
- Acrylic paint. These paints have a number of advantages, such as adhesive properties and a large selection of shades. They do not harm human health, since they do not contain harmful solvents.
- Graphite metallic. These paints contain graphite powder, which makes the coating durable, resistant to corrosion, water and environmentally friendly.
The most popular two-layer metallic paint
- Powder formulations. Paints with this composition are beginning to gain more and more popularity due to their economical use, large number of shades and environmental safety.
- Automotive paints. This type of paint is the most popular at present. The dyeing process itself has certain difficulties. But if the paint and varnish material is applied correctly, the painted surface will be used for more than one year.
Final coating with car varnish
The third and final stage is to distribute the varnish yourself:
- The varnish for this procedure must be diluted with a solvent and a fixative in the proportions specified by the manufacturer. Professionals change the concentration of the substance depending on the layer number - the first is the densest, then lighter ones.
- The varnish is applied in two or three layers, each of them is well dried. You can check the degree of drying only in an inconspicuous area; if the varnish sticks but does not smudge, then you can apply the next layer.
- After applying the last layer, the car must dry for at least a day.
Application process
To paint a car with a high-quality metallic paint, you must have a good spray gun with an even and correct spray. A lot will depend on this. Gun settings are usually done at your own discretion. But you should remember that metallic painting does not require a lot of pressure, so for an Hvlp gun the average value is somewhere between 1-1.8 bar. Before applying, do a test color on some surface.
Metallic car painting
rarely occurs in one layer. Their number depends on the covering power of the material and the type of repair.
1. It is recommended to make the first layer not wet “greasy”. And the floor is dry and “dusty”. This way you can see whether everything is going well and whether there are any defects and avoid paint damage if there is rubbing down to the old paintwork material.
2. The second and subsequent ones are applied semi-wet, semi-glossy layer.
3. The main factor is interlayer drying. The next layer can be applied only after the previous one has completely matted. Do not rush; allow the solvents to evaporate from the material.
4. It is necessary to go between layers with a sticky napkin to remove accumulated pollen or small debris.
5. You should not move the spray gun in different directions back and forth. Your movements should be smooth and even. This way the paint will apply evenly and correctly and you will avoid over-spraying, dusting and differences in thickness.
Metallic paint should NEVER be applied in a wet, “greasy” layer. The surface will acquire an unsightly structure and defects such as stripes will appear.
But you also cannot apply all layers by spraying (dry). This way you will get a strong hedgehog
» rough surface like sandpaper. The varnish on such a base will not spread well and will have an unsightly shagreen pattern, and metallic grains can break through the varnish after drying.
Shagreen on the varnish also depends on how the base is applied; this point must be taken into account.
The metallic car painting technology ends with the application of varnish. The varnish must be applied over a completely matt base paint. Approximately 20-30 minutes, it all depends on the ambient temperature and the nuances of the work being carried out.
Applying paint
The second step is to apply the base paint yourself:
- The enamel is applied in two or three layers, the number of which depends on the shade of the paint, so pay attention to the manufacturers' recommendations. Typically, metallic painting is done in two layers:
- the first layer is applied more densely; application in stripes or spots is allowed, since here you are pursuing one goal - high-quality coverage of the primer layer and the formation of a uniform color coating;
- then it is correct to wait about 30 minutes until the solvent evaporates; it is forbidden to speed up the process with air currents, everything should happen gradually and naturally, otherwise stains may appear;
- the last layer will make the coating extremely even, the paint is diluted more strongly with a special solvent, application is carried out from a greater distance than usual, the layer should be final and very light.
- Next, you need to wait for the paint to dry before applying varnish. According to the requirements for working with metallic paint, the applied metallic paint must not be over-dried, otherwise the varnish will have poor adhesion to the paint. Never leave a painted car for a long time without applying varnish.
Dyeing technology