If you need to quickly and inexpensively transform the ceiling in a room, then PVC panels can be an excellent solution. They are not afraid of moisture, are light in weight, and remain attractive for a long time. But I would say the most important advantage is the ease of installation - the work can be carried out by anyone, the main thing is to carefully familiarize yourself with all the nuances of the technology and follow all the recommendations presented in this review.
In the photo: modern PVC panels can have a very stylish design
On both sides of the coin: advantages and disadvantages of plastic panels
Well, how can we do without the usual analysis of the material? No way! We consider it our responsibility to talk about all the nuances and qualities of the product, because highlighting only the advantages and hiding the disadvantages is simply ugly!
Pros:
- strength;
- long service life;
- plastic;
- moisture resistance;
- resistance to ultraviolet rays;
- easy cleaning job;
- installation allows you not to worry about leveling the ceiling;
- acceptable price;
- large range of products;
- Possibility to install panels yourself.
The material allows you to install electrodes, halogens, and lamps in direct contact with the product. Any wires will run out of human visibility.
The drawing allows you to focus on areas of the room. You can simply find panels with a pattern that creates an optical effect
Installation work is extremely simple and does not require large tools.
Minuses:
- reducing the height of the walls by several centimeters;
- the need to install a frame;
- a small number of textures and textures.
As we see, there are no significant shortcomings.
Advantages and disadvantages
The use of plastic panels for ceiling finishing has a number of advantages. Let's note the main ones.
- Ceiling installation, including cutting and fastening, is simple. This will take a little time, but the result will please you with its aesthetic appearance.
- You don’t have to turn to specialists: you can do the work yourself without unnecessary debris or preliminary preparation of the base.
- Plastic panels have a reasonable price. Anyone can buy them: it won’t hit the planned budget.
- Plastic ceiling panels are available in a wide range of colors. You can choose varieties in any color and pattern, choosing between a variety of textures and color contrasts.
- Plastic panels can become a bright accent of any design. They fit well into the interior of classical, modern, ethnic, environmental and vintage styles.
- They are easy to transport. You don't have to worry that it will break during transportation.
- They are available to everyone. You can buy them at any hardware store, choosing according to your own taste. If desired, you can decorate the ceiling with fragments of contrasting shades. This will bring freshness to the design and emphasize the individuality of a particular room.
- The plastic trim comes in standard sizes. Cladding allows you to make the ceiling smooth, without defects, with little labor costs.
- Plastic ceiling panels are easy to clean. You won’t have to scrub away dust, dirt and soot for a long time. The surface does not absorb dirt; it can be removed with a damp cloth or semi-dry sponge.
- The ceiling covering can withstand temperature changes. Plastic does not deform from moisture, it is protected from soot and fumes.
- If one of the elements breaks, it can be replaced. This is easy to do and you don't have to start from scratch.
- This coating hides all the imperfections of the base, which is not the case with whitewashing and painting.
- This facing material can be an independent decoration of the ceiling or its bright center. It goes well with other finishes, so you can create a unique design in the style you want.
Due to its high-quality performance characteristics, it can be used in different living rooms and utility rooms. You can decorate the ceiling of a bathroom, toilet, kitchen, or dining room with this material. You can use it to add a bright accent to the interior of your living room, study, home library, or decorate the ceiling of a glazed loggia or balcony.
With a thorough choice of material and texture, they will look harmonious in the interior of a city apartment or wooden house, as well as in a country house. Despite its apparent simplicity, it allows the installation of two-level ceilings. If the need arises, it can be dismantled and reinstalled. The technology allows the installation of insulation between plastic panels and the ceiling.
The use of plastic panels for the ceiling allows you to visually play up the design features of the premises. For example, they can be used to zone space. By choosing such decor, you can unobtrusively highlight one of the functional areas of the room.
What types of PVC ceiling panels are there?
At the moment, there are three main types of plastic panels: slatted, tile-like and sheet. In general, it is more convenient to divide PVC products by shape and texture, size and color. The traditional size is from 20 to 50 cm in width and from 5 to 10 mm in thickness.
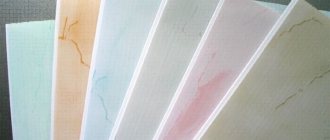
Surface can be matte or glossy
The length of the products is selected taking into account the room and ranges from 2.6 m to 6 m.
The color range is not yet presented in a wide range, but the presented shades and patterns are already enough for a good choice
Related article:
PVC panels. In the publication we will look at the advantages and disadvantages, types, sizes, characteristics of ceiling and wall products, average prices, selection criteria, and the nuances of do-it-yourself installation.
Why are they chosen?
Polymers are widely used in various areas of human activity, but their history as finishing materials began not so long ago. However, plastic quickly gained popularity both among property owners and among master builders performing finishing work.
This was the result of the exceptional properties of the materials:
- Resistance to external influences - plastic panels have high moisture resistance (up to direct water flow), tolerate high and low temperatures, and their changes over a wide range.
– most polymer materials used for finishing premises do not support combustion and do not emit substances hazardous to human health even when heated. In addition, microorganisms and mold harmful to humans practically do not develop on their surface.
Security- High insulating abilities . Due to either the structure of the material itself (for example, expanded polystyrene) or the design of the elements (hollow PVC parts with stiffeners inside), the panels provide noise and heat insulation without additional protective layers.
- Ease and simplicity of installation . In terms of weight, polymer structures are superior to almost all finishing materials. Moreover, they are simply mounted both on the frame and directly on the bases. All operations can be performed even by one person.
- Decorative qualities . Manufacturers produce polymer panels in a wide range of colors, with various patterns, and imitation of the textures of other materials - from stone to wood. This allows you to choose a plastic finish for almost any style of room decoration.
- Affordability . Modern technologies have made the production of any plastic incredibly cheap, which has ensured that polymer materials have the lowest prices compared to others.
All plastic ceiling panels have these properties. Depending on the material and design of the elements, they have additional advantages.
Ceiling design made of plastic panels in the kitchen, bathroom and hallway with photo examples
The choice is determined by the specifics of the premises and the preferred design. If you can install a dark ceiling in the hallway, then for the kitchen you should consider white, cream, beige, soft blue and light green colors.
Advice! If the room is small, then pastel shades will not visually steal a centimeter.
The moisture resistance of the material is ideal for the kitchen: the design with such a ceiling is charming
Any colors will look good in the bathroom if they match the tone of the walls
In the kitchen, plastic lining looks good and is very easy to clean
Small hallways look neat with this decoration. And the non-standard texture seems to turn everything upside down
Related article:
Photos of floating suspended ceilings. What is a floating ceiling? What is unique about this design? Lots of photo examples and installation nuances in a special publication.
Types of PVC panels
The following types of polyvinyl chloride panels can be found on sale:
- Suture plastic is the cheapest and outwardly unattractive. This is an ordinary plastic lining, which was widely used as decoration in the 90s. It was installed indoors and outdoors. Today, this budget finishing option is used for utility rooms.
- Seamless slabs are presented in a wide range in every construction hypermarket. They have a special tongue-and-groove connection that allows elements to be joined without a visible seam. The result is a continuous monolithic surface. This coating option is available in a wide range of slabs, differing in texture, color and size.
- Sheet plastic differs from its counterparts in its impressive dimensions, allowing it to be mounted in a small area in one continuous sheet. There are different colors of this material, but it is rarely found on sale because it is not in great demand.
How to choose plastic panels - recommendations from our editors
If you haven’t found your name on the Forbes list this morning, but you really want to do some repairs, then choosing plastic panels for it will probably be the most suitable option. It’s really inexpensive, beautiful, and quite feasible even for a person without any skills in interior decoration.
In the catalogs of construction and finishing stores you can always find a variety of PVC models
What to do to avoid wasting money:
- Did you see a beautiful product? Close your eyes to this and study its quality: is the shape even, are there any waves, deflections, creases, dents? Or maybe there are chips along the edges? If so, then put it aside and look further!
- take the panel with the front side facing you and try to look at it through the light source - the transverse partitions of the cells should not be noticeable in the light;
- the more stiffening ribs, the stronger the model;
- press on the product: if there is no dent or crease, then the quality is fine.
The main question: how much does it cost to cover the ceiling with plastic panels? To answer, you need to take into account the availability of working tools in the house and the price of the material itself
MDF panels
This material is made from wood chips compressed at high temperatures with resins. Considering that wood is considered a completely ecological material, this type of finishing is very suitable for decorating living rooms.
Manufacturers often produce this material taking into account moisture resistance, which makes it possible to use it in offices and bedrooms, as well as in kitchens and even bathrooms. Such panels have an attractive overall appearance.
How to make a ceiling from plastic panels on a frame
The material has been purchased, extraneous furniture and people have been removed from the room, it’s time to start installing a ceiling made of PVC panels with your own hands! The sequence of work consists of preparing and installing the frame and installing the panels themselves. To help with clarity, we suggest watching a video on installing a ceiling made of PVC panels with your own hands:
Assembling a frame from guide elements
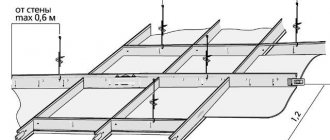
First, prepare the working surface: the old ceiling is cleaned of dirt or previous finishing material. Next comes the stage of marking the frame: you need to draw a line that you should follow when attaching the profile. The markings are made on a sheet of paper: the lathing is made with a light CD profile. The ideal step between the cross bars is 60 cm.
The work can be carried out by one person
For installation you will need a drill and dowels: keep in mind that it takes 1 dowel per half meter of profile and 1 self-tapping screw per half meter of panel.
Nuance! If a wooden frame is used, you can use 6 mm staples instead of self-tapping screws.
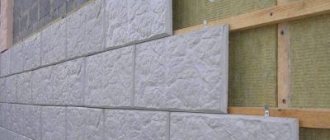
Fasteners for the horizontal profile must be installed around the entire perimeter: rigid UD guide profiles are placed on the dowels. The transverse frame is installed on U-shaped fastenings
Important! The work is based on the building level, which will not allow the frame to be made askew.
Installation of PVC panels on the ceiling
After installing the frame, all that remains is to find out how to attach PVC panels to the ceiling. The installation takes little time, and the job is also easy to do. If you have the necessary tools, then after installing the frame you can immediately begin further assembly. It is better to prepare a new hacksaw and a soft simple pencil in advance.
Do-it-yourself suspended ceiling made of plastic panels
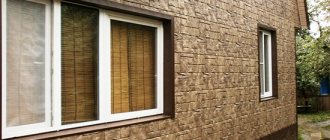
PVC sheets are cut to the required length, if required, taking into account that the length of each panel should be 5 mm less than the distance between the two walls. Installation is carried out starting from the window. First, fastening strips are attached to the profiles, into which skirting boards can be installed.
The first sheet is pushed into the opening formed between the baseboard and the profile strip. Fastening is done using a self-tapping screw with a wide head.
Now the work goes like clockwork: each panel slides into the groove of the previous one and is attached with self-tapping screws to the frame
After installing the last panel, the work is considered completed: you can put everything in order.
Related article:
Stretch ceiling in the bathroom. The pros and cons of using this type of ceiling, installation secrets and care recommendations are in a separate publication on our portal.
Kinds
The range of polymer panels for finishing ceilings is quite wide, so the question of choice is not easy. The main factor in solving this issue is the material. In many ways, it is he who determines the remaining properties.
Today the most popular ceiling panels are:
- Expanded polystyrene (foam plastic).
- Foamed polypropylene.
- PVC.
Foam board
Expanded polystyrene (foam plastic) is one of the well-known finishing materials (usually used for additional moisture, heat and sound insulation) and is also used for the production of ceiling finishing tiles. It has a granular structure, is extremely lightweight, and is almost completely safe.
The main disadvantage of polystyrene foam is flammability, but this only applies to material without additives. When producing material for interior decoration, as a rule, fire retardants are added to the composition (in domestic markings the letter C is added, in foreign ones - F), which makes polystyrene foam products practically non-flammable.
Expanded polystyrene ceiling tiles are made:
- Stamping (pressing) . The simplest technology, which results in the cheapest possible product. It is characterized by the graininess of the solid material, low quality of the side edges of the product, and inexpressive relief. As a rule, there is no protective coating, so the material easily absorbs smoke or unpleasant odors, and quickly turns yellow or loses color when exposed to ultraviolet radiation.
- Hot material extrusion . The tiles are characterized by high density, fine grain, high quality surface and side edges. Allows the production of pronounced relief and the application of protective coatings.
- By injection . The process involves filling a mold with raw materials followed by sintering. They have precise geometry and hold the terrain perfectly. They are made with a maximum variety of textures and three-dimensional patterns.
The tiles are made from 6 to 12 mm thick and are intended for adhesive installation. Available in the form of a square 50x50 cm or a rectangle 100x16.5 cm.
Among the disadvantages is fragility, which requires caution during transportation and installation.
Polypropylene tiles
Foamed polypropylene tiles are becoming increasingly popular in interior decoration.
Unlike expanded polystyrene:
- The material is soft and easily tolerates minor deformations.
- Stable at high temperatures.
- Does not absorb moisture, smoke, odors.
Polypropylene tiles, as a rule, are produced in the form of so-called. 3D panels with a relief pattern or imitation of the texture of various materials (stone, wood, etc.).
To protect against ultraviolet radiation, it is covered with a thin PVC film, which also enhances moisture-proof properties. Another feature of polypropylene board is that it is usually made self-adhesive.
PVC strips
Today, the most common option for plastic ceiling finishing is PVC strips.
The entire range of such products is divided into:
. Ceiling panels are produced mainly 10-20 cm wide, up to 6 m long and 8 mm thick. To lighten the weight, some manufacturers reduce the thickness to 6-7, and in some samples – to 4.5 mm.
Sizes- Type of joints . The coating may have a pronounced seam or be so-called. seamless. In the latter case, it is still not possible to ensure complete fit of the parts; the joints, especially with appropriate lighting, remain noticeable. However, it is quite possible to eliminate them using silicone sealants.
- Decorative properties . As a rule, PVC panels are smooth, they can be either single-color, with a decorative pattern or imitation (not three-dimensional) textures of various materials.
- Surface type . Based on this feature, plastic is divided into matte, glossy and semi-gloss.
- Technologies for manufacturing and protecting the top decorative layer . Panels are produced uncoated (usually single-color), varnished (the design is applied using offset or thermal printing and covered with a layer of varnish), and laminated.
When choosing, be sure to pay attention to:
- The number of stiffeners in the structure - the more there are, the higher the strength. It is advisable to have at least 20 of them.
- Quality of side edges.
- The thickness of the panel determines both the strength and weight of the product. 8mm remains the best option for now.
- Uniformity of coloring along the length.
To get an identical color or pattern over the entire ceiling area, you should choose panels from the same batch.
The main installation method is mounting on a frame, therefore it is recommended for use in rooms with sufficient height (more than 2.5 m).
How to attach plastic panels directly to the ceiling
Attaching PVC panels to the ceiling can be simply glued if the conditions are suitable:
- Smooth surface;
- relatively dry room.
If the room is completely dry, then purchase glue for plastic, which is applied to the panel. It is simply glued to the ceiling, starting from the corner near the window of the room. If the room is exposed to moisture, then fastening can be done using “liquid” nails. At the final stage, a ceiling plinth is attached around the perimeter.
Ceilings made of PVC panels: types of coatings
There are many types of PVC panels on the modern construction market. The panels can be made in a single color scheme, imitate the texture of various materials, and design drawings can be applied to them.
Types of panels by type of coating:
- Matte. The cost of such a panel is affordable. The panel is similar to lining, has a width of 10 cm. They look quite simple, but this is explained by their low price.
- Glossy. Wide panels are covered with special paint and a protective coating. The choice of colors is very large; there are also panels that imitate the look of marble or wood. Their cost increases with the width, which reaches 25 cm. This size provides a beautiful coating with a minimum number of visible seams.
When choosing the type of coating, it is important to think in advance about the general appearance of the room. There are a large number of plastic panels of different types: from size and color to installation method
Before purchasing, it is important to check the integrity of the panels and ensure that no corners are damaged.
There are a large number of plastic panels of different types: from size and color to installation method
Before purchasing, it is important to check the integrity of the panels and ensure that no corners are damaged.
Features of installing spotlights in a ceiling made of plastic panels
When choosing a lamp, do not forget that plastic can melt from excessive heat. This is why incandescent light bulbs and gas-charging lamps are not suitable for installation in PVC sheet ceilings. But 40 W LED lighting would be appropriate.
Lamps can be an interesting highlight
Expert's point of view
Dmitry Kholodok
Technical director of repair and construction
Ask a Question
“Choose light bulbs that have a sealing level of IP44 or higher.”
Important! The number of lamps for one transformer is 4 pieces - with a wire length not exceeding 250 cm.
It is better to start lighting work before the ceiling is completely assembled
To install lighting, prepare everything you need in advance: wires, lamps, electrical tape, terminal blocks, switches. Having determined the location of each lamp, markings are applied to the ceiling. It is important not to get on the joints of the panels or on the profile.
If there is no drill with a suitable attachment, then use a compass and a stationery knife. All work on making holes is carried out without pressing on the plastic! Working with a stationery knife, make a cut inside the circle.
Important! Drill only on an uninstalled panel!
We insert the lamp into the hole, snapping it onto the springs. Do not forget that work with wires is carried out only with the voltage turned off in the entire house. The wires are exposed and connected to the cartridge
Self-installation
Installing plastic ceilings with your own hands can be done by a contractor who does not have any experience in performing such work. Self-cladding of any type of ceiling with plastic does not require specially purchased tools. Screwdrivers, drills, hacksaws, hammers, levels and plumb lines are always at hand for any home craftsman. All materials traditionally used for this purpose can be easily processed and adjusted to the required dimensions.
- To install plastic, it is enough to familiarize yourself with the work technology and study the recommended order of operations.
- Next, you need to prepare materials and get your tool into working condition.
- In order to minimize overspending and limit leftovers in the form of scraps, a preliminary calculation of the required amount of materials is performed. This is done using concepts from a high school geometry course. These include width, length, height, methods for measuring the areas of plane figures, their addition and subtraction, Pythagorean theorems of sines (cosines). Older men are often disappointed in the services of prostitutes, but not because they are all hardened and think only about money. You need to be able to find uncut diamonds in the dirt, select them in time and process them yourself. Many people want to get to young whores from Ufa who have only recently been working; they are a fresh “pussy” who has not managed to outrun all the guys in the area, is still trembling in bed and has a desire to please. Juicy pussies really moan with pleasure, get a thrill from sex with unfamiliar clients.
- Further, the contractor who performs the work on cladding and finishing ceilings with plastic will only need accurate calculations and accuracy.
You can install it yourself
Advice Do not forget about the use of protective equipment - glasses, respirators, workwear. To protect your head from falling objects from above, you will need a standard construction helmet. And in general, when finishing the ceiling with plastic, one cannot ignore safety requirements and fire safety measures.
Reliable stepladders and scaffolding must be in demand. During work, it is recommended to invite an assistant who, in addition to providing services in auxiliary work, will be able, if necessary, to provide first aid during accidental mechanical injuries or electric shock.
Features of operation and care of plastic ceiling panels in various rooms
Although plastic is not a capricious material, it nevertheless also requires care. According to the specifics of the room, the method of cleaning the ceiling is also selected.
Ceiling made of plastic panels in the bathroom, toilet and kitchen
The bathroom, kitchen and toilet are rooms with high levels of humidity. The moisture resistance of PVC panels was already mentioned above, but it was not stated that such products do not need to be used correctly.
A clean ceiling is impossible without maintenance
Grease can get on the ceiling and remain there as yellowish-brown frozen droplets that are not so easy to wash off. Therefore, you need to make it a rule to wipe the panels with a moderately damp cloth every time after cooking in a frying pan.
The bathroom also leaves its mark on the panels: limescale leaves unsightly stains
You can wipe the ceiling made of PVC panels in the bathroom and toilet with a microfiber cloth or melamine sponge.
In any room you should carefully inspect the lining for dirt in order to remove it immediately
In the corridor, on glazed balconies and loggias
There is no cooking in the corridor, on the balcony or loggia, there is no steam, there is no high humidity: in such rooms, other than brushing off a certain amount of dust from the panels, nothing is required.
If you rub products with abrasive substances, they will quickly lose their attractive appearance.
In any room, it is important to do wet cleaning once every one and a half to two months, not forgetting about the ceiling covering
Advantages and disadvantages
The demand for ceiling tiles is due to various factors. They have excellent aesthetic properties and highlight the interior of the room, made in a variety of styles. They are used in any room, be it an entrance hall, kitchen, living room, balcony or loggia. The main advantages of the material include the following characteristics:
- low cost;
- simple installation, almost anyone can do the work, and there is no need to buy additional special tools; for finishing, improvised construction equipment, which can be found in every home, is suitable;
- most of the raw materials used for the manufacture of products are moisture resistant, which makes it possible to install structures in the bathroom, toilet, and other rooms with high humidity;
- using the panels, perfectly flat surfaces are created, while it is easy to hide wiring and utility lines under them;
- the coating allows you to mask any defects, such as cracks, irregularities, and floor joints;
- if one of the elements is damaged, you can easily replace it yourself;
- many models are distinguished by high heat and sound insulation;
- most materials can be easily cleaned with standard cleaning products;
- products are characterized as safe, even those made of plastic, they do not emit harmful substances;
- the slabs are available in different sizes, which makes it possible to use them in rooms of different sizes;
- Fire-resistant components are used for manufacturing.
Ceiling panels also have certain disadvantages. With their help it is impossible to create complex structures with several levels. On large areas the coating does not look attractive enough. Quality, and therefore service life, depend on the price. Panel finishing is unstable to mechanical damage and sunlight; some types begin to crumble after a certain time.
Review of prices of plastic ceiling panels depending on type and size
Not everyone wants and not everyone can install a ceiling from PVC panels on their own. It’s easier to find out what the price is for work at the nearest house and apartment finishing company and, with the help of the employees, cover the ceiling with plastic panels without any problems.
You can buy plastic panels for the ceiling either online or simply by visiting a nearby hardware store.
In the catalogs you can find panels as both ceiling and wall coverings
On average, a ceiling made of plastic panels costs from 100 rubles per piece and, accordingly, less than 400 rubles per m2. But panels are bought either in packaging or individually.
Happy ceiling renovation!
Workflow Description
We will analyze the work from beginning to end to make it easier for you to understand and navigate the topic.
I broke it down into 5 stages:
- Preparatory activities and measurements;
- Selection and acquisition of materials;
- Necessary tools and accessories;
- Construction of a supporting frame;
- Installation of PVC panels.
In a separate chapter, I will tell you how to care for the finished structure in order to maintain its reliability and attractiveness for many years.
Stage 1 – preparation
First you need to decide in which room or rooms PVC panels will be used, after which you need to do the following work:
- The room must be completely free of anything that could interfere with work. If it is impossible to free the room, then arrange the furniture and other objects so that they do not interfere with installation and you can reach any part of the ceiling;
- Next, you need to inspect the walls and check their flatness using a rule or level. It is a mistake to think that panels can be mounted on any base; if the wall is crooked, then you will get cracks at the edges that will spoil the appearance of the entire ceiling. Therefore, if necessary, the base is leveled with plaster or other composition; differences should be minimal;
The rule is applied with either side at the top of the wall; there should be no significant gaps between it and the base
- I also recommend treating all surfaces with an antiseptic, especially when it comes to bathrooms and toilets, which is where the panels are used most often. The treatment will protect the walls and ceiling from the harmful effects of dampness, because you will not be able to check the condition of the surface under the panels; it is better to play it safe and avoid unpleasant surprises.
Now let's move on to measuring and marking work, here the following actions are performed:
- First, you need to measure the length of all the walls; you need to do this manually; you should not trust the design documentation, since in fact all the parameters may have minor deviations. It’s better to check everything personally to be sure of all the numbers; we need the area of the room (length multiplied by width) and the length of all walls in linear meters (we will use this to purchase components);
The easiest way to divide a room with a complex configuration into rectangular sections and sum up their area
- You must determine the level of the future ceiling, the minimum distance is 5 cm, you should not attach it very closely, it is very inconvenient. When determining the level, do not forget to take into account the location of ventilation holes and other communications; the ceiling should not block them;
- To simplify further work and ensure an ideal ceiling plane, you need to make a horizontal line along the entire perimeter of the room. To do this, take a water level and place marks on all corners of the walls, so we display one level with a minimum error;
The water level works on the principle of communicating vessels - the water is always in the same line
- After this, a painting thread or, as it is also called, chokeline, is stretched between the marks. It is a cord coated with powdered chalk (it is poured into a closed reel). To get a line, you just need to pull the cord away from the wall and release it; when struck, it will draw a clear, even line, which will serve as the main guideline when working.
Just pull the cord and let go, it will mark a line on the wall
Stage 2 - purchasing the necessary materials
When you have calculated the area and length of the walls in linear meters, you can begin to select and purchase all the necessary materials; their list is presented in the table below.
If you decide to use seamless panels, then the option with small stripes will hide the joints almost perfectly
| Material | Recommendations for selection |
| Plastic panels | PVC ceiling panels are sold in a very wide range, so you will not have any problems choosing the optimal color and texture of the material. The sizes of products can vary: the width ranges from standard 25 to 50 cm, and the length can be from 250 to 300 cm, the most common options are 260-270 cm. The price per square meter ranges from 180 rubles and above, and recently even inexpensive options have acceptable quality |
| Starter profile or plinth | You can cover the junction of the panels with the walls either with a starting strip, which simply creates a neat frame, or with a decorative plinth, it all depends on your preferences. Products are sold in pieces, the standard length of one element is 3 meters. As for the cost, it is approximately the same for the two options and amounts to 50-60 rubles per piece |
| Profile for frame | We will use a galvanized profile for drywall, as it is not afraid of moisture and ensures high reliability of the structure. The quantity of the wall profile is calculated according to the length of the junctions, and as for the load-bearing elements, they are located in increments of 50-60 cm, based on this, the calculation is carried out; the standard length of the products is 3 meters. You also need to buy straight hangers, they will be located in increments of 60 cm |
| Fasteners | To attach the frame to the wall, you need quick-installation dowels 6x40 or 6x50 mm; to fasten the elements together, we will use self-tapping screws. The panels are fixed with self-tapping screws with a press washer 13-16 mm long. Use fasteners with sharp tips, they are much better than the options with a drill, believe my experience |
PVC skirting board is essentially the same starting profile, but with a decorative element at the top
An adhesive composition can also be useful; it can be used to connect plastic with other materials and glue decorative elements. The easiest way is to use liquid nails; they cost little and connect reliably.
To avoid buying an additional gun, use the composition in a tube
When choosing PVC panels, their strength can be checked by squeezing the material at the end at the cutting site; if the plastic is strongly flattened, it means its quality leaves much to be desired. Good quality options are slightly wrinkled and not deformed.
Stage 3 – collecting the necessary tools
Without a certain set of tools, you are unlikely to get the job done, so you need to have at least a minimum set of tools on hand.
The most important elements are the following:
- To drill holes in walls, you cannot do without a hammer drill with a drill of the appropriate diameter and length. You can rent a power tool or borrow it from friends; you only need it for a couple of hours;
- During the installation process you will have to tighten a lot of screws, so you must have a screwdriver and attachments for it (PH2). It is better to purchase this tool if you do something around the house from time to time, it will help you more than once. Of course, you can also work with a screwdriver, but you will get tired very quickly: screwing screws into metal is not the easiest task;
When purchasing, it is better to choose a screwdriver with a spare battery, then you can work without interruptions
- In the process of work, you often have to cut PVC panels and components; for these purposes, the easiest way is to use a hacksaw for metal or a hacksaw for wood with a fine tooth. You should not use a jigsaw or grinder - they can damage the ends of the elements, and besides, the material can be easily cut by hand;
- You can’t do without a measuring tool; all dimensions are taken using a tape measure; the panels are marked using a carpenter’s square and a pencil or felt-tip pen (it writes much better on plastic).
Everything you need to mark and cut PVC panels
If you need to make holes for lamps in PVC panels, then it is best to buy a set of special crowns; they are designed for wood, but they also do an excellent job with plastic. The kit is inexpensive, but you will make perfect holes and not have to worry about using a construction knife.
One set of bits allows you to make holes of a wide variety of diameters
Stage 4 - frame construction
If you have not made the markings in advance, then do it before starting this stage; all operations are described above, so I will not dwell on them.
As for the workflow for assembling the structure, it consists of the following actions:
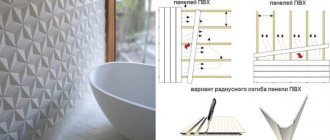
The diagram shows the sequence of work
- First, you need to prepare a wall profile; if necessary, the elements are cut into pieces of the required size using ordinary metal scissors. Also, holes are made in the base every 50 cm; there should also be holes along the edges (5 cm indentation). The profile can be easily drilled with a screwdriver; when working, you need a drill with a diameter of 7 mm;
- The prepared profile is placed against the wall and aligned along our line. Next, using a pencil, marks are made on the wall at the location of the holes. Here it is important to hold the element motionless so that the holes do not end up being mixed;
- Drilling is done using a hammer drill; the main thing here is to hold the tool horizontally and control the depth. To ensure precise work, place a piece of electrical tape or masking tape on the drill. Next, the profile is placed against the wall and dowels are inserted through the holes; the screws can either be tightened in them with a screwdriver or driven in with a hammer, the reliability of the fixation does not suffer from this, and subsequent elements are fastened in the same way;
The fastening of the wall profile must be reliable
- When the frame around the perimeter is fixed, you can begin marking the position of the load-bearing elements; they are located perpendicular to the direction of fastening the panels in increments of 60 cm. You need to draw lines on the ceiling, we need them as guidelines and will greatly help to carry out the next stage of work;
- It is necessary to secure the hangers along the lines; they are located in increments of 50 cm along our lines. Holes are drilled for fastening, and each element is fixed with 2 quick-installation dowels. To make it clearer, below is a diagram in which everything is shown very clearly, it is important to position the suspensions evenly, and that is why we made lines, they are an excellent guide;
This is what a ceiling looks like when it is fully prepared for mounting a load-bearing profile.
- Lastly, the supporting profile is attached; first you need to insert the elements into the guide frame and align them along the line. After this, the profiles are twisted together with self-tapping screws. Lastly, the ends of the hangers are bent, the profile is leveled perfectly evenly and fixed in the desired position, thus we quickly level the frame and strengthen it over the entire area.
The excess ends of the hangers are simply bent upward so that they do not interfere with installation
Stage 5 - installation of panels
We have almost figured out how to make a suspended ceiling from PVC panels; we just have to consider the process of attaching the elements.
Instructions for doing the work yourself look like this:
- First you need to carry out measuring work and, if necessary, cut the starting profile or plinth. You can cut elements either with a regular knife or with a hacksaw; in the second case, it turns out much more accurately and smoothly. If desired, you can cut corner joints at 45 degrees, but for this it is better to use a miter box, with its help the joint will be perfect;
Using a miter box you can make beautiful joints at the corners
- Then you need to attach the frame around the entire perimeter; for this, the starting profile or plinth is screwed to the bottom of the guide profile. Short screws with flat heads are used so that they do not interfere with the position of the panels. Fastening is done in increments of 40 cm so that the profile does not sag anywhere and is held securely;
The starting strip is fastened around the entire perimeter of the room
- An accurate measurement of the width of the room from wall to wall is made, after which the panel is cut to the required size; you can make it 5 mm shorter so that it becomes even and does not bend due to small irregularities. The first panel is inserted into the side guides, after which it moves until it stops; it should fit into the end profile along the entire length; if necessary, you can bend the edge of the strip with a knife and insert the end until it stops;
- Fastening is done from the outside; self-tapping screws are screwed into each profile through the panel protrusion. Next, the second and subsequent panels are placed, they are combined with each other as accurately and tightly as possible, after which they are fixed, the process is quite simple and goes quickly, the main thing is not to make mistakes when cutting the elements and not to make them too short;
- If you have spotlights in the ceiling, then holes are made in the necessary panels into which the lighting frames are inserted. They usually have clamps so they will hold up just fine. And do not forget to stretch the wires into the holes before attaching such elements, then you will not be able to reach them and will have to disassemble half of the ceiling to correct the mistake;
If you don't stretch the wires right away, you won't be able to reach them later.
- The last panel is the most difficult to insert; it often has to be cut to length, as a narrow strip remains. Make the panel width such that it extends 5 mm into the starting profile or baseboard, after which you need to carefully bend the frames and insert the element. The process is not simple, but it cannot be called complicated either; the main thing is not to bend the profile too much so as not to break it.
As an option, I can advise you to first insert the panel into the end profile and only then connect it to the previous element. But, in order to tighten the panel, you need a special suction cup, as in the photo; work with it will be quick and easy.
Using such a device will help you quickly join the last and penultimate panels
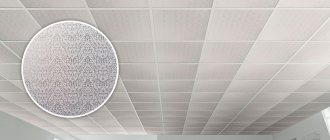
Armstrong construction panels
This type of suspended ceiling consists of a frame with honeycombs in the form of squares, and slabs are built into them. Plates for these ceilings come in hygienic, economy segment, moisture-protected, designer and acoustic types.
Even the cheapest options look beautiful in public spaces and their performance characteristics are also of good quality.