In this step-by-step photo and video instructions, we will answer in detail the question - how to correctly lay tiles on the floor with your own hands. The explanation will be in simple, intelligible language, and now even an untrained specialist will be able to cover the surface. And if you are already familiar with the basics of installation, you can scroll to the end of the article, where you can find the features of the technology for laying tiles on the floor in the bathroom, toilet and kitchen, as well as on different types of surfaces: wood or plasterboard. In addition, you should be inspired by our super selection of photo ideas (50 amazing photos!).
Surface preparation
Ideally, the floor on which the tiles are laid should be level. It is advisable not to have defects in the form of depressions or bulges. This condition must also be observed before laying coverings for gyms. Unfortunately, in practice the surface often looks far from ideal. And therefore, before laying tiles or roll coverings, it is necessary to clean and level the floor. If necessary, work must be carried out in order to reduce the number of defects.
If the surface is concrete, then it is cleaned and prepared. All existing sagging is eliminated and the surface is leveled. Plaster coatings are cut with an ax or chisel. And wooden ones require a special approach in the form of reinforcement with metal mesh. If the floor is heterogeneous and consists of several materials, then the joint can be covered with a mesh. In this case, a crack will never form on the seam. And you won’t have to worry about the safety of the coating. The solution will not lie on a loose surface. Therefore, it needs to be beaten to a solid state and leveled with a screed.
How to choose the right glue and not make a mistake?
So, it’s clear how to properly glue tiles. All that remains is to figure out the process of choosing a reliable adhesive mixture. Below is a list of points that you must pay attention to in order to choose the right tile adhesive.
- Checking the rules for storing the mixture. Products must be kept in a dry room where the temperature never drops below zero. Large construction department stores are able to provide proper storage conditions. When purchasing products from them, you don’t have to worry about the quality. The counterbalance is open markets, where glue can be stored directly on the street or in an unheated container. It is recommended to refrain from shopping in such places.
- Often, in an attempt to save money, people purchase products from little-known companies. Of course, it is permissible to select some products on the basis of lower cost, but this does not apply to glue. The cost of a mistake may be too high. Serious manufacturers closely monitor the quality of their products, so it is reasonable to give preference to them.
- When choosing a composition, you must be guided by where it will be used. For example, you cannot buy wall adhesive when you plan to replace the floor covering.
Materials and necessary tools
Of course, to carry out all the work, a large number of tools and special clothing may be required. All work clothes should be comfortable and not restrict movement. Additional pockets and knee pads will, of course, serve as an indispensable convenience. The material can be dense so that the solution does not get through the fabric onto the skin. In addition to the robe, you will need the following tool for the job:
- screws or nails;
- wire cutters, chisel, hammer, chisel, knife, pliers;
- level 120 or wooden slats;
- cutter and grinder;
- pencil, tape measure, corner;
- electric drill;
- several types of spatulas (comb, flat);
- whisk for mixing;
- ballerina;
- metal hacksaw and extension cord.
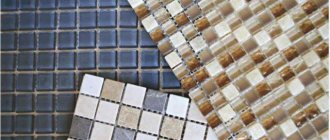
In addition, respiratory protection may be required with special clothing and tools. It is especially important to wear a respirator when using an angle grinder. A simple baby cream will help protect the skin of your hands from drying out and cracking. You may need a damp cloth in case you need to wipe the surface or your hands. By choosing the right crosses, you can ensure the surface has a beautiful and even seam.
Crosses vary in size and the larger they are, the larger the seam will be. This is how you can adjust the width between tiles.
Laying tiles on the floor requires careful sorting and placement. This saves a lot of time in the future and makes the job easier. Codes, patterns, roughness, etc. are checked. If there are defects, they are either replaced at the place of purchase. Or they are placed in the most inconspicuous places. All boxes with material are placed in the far corner closer to the exit. This will protect it from breakage and mechanical damage and make it easier to work with.
Characteristics of tile adhesive
Useful information regarding the characteristics of tile adhesive. They are:
- Consumption. This information is always placed by the manufacturer on the packaging. But we should not forget that the consumption rate is a very conditional concept. There may be unevenness on the wall that can significantly affect it.
- Drying time. The average tile adhesive takes 24 hours to dry completely. But it is still advisable to wait another day. Primary drying (the time when the position of the tile can be adjusted) averages from 15 to 25 minutes.
- Exposure to external factors. There is no need to overpay for an adhesive for external use that can maintain its properties at temperatures down to -80 degrees Celsius when you need to renovate a bathroom.
Making your own solution
If you are planning to lay tiles on the floor, then preparing the mortar is an important point in which maximum detail must be observed. Usually a dry mixture is used, which is diluted in a ten or fifteen liter bucket. Only three liters of liquid are required for such a container; this is where the mixture is diluted. Stir the water and mixture until smooth using a whisk and electric drill. Stir for 5-7 minutes, add water or glue if necessary. Then we re-mix.
How to prepare mortar for laying tiles? Use the instructions included on each bag of dry mix. You can additionally add cement mixture to the solution in order to make the solution more viscous. In addition, this can help significantly save expensive glue. The consistency of the solution should not be too liquid, but not too thick. Of course, liquid glue is more difficult to work with. Since it reduces the quality of installation and leads to the formation of defects and dirt. Over time, you need to stir the solution and add water to it. Otherwise, it may become more viscous and thick. All this can be done manually. If dust is generated during work, you can wear protective equipment, such as a respirator.
FAQ. Questions and answers
How to prepare tile adhesive?
First of all, in accordance with the manufacturer's instructions. The finished solution should have a thick but fairly soft consistency. After mixing, the glue is infused for about 5 minutes, then mixed again and only then used.
How to save tiles?
This can be done if you choose the right shape and size. Modern tiles can be large and small, rectangular and square. If you plan to use a complex pattern or the room has a complex geometric shape, then do not forget that rectangular tiles leave a lot of waste. Which, in turn, increases consumption and financial costs.
Do I need any preparation for the tiles?
Experts advise placing the tiles in a container of water for 8-10 hours before installation. This will increase the adhesion of the material, i.e. the glue will stick better. Then the wet tiles need to be laid out on the floor to dry.
How to determine that a tile is from the same series?
All tiles must be not only from the same manufacturer, but also from the same series. Then there will be no difference in shades between individual elements. It’s easy to make sure that the tiles are from the same series - just study the packaging and check the passport information.
Can I lay wall tiles on the floor?
Definitely not! Wall tiles are too flimsy and fragile to be used as floor finishes.
Insulation of walls inside an apartment: choice of material and installation technology
Deep penetration primers for walls: features, rules of use and rating of the best
How to paint plaster: choosing paint, life hacks from professionals
Leveling walls with beacons with your own hands: choosing plaster, methods and step-by-step instructions
Insulation of walls inside an apartment: choice of material and installation technology
How to putty walls with your own hands - detailed instructions and life hacks from the masters
Leveling walls with plasterboard with your own hands: 2 methods with instructions
Primer for wallpaper: what functions it performs, types, advice from professionals
On a note ! Properly laid tiles will become a highly durable, durable and high-quality coating - the most reliable in the entire house. In this regard, no other type of coating can compare with tiles! And it’s not even worth talking about its water resistance.
What markings are needed to lay tiles on the floor?
So, first you need to measure all the floor parameters in length and width. Why do this? To ensure that the markup is as correct as possible. This will allow you to comply with the tile laying technology. The angles from which you are supposed to start are marked separately. All tiles that will be cut should be in corners or in the most inconspicuous places. Such places are usually covered with furniture or are not visible from the entrance. If there is a joint with another type of tile, then metal thresholds are used.
The cut tiles are located in the place where it is covered by the door casing. In all other places, from the floor and in horizontal rows, a solid one is placed. Correct marking helps to avoid unwanted displacements and defects. By following it, you can lay tiles (or other coverings) as beautifully and efficiently as possible. Therefore, it is better to devote enough time to marking.
The best brands you can trust
The most popular brands of adhesive mixtures for cement-based tiles are Ceresit and Knauf. Their manufacturers add a variety of fillers to their compositions to promote reliable adhesion to the surface. The most common copies of both brands:
Knauf Fliesen
Made for working with natural stone and ceramic tiles. Some experts also prefer to use it for fastening thermal insulation materials, all because of its ability to easily withstand temperature changes.
Unlike the mixture indicated below, Knauf can be used on deformable coatings (provided that the composition contains an elastic additive).
The mixed structure is ready for use within 5 hours. Adhesion is at the level of 0.5 MPa. You can change the position of the glued tile within 20 minutes after it is attached.
Ceresit CM 14 Extra.
This product is designed to work with porcelain stoneware and tiles. The composition is famous for its moderate cost and durability. It can be safely used not only for internal finishing work, but also for external ones, when it is necessary to attach artificial stones to the walls of a building.
The mixture, once diluted, is suitable for use within 2 hours (after the mixture begins to harden, it must be applied before this point).
Adhesion is approximately 0.8 MPa. You are given 20 minutes to adjust the position of the tile. The mixture is not suitable for use on substrates subject to deformation during operation.
How to lay tiles on the floor if the surfaces are different
Depending on the surface on which the tiles are supposed to be laid, we will consider the basic recommendations:
- screed Laying tiles on a concrete screed is the simplest. Why, you ask? Because the prepared surface has everything necessary for this. Thanks to it, the coating will retain its properties and qualities for as long as possible. Apply glue to the prepared surface in small portions. And then, distribute it evenly over a small area, onto which the tiles are quickly laid. The tools needed for this are the same as for other surfaces. Let's look at some types of surface installation:
If you have asked this question, the answer is quite simple. Finishing is the same as with any other surface. With the only consideration that there will be more small details. And the cuts should face the inside of the stairs. Laying occurs from top to bottom, taking into account all instructions and safety precautions. The outer corner requires the installation of a metal corner or a finishing profile; installation of a plastic corner is excluded here;
how to lay tiles on stairs?- how to lay tiles on wood flooring? Of course, laying tiles on a wooden floor will not work. Therefore, in order to do this, you must first prepare the surface. Namely, replace rotten or damaged boards. Then create good ventilation to ensure the safety of the floors. Then gypsum fiber sheets are installed, preferably in 2 layers. It is on them that the tiles will be laid using regular glue. The technique is exactly the same as when laying it on another surface.
Master class: pruning
It may be necessary to trim floor tiles during installation. The instructions below will help you do this correctly.
DIY cutting of floor tiles
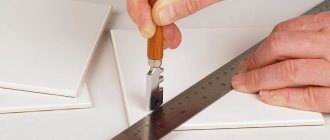
Step 1 . To trim the end tile that is adjacent to the wall, lay the last row of tiles on it. Place another element on top, retreating 10 mm from the wall, and draw a line for the future cut.
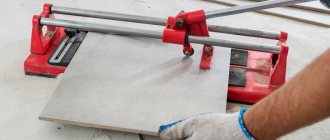
Step 2 . Place the tiles on the tile cutter so that the mark is exactly on the cutting line. Place the knife on the top edge and operate by gently pressing down on the other end of the element.
Step 3 . A similar procedure can be performed using an electric tile cutter. And if you need a figured cut, then first mark its boundaries with a pencil.
Step 4 . Divide the part to be removed into rectangles. For this purpose, use a special scriber for sawing. If the part is large enough, you will need a tile cutter or sander.
Note ! To adjust the shape, experts use parrot pliers.
How to lay tiles on the floor with your own hands: technology
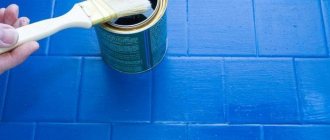
After all the necessary preparatory work has been carried out, you can begin the cladding itself. Use a notched trowel, which is held at an angle of 40-45 degrees. It is used to apply glue to the surface.
The surface itself should be small. Since the glue dries quickly, and the layer is uniform and not thick. This area is covered with tiles as quickly as possible. If there are difficulties in correctly applying the adhesive to the floor, the solution is applied directly to the tiles. The pressure on the tile should not be strong. Because if you press hard, the location of the tile may shift. It is constantly necessary to check the correct installation using a level or angle. To increase strength and adhesion, tap the tiles with a rubber or wooden mallet. The joint between the tiles is filled with crosses; they help determine the same size of the seam and the uniformity of the tiles. We do the same with the remaining rows. If you need to trim the material, then measure the dimensions with a tape measure and draw cutting lines using a corner.
We cut the tiles with a tile cutter and spread them. Glue the remaining pieces. After an hour, the crosspieces can be removed. And after 24 hours, the seams can be dried and treated with sealant. Remains of glue and jointing can be removed with a damp cloth. You can do this more often to ensure that the surface is beautiful and the installation is of better quality.
Expert advice
The recommendations below will help you with laying floor tiles.
- Prepare glue only in a clean container - the presence of foreign impurities in it is unacceptable.
- Tile adhesive is toxic; use a respirator when mixing it.
- When cutting tiles, do not forget about protective equipment. Use safety glasses and a respirator, because caustic dust can be harmful to your health!
- The glue sets quickly enough, and therefore you should not apply it to large areas at once.
- When applying the adhesive, the spatula should be held at an angle of 45 degrees relative to the floor/tile.
- Make sure that there are no voids in the glue layer.
- Finally, you can use a regular damp sponge to remove the adhesive from the tiles.
Rules for laying floor tiles
Laying tiles at the joint with laminate
Sometimes difficulty can arise in how to properly connect the joint between laminate and tiles. How to lay tiles in this case? It is sometimes difficult to make a joint visually attractive and beautiful, but it cannot be said that it is impossible. The finishing of this point is usually done using a wooden or laminated threshold. Plastic and metal are rarely used.
The joint between laminate and tile requires not only the choice of threshold, but also its high-quality fastening. There is an open method and a hidden method, when the screws are not visible. Everyone chooses independently, depending on their individual needs.
After laying the tiles, its surface must be treated with a damp cloth with a detergent solution. This will help maintain its attractive appearance and remove any remaining glue or jointing from the surface. Completion of work also involves cleaning tools and clothing from dirt and trapped material. Insufficient attention to this issue will lead to rapid wear of not only clothing, but also tools. Because after drying, the glue and jointing are quite difficult, if not impossible, to remove. So, we discussed the question: how to lay tiles yourself? As you can see from this article, laying tiles is actually not such a scary task. If you follow the instructions and take your time when performing the work, you can quickly gain experience. Then laying tiles will become a habit for you.
We look forward to your comments, questions and comments. We are ready not only to transfer knowledge, but also want to learn ourselves, from you. Share your experience, because tiling is an area of work with many facets.
Laying features
Laying floor tiles is not as simple as it might seem at first glance. Despite the fact that the coating created from it is highly durable, the material is quite fragile and demanding to work with. This, in principle, explains the main difficulties when finishing floors with tiles. Keep this in mind if you decide to do the installation yourself.
Important ! To avoid mistakes, it is necessary to study the process at least in theory, otherwise after the repair you will most likely be disappointed. There is a technology that must be followed even when you really want to save on materials and tools. But first things first.
Study the technology of laying floor tiles in advance
Calculation of the number of tiles
In order to find out the number of floor tiles, you should make calculations, taking into account the cutting distance:
- Having chosen a single-color design, you need to calculate the square footage of the floor and add 10% to it.
- The resulting numbers must be divided by the area of 1 piece of tile and the desired result should be obtained.
- When the dimensions of the tiles are known, you need to lay out the tiles in the kitchen on the floor.
- To understand the whole picture, you can schematically depict the floor to scale.
- When you choose the type of floor for tiles with relief, the amount of waste increases greatly.
It is worth remembering that laying floor tiles in the kitchen is done with seams; otherwise, the cut item runs the risk of not fitting into the niche.
Several life hacks from practitioners
If you choose a simple tile laying pattern - seam to seam, it is better to lay it not in rows, but at an angle. Lay two or three horizontally, several vertically, start the next row by laying out a corner. Then add a few pieces in the first row, then in the second, start the third. And so on. With this method, it is easier to maintain the surface, and you can control the “care” of the rows. If anything, you can adjust it due to the width of the gap.
Second practical point. Constantly check the evenness of the tiles. Not only each tile individually, but also how it is positioned in relation to those next to it.
Another trick - if tile adhesive gets on the front surface of the tile, remove it immediately without leaving a trace. As long as it is wet, it washes/puts away normally. As soon as it sets, you will have problems. The same goes for grout, by the way. Especially polymer ones. In general, you need to work with her quickly. And so that there is no whitish residue left on the surface of the tile, after the grouted tile has been wiped with water - the excess polymer grout has been washed off, forming a seam - we wipe each tile dry with a soft cloth. In this case, we do not touch the seams. They should be smooth.
Choosing floor tiles – which option to choose?
One of the important criteria when purchasing tiles is their abrasion resistance. For public spaces, as well as hallways, where traffic is highest, porcelain stoneware would be the ideal choice, since it best resists mechanical stress. For bathrooms, on the contrary, you can choose the lowest class, since these rooms are not walk-through. And such a property as resistance to moisture and aggressive detergents comes first here. It would not be superfluous to pre-waterproof the floors before installation in bathrooms and toilets. This approach will increase the coating's resistance to moisture.
When choosing tiles for the floor of the kitchen and dining room, first of all, pay attention to the material’s resistance to mechanical stress, because during cooking and eating, not only food, but also dishes or utensils often fall on the floor, which can damage the coating. Tiles of abrasion class 3 will not only last in such a room for a long time, but will also be able to adequately withstand household chemicals used during cleaning. It is preferable to choose a product with the AA marking, which means that the tiles do not absorb dirt and chemicals are not capable of destroying its structure.
To prevent the surface from being slippery, you need to choose tiles with an index of at least 0.75
The surface of the tile is very often slippery, and not only glossy, but also matte tiles have this feature. When purchasing, look for a product with an index of at least 0.75. This will avoid falls and injuries, which is especially important if there are small children or elderly people in the house. It is worth mentioning that different surfaces have their own distinctive features:
- glossy is easy to clean, but stains are always visible on it;
- It is much more difficult to remove relief tiles, since they are capable of accumulating dust and dirt in the recesses;
- Matte tiles are the hardest to clean, although they hide all minor defects (cracks, debris and chips) better than others.
We do not recommend gluing wall tiles to the floor - they are not intended for this, since they are not strong enough and break easily.
Common Mistakes
In conclusion, let's look at some common mistakes that are made when laying floor tiles:
- The most serious mistake is failure to ensure that the tiles are laid out evenly on the sides of the room. It is generally better not to make narrow cuts, especially on a visible area of the floor that is not hidden by plumbing, as it does not look very attractive.
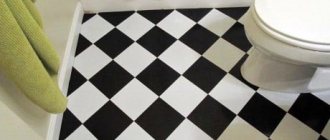
Examples of unsuccessful tile layouts. - The joints between the tiles are too wide (more than 3 mm). Even if the tiles are large, a joint of 2–2.5 mm is more than enough.
A seam that is too wide looks awkward in any bathroom. - Another serious mistake is trying to lay tiles without dismantling plumbing fixtures, such as a toilet. Attempts to cut tiles in a semicircle will lead to chips and scratches; as a result, such a finish looks ugly and even poor. The correct technology is to lay the floor covering and install the toilet on top of it. If the toilet is embedded in an old concrete screed, it will have to be broken and a new one purchased.
Before installing the tiles, the toilet is dismantled, and after installation is completed, it is installed on top of the new floor covering. - Improper preparation of the base and the choice of inappropriate or low-quality adhesive leads to the fact that over time the tiles lag behind the base or adhesive solution. If there is a lot of air space under the tile, this coating is susceptible to cracking. Therefore, it is important to follow installation technology and purchase quality materials.
If you lay the tiles according to all the rules and avoid serious mistakes, then such a floor covering is considered the most reliable and durable, because high-quality tiles practically do not wear out and do not change their appearance throughout their entire service life.
Advice! If you need bathroom renovation specialists, there is a very convenient service for selecting specialists from PROFI.RU. Just fill out the order details, the experts will respond and you can choose who to collaborate with. Each specialist in the system has a rating, reviews and examples of work, which will help with the choice. Looks like a mini tender. Placing an application is FREE and does not oblige you to anything. Works in almost all cities of Russia.
If you are a master, follow this link, register in the system and be able to accept orders.
Final stage
While working, you need to periodically wipe the already completed area of masonry with a rag. This is necessary to wipe off any remaining adhesive before it hardens. And after laying the entire flooring, you cannot walk on it for at least two days.
Grouting floor tiles
After the glue has hardened, you can begin grouting the joints. For this, a special moisture-resistant putty is used. This work can be done using a rubber spatula. But first you need to clean the seams from construction debris and dust.
After all the seams have been rubbed, you need to clean the entire floor of debris with a rag. Then the grout is given a day to dry and you can begin wet cleaning.
This completes the tile laying work. You can learn some tricks and installation techniques by watching videos and photos.
How to cut tiles?
During the installation process, it may be necessary to cut individual tiles. As a rule, these are junctions with walls, corner bends, spaces near doors, pipes, etc. There is a special tool for this - a tile cutter. But for a single job, you can also use improvised tools. To cut tiles used for wall cladding, a glass cutter is sufficient. To make the procedure as simple as possible, you need to soak the tiles in water for about one hour. This will make the tile more pliable.
Attention! The cut line on the tile should be located at least 1 cm from the edge. Otherwise, despite the tool used and its capabilities, the product runs the risk of becoming deformed.
While tiles can be cut with a glass cutter, floor tiles, in particular porcelain stoneware, cannot be handled with such a tool. Floor tiles are more dense and durable, so you will still need a tile cutter, which can be found in any hardware store.
In the simplest version, with minimal functional equipment, the cost of a tile cutter starts from 400 rubles. It may also be necessary to make holes of different sizes in the tiles. To do this, you will need to buy “tile drills” and a so-called “ballerina drill”.
What to consider when choosing tiles
If when choosing wall tiles the main attention is paid to the decorative component, then for the flooring material the strength characteristics are more important. Ceramic floor tiles are produced in accordance with GOST 6787–2001. According to this regulatory document, the physical and mechanical characteristics of floor tiles must correspond to the values indicated in the table.
In addition to the indicators given in the table, the tile must have chemical resistance to certain types of solutions in accordance with GOST 27180–2001.
The size and thickness of the ceramics for the floor are of no small importance. According to current regulatory documents, floor tiles are available in the following shapes and sizes:
- Square: 150×150; 200×200; 250×250; 300×300; 330×330; 400×400; 500×500 mm.
- Rectangle: 150×200; 200×250; 200×300; 300×400; 300×500 mm.
Note! The minimum thickness of ceramic tiles intended for use as flooring is 7.5 mm. All products with a smaller thickness are intended for wall cladding.
As for choosing the size of the tiles, it is worth starting from the dimensions of the bathroom. For compact rooms, it is better to take ceramics of minimal sizes: such a design will look as harmonious as possible and visually increase the area. For spacious bathrooms, large square or rectangular tiles are suitable.
Advice! When choosing floor coverings, pay attention to the front surface. You should not choose smooth, glossy samples, as the floor will be very slippery and the risk of injury will increase, especially on a wet surface. The optimal structure of the front surface is slightly rough or embossed.
Often, ceramic granite tiles, manufactured according to GOST R 57141–2016, are used for tiling heated floors in bathrooms. It has less water absorption, greater strength and hardness. The physical and mechanical characteristics of porcelain stoneware slabs intended for indoor flooring are shown in the table.
Note! The dimensions of manufactured porcelain stoneware slabs are 300–1200 mm in width and 200–1200 mm in length. The minimum thickness of the slabs is 7 mm.