A day after laying the slabs, the joints are grouted. For grouting, a mixture of liquid glass or a frost-resistant special solution is suitable.
When a person enters a house, the steps receive the heaviest load. That is why it is necessary to give the porch maximum strength and wear resistance. Just covering the steps with tiles helps to cope with the problem.
Laying tiles with your own hands
Next, we will tell you how to choose slabs for finishing the stairs, and in what sequence to carry out the work. We will also provide recommendations that will help you quickly and efficiently complete the repair and arrangement of the porch.
Next, you need to check and level the plane of the ceramics according to the building level, ensuring that the planned slope is maintained and the same plane as the previously laid specimens. Experts recommend taking tiles from several packs one at a time.
Material selection
It is very important to choose the right cladding material relative to the location of the stairs.
Tiles for external finishing of steps should differ in performance characteristics from the material for cladding internal structures. It is important to take into account not only the properties of the tile itself, but also the characteristics of the adhesive composition and grout.
The most popular tile materials are:
- porcelain stoneware,
- clinker,
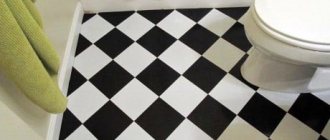
- tile,
- concrete tiles (paving stones),
- a natural stone.
Let's consider the properties of each material, paying attention to the main advantages
Porcelain tiles
The most popular material for external cladding is porcelain stoneware. Available in various sizes, with different decoration options: from matte to lapped.
Porcelain tiles are attracted by the following qualities:
- absolute chemical inertness;
- naturalness, environmental friendliness, fire safety;
- almost zero level of water absorption;
- high bending strength and low level of abrasion;
- resistance to physical influences;
- most options remain non-slip even when wet;
- high thermal insulation properties.
The most important quality of a material for constructing stairs is abrasion. Porcelain tiles according to this principle are divided into 5 classes (PEI I - V)
For interior steps, cladding of class PEI IV is suitable; for the porch it is better to choose material with abrasion class PEI V.
Clinker
In the manufacture of clinker tiles, highly plastic grades of clay are used, without any plasticizers or chemical pigments.
As a result of intensive pressing and high-temperature firing, the output clinker acquires the following properties:
- water absorption no more than 6%;
- resistance to temperature changes;
- high level of wear resistance;
- chemical inertness;
- color in the mass.
The surface of clinker tiles imitates the texture of brick, and the color options for finishing are quite varied and limited only by the naturalness of the dyes.
Tile
As with porcelain stoneware, the degree of abrasion or resistance of the top layer to stress is important here (read more here). For cladding you should also purchase class 4 or 5, depending on the location of the stairs.
Other important characteristics include the following indicators:
- Material thickness. This indicator indirectly indicates the degree of strength of the tile. For stairs we select tiles with a thickness of 10 mm.
- Frost resistance is very important for cladding street steps.
- Water absorption. Tile can absorb up to 15% moisture, therefore, when using it for exterior decoration, you should select tiles with the lowest possible index, otherwise the cladding will be short-lived.
- Resistance to active chemicals. For internal interfloor passages, this indicator is not particularly relevant, but for porch steps, class A or AA tiles are suitable, that is, the most resistant.
Paving stones
Finishing steps with paving slabs is practiced in parks or public recreation areas. This finishing method is the most budget-friendly. Moreover, you can make concrete tiles yourself.
There is no need to purchase special equipment for this. Despite the fact that the price of the product is quite low, the material has high strength characteristics, and with the help of various additives, all the disadvantages of concrete can be minimized.
In addition, concrete paving slabs have the following advantages:
simplicity and cost-effective installation; durability and practicality in operation; fire safety and environmental friendliness.
Stone
Cladding steps with natural stone is a very expensive solution and requires a professional approach. Natural stone has high fracture strength, but is very difficult to process during cutting.
At the same time, when selecting stone tiles, you should take into account the individual qualities of the rock:
- Granite becomes quite slippery when wet, so it is necessary to install additional anti-slip pads.
- Marble has a high ability to absorb moisture and is more suitable for interior work.
Form
The shape of the steps for the porch is largely determined by the design of the entrance, the size of the area in front of the house, and, of course, the type of staircase. So, the staircase can be single-flight or double-flight with steps perpendicular to the door, or with side steps. Typically, a porch consists of a one- or two-flight staircase; steps, semicircular or rectangular, can be located relative to the upper platform in a circle, on one side, on both sides, and in front. If the house has a high base, then the porch may consist of a landing and a spiral staircase with an almost triangular tread.
Semicircular concrete porch
Sequence of finishing steps with tiles
Let's look at the method of preparing and laying tiles on the porch and adjacent steps.
Tools and materials
So, for work you need to prepare the following tools and materials:
- Spatula and trowel;
- Rubber spatula;
- Electronic drill;
- Glass cutter;
- Roulette and ruler;
- Hammer;
- Crosses for tiles;
- Cement (M200 and above);
- Sand;
- PVA glue;
- Tile.
Preliminary work
Before cladding it is necessary to carry out a number of preliminary measures:
- Level the porch with a screed, giving it a slope of 1.5-3° (about 2 cm per meter of coverage).
- Seal the deepest cracks on the steps. The slope is improved directly during installation of the tiles.
The procedure for creating a slope on a finished cement porch is as follows:
- Place a metal mesh on the surface. You can use a chain-link made from a rod up to 4 mm thick.
- The installation stroke of the steel wire is 20 cm. The mesh is secured with mounting brackets or dowels.
- Set up beacons. It is better to make them from sand and tile adhesive. With this option, the entire preliminary structure may be poured and walled up with a screed.
- Apply an alternate layer of mortar and tile adhesive to the completed frame. Work is carried out in the direction from the front door to the first step.
- Leave the treated surface until completely dry (24 hours).
Laying tiles on the porch
After the days have passed after pouring concrete, the surface of the porch must be sanded, all “protrusions” must be rubbed down and imperfections must be covered up. The upcoming work is carried out in the following sequence:
- Clean the surface of the porch (sweep, take out construction debris).
- Prime the cement surface. You can use a special primer or an aqueous solution of PVA glue.
- Leave the primer to dry completely (about 30 minutes).
- Place the tiles on the porch. It is necessary to try to ensure that the surface is very filled with solid elements. The layout is made from the door. Small cuts are allowed along the perimeter of the porch (at least 20-30% of the overall dimensions of the tiles).
- Lay the tiles on a thin layer of tile adhesive (layer thickness - less than one cm). The gaps between the tiles must be filled with mounting material.
- If the tile is not firmly fixed, it must be removed, checked for the presence of adhesive and laid again.
Preparing the riser, laying tiles and finishing the ends
After finishing the porch cladding, you can begin laying tiles on the staircase steps.
- Design of the first riser from above. To firmly join the tiles on the porch and cover the riser, you can use a special stencil. The tool is a corner with a small cutout to match the thickness of the tile.
- If the riser is very deep (more than 3 cm), it must be reinforced with scraps of reinforcement or steel mesh.
- While the first end of the step dries, the tiles are installed on a horizontal surface. “Trying on” the coating without glue - assessing the appearance and material consumption.
- During installation, it is imperative to maintain a slight slope for water drainage (2-3°).
- After finishing all the steps, you can start decorating the ends. Laying must be started from the corners to avoid breaking the symmetry.
Different materials are suitable for facing the ends: clay tiles, decorative mosaics, granite, marble or various tiles
Final step
A day after the completion of laying the tile covering, it is necessary to grout the seams. As a grout, a solution based on watery glass or special compositions are used - frost-resistant fugues, created for external application. Turns and corners of steps can be decorated with steel corners, protective rubber mats and anti-slip coating.
Non-specialized advice on tiling stairs
Here are some tips that will help improve the quality of the cladding steps:
Installation work must be carried out at a temperature of 20°C. The best seam width is 3-4 mm. It is best to use a notched trowel to apply the adhesive to the tiles. To firmly fix the tile in a suitable position, after finishing the laying, you need to tap it with a rubber hammer. Traces of glue must be removed from the tiles just right with a soft sponge soaked in water. Step cladding: design options
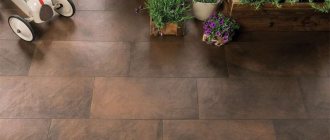
Decoration of steps with clinker tiles combined with natural stone.
Finishing a cement staircase with tiles.
Steps in the style of classicism. Finishing: natural stone.
Unusual staircase decoration. The risers, decorated with decorative mosaics, form a solid outline.
A single stylistic solution for the porch, steps, railings and walls of the room.
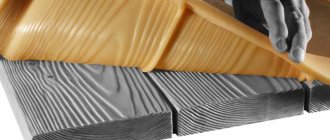
DIY finishing of concrete stairs with wood with photo
To finish a concrete staircase with your own hands, you will need the following tools and materials: drill, dowels, screws and a screwdriver, jigsaw, grinder, hacksaw, plywood, liquid nails, polyurethane foam, level, ruler, boards, wood varnish.
As shown in the photo, when finishing a concrete staircase with wood, if the concrete steps are uneven, then it is recommended to build a wooden frame from bars (logs) on top of them. Use a ruler to measure the bars of suitable length and cut them with a grinder. Then you need to connect the wooden blocks together using a screwdriver. This must be done strictly at a right angle, checking the verticality with a level. Boards should be secured to the constructed wooden frame using glue and screws: treads and risers. When finishing a concrete staircase with wood, the top of the steps must be coated with a special varnish for wood.
On each step, starting from the bottom of the staircase structure, plywood should be fixed in size equal to the area of the step. Plywood must be cut using a jigsaw.
For ease of installation of plywood when finishing a concrete staircase in a private house, it is recommended to first insert the dowels into the holes and mark their heads. By carefully placing a sheet of plywood on the dowels, you can get marks for future holes. To avoid creaking steps, before nailing the plywood, you should treat the tread with polyurethane foam. Next, you need to attach a wooden board of a suitable size to the plywood sheets using liquid nails. TO finish a concrete staircase, you can either saw it off yourself or order it ready-made from a carpentry shop.
The gaps between the step and the concrete can be easily closed with decorative frame strips. If there are no planks, then the cracks can be treated with polyurethane foam, and after it dries, carefully level out its unevenness and cover it with plaster along with the riser.
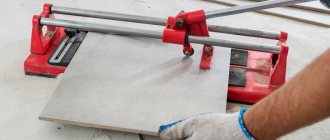
Finishing the steps of an external concrete staircase in a private house with tiles
Finishing the steps of a concrete staircase with tiles can be easily done independently, even by a novice craftsman. To do this, you first need to clean the base from residual mortar and dust and level it. Then you need to pre-lay out the tiles. Most likely, it will be necessary to cut some into several pieces of a certain size. If you don't have a tile cutter at hand, you can use a glass cutter. Next, to finish a concrete staircase with tiles, you need to mix a cement-sand mortar in a 1:1 ratio and apply it in a thin layer to the surface of the staircase.
To avoid the formation of cracks, it is recommended to fill the joints of horizontal and vertical planes with silicone-based sealant.
The stages of finishing external concrete stairs are shown in these photos:
Technology of laying tiles on the wall. Laying tiles in stages.
First, you need to establish the baselines that are needed in order to correctly orient the tiles relative to the horizon. Since floors are not always level, base lines are measured using a level.
Step 1. First we set a horizontal line. To do this, we lean the first row of tiles against the wall and mark where the top edge of the lowest one is located. Along it, using a level, we place and nail a strip strictly horizontally, on which the tiles will subsequently be laid.
Step 2. The vertical rail is installed in the same way. We apply a tile to the left edge and set a plumb line. By moving the tile from top to bottom along the plumb line, we determine the extreme point at which we set and nail the lath. We stretch nylon threads between the slats in order to place the tiles along them. The threads must be stretched strictly parallel to the wall, at the same distance from it.
Step 3: Lay out the tiles on the floor, and if they have a pattern or raised surface, make sure they match everywhere. The optimal arrangement of the tiles will not only provide an attractive appearance of the coating, but will also significantly save on its quantity, since in this case it will only be cut on one side.
Step 4. Before you start gluing the tiles, apply a thin layer of adhesive to a wall surface of about 1 square meter using a notched trowel, thereby forming grooves that promote more efficient adhesion of the bonded surfaces.
Step 5. The first tile is placed in the area where the base slats intersect. It is necessary to apply a thin layer of glue to its reverse side and quickly press it to the surface. After this, its position is aligned with respect to the tensioned threads, and is also controlled using a level.
Step 6. Next, all the tiles of the bottom row are laid out, each of them must be pressed into the glue and placed in the same plane as the others. Using the rule, we constantly control that the front surface of all tiles is in the same plane. In order to ensure the same distance between the tiles, special dividers are used - crosses or plastic wedges. The last tile, as a rule, does not fit completely. Therefore, its seating position is carefully measured, and the tile itself is cut to the extent necessary. The glue that protrudes between the seams is removed with a rag.
Step 7. After each tile of the first row is installed, you need to make sure that the glue evenly fills the entire space under it and that no voids are formed. Cavities usually form in the corners, so they must be filled with the same solution that is used for gluing, only with a thinner consistency. All this must be done before another row is laid.
Step 8. Then we proceed to laying the next row. Glue the first tile in the same way, set its position, and continue laying the rest to the edge of the wall.
Step 9. After all the rows have been laid, the base strip is removed and the bottom row is laid in its place, and the tiles are trimmed as necessary using a grinder. Once all the tiles are in place, you can carefully pull out the spacer wedges.
Grouting between tiles
It is best to do jointing the next day after installation, when the glue is sufficiently hard.
The prepared composition is rubbed between the tiles using a special rubber spatula, while at the same time excess material is removed from the surface. It is necessary to ensure that the composition evenly fills the entire joint space between the tiles, without leaving cavities.
Next, using a wooden stick with a rounded end, the seams are given the required shape, and their shape is formed. At the final stage, use a damp cloth to wipe the tiles, getting rid of any remaining material, and at the same time smooth and clean the surface of the seams
It is best to smooth out the seams at the moment when the solution begins to harden, but you must act carefully so as not to disturb their geometry.
If you decide to carry out all the work yourself, before laying tiles in the bathroom, kitchen or hallway, carefully read the instructions, prepare everything you need and carefully think through each stage of the work. Because not only the quality of the appearance of the coating, but also its durability depends on how correctly you follow the instructions.
Laying tiles on round steps
The first step is to line the area near the entrance doors. They start laying from the outer edge of the area so that the pattern looks symmetrical.
The first outer row is laid out according to the markings, stretching the thread from one edge of the site to the other. The string serves as a guide for the center of each tile.
To make the seams even, crosses are used.
The thickness of the adhesive mortar layer may differ at different edges of the site if the concrete was poured unevenly. The plane must be checked with a level.
The entire site is laid out at a time only if people will not go into the house for a day.
The tiles on the steps are laid out in the order in which they were signed, starting from the top step to the bottom.
Installation Rules
Choosing the angle of a concrete staircase.
Among other things, you need to know some nuances, taking into account which will allow you to implement everything you plan quickly and at the highest level. The most important condition that future steps must satisfy is safety for all members of your family. Accordingly, if you have small children or they often come to visit you, then you should avoid overly dangerous finishing options, and the distance between them should not be too large, since it will be quite difficult for children to climb them. And over time, you yourself are unlikely to run up and down the stairs like schoolchildren.
Thus, if you are going to add steps to a wooden hut outside the city, then massive metal and concrete stairs are probably not suitable for you.
Tools and materials for finishing work
When the required amount of tiles has been purchased, in addition to them, you need to prepare tools and consumables for work.
Tools you will need to lay the floor with ceramic tiles.
Tools for work
Tools you will need:
- Construction level 1000 mm long.
- A tape measure, the length of which must be at least the length of the diagonal of the room.
- Painting (mooring) cord for marking the surface of the base before laying tiles.
- A tile cutter, sander or other tool capable of cutting tiles.
- A trowel or wide spatula with a serrated edge. This allows you to distribute the adhesive solution over the surface as evenly as possible and avoid the occurrence of voids.
- Conventional spatulas 100÷150 mm wide.
- A set of a roller, a sliding rod-handle for it and a special bath with an inclined ribbed surface. All this is necessary to prime the floor surface.
- Rubber spatula for filling the joints between tiles with grout.
- A clean container for mixing glue and then grout, approximately 10 liters in volume.
- Construction mixer or electric drill with appropriate attachment.
- Rubber hammer - if necessary, knock the tiles down to the general level of the cladding.
- Construction gloves and rubber knee pads - these items will help you avoid getting hurt while working and make it more comfortable. When cutting tiles with a grinder, safety glasses and a respirator may be useful.
In addition to these tools, you will need a metal ruler and a marker for marking the tiles. As well as a rag and a sponge for cleaning the tiles both after laying and after applying grout.
Materials for laying tiles
Materials for tiling the floor you will need:
Tile adhesive and grout for joints (fugue) are the main materials for tiling the floor with ceramic tiles
- Primer composition - it is used to treat the base surface of the floor to ensure reliable adhesion to the tile adhesive. The quantity depends on the area of the room. And it is better to count on applying primer twice. However, if a house or apartment is undergoing renovation, then the primer is always purchased with a substantial supply - it will always find a use. For example, there may still be wallpapering or other finishing ahead.
- Cement-based tile adhesive.
- Grout mixture of the selected color.
- Plastic calibration crosses that determine and maintain a uniform width of tile joints during installation. Their cost is low, so you can take them with a good supply.
But for glue and grout, it is better to calculate the required quantity.
Tile adhesive
The adhesive consumption depends on the size of the selected tile. The larger it is, the thicker the layer should be and the greater the height of the tooth of the comb spatula. Therefore, as the size of the tile increases, so does the consumption.
You can use the following table:
| Tile size (for rectangular - along the long side), mm | Recommended ridge height of a notched trowel, mm | Approximate consumption of adhesive solution, kg/m² |
| no more than 50 | 3 | 1.9 |
| from 50 to 100 | 4 | 2.5 |
| from 100 to 200 | 6 | 3.8 |
| from 200 to 300 | 8 | 5 |
| from 300 to 400 | 10 | 6.3 |
| over 400 | 12 | 7.6 |
It’s even easier to calculate using our online calculator below:
Calculator for calculating the amount of tile adhesive
The result is shown taking into account a 10% margin. The masonry scheme here has no effect on the glue consumption.
Grout for joints
When grouting joints, the spacer must completely, to the full depth, fill all the gaps between the tiles. Therefore, the total consumption will depend on the following initial values:
— Dimensions of tiles in length and width. This directly affects the “density of the joints,” that is, their specific length for each square meter of the floor surface being tiled.
— The thickness of the tile will determine the depth of filling the joint with the fugue.
- And, of course, again this is an area to be tiled.
The online calculator below will help you make the calculation quickly and accurately.
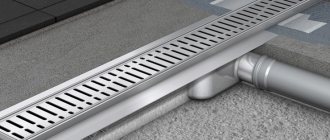
Installation of stairs on a metal frame.
Corner for stair steps types, materials and installation. The principle of finishing the walls on the stairs description, characteristics, photos, videos. The important role of stairs in the house
Depending on the design solutions and layout of the house, staircases can be single or double flight.
In cases where a flight of stairs is designed for a large number of steps (more than 10 in one flight), moving along the stairs becomes difficult and inconvenient.
Therefore, flights are divided into two or more flights and separated from each other by intermediate landings.
The installation of stairs begins in the following order:
- install scaffolding from inventory elements (Fig. 3);
- using a tape measure and a level, mark the location of the nests for the support beams;
- they punch out the nests with jackhammers (the dimensions of the nests are taken according to the cross-sectional area of the steel beams, taking into account the required embedment depth of 200...250 mm
and the anchoring provided for in the design); - one nest from each pair is punched to a depth twice the embedding depth;
- steel beams are laid (Fig. 1, item 1) - when laying, the beam is first inserted with one end into the deep socket until it stops, and then inserted into the opposite socket;
- with a beam weight of up to 200 kg
, installation can be carried out manually; - the laid beam is aligned with cement mortar on the supports;
- the lower flanges of the beams are wrapped with metal woven mesh;
- the nests are sealed with bricks and cement mortar, carefully wedging all the voids;
- lay steel beams of stringers, with fastening in places marked in advance (Fig. 2);
- Flat reinforced concrete slabs of staircase landings are laid along the flanges of the beams (Fig. 4);
Tiling steps
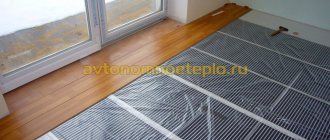
Surface priming
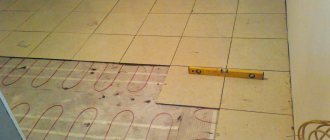
Laying ceramic (or any other) tiles on stair steps begins with preparing the surface. If the steps are uneven, then smoothing will require applying a large amount of glue, and this is not advisable.
If noticeable flaws are identified, alignment should be carried out using beacons. It is recommended to make them from a mixture of sand and tile adhesive. Standard plaster or metal beacons are not suitable here, since after the screed has hardened, they sometimes protrude above the surface.
Also, the steps need preparation for screeding. You should not place the solution directly on concrete - this will not provide high-quality adhesion of the materials. Therefore, a wire frame is attached to the surface of the steps using tin clamps and an adhesive mixture and cement-sand mortar are laid on top of it in layers, having previously installed beacons for control.
The next day, the screed is checked and, if the beacons rise above the surface, they are “recessed” back. After the solution has hardened, the screed is sanded with a special grater, cleaned of debris and dust, then the steps are coated with a primer. Now you can proceed to laying the material.
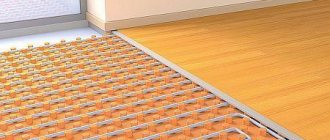
Distributing tile adhesive along the steps
In order for the tiles to lie evenly on the steps of the stairs, you need to distribute the glue correctly. It is applied with a notched trowel, allowing the solution to be distributed in a thin, even layer. Before this, the surface of the concrete is wiped with a sponge soaked in water to improve the adhesion of the materials. The consistency of the glue is also important. To ensure it turns out well, follow the cooking instructions on the package.
Distribution of adhesive composition
The finished adhesive mixture is taken with the corner of a spatula and applied to the steps in semicircular strokes, using the flat side of the trowel. The finishing touch is to “comb” the adhesive layer with the teeth of a spatula.
If the surface of the stair steps has been previously leveled, and the glue has been mixed to the desired consistency and distributed in a thin layer, the cladding will not require much effort, and the coating will be perfectly smooth. You can check horizontality using a building level.
Installing Tile Separators
After applying the adhesive composition, it is time to lay the cladding. In order for its rows to turn out impeccably even, before laying the tiles on the steps, you will need to install dividers - cross-shaped plastic or metal parts that regulate the size and angle of the gaps between the tiles. You can purchase them at any hardware store.
Tile separator
After laying out the rows and installing dividers between the tiles, you should remove excess glue with a damp sponge before it has time to harden, and then lightly tap the surface with a rubber hammer, securing the material in the desired position. In this case, the evenness of the masonry is checked using a building level, and the correct location of the resulting rows is checked using a square.
First, the horizontal surface of the steps is faced, starting with the corner tiles, and then the vertical part - the riser. When working with risers, the use of spacers is also recommended.
The described steps are repeated until the entire coating has been laid. So, to ensure a tidy staircase made of tiles, adhere to the following rules:
- Regularly check the evenness of the masonry rows with a level.
- Do not use tiles with cracks or defects.
- Install dividers in all rows.
In addition, on the second day after completion of installation, tiles for outdoor stairs must be processed at the joints. To do this, grout is applied between the facing panels, contrasting or matching the color of the material. This treatment will increase the moisture and frost resistance of the coating.
Laying tiles on the landing
The last stage of work is finishing the landing. This process is similar to laying material on steps; the only difficulty may be the shape of the platform. If this space has complex curves, you should lay it out with tiles without mortar in advance and mark out the places where the material will have to be trimmed.
Landing of non-standard shape
Having finished the cladding, all that remains is to wait until the coating securely adheres to the surface of the steps. Typically, the adhesive solution hardens from one to three days, after which the staircase is suitable for use. As you can see, laying tiles on the stairs is not difficult, although it will require diligence and some effort, but the result - a durable and neat staircase is worth it.
https://youtube.com/watch?v=MhDcO5NYSgQ
Grouting joints
To finish facing the steps, you need to grout the joints. The grout mixture needs to be moisture-resistant, which is well suited for outdoor use. Based on the color scheme, choose what suits you and what you like. Usually they take a color that is either the same as the cladding or matches it, which will highlight the seams and emphasize the geometric correctness of the laid steps.
The grout mixture is applied to the seams using a rubber spatula. Try not to let the grout get on the outer surface. If, however, the grout mixture ends up on the surface of the laid cladding, it must be removed immediately, preventing it from drying out.
After the grout mixture in the seams has dried, the surface of the stair steps is thoroughly washed with water, and then the remaining water is removed with a soft cloth.
Tips and rules for installation
To ensure a beautiful, perfectly smooth surface, you should remember the following points:
It is advisable to start a new row so that it ends near the exit of the room
And then you won’t have to step on the newly laid tiles. When planning a grid for floor tiles, you need to take into account the width and length of the seams. Pay attention to the lighting in the room. In the sun's rays, irregularities and discrepancies are especially striking. The surface must be treated with a deep penetration primer
This will guarantee that the tile will not fall off. It is advisable to use crosses with a thickness of 1.5-2 mm. When preparing the mixture, you first need to pour water, then the dry mixture. When grouting joints, it is better to wipe off the excess immediately before it dries.
How to lay
Before starting work, the required amount of carpet is calculated. It is best to take a whole canvas for the room, but if its size is not enough, then the pieces can be joined together. The material is taken in such a way that there is a margin of about 5-8 cm for the walls; the excess carpet can then be cut off.
Carpet can be laid on almost any base: concrete screed, tiles, wooden floors, on stairs, there is tiled carpet, the main thing is that the floor is smooth and clean.
If you have a concrete base, then carefully level it using putty, let it dry and completely remove the dust.
The wooden base can be leveled using chipboard sheets, the joints are sealed with putty and everything is opened with a primer.
There is another way: first, the nail heads are pushed down, then the surface is scraped, primed and filled with a self-leveling mixture for wood.
If you do everything yourself, follow these recommendations:
- lay the carpet on the floor and let it lie for at least a day until it is completely level;
- there should be no draft in the room, otherwise folds may form on the coating;
- instead of a primer, you can use a mixture of PVA and water;
- During work, the room temperature should be at least 17 degrees and humidity within 10-65%.
Very often, home craftsmen ignore laying underlay under the carpet, but experts recommend using it.
Substrate
Laying the underlay improves the heat and sound insulation characteristics of the specified coating, it gives it strength and elasticity.
Using a backing almost doubles the service life of the carpet. For this, foamed polyurethane or rubber is usually used.
In the hallway it is better to use a thin and durable underlay, but in the bedroom and nursery you can lay thicker material. At the next stage, the carpet is laid, its excess is cut off, and it is pressed using baseboards.
Tile carpet
Tile carpet is produced in the form of squares with a side size of 50 cm, it has a denser base, and thanks to its precise dimensions, its installation is carried out practically without seams.
Installation of such a covering can be carried out using double-sided tape or carpet glue.
First, the base is leveled, after which the tiles are laid, installing them using one of the methods described above.
When laying with tape, first they glue the perimeter of the room with it, then they make a grid with a cell size of about 50 cm. Now all that remains is to remove the protective film and you can glue the tiles. Thus, they first move along one lane and then move to another section.
When installing tiled carpet, you need to use wide tape, this will make it easier to glue the elements.
Features of laying on stairs
To do this, you need to purchase a special stair carpet, which has increased strength and wear resistance. When taking measurements, you need to be careful, select the material according to the width of the largest step, and if the staircase is open on one side, then do not forget to add 4 cm to the hem.
You can measure the size of the largest step, then multiply it by the number of steps and so you will get the required amount of carpet.
The simplest way is to use carpet as a path, covering only the center of the stairs. In this case, it can be removed for cleaning. But the continuous covering of the stairs looks more beautiful.
This is a complex job that requires attention; for each step you need to cut the material correctly, so as not to make a mistake, it is better to make yourself a template, after which the coating is fixed with glue or strips.