Repair. For some, this word gives positive emotions, while others will say the famous phrase of an unknown author: “Repair is worse than fire!” In both cases, repairs need to be done.
It is clear that a resident of an apartment or house spends most of his time in the kitchen, bedroom, or living room, but... do not forget about common areas - the bathroom and toilet. In this article we will try to describe only part of the toilet room renovation - ceramic tile flooring.
Specifics of finishing the floor in the toilet
First of all, the toilet, in modern standard multi-storey buildings, low-rise buildings and private houses and cottages, is a minimal room in area.
The small size of the room is directly related to two factors that should be taken into account when renovating - the choice of tile size and the inconvenience of the work.
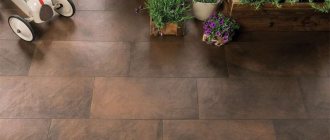
It is also worth paying special attention to the humidity of the room, that is, the floor covering should not become slippery when exposed to moisture. For many years, tiles have been the optimal choice for toilet floors.
Advantages and disadvantages of tiles
Ceramic tiles are thin slabs made from a mixture of clay and sand with other materials. They are made by firing. Tile is used for cladding walls, floors and ceilings, and for exterior decoration.
The advantages of the material include:
- Strength;
- Durability;
- Wear resistance;
- Easy to care for;
- Hygiene;
- Environmental friendliness;
- Ceramics are not affected by moisture.
In addition, companies offer a huge selection of colors, shapes, sizes and textures of tiles, from which it is easy to choose the most suitable one for the interior.
The coating has practically few disadvantages: mold may appear at the joint, so you will have to choose a high-quality grout that will resist this. You will also have to be careful when working so that the tiles look smooth and beautiful.
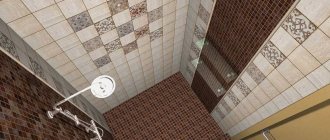
Choosing ceramic tiles for the toilet
Tiles in the bathroom, no matter how funny it sounds, are the main decoration of the room, which the owner of the apartment will have to observe every day, and on occasion, guests will note the beauty of the toilet room.
When choosing ceramic tiles, you should take into account the overall design of the room. Most often, the color scheme of the tiles is selected in the same style as the bathroom.
The practicality of the tiles is an important aspect - stains of moisture and condensation are very noticeable on dark-colored materials, and the dark color “eats up” an already small space. Therefore, light-colored tiles are installed in toilets.
For a small room space, use tiles of cold shades, for a large space - warm ones.
Let's look at several common types of tiles.
The asymmetry of the room will be perfectly emphasized by the mosaic. With the help of mosaics, ornaments and panels will give the room a more interesting, beautiful and unusual look.
Porcelain stoneware has been used for flooring in toilets for decades. Manufacturers of porcelain stoneware claim a service life of up to 40 years for some types. This material does not lose color or properties when in contact with chemical detergents, however, it would be a good idea to check this before purchasing.
In houses and apartments, you should not buy a very expensive and especially durable one, since visiting the toilet occurs either in house shoes or barefoot if a “warm floor” is installed.
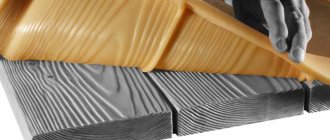
One of the original solutions for toilet tiles is a textured option. Textured tiles can be used to style walls like brick, wood, natural stone, etc.
This tile is rarely used on the floor, and mainly as decoration.
The big disadvantage is the high cost of the material.
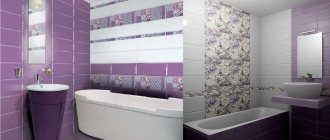
Colored tiles will allow you to diversify the monotony of the room. Manufacturers, when releasing tile collections, usually produce colored tiles and borders as decoration, which perfectly fit the base of the collection.
Common form
Refined sculptural and convex tiles, which add texture and color variety, look most impressive. But to work, the master needs to prepare a power tool. If you have the necessary skills, you can process the surface manually. Since bathrooms have a minimal area, visual deception should be taken into account when selecting suitable construction products.
When choosing a quality material, a number of nuances should be taken into account:
- Visually, the space will look much narrower if wide lines and contrasting details are applied to the tiles. This is why it is necessary to buy products in pastel colors.
- Proportions. Plain wall decoration allows you to visually expand the room.
- If large tiles were chosen, then the joint width should be more than 5 mm.
- Large patterns visually reduce free space.
The relevance of pastel shades
Ideal for limited space
List of tools needed for laying tiles in a toilet
To take measurements and mark out the room you will need a tape measure, a pencil and a square.
A building bubble or laser level will help determine how level the plane is relative to the horizon.
An indispensable tool for the ideal thickness of the seam and the placement of tiles one relative to the other will be spacer crosses. Older craftsmen remember how they used matches for these purposes.
The best way to level the tiles horizontally and increase the adhesion of the tile adhesive is to use a rubber mallet.
The adhesive is applied to the tiles and distributed over the surface using a notched trowel.
A rubber spatula is used for grouting joints and applying grout mixture.
You can cut tiles evenly using a glass cutter, a tile cutter, and many craftsmen even use a circular saw with a stone blade or a grinder. At home, the most accessible tool is a glass cutter.
Rags, rags (preferably flannel), paper napkins, and a clean sponge will be needed to clean the tiles from dirt.
To mix mixtures, you can use any available containers - old buckets, basins, etc., but it is better to purchase special plastic baths at a hardware store - they are more convenient to use.
Long-lasting fixing compound
To cover surfaces, you need a high-quality adhesive solution. Most often, builders use products based on cement and river sand. Working with such a composition is quite simple, and the final hardening speed allows the master to adjust the location of the tiles.
For reliable fixation, you can use liquid nails, but they are used only when laying on drywall. In practice, it has been proven that dispersed adhesive is convenient to use, but you must first prepare the surface.
Popular composition
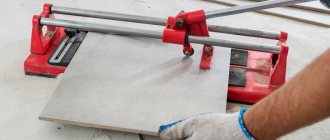
How to cut tiles correctly?
There are many tools for cutting tiles: a glass cutter, a manual tile cutter, a tile cutter in a machine, an angle grinder, popularly called a “grinder”. When making repairs yourself, a glass cutter will be sufficient, as it is the most budget option.
Cutting tiles with a glass cutter is completely identical to cutting glass.
There are two types of glass cutters: roller and diamond glass cutters (with a diamond tip). It is believed that roller blades are more convenient to work with, but diamond blades leave a more even cut. Let's look at a step-by-step algorithm for cutting with a glass cutter with a diamond tip.
Place the tile on a flat surface so that after cutting, the tool does not rest against obstacles, but simply extends beyond the edge of the tile and table.
Mark the cutting line. Place a ruler or other tile along the cutting line. Pressing the stop firmly and holding the glass cutter like a ballpoint pen at a 45-degree angle, draw along the cutting line in one non-stop motion.
On the back side of the tile, under the cut, place a dowel, or a regular nail, or some other object that will create a break.
Using light pressure on both halves, separate the required piece.
If small chips appear, fine-tune with sandpaper.
We also recommend watching - How to cut tiles without a tile cutter: a selection of simple methods
Cutting Features
Let's dwell in more detail on cutting tiles, since when decorating surfaces with this material, it will not be possible to limit yourself to using solid tiles - you will inevitably need pieces and trimmings. For this purpose, a glass cutter or a special machine equipped with a diamond wheel is used.
When using hand tools, proceed in the same way as when cutting glass. Using a cutting wheel, draw a line along the markings on the glazed side of the tile. Then they are scrapped.
Floor tiles are heavier and cannot be cut aesthetically with a glass cutter.
Tile cutting tools have a large diameter wheel, which allows you to make deep cuts.
An example of cutting tiles with a grinder is in the photo:
Such a device is equipped with a platform for placing tiles with limiters with ruler markings. This makes it easier to cut entire rows of tiles of the same size.
Adjust the stops to the required distance so that the cut line falls on the line in the center of the tile cutter. At the top, a carriage moves along two guides, equipped with a cutting wheel and a folding stop with angled petals and a lever. Move the carriage to the far side and place the wheel against the edge of the tile, with force move along the surface along the cut line.
The carriage stop will be placed in the center of the cut, and you can split the tile.
The difficulty lies in cutting out intricate shapes and creating cutouts for cables and communications. In such cases, the configuration of the cutout is marked on the glazed side and the wheel of a power tool is carefully drawn along this line. Excess parts of the tile are bitten off piece by piece until the required shape remains. The resulting edges have irregularities; they are sharpened with sandpaper or a file.
When using a power machine, the unnecessary part is cut into thin strips and bitten off. The edges are filed with a file.
Dismantling of plumbing fixtures
To dismantle the old toilet and other appliances you will need:
- a set of keys of different diameters,
- pliers,
- prybar or small crowbar,
- chisel.
It is recommended to carry out work with gloves, which will protect against bacteria and injuries.
Let's look at the dismantling step by step.
- Step 1. Free up as much space as possible for work.
- Step 2. Turn off the water supply to the toilet, if it is possible to shut off the water supply from the common riser; if not, warn your neighbors not to use the water while the work is being carried out.
- Step 3. Drain the water in the tank.
- Step 4: Disconnect the flexible hose.
- Step 5. Completely drain the tank and remove it.
- Step 6. Free the base by first knocking down the tiles around it.
- Step 7. Using a wrench, unscrew 2 or 4 fastenings of the base to the floor.
- Step 8. If the mount is on a wooden board, then knock off the lower part of the base, and then separate all other parts from the floor.
- Step 9. After unscrewing the studs, separate the base from the floor and disconnect it from the pipe using loosening movements.
- Step 10. When fixing the socket to the cement, use a chisel and hammer to release the pipe with gentle movements on both sides.
- Step 11. Remove splinters, dirt and dust and separate the bowl.
- Step 12. After dismantling, plug the pipe with a rag gag or a special plug.
Other plumbing fixtures are dismantled in the same way.
The most important thing is to minimize the use of water during operation.
Dismantling the floor covering
After removing all hanging structures and plumbing, the floor covering is dismantled. If it is necessary to preserve the old tiles, dismantling is done manually and carefully using a thin chisel and hammer.
Dismantling work should be carried out carefully, since communications and electrical wiring pass under the tiles.
To protect against dust you will need:
- respirator,
- construction glasses,
- thick clothes,
- shoes.
So, the stages of dismantling:
- Wet the grout with a damp sponge and remove it from the space between the tiles. (This option is for soft grout only).
- Clean the space between the tiles using a grinder to a depth slightly greater than the thickness of the tile.
- Carefully, preferably with a spatula, start tapping from the bottom edge up.
The described steps will allow you to save the maximum amount of tiles for reuse. If tiles are not needed, use a hammer drill and a special attachment to knock off all the tiles.
Preparing the floor for installation
Heat and sound insulation
Experienced craftsmen recommend using mineral or basalt wool for heat and sound insulation. The cotton wool is placed in special grooves in pre-made sheathing. At the same time, the final floor level will rise by 10 cm.
Mineral wool is not subject to rotting and even when exposed to moisture it does not lose its properties and is quickly restored when dried in a timely manner.
Modern craftsmen recommend using new, high-tech solutions made from polymer materials for sound and heat insulation. Their main advantage is their minimal thickness and the ability to install them with glue or liquid nails.
For thermal insulation, a “warm floor” is also used, which can be laid either on a mineral coating or on a screed. There are two types of underfloor heating – electric and water.
Read more about heated floors in the article - How to choose a heated floor for tiles and install it yourself?
Waterproofing
Waterproofing a room such as a toilet will minimize the possibility of liquid leaking to neighbors and also spreading throughout the apartment. When laying mineral wool, be sure to waterproof the sheathing, since wood is susceptible to rotting when exposed to moisture, and as a result, unpleasant odors appear.
Waterproofing is a coating that is waterproof or absorbs moisture, but is not subject to expansion.
Modern construction stores offer more than a hundred types of waterproofing materials from different manufacturers. Let's name some of them:
- A bitumen mixture with various additives, available both in liquid form and in the form of slabs.
- Rubberized, non-woven materials based on liquid glass. Typically in rolls.
- The most criticized type of waterproofing is liquid materials with a consistency reminiscent of “self-leveling floors”. They are susceptible to cracking and loss of their properties, even with short periods of use.
The waterproofing layer is laid on the cleaned surface after priming. Many craftsmen recommend laying the first layer of bitumen, then mineral wool, and on top a layer of rolled material.
Leveling screed
The screed in the toilet is not fundamentally different from the screed in other rooms. First, a more liquid consistency of the solution is made in order to maximally fill all the cracks and cracks between the heat and waterproofing, in corners, etc.
The next stage is a finishing layer, either using a self-leveling floor, or a classic one - made of cement and sand, and fine crushed stone is also added. Filling is carried out along beacons, which are set according to the building level.
Cement grade 400, 500, for 10 kg of dry mixture about 2 liters of water. With a layer height of approximately 5 mm, 10 kg of solution per 1 sq.m. is enough.
Preliminary stage
Where to start - floor plan
We draw a floor plan and use a tape measure to measure the main dimensions: length, width, height of the surfaces that will be tiled. Based on these dimensions, we determine the volume of tiles that need to be purchased: an average of 15% must be added to the resulting area (from 10% to 20% depending on the pattern and size of the tile).
A traditional toilet plan looks like this:
standard bathroom plan
Behind the toilet there is a hard-to-reach area where the pipes are located. This niche is also used to install a utility cabinet. To improve the aesthetic appearance and to simplify the installation of tiles, this niche is often covered with plasterboard. Here you need to decide, because... Having sewed up the niche, it will be difficult to get there if necessary to replace pipes. Therefore, before making such a decision, you first need to understand the condition of the pipes and, if they need repair or replacement, carry out this work before covering it with plasterboard. And for access to meters and valves, make special inspection hatches.
Next, calculate how many tiles you need using our free calculator.
Tile selection and size
You need to choose high-quality tiles, without defects or chips. The surface must be flat, without bulges or saucers (unless otherwise provided by the design). You can check this by placing the tiles face to face. It is very important that the tiles come from the same batch, because... The shade of the tile may vary in different batches. You need to pay attention to the caliber of the tile; its size is written on the box. The tile may differ in size by fractions of a millimeter (up to 1 millimeter), plus or minus from the declared size. Good tiles (and this affects the price) are sorted at the factory by size and distributed into different batches, i.e. In one batch, the tiles must be the same size. But, if you buy tiles of two different colors and are going to lay them out, for example, in a checkerboard pattern or alternate dark and light rows, then make sure that both tiles are the same caliber. For example, a dark tile has a size of 300.0mm+0.5, and a light tile has a size of 300.0mm-0.5. This 1 mm difference in size can play a bad joke: by maintaining the same seam width, after laying 5 tiles, you can get a difference of 0.5 cm between two rows. This is not a defect, this is production technology (expensive brands do not have this). You just need to know and take this into account.
For walls, it is better to take light clay tiles. This will make it easier when laying and cutting.
Options for laying tiles in a bathroom or toilet
The tile layout scheme must be taken seriously. We draw a plan for each wall (you can do it directly on the wall, but it’s better on paper) and lay out the tiles. It is ideal to choose a tile size such that it does not need to be cut or the number of trims is minimal. At this stage, you need to decide which side to cut the tile from if it does not entirely fit into the size of the wall.
Layout option No. 1 is symmetrical, also known as classic. In this case, one or two solid tiles are placed in the center of the wall and laid out to the sides from them. Trimming is done along the edges (identical pieces are cut on both sides).
Advantages:
- the walls have a finished look.
Flaws:
- overuse of tiles;
- additional work on cutting tiles.
Symmetrical tile layout diagram
Option No. 2 – trimming on one side. The option is more practical, although not entirely correct from the point of view of classical tile laying technology, but quite acceptable. In this case, solid tiles should be placed in a more visible place. In the case of a standard toilet, these will be the corners of the side walls farthest from the door. It is better to lay out the central wall using the first method.
Advantages:
- more economical consumption of tiles;
- less labor intensive.
Flaws:
- There is not always a little-seen corner.
Tile layout
Laying tiles on the floor in the toilet
Installation of tiles in a straight line
In order to correctly lay the tiles using the direct method, several measuring steps must be performed. Find the center along the length of the room and the center along the width, then connect them together. This will reveal the center of the room.
Glue is applied to the first, whole tile with a notched trowel and distributed over the surface.
The tile is applied to the marking line and aligned with the horizon using a level.
Fitting is done with a rubber mallet. The glue protruding on the sides is removed. Likewise with all other intact tiles. Spacer crosses are installed between the tiles. The next stage is the installation of fragments and corners, where pieces of different sizes are required.
Installation of tiles diagonally
Laying ceramic tiles diagonally is considered more difficult than straight, but even a beginner can do it with the right algorithm of actions. Laying begins from the central axis of the threshold of the toilet room.
The tiles are cut in half diagonally and laid with the end facing outward and the sharp edge inward of the room. Next, all whole tiles are laid from the starting point in the form of half.
It will be more difficult to cut out diagonal pieces for the base of the toilet and other non-closed parts, so you should be very careful when marking and cutting.
Useful tips
It is optimal if the length of the row can accommodate a whole tile, avoiding cutting the last one. Otherwise, the laying line is shifted enough to allow the last intact tile to be laid.
If an element requires trimming a couple of centimeters due to a gap, you need to move the row further in order to lay the wide parts on both sides. This will save you the hassle of cutting narrow tile strips.
This recommendation also applies to the arrangement of rows in height, which is especially important when laying wall tiles to a certain level. Distribute the rows so that the first bottom line is created from pieces, and the top from whole elements. It is advisable to start installation with solid tiles, raising the original support rail to the required height.
It is preferable to start laying by filling the area of large walls, leaving a gap of one element in the center or on one side. Be sure to apply markings so as not to make mistakes.
When using figured variations of laying and combinations of elements of different colors, pre-designate the placement of facing tiles that differ in shape, direction and design.
Often, dividing individual elements in a diagonal plane is used to create a pattern through joint distribution. It is advisable to fill areas with installation of carved tiles last.
Be sure to read the instructions for using adhesive for installing tiles. Some compositions require moistening the tile surface and treating the walls.
Following the step-by-step instructions, you can decorate the walls and floor in the bathroom with tiles yourself and save significantly on the services of a specialist.
Grouting floor joints
It is recommended to apply the grout after the glue has dried, 12-15 hours later.
The grout is applied in an even layer from the front side, level with the tiles. After 5-6 hours, you can perform final cleaning with a clean sponge and rags.
After reading this article, even a person who is not prepared in terms of construction can lay tiles on the floor of the toilet room with his own hands. Use the tips and go for it.
For more information about grouting floor joints, read the article - How to properly grout floor tiles
Reliable adhesion
Many professionals prefer to lay finishing material from the bottom up. The first row must be mounted above the floor, and only then gradually rise up. If it is impossible to place exclusively whole tiles on the surface, then the first step is to attach two parts in the middle of the wall, on either side of the vertical line.
Thanks to this, you can arrange the tiles as harmoniously as possible, without creating a special transition in width in the corners. The final result of the manipulations performed directly depends on how responsibly the master approached the implementation of each stage. To ensure that all rows of tiles are as even as possible, a straight strip is carefully placed on the wall below the level.
In the future, it will be used as a base that will prevent the material from moving. There are two proven methods of laying:
- Stepped. First of all, carefully lay out the very bottom row, and then the top row without the last one tile. At the final stage, the missing one is reported in each row.
- Consistent. Installation of a new row is carried out only after the completion of the previous one.
Important! Experts believe that sequential row laying is easiest for beginners. Only in this case can a minimum divergence of seams be achieved.
Application of the solution