The decoration of the ceiling in the kitchen needs to be carefully considered. The microclimate in this part of the apartment dictates special requirements even for glue. If the covering is made of high quality, but from unsuitable materials, then soon you will have to take up the brush or drill again. Let's take a closer look at the optimal options for ceiling finishing, find out which is better and understand the intricacies of installation.
Whitewash
Does anyone else whitewash the ceiling these days? - you ask. Yes, someone else is whitewashing. Either out of old habit or because whitewashing is one of the most budget-friendly options for finishing the ceiling in an apartment. And the most famous material for whitewashing is lime.
For a kitchen, whitewashing is not the best option due to the low performance properties of such a ceiling. High humidity and temperature changes are not the best friends of a whitewashed ceiling. And even without taking into account “harmful” factors, the whitened layer will last in its original form for no more than two to three years, after which it will begin to crack and peel off. It will not be possible to wash or clean such a ceiling from soot or dirt; you will have to whitewash it again.
But, most importantly, whitewashing requires preliminary preparation of the ceiling. Firstly, to improve the adhesion of the whitewash layer to the base. Secondly, without preparation, all surface imperfections will only be emphasized by lime. This means that if your kitchen ceiling is not ideal, the following steps await you:
- cleaning the surface from old coatings;
- sealing all existing cracks and recesses, including height differences between ceiling slabs;
- general leveling of the surface with putty;
- leveling with finishing putty;
- cleaning with sandpaper;
- cleaning the surface from dust;
- applying primer.
Agree, the process is labor-intensive and requires, in addition to the purchase of lime, the purchase of additional finishing materials. And the question already arises: “Is this really budget-friendly?”
Plain painted ceiling in the kitchen
Everything here is the same as in the case of whitewashing. The only thing is that water-based paint costs a little more. Yes, there are expensive paints that can be washed. But to wash is said very loudly, frankly speaking. They can be lightly wiped with a damp cloth, and that’s it. Therefore, you won’t achieve any special cleanliness; you’ll have to repaint everything, and you’ll be wasting your money.
Of even greater importance in practicality is what kind of base the paint is applied to. If it’s directly on the putty, and it’s on concrete, then this is a good option for the kitchen. If it’s on a plasterboard box, the situation is worse if you live in a multi-story building.
Why? But because there are a lot of places in the kitchen where water can leak from a pipe that has burst in the neighbors above. And, if an ordinary ceiling simply has red streaks that can be easily and simply painted over, then plasterboard ceilings will sag and crack. The entire structure will have to be changed.
So, if you are not confident in your neighbors, then you should not make plasterboard boxes in the kitchen, no matter how much you would like to install spots. It’s better to get by with an ordinary chandelier, but protect yourself from the “pleasure” of suddenly having to repair a damaged ceiling. Even if your neighbors pay you for your work, why do you need this unnecessary trouble? And if they don’t pay (and this is what usually happens, the neighbors extend the loan for a year), it’s really a shame. Judging by the reviews, this ceiling is the best choice.
Painting
In recent decades, whitewashing has been replaced by painting, which has its obvious advantages. Painting can also be considered a budget finishing option and it also requires leveling the ceiling surface. The most popular material for this type of finishing is water-based paint - an environmentally friendly finishing material that dries quickly and allows you to give the ceiling different color shades. This ceiling can already be washed and used without repair for about 5-6 years.
Polystyrene tiles
The low cost of polyurethane foam tiles makes them a good option for those who are not willing to spend too much on a kitchen renovation. At the same time, polystyrene tiles have other advantages. The tiles are resistant to water, which is suitable for use in the kitchen, and the variety of textures and colors of this finishing material will help add special chic to the interior of your kitchen.
Installing tiles is very simple, you can handle it yourself and do it in one day. If you have a flat ceiling, then you can easily glue the tiles directly onto the plaster or painted surface without first cleaning it. The tile will easily cover all the cracks and minor unevenness of the ceiling due to its volume and some flexibility of the material.
Two more advantages of polystyrene tiles are that they are easy to dismantle and can be washed. Abrasive detergents cannot be used for polystyrene tiles; they will destroy the surface of the material.
The only possible disadvantage of polyurethane foam boards is their irrelevance in the modern world of interior design. Simply put, using polystyrene tiles is becoming unfashionable.
Types of finishing: advantages and disadvantages
Main ceiling design options:
- Whitewashing, painting, wallpaper, plaster.
- Suspension and tension systems.
- Panels and slats.
- Cassette designs.
- Plates.
The simplest methods of cladding, plastering, painting and whitewashing do not require design and take only a few days. However, they are limited in terms of aesthetic solutions. The most durable and resistant material for quick finishing is plaster, the most budget-friendly is whitewash. Tensile and hanging structures will become a real decoration of the kitchen. Among other things, they are easy to clean and serve as the basis for organizing additional lighting. Light bulbs will have to be replaced periodically, but level systems themselves are reliable and durable. As for panels and slats, a lot depends on the materials: they vary in strength and ease of use. Plastic, for example, darkens from aggressive chemical compounds. Cassette systems are good for their diversity. There are options for simple kitchens and compositions that are more complex than hanging systems. However, their design will take a lot of effort. Ceiling tiles, in turn, are superior to other materials in terms of performance characteristics.
Painting
Painting the ceiling will not cost much. And yet, painting will cost more than lime whitewash, which is of lower quality in its structure. Owners always have a large selection of ceiling paints. Water-based, for example, forms a film that protects the finish during washing. It should be remembered that any paint loses color due to moisture, temperature and light exposure. It often peels off, and in some cases the top layer generally cracks and begins to gradually fall off. As a result, re-painting will be required to remove the old paint. The modern market offers vapor-proof paints with high coverage and virtually odorless. Silicone, silicate and acrylic paints are used to paint kitchen ceilings. In the most unfavorable conditions, silicate ones are used, but for an ordinary kitchen, the properties of silicone or acrylic are sufficient.
Before buying paint, you should make sure that the composition does not contain allergens or other harmful substances!
Whitewash
One of the most common options, and also justified in most situations. Whitewashing is carried out quickly and at minimal cost when compared with constructive ideas, for example, paneling or suspended ceilings. However, this choice comes with many disadvantages. Cosmetic defects that appear will remain on the ceiling, because the ability to paint over it does not mean that it can be done easily and at any time. Stains and stains are the most difficult to remove; when trying to correct the defect, the situation sometimes only worsens. The inherent dynamics of temperature changes in the kitchen will make whitewash unattractive in just a couple of months. Every few years you will have to update the coating. However, even despite this, whitewashing remains the cheapest and simplest solution.
Wallpaper
You can make the ceiling look decorative quickly and without complex calculations using wallpaper. Irregularities and large cracks will not appear under the canvas. Drawings and patterns, in turn, not only decorate the room, but also hide imperfections. As for the color palette, the main tone is coordinated with the furniture. At the same time, the effect of steam is taken into account - since the design will fade, a bright and expressive one is initially selected. The kitchen ceiling is covered with polystyrene foam, non-woven and vinyl wallpaper. Moreover, the first two types, if desired, can be coated with acrylic paints, up to 10 times. That is why some options have only a textured pattern, but are devoid of color. As for the basic rules for kitchen design, it is not recommended to decorate them with paper wallpaper. The joint lines must coincide with the direction of sunlight.
Among different types of wallpaper, it is better to choose “washable”.
Ceiling tiles
Tile cladding looks good on the ceilings of low and high kitchens. The material is easier to clean than others, even if it has a texture. Aesthetics and resistance to pollution are the determining criteria for choice for many owners. The two main tile materials for kitchens are polystyrene foam and polyurethane foam. The first of them is cheaper, but polyurethane foam holds color better. The laminated surface of polystyrene foam can be painted. The structure of the ceiling tiles can be processed with a sharpened knife; moreover, they can be laid on uneven surfaces without preliminary cleaning. If the distortions are significant, then preliminary plastering will suffice. Moreover, during installation, a straight wall is chosen as a guide. For an ideal result, finishing begins from the corner farthest from the entrance.
Plasterboard ceiling
Drywall, a beautiful and at the same time inexpensive material, goes well with modern style. The properties of drywall provide ample opportunities for choosing the final design option. Ceiling structures can be single- or multi-stage. Installing a suspended multi-level ceiling will hide stains and unevenness on the old coating. Communications for the functioning of the ceiling system are also hidden and placed inside the new cladding. Installation takes a minimum of time, and as a result, the owners will receive a durable structure with soundproofing properties. Plasterboard ceilings are washed with special products that ensure easy and safe cleaning for the material. Finishing with original shapes provides for highly accurate preliminary calculations of the load from lighting fixtures. This is a job for masters with a wide range of knowledge.
Plastic panels
Plastic options will allow you to achieve the desired aesthetics, and with great savings. The kitchen will look stylish and expensive, but no one will see the cheapness of the material. Caring for a perfectly flat cladding surface will take no more than 20 minutes once a month. You should not use aggressive reagents, otherwise the plastic will change color over time. However, it will be difficult to damage it mechanically, even with hard washcloths. The possibilities for organizing lighting on a ceiling made of plastic panels are practically unlimited. It’s worth experimenting with the placement of lighting fixtures. The good thing about panel finishing is that each of its elements is replaceable. In addition, the moisture in the kitchen will not in any way affect the reliability of the structure or its appearance. Panels are produced in 2 types: with suture and seamless connection. The second type of lining is more budget-friendly.
Aluminum rack systems
Rack and pinion systems are used to create designs in the style of minimalism and hi-tech. Making aluminum slats does not take much time, and their configuration does not depend on the shape of the room. To decorate kitchens, planks with closed seams are used. Aluminum is sometimes combined with other materials to create additional design options. A variegated color scheme looks great with metal elements, which is not typical for plasterboard ceilings and plastic lining cladding. The quality of the metal coatings themselves is growing from year to year. When it comes to choosing a specific color or texture, mirror, gold and white surfaces look most attractive. A mirror will significantly “expand” the space and make many design effects available. White color is the traditional and most versatile option.
Wooden clapboard finishing
Profiled wood panels are often used in large country houses. Lining for kitchen ceilings is usually represented by such options as Europrofile, double-sided and radius. Moisture resistance of wooden planks is ensured by treatment with special compounds. Some of the other beneficial properties of wood are lost because of this, but the wooden lining will remain of very high quality and natural. The material can cope with short-term pressure, for example, if you touch the ceiling with some heavy object, chips or cracks will most likely not appear on it. The strength of the panels allows the additional installation of heavy suspended structures with a practical or decorative function, which is difficult in the case of other types of ceilings. Cladding with clapboard will make the atmosphere more homely, thus “reimbursing” the costs.
Stretch ceiling
An excellent option for studio apartments. Stretch ceilings can be a kind of structure with color inserts and ornaments. The form depends primarily on the client’s wishes. At the same time, rich lighting is installed, sometimes around the entire perimeter. Despite the reduction in the height of the kitchen, it can increase visually thanks to rounded lines, glossy and mirror surfaces. At the same time, in low and cramped rooms it is better to install only single-level options. Like suspended structures, suspended ceilings are characterized by durability, masking abilities, variety of shapes and colors, resistance to harmful factors, ease of maintenance and aesthetics. The manufacturer will make a custom ceiling after drawing up a sketch and taking measurements. The tension fabric can be either film or fabric.
The fastening itself is carried out using one of these methods:
- clip;
- glazing bead;
- wedge;
- harpoon
Cassette ceilings
Cassette-type ceilings come in both simple and complex geometries. There are 4 main types of this coating: metal, plaster, glass and mirror. Metal ones are made mainly of aluminum and steel. Ceiling segments are arranged in different compositions; matte, glossy and satin elements are interestingly combined. Gypsum cassette coatings were one of the first to appear. Although they also turn into various beautiful ornaments, they should not be used in the kitchen. Mirror options are made from acrylic or silicate glass. Buyers choose between a perfectly mirrored or slightly rubbed surface. If desired, an inkjet ornament can be added to the surface. The design provides a reliable mount for mirrors, based on a mechanical connection to the frame. Glass cassette structures are similar in design. Here you can additionally arrange interior lighting and make stained glass drawings.
Decorative plaster
The main advantage of this type of finishing is the speed of work. Unlike whitewashing and painting, the result is more durable. The plaster does not crack, does not crumble and practically does not wear off. This option is useful for ceilings with distinct flaws. Moreover, plaster is applied to almost any surface: brick, concrete, wood. The home owner will ultimately receive not only a durable coating, but also good sound insulation and a decorative element. The coating will be resistant to not only moisture, but also fire. Plaster is one of the most environmentally friendly materials for quick finishing - it is a mixture of natural raw materials, natural additives and synthetic fibers that are safe for health. The material has only one serious drawback - the difficulty of dismantling. One of the popular types of decorative plaster is bark beetle.
It is advisable to plaster the entire ceiling at one time!
Combining materials when finishing the ceiling
Special combined options will appeal to decor connoisseurs. There is only one rule - the composition should look organic. Designers sometimes “combine” stretch and suspended ceilings, creating something in between. The design on several levels is visually combined with lining, wallpaper, and decorative tiles. Sometimes a mirror acts as an insert. In practice, there is also a design in the form of a border of a hanging composition together with a plastered and painted core. A combination of plasterboard and tension options also logically suggests itself. In kitchens with a large area, the ceiling can be finished with a structural element at one of the corners, and the rest of the space can be decorated with a uniform glossy or matte surface. Suspended structures are also finished with niches with many curves, which themselves create a certain pattern. These same recesses can be decorated with original pictures with detailed details.
Wallpaper
Another relatively budget-friendly, but admittedly somewhat old-fashioned way to decorate a kitchen ceiling is wallpapering. Like polystyrene tiles, wallpaper will successfully cover various cracks and unevenness in the ceiling, and due to an even greater variety of colors than tiles, they will create a unique interior in the kitchen. Vinyl wallpaper is suitable for the kitchen, as it can easily withstand moisture and is also easy to wash.
The main disadvantage of finishing the ceiling with wallpaper is the inability of the joints to maintain their strength for a long time. Over time, under the influence of temperature changes in the kitchen and humidity, the wallpaper at the joints will begin to peel off from the ceiling and spoil its appearance.
Ceilings made of MDF panels
They do this too... But, in the end, the ceiling looks not like a kitchen, but like a bath (because the main design of MDF panels is wood-like).
This is a rough look and there is absolutely no practicality in it. MDF will swell from the flood, become smoky, it will need to be scrubbed hard, and it is afraid of abrasives... No, we cannot recommend such a ceiling.
Decorative plaster
Everyone knows about decorating walls with decorative plaster, but not everyone realizes that it can just as well be used to decorate the ceiling, including in the kitchen. The coating is durable and never repeats its pattern; it can be washed, including using light detergents.
First, the surface of the ceiling will need to be leveled and eliminated from obvious defects. The plaster will cover small irregularities and cracks on its own. For the ceiling, as for the walls, the following main types of decorative plaster can be used:
- textured;
- structural;
- Venetian
All previous methods of finishing the ceiling in the kitchen have one more advantage that unites them all - maintaining the height of the ceiling. If the height difference on your ceiling is more than 5 cm, then you need to resort to other finishing methods. These methods, unfortunately, “steal” from 5 to 20 cm of the height of the room due to the fact that they require the creation of a frame system for installation of the main finishing material. Therefore, almost all of these methods relate to so-called suspended ceilings and are best used if the height of the room in your house before installing the ceiling is at least 2.7 m.
Painting the ceiling slab
If you are looking for the simplest, fastest and cheapest way to install a ceiling slab, then you should choose the option with putty and painting. But this type of repair requires great skill from the plasterer. The surface must be perfectly leveled, since even the slightest flaw will immediately be evident.
For work you will need the following tools and materials:
- wide and narrow steel spatula;
- paint brush and roller;
- abrasive mesh;
- liquid primer;
- starting and finishing putty;
- sandpaper of various grain sizes;
- water-based paint.
Installation of beacons
Puttying (leveling) the flow
Final level check
In order to be able to easily reach the ceiling with the tool, you will need a high stepladder or other stable base. The plasterer making a ceiling of this type must protect the respiratory system and eyes from dust, which will be released in abundance during work. Therefore, you should purchase safety glasses and a respirator.
The ceiling in a small kitchen is finished in a certain sequence:
- All lighting fixtures are removed from the base plate. All unstable fragments of the old coating are removed. The stove is cleaned of oil deposits and other contaminants;
- Large cracks and holes are sealed. The slab is treated with a liquid primer;
- The starting putty solution is mixed. It must be applied quickly even to a small ceiling area, since this type of putty hardens very quickly;
- hardened plaster is treated with a primer;
- a layer of finishing plaster is applied. After hardening, its surface is leveled with abrasive materials, cleaned of dust and coated with a primer.
Sequence of applying paint layers
The final stage of repair is painting the leveled surface. If you are finishing a kitchen with high ceilings, then it is advisable to use paint in beige tones, on which dust and oil deposits are almost invisible.
Painted ceiling tile options
Video instructions for painting surfaces
Drywall
One of the suspended ceiling systems also includes plasterboard, the sheets of which are mounted on a pre-installed metal frame. This allows you to hide not only ceiling problems, but also various engineering communications (electrical wiring, ventilation, etc.).
For the kitchen, of course, it makes sense to use a moisture-resistant version of drywall. After installation, the plasterboard sheets must be puttied to eliminate minor defects (places where screws are screwed in, sheet joints, small scratches). And then choose from the above finishes, and they will be needed: painting, wallpapering or decorative plaster.
Drywall has another feature - it can be used to create unusual designs on the ceiling, including multi-level ceilings.
Using plasterboard as a ceiling finishing option can no longer be considered a budget method; it is not a cheap pleasure, given that the installation work is quite complex and you will have to invite and pay for the work of specialists.
A small drawback of plasterboard is that its installation will take a relatively long time, especially if you want a multi-level ceiling or a complex design structure. But as a durable, moisture-resistant coating that quickly covers all the defects of the worst ceilings, it’s worth it.
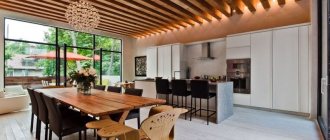
Ceiling decoration and style
An ordinary modern kitchen is the epitome of stylish functionalism. All furniture and household appliances are designed according to the latest technology in the world, while there is nothing superfluous in the kitchens. This approach is not always correct, because it is better to arrange the entire interior of the house as one whole. If the kitchen is planned in a minimalist style, the ceiling is designed strictly, monochromatically and in harmony with the rest of the palette. The stylistics of constructivism and high-tech require sophisticated geometry and high-quality modern materials. In these style directions, a cassette design of an unusual configuration will come in handy. You can decorate it in the English style using soft tones and a complete absence of colorful accents. Decorative plaster and “boring” wallpaper are two acceptable methods of cladding in a neat English style. The color background of the Provence style is saturated with bleached tones, so a slightly careless appearance of the ceiling will be relevant. Just a few false beams will enhance the feeling of a provincial setting.
Ceiling moldings and moldings are compatible with many luxury styles:
- baroque;
- rococo;
- classicism;
- vintage.
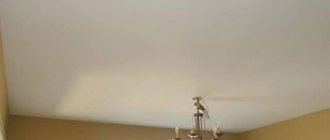
Stretch ceiling
If you dream of a completely flat surface, then choose a suspended ceiling for your kitchen. A stretch ceiling is a special fabric (PVC film or fabric) stretched over a metal frame. Installation of a stretch ceiling can only be carried out by trained specialists.
Unlike drywall, it can be installed in just a few hours and makes it possible to apply absolutely any image to the ceiling, including photographs. The stretch fabric is not afraid of moisture and is easy to care for. Like plasterboard, it allows you to make complex multi-level ceilings.
Types of suspended ceilings:
- budget matte , ideally imitating a painted ceiling;
- glossy , capable of expanding small spaces;
- modest and at the same time presentable satin .
Ceiling made of PVC panels
Plastic is a thing of the past, to be honest. Yes, it is quite practical and very suitable for the kitchen. And it is convenient to wash and in case of a flood it does not deteriorate. But what to do with the appearance?
His appearance is unpresentable and even burst! No, maybe you can find a plastic that doesn’t look like a public toilet, maybe. If yes, then this is just an ideal option for the kitchen.
Cassette ceiling
The cassette ceiling consists of a suspended metal system and decorative plates placed in the resulting cells. According to experts, you can easily install such a ceiling yourself, and this is a plus of this type of finishing. On the other hand, we are more accustomed to seeing cassette ceilings in office premises. So won’t they spoil the cozy space of the kitchen with their official appearance?
With a creative approach, such a ceiling can very well decorate your kitchen. It is not suitable only for small kitchens (from 9 sq.m. or less) and for kitchens with low ceilings, since, like any hanging system, this ceiling will “eat” up to 20 cm of the room’s height. But if you take into account its durability, environmental friendliness, moisture resistance and the relatively low cost of some types, then it is worth taking a closer look at it.
All necessary communications can be hidden behind such a ceiling without much difficulty. In addition, the low maintenance requirements of such a ceiling and the easy replaceability of the damaged slab or slabs evoke additional respect.
Decorative boards can be made from different materials:
- Mineral fiber (the most budget option);
- metal (colored, mirror);
- glass or plexiglass (transparent or colored);
- chipboard or fiberboard slabs (for premium premises).
Wooden lining ceiling
Now this is a very fashionable option. For example, ceilings in the Provence style are entirely made of lining, painted white. It’s beautiful, they can be tinted when they become smoky...
But if your neighbors flood you, the lining will simply warp, it will lose its shape, and cracks will become visible. Replacing such a ceiling is very expensive. Therefore, think.
Plastic panels
Ceilings made of plastic panels are similar in many respects to cassette ceilings. To install these panels you also need a frame. Plastic is durable, moisture-resistant and easy to maintain, just like cassette slabs. If one or more panels are damaged, it is very easy to replace them with new ones. However, the installation of the slabs itself is also simple, which you can do with your own efforts.
Plastic panels of all hanging systems are among the most budget-friendly. Suitable for any kitchen, except for interiors that claim to be elite. They have a wide range of colors and textures.
Slat ceiling
Another suspended ceiling system is a slatted ceiling. Metal or wooden frame and slats laid on it. The material of the slats, as well as the method of their installation, is varied.
Rail material:
- aluminum;
- steel;
- plastic;
- tree.
Metal slats have a U-shaped profile, are powder-coated and can have the texture of fine wood.
Methods for installing slats:
- With open space between the slats;
- with closed inter-slat space using decorative inserts;
- with a closed space due to the installed butt-to-end slats.
The first method for kitchens is less preferable due to the fact that dirt will accumulate in the space between the slats, not to mention the fact that all the imperfections in the ceiling base and the communications laid there will be visible. We'll talk about wooden slatted ceilings in the next section.
Covering the ceiling surface with panels and lamellas
For a kitchen ceiling this is the most practical and budget solution. The finishing is made from polyvinyl chloride or polyurethane foam, produced in the form of lamellas - long strips, and panels - rectangular and square fragments.
The principle of covering is the same: clean the ceiling, make markings and glue decorative material to the surface. In some cases, a complete absence of seams is achieved in order to obtain a single surface; in others, the seams serve as a decorative element.
This choice has many advantages:
- ease of installation - requires only care and good glue;
- decorative - both panels and lamellas can imitate any artificial and natural material from stone and fabrics to colored mirrors and wood;
- ease of cleaning - plastic can be washed with just one swipe of a sponge;
- hygiene - does not absorb dirt or grease, and therefore does not contribute to the growth of bacteria;
- not afraid of moisture in any form.
Disadvantages of a kitchen ceiling made of panels:
- plastic does not tolerate high temperatures; the area above the slab becomes deformed over time;
- it is a flammable material;
- low vapor permeability, which is fraught with the appearance of condensation.
Wood finishing
This type of finishing is not suitable for every interior. Firstly, a kitchen with a wooden ceiling requires a large area, especially if you plan to decorate it with dark-colored wood. Secondly, the wooden ceiling must have an appropriate interior setting.
A general recommendation that must be followed for any type of wooden ceiling is that wooden elements must be treated with fire-resistant compounds and compounds that prevent rotting. Treatment with moisture-protective agents (paint, varnish, wax) is also included in this mandatory list. This will help the wood last in your kitchen for a very long time.
Lining. An economical option for finishing the ceiling with wood. The lining consists of long planed boards with a tongue-and-groove fastening, which makes it very easy to install such a ceiling on a pre-prepared wooden sheathing.
slatted ceiling is essentially a lattice made up of bars that are attached to a metal frame in a secret way. A current modern way of finishing ceilings in residential premises.
Wooden panels as a type of finishing are very common. They can be made in different versions:
- in an expensive version - made of solid wood;
- from 3-layer slabs, where the first face layer is made of valuable wood, and the next layer is made of less valuable species such as spruce or pine;
- in a cheaper form - from MDF boards covered with veneer;
- and in the cheapest form - from plywood.
Installation of such panels, like all previous options, is possible only if there is a prepared wooden sheathing.
Finishing the ceiling with laminate may be surprising at first glance, but moisture-resistant laminate is quite applicable not only on the floor, but also on the kitchen ceiling. Installation is carried out using a hemming method, which significantly preserves the height of the room.
Beams and false beams . A ceiling with such elements is always original and gives the room a certain solidity and solidity. To attach beams made of natural wood, there is no need to create battens; long self-tapping screws are sufficient to attach the beam to the base of the ceiling.
False beams are as durable as natural ones, but at the same time they are lighter in weight and make it possible to hide the necessary electrical wiring inside the beam. Installing a false beam has its own characteristics - to attach it to the ceiling you need a frame made of a metal profile or a wooden beam.
The cheapest and fastest DIY finishing methods
Most homeowners do the decoration of economical housing on their own, without the involvement of specialists.
Painting
The easiest way to repair is painting. The work consists of the following stages:
- Remove the old coating.
- The uneven surfaces are filled with putty (first the starting one, then the finishing one), after priming them. When the composition dries, sand it with fine sandpaper.
- Remove dust from the working surface.
- Prime the ceiling.
- Painting is being done. Use a roller with a long handle or a spray gun. The composition is applied in 2-3 layers, each subsequent one is performed perpendicular to the previous one.
Foam tiles
Pre-level the ceiling. Sometimes masters believe that this stage can be skipped. But then the material will lie unevenly, making the flaws more visible. Then a laying diagram is drawn up. It is better to stick from the middle. If there will be a suite or mezzanine near a wall, then start from the opposite side.
The work consists of the following stages:
- The ceiling is treated with a primer.
- Markings are applied. Two perpendicular lines are drawn from the middle of the walls to determine the center of the room. If a chandelier is used as the main light source, gluing begins from there.
- Apply adhesive to the edges and center of the panel, then press it to the ceiling. The setting time depends on the glue used and is indicated on the packaging.
- Next, in accordance with the chosen pattern, tiles are laid over the entire ceiling area. The outer elements are cut to the required size.
- The cracks formed at the joints are masked with acrylic sealant.
Wallpaper
For work you will need: glue, a roller, a plastic spatula, scissors and a stationery knife. At the preparatory stage, the old coating is removed. The wall is cleaned of dust and primed.
Pasting is performed in the following sequence:
- Dilute the glue according to the instructions.
- Cut the roll into strips with a margin of 20 cm.
- Apply the adhesive to the ceiling and/or wallpaper (indicated in the annotation). The edges and corners are especially carefully coated.
- Glue the strip and level it with a clean pressure roller (wide for the panel, narrow for the joints). The seams are placed parallel to the window, and not across, so that they are less noticeable.
- The wallpaper is placed end to end without overlap. Near the walls, excess material is pressed with a wide spatula and cut off with a stationery knife. It turns out to be a perfect joint. Small flaws will be covered with ceiling plinth.
PVC panels
To line the ceiling with plastic panels in the kitchen, a metal frame is required. Sometimes craftsmen use wooden slats as a base. But this should not be done, such sheathing is afraid of hot air, moisture and temperature changes.
Installation is carried out as follows:
- First, the frame is assembled. A guide profile is attached to the walls under the ceiling along the perimeter of the room. A ceiling profile is installed across the planned direction of the panels into the grooves of the previous design. Hangers are attached to the base slab and connected to the overhanging reinforcement.
- Next, install three pieces of plastic trim profile: one on the wall from which installation begins, two on the sides. Attach the parts to metal guides around the perimeter of the room.
- Then the panels are inserted into them and screwed to the ceiling profile with self-tapping screws and a press washer. In this way, plastic slats are installed up to the opposite wall.
- The last element is trimmed if necessary. Put on the trim profile. The lamella is inserted, the profile is attached to the wall using silicone glue.
Stained glass ceiling
If we take into account that stained glass ceilings are mounted on the basis of the Armstrong suspension system, then to some extent they can be classified as cassette ceilings. But due to their non-standard nature, they are placed in a separate group.
A stained glass ceiling is not a cheap ceiling. The material used for the plates is glass or plexiglass. The advantage of the latter is that it perfectly imitates stained glass, but does not break, and also absorbs noise well and retains heat in the room. Plexiglas is easy to care for, the main thing is not to use abrasive detergents.
Due to its fragility, silicate glass is inferior to acrylic glass (plexiglass), but it looks more beautiful and expensive.
Stained glass windows can be made in several ways. Let's list the most common ones.
- use of PVC film (the image is not applied directly to the glass, but is printed on the film, which reduces the cost of the design);
- hand painted with special paints;
- sandblasting glass processing method;
- fusing - an image made from pieces of colored glass, baked at high temperatures;
- “Tiffany” mosaic technique (joining pieces of glass using special foil and a soldering iron).
The advantages of stained glass ceilings, regardless of their material, are durability (they will last for dozens of years), inertness to moisture, a variety of printed images and, undoubtedly, their beauty.
Many of the listed types of ceiling finishes in the kitchen can be combined with each other, it all depends on your design imagination, taste and technical compatibility of finishes. For example, a suspended ceiling and a stained glass system look good together.
The option of combining drywall with plastic or wood panels is quite appropriate and harmonious.
Stretch ceilings can be combined well with plasterboard.
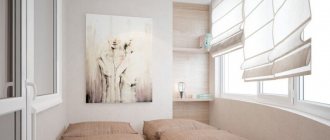
How to make a kitchen ceiling in a studio apartment
There are no hard partitions or doors in such housing. The designer’s task is to visually divide the space into functional zones. One solution is to properly design the ceiling.
In a large studio kitchen, zoning is often organized through level transitions. But the reception visually reduces the room. The space will add gloss with spotlights around the perimeter. Reflection will create the illusion of more volume.
You can separate the kitchen by decorating the ceiling with a small pattern. In small rooms this design looks neat and beautiful. The ceiling is also zoned using a combination of different colors, textures and combinations of materials. Lighting helps enhance accents. For example, a chandelier is hung in the living room, and spotlights are installed in the kitchen. This division helps not only to visually highlight the functional areas in the room, but also to select the most suitable lighting for each room.