Depending on what kind of coating is planned for finishing the bathroom ceiling, two types of leveling are used:
- level the ceiling using a “raw” method using putty mixtures for finishing for painting or whitewashing;
— the “dry” method does not involve preliminary leveling as such, and the evenness of the surface is imparted by the finishing material itself: drywall, suspended structures, suspended ceilings, glass-magnesium sheet.
Leveling the ceiling in the bathroom with putty mixtures
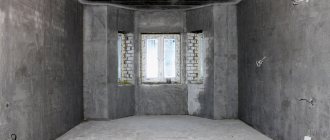
This is the most labor-intensive and time-consuming way to level the ceiling with your own hands. The process begins by removing the previous finish, eroding the ceiling for a concrete base.
Tools
For leveling you will need a large container, a special drill-mixer, a trowel, usually sponge grout, a metal float, a plaster comb, spatulas, a pick, and a plaster trowel.
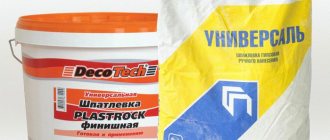
Choice of putty
When leveling the ceiling using the puttying method, the choice of the putty mixture itself is approached very carefully, since the quality of the ceiling surface and its durability depend on the quality of the mixture. Putty is a mixture of binders, base and special leveling additives. After drying, it requires grouting, that is, removing excess with sandpaper.
Putties are sold in the form of dry mixtures, which requires additional labor to prepare the putty mixture before use. Ready-made putties have a higher cost and require special storage conditions. Depending on the type of binder component, putties are divided into gypsum, cement and polymer.
Gypsum putties are suitable for leveling surfaces with a height difference of more than a centimeter. Such putties are not suitable for bathrooms and other rooms with high humidity and possible temperature changes.
Cement putties are suitable for wet rooms, but due to shrinkage when drying, they require repeated puttying. Cracks may form on the surface, especially if the uniform drying technology is violated.
Polymer putties will provide high quality work, provided that the putty itself is authentic. Due to their high cost, such putties are most often counterfeited, so there is a risk of running into poor-quality material.
Otherwise, putties differ in the degree of whiteness of the resulting surface, in the evenness of the resulting surface, which is determined by the size of the filler particles. The finely dispersed fraction allows you to achieve smoother and more even surfaces.
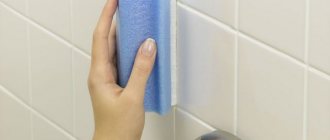
Removing old coating
Before leveling the ceiling in the bathroom, it is worth preparing the surface. The previous layer of plaster is removed with a sharp, sharpened spatula. In this case, the plaster itself must be constantly wetted. Ordinary lime is soaked in water using a sponge or spray bottle. Water-based paint is removed by wetting it with a solution of water and iodine, and water-dispersion paint is moistened with special solutions and removed with a spatula or drill from a special wire brush attachment.
When handling wash-off solutions, it is necessary to observe safety precautions, as this is an aggressive environment that can cause burns on the skin. Old plaster is knocked off the slabs with a regular hammer, pick or spatula.
Surface treatment before puttying
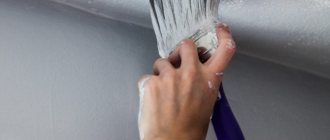
The concrete base of the ceiling is inspected for the presence of fungus and treated with a special primer to ensure better adhesion between the base and putty. For priming flat surfaces, use a roller, and for hard-to-reach places, use a brush.
Plastering (leveling) the ceiling
Finally, we move directly to how to level the ceiling in the bathroom with your own hands. Large cracks are sealed with putty for rough work. It will prevent cracking and laying of the reinforcing mesh at the joints of the plates, which is pressed into the putty layer so that it is located not at its base, but in the center.
The next step is to apply the first layer of putty mixture, 2 cm thick, and level it with zigzag movements towards you. If a thicker layer of putty is needed, the first layer is combed with a comb and, after hardening, a second layer is applied to it.
If the layer is not combed, it must be carefully primed to ensure better adhesion. Layers of putty must dry naturally at the temperature at which they were applied.
Before applying the next layer, the previous one must completely harden, and not just dry on the surface. Subsequent layers are applied in a direction perpendicular to the direction of application of the previous layer. The second and third layers, if necessary, are made thinner and leveled more carefully. But in any case, this is still a rough leveling of the ceiling.
Before applying the final thin layer of putty, check the evenness of the ceiling. Protruding surfaces are lightly sanded, gaps are puttied. Preparing the surface for wallpapering or painting involves periodically moistening and sponging the entire surface. This allows the ceiling surface to be leveled to perfection, and also ensures proper hardening of the putty layer, preventing the appearance of cracks.
The last layer to be applied is the finishing putty mixture. Problematic surfaces over the entire area are additionally reinforced with fiberglass before applying the finishing putty.
Finishing putty requires complete dust removal of the surface. Therefore, before application, the surface is wiped with a damp cloth and dried naturally or simply vacuumed thoroughly. The final putty is also applied in several layers depending on the condition of the surface. Each layer should dry well within one to two days.
This leveling method is costly both in time and in finance, especially when it comes to the need to level a ceiling with large differences in height and a large number of defects. But only this method allows you to achieve ideal evenness of the ceiling without loss of height.
Sealing cracks and joints of slabs
Any cracks and joints must be sealed with cement mortar before starting puttying. Otherwise, a large layer thickness in such places will lead to uneven drying of the material and to repeated cracking. Similar work is carried out using reinforcing tape. It is sold in rolls of various widths. The tape should cover the crack by 1.5–2 cm on each side. For winding cracks, the tape must be cut into pieces and applied so that the individual pieces overlap each other.
First, the crack or joint is sealed with mortar, and then the tape is pressed into it with a spatula. For work it is necessary to use low-drying mixtures with high strength. Mixtures for sealing joints of plasterboard boards have proven themselves well. Some craftsmen get good results when using ordinary putty, mixed not with pure water, but with the addition of 30% primer.
The resulting mixture must first be tested on a trial plot. Typically, such solutions set very quickly, so they must be prepared in small quantities and try to apply without flaws, since it will be difficult to remove deposits of dried plaster.
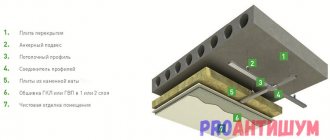
Leveling the ceiling in the bathroom with plasterboard
How to level a ceiling with plasterboard? To do this, markings are applied to the walls using sheets of plasterboard, and load-bearing metal profiles are installed according to these markings. Drywall sheets are screwed onto the finished metal frame. The joints of the sheets are covered with sickle tape and puttied in several layers, paying special attention to the joints of drywall. The finished surface can optionally be painted, covered with wallpaper or tiles.
This alignment method has many advantages:
- it allows you to level the most complex ceilings with large differences and multiple defects,
- This finishing provides significant time savings compared to the plastering or puttying method,
- it becomes possible to hide pipes and electrical wiring behind the frame,
- the method makes it possible to arrange stepped ceilings of any complex design,
- allows you to embed any lighting elements in the required quantity.
Special approach
Putty consists of a whole mixture of various components, in which coarse-grained particles play the main role. They allow the solution to more thoroughly level the surface of the wall or ceiling in the shower room. After applying the putty, it is best to wait for it to dry completely, and then wipe and rub it thoroughly. Otherwise, application to a damp and unprepared base will result in a lack of high-quality coating. Various flaws, irregularities, and roughness will be visible. You can glue waterproof wallpaper to finished walls in the bathroom, but then you will need putty made from smaller particles.
In order to properly apply putty to the wall or ceiling in the bathroom, you need to select the right tool. For example, a wide spatula is best for comfortable work. In some respects, it looks more like a spatula with a thin metal base. When applying putty with this device, you can feel all the bends and unevenness of the surface. This is very helpful when working and also makes it much easier.
The putty should be applied in a layer of no more than 2–3 mm, however, this indicator directly depends on the degree of unevenness of the ceiling or wall. In order for the mixture to dry, you need to wait a certain period of time. The most reliable drying method is natural. Artificial methods in the form of various heat sources, convectors or ventilation systems will lead to premature drying, which will result in the appearance of cracks.
How to level a ceiling using suspended structures?
The installation of suspended ceilings includes leveling with plasterboard sheets according to the previous method, as well as additionally constructing plasterboard structures in accordance with the design project.
The metal profile frame follows the geometry of the ceiling being created and is usually created in several levels. The frame of the first level is first covered with sheets of plasterboard, then gradually all subsequent ones. Holes for lamps are cut in the required places. Each of the ceiling levels is puttied and rubbed after drying for one to two days.
Along the perimeter of the second and subsequent levels, a board is formed from strips of plasterboard of the required width, behind which wiring, lampshades and night lighting are hidden. Along the perimeter of the room, the joints of the walls and ceiling are decorated with baguette. The last step is to paint the ceiling surfaces in the desired colors.
Advantages of this method of ceiling leveling:
- high decorativeness and aesthetics,
- the ability to create an exclusive ceiling and implement any design idea,
- relatively low cost when creating a ceiling with your own hands,
- the ability to get a finished ceiling in a relatively short time.
The disadvantage of this method is a significant underestimation of the ceiling level by the thickness of the entire ceiling structure.
Varieties
Bathroom putty is divided into several types. Which one is most ideal? To do this, you need to understand the division of the material. The mixture is divided into separate categories depending on the main component and its intended purpose. For example, according to the degree of readiness, the putty can be ready for use or in the form of a dry consistency.
For premises characterized by complex operational criteria, i.e. For a kitchen or bathroom, it is best to select compositions based on a polymer or cement base. These particular consistencies have the required level of protection against microbes, corrosion, and cracks. To get to know each composition in more detail, it is necessary to find out all their strengths and weaknesses. Kinds:
- Cement. One of the main advantages of the material is its highest resistance to moisture. Therefore, the mixture is recommended for use in the bathroom for application to walls and ceilings . The cost of the material is at an affordable level, and the characteristics are highly rated. The downsides include a grainy structure and a grayish tint. This makes it difficult to combine with different colors, especially white. The composition takes a long time to dry, is subject to shrinkage, the room must be regularly ventilated.
Stretch ceilings in the bathroom as a way to level the ceiling surface
Installing suspended ceilings is the easiest and fastest way to level the surface and obtain a ceiling of any design, even the most complex.
It is worth noting only three disadvantages of this method:
- its relative high cost compared to other methods,
- the difficulty of installing such ceilings with your own hands due to the need for special equipment, in particular a heat gun,
- lowering the ceiling by about 3-5 cm, depending on the type of fastening.
A stretch ceiling is a film that is fixed to a profile around the perimeter of the room, stretching under the action of hot air created by a heat gun and the elevated temperature in the room itself. Gradually cooling to normal room temperature, the film stretches, creating a perfectly flat surface.
Modern stretch ceilings can be of any color and texture, with or without a pattern, they can be multi-stage, equipped on the principle of suspended ceilings.
What properties should bathroom putty have?
First of all, let's figure out what putty is? This is the finishing layer that is applied before final finishing to create a perfectly flat and smooth surface. The main purpose of applying putty is to eliminate minor defects and cracks.
More serious unevenness must first be corrected using plaster or drywall.
Regardless of what you use to finish the bathroom in the future, the leveling layer should have the following characteristics:
- Moisture resistance. The bathroom is a room with high humidity. The coating should not deteriorate or peel off under the influence of moisture, even over time.
- Durability. The service life of such a coating without loss of quality should be long.
- Resistant to temperature changes. Temperature changes should not lead to deformation of the putty layer, otherwise the lining will not stick to it.
These are the main criteria by which you need to choose a composition. All other characteristics depend on your individual needs and further cladding.
How to level the ceiling with your own hands using other methods?
Other dry methods for leveling the ceiling surface also include gluing the ceiling with tiles, finishing with plastic panels or clapboard. The advantages of these methods are sufficient decorativeness and low cost. As in the case of stretch and suspended ceilings, when leveling using these methods, the ceiling level is lowered by several centimeters.
Tiling the ceiling will not solve the problem of leveling surfaces with large differences in height. In this case, you will still have to first plaster, putty or cover the ceiling with plasterboard. But minor surface defects can be hidden with this finishing method. Therefore, this type of finishing can also be classified as a leveling method, especially since this is one of the cheapest ways today to simultaneously hide minor defects in the ceiling surface and give it a finished look.
Types of putty based on raw materials
Depending on the type of main component and purpose, bathroom putty for painting comes in the following types.
Cement
One of the main advantages of this type of mixture is its high resistance to moisture. Therefore they are recommended for use in the bathroom. The cost of such material is within reasonable limits, and the characteristics are quite high.
Important! When exposed to moisture, the putty becomes even stronger. But this composition dries slowly and shrinks.
Polymer
At the moment, these are the most advanced developments, which, of course, affects the price. The surface is very even and smooth. This putty is flexible and easy to work with, and does not shrink.
There are 2 types of polymer-based putty:
- Acrylic - has a high level of plasticization, so it can fill small irregularities and defects. The composition is odorless and has a high degree of adhesion to surfaces made of wood or concrete.
- Latex composition - allows you to get a mirror surface that is not prone to cracking and shedding.
Plaster
Gypsum mixtures are not suitable for the bathroom, as they are not able to resist the concentration of hot steam, not to mention possible leaks from above.
Oil-adhesive
One of the first putty powders, which is considered obsolete. How to beautifully paint walls with wallpaper for painting? The quality of work with such a composition is very low.
Therefore, it is mainly used for utility rooms that do not require high-quality finishing.
Work before painting
In order to carry out finishing work, you either need to involve professionals or try to do everything yourself. It is necessary to take into account a large number of nuances and pitfalls. Take into account the cost, quality of the material, calculate the area and condition of the surface being treated, the number of corners, the depth of flaws, and much more.
- You should inspect the walls or ceiling before painting for the presence of microorganisms, rot or mold.
- Mandatory dismantling of outdated coating. Special mixtures that are used according to the instructions will help here. In addition, you can use sandpaper, a scraper or even a grinder. Although the most effective method is a grinding machine with a diamond tip.
Preparatory work
When puttying, like no other type of work, not only the finishing process itself depends on the correct preparation of the surface, but also the final result, material consumption, and durability of the repair. Conclusion: before you putty the ceiling in the bathroom, the surface of the base must be prepared in the most careful way. The following work is required:
WHAT TO LEVEL AND PUTTER A BATHROOM CEILING FOR PAINTING. BATHROOM FINISHING.
- removing the old layer of plaster;
- paint removal;
- whitewash removal.
Most putty mixtures have poor adhesion to chalk or paint (see Painting the ceiling in the bathroom: selection of materials and work algorithm). If the old coating is firmly adhered to the base, then you can leave it alone. It is quite simple to check the delamination - you need to tap the surface with a hard object. A loud knock indicates that the coating is solid, while a dull and rattling sound indicates that the coating is weak and must be removed. The internal surfaces of cracks or deep joints of concrete floor slabs, if any, must also be cleaned. For better coverage and adhesion to the putty, the edges of the cracks are cut to create inclined walls from the surface to the bottom of the crack.
After cleaning, the entire surface must be treated with a deep penetration primer with antifungal and antiseptic impregnation. Such additives prevent the formation of mold and mildew, which love high humidity and temperature (see Fighting mold on the ceiling in the bathroom). If the fungus is already present, then the old plaster in this place must be completely removed, down to the base. All subsequent work is carried out only after the primer has completely dried.