Profiled metal flooring can be classified as an inexpensive but durable material that is used to cover the roofs of industrial, residential and many other commercial buildings.
This material is famous for its strength, resistance to corrosion and other mechanical and natural phenomena. If the minimum angle of inclination of a roof made from a profile deck is calculated correctly in advance, then water drainage and snow melting will be effective, and the roof covering will last about 20-25 years.
Why single-slope?
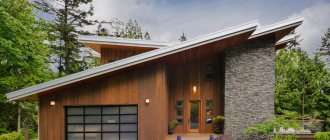
The time has passed when a pitched roof was considered the best option for bathhouses, sheds, and cabins. Now it is interesting to use this form in a non-standard project. An atypical roof looks organic against the backdrop of many landscape design trends.
- Despite the windage of the corrugated sheeting, a pitched roof, when positioned correctly, is considered safe even with large gusts of wind. In this case, special attention is paid to waterproofing.
- A roof of a simple configuration can be erected quite quickly.
Each sheet of cold-rolled steel is factory-coated with multiple layers. Due to the passage through the forming shaft of roll forming machines, the surface becomes ribbed (corrugated) and rigid. The higher the rib height, the stronger the building material. Corrugated sheeting is perfect for creating a pitched roof.
Shed roof made of corrugated sheets
Examples of beautiful buildings
Private two-story stone house in a modern style. The absence of a ridge allows you to build multi-level systems without any problems. The clear horizontal lines of the facade rhyme perfectly with the duo of pitched roofs. The same technique is perfect for an L-shaped base made of foam blocks.
Sometimes only a single slope can smooth out complex terrain; the appearance only benefits from this.
Sloping roofs fit perfectly into the designs of spacious cottages and small frame buildings of 50 square meters. m. These Finnish eco-style houses captivate with their comfort and elegance of design.
Pitched roofs are harmonious in combination with sloping awnings. This allows you to favorably emphasize some parts of the house and focus on the design of the entrance group. Additions in the form of canopies, like weightless extensions, canopies coated with polycarbonate or corrugated sheets, look stylish.
Protruding bevels provide ample space for external lighting. Built-in lanterns softly illuminate the area around the building and create the effect of a floating roof. There are many variations on this theme.
Houses made of timber are quite capricious from the point of view of experimenting with style, but original solutions have also been invented for them. The photo shows a pitched roof of an unusual shape, covered with bitumen shingles.
Operable or eco-roofs have a slight slope, enhanced hydro- and thermal insulation. A properly selected plant carpet protects against noise. By absorbing water, it reduces the load on the storm structure.
The mini offers are no less interesting. A garden house with a funny sloping roof and a cozy country house, with a duet of two-level slopes, have a special charm.
To learn how to build a pitched roof with your own hands, see the following video.
What is good about corrugated sheeting for a pitched roof?
The building material has:
- durability;
- financial accessibility;
- color variety;
- variability of shapes and sizes;
- ease of installation and transportation.
Important! If the roofing “pie” is installed incorrectly, heavy rain, hail, and snow can be heard inside. When the protective polymer layers of corrugated sheeting are damaged in certain places, the exposed areas are covered with special paint.
From project to implementation
Installation
After you have made a diagram of the future roof, calculated the main design parameters and purchased materials, you can begin installation work. For assembly you will need the following tools: electric drill, screwdriver, construction stapler, wood planer, hacksaw or grinder, cord, marker for marking and ruler. Installation is carried out in the following order:
- A mauerlat beam is attached to the wall of the house using strong anchor bolts or metal studs. You need to take care of the reliability of the fastening, since the rafter legs will rest on it.
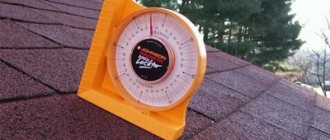
How to determine the slope angle of a pitched roof
Among the important parameters characterizing the roof, experts call the angle of inclination of the slopes relative to the horizontal surface - slope.
This parameter influences a number of important operational and structural features of the roof.
It is logical that the angle of inclination of a pitched roof is not chosen arbitrarily, but depending on climatic conditions, the prevailing wind rose in the area, the amount of precipitation, the structural type of the rafter system, the roof covering and the length of the slopes.
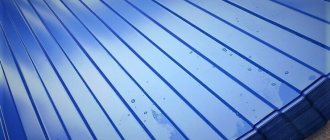
Let's consider the roofing material - profiled steel sheet (corrugated sheet) and the minimum slope of a corrugated sheet roof recommended by building codes and regulations (SNIP).
If there is no overflow of water between the corrugations, the angle of inclination is considered minimal. Otherwise, the formation of puddles is inevitable.
Angle of inclination of a pitched roof made of corrugated sheets
The choice of pitched roof angle depends on:
- from the height of the walls of the building;
- climatic features of the region of the country (how much snow falls, how often there are gusts of strong wind);
- type of selected corrugated sheet.
Remember! The flatter and lower the slope of the roof, the thicker the waterproofing material should be, and the more the joints are sealed. Roofing activities are simple and can be done independently if you follow the ready-made instructions.
Relationship between profile and sheathing
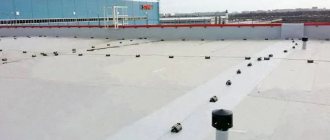
Buildings intended for industrial use are often covered with single-pitched or flat roofs, and residential buildings can have two or more slopes.
But any roof covering must be laid on a solid base (lathing) that can withstand high loads and distribute them evenly onto the floor beams in industrial buildings, or onto the rafters used in residential buildings.
The pitch of the sheathing depends not only on the slope of the roof, but also on the height of the profile waves of the sheet being installed. The higher the waves, the greater the load the sheet can withstand.
The sheathing is usually selected according to the type of sheet and the slope of the roof slope:
- For example, the wave height of a sheet when the roof is tilted up to 15 degrees is no more than 20 mm. In this case, according to the standards, the sheathing must be continuous, made of edged boards 20-30 mm thick.
- With the same roof slope (15 degrees), if a profiled sheet with a wave height of more than 35 mm is laid, then the lathing can be spaced within 300 mm.
- If the height of the profile wave is more than 44 mm, and the roof slope exceeds 15 degrees, then sheathing boards can be used with a thickness of 30 mm or more and fastened in increments of 350-500 mm.
It should be taken into account that when constructing a flooring from a profiled metal sheet, a certain pattern can be observed: the smaller the slope of the roof slope, the greater the overlap of the upper sheets on the lower ones. This is required to protect the roof from leaking at a slight slope, blowing water under the sheets and tearing off the roof in strong gusty winds.
How to calculate loads
First of all, the region of operation is taken into account. Corrugated sheeting as a roofing material has a special windage, so the roof should not be made too steep.
A layer of snow more than a meter thick will bend the profiled sheets on the roof of the building. This means that calculations must be approached with full responsibility.
In addition to taking into account wind loads, humidity, temperature changes, and other precipitation are taken into account.
Calculation of the cross-section of rafters for a pitched roof
What forces act on the rafters and roofing?
Before you begin calculating the slope of the roof, you need to understand the degree of impact on the roof covering. There are two types of loads - dynamic and constant .
Constant loads include those that will always affect the roofing , regardless of the time of year. This includes the chimney, antenna, the weight of the roof itself, etc.
As for dynamic loads , these are non-constant quantities, i.e. weight that is placed on the roof from time to time . Such an impact can be caused by the weight of a person who periodically visits the roof to carry out any work, the weight of snow and hail, the impact of wind, etc.
Snow load
If the roof slope is 30 0, then the force of the snow will be 50 kilograms per square meter. If you increase the angle of a pitched roof to 45 0, then most likely the snow will not linger on the roof.
That is why this value should be chosen based on the region of residence , i.e. based on the amount of precipitation.
At the same time, if you want the snow to melt off the roofing on its own (at least some part of it), then the minimum slope value should be 10 0. The maximum value is 60 0.
Be that as it may, owners of houses with pitched roofs independently remove snow from their roofs every year to reduce the load on the roof .
Snow load
Wind loads
The design of a pitched roof is such that it is always made with a low part towards the leeward side in order to reduce the load from the wind.
Wind load
Combined loads
Many people ignore this fact, which often leads to unpleasant situations. This type of load represents the maximum impact that is exerted on the roof covering at any time.
Let's imagine a situation when there is a snow storm outside, i.e. the roof is exposed to both strong wind and snow mass at the same time. In addition, a person is forced to climb onto the roof to adjust the antenna or he has to pick up a toolbox, it doesn’t matter.
It turns out that in addition to snow and wind, the weight of the human body is added. If you do not take this fact into account, the roof may not withstand .
How to design ventilation
With a minimum slope, a combined pitched roof without an attic is built. External air flows pass through the channel in the top panel and through the air gap in the roofing “pie”. This mechanism prevents the formation of condensation.
Another condition for a well-made pitched roof will be the thermal insulation of the house.
Important: protect the under-roof area from heat in the summer. A waterproofing film with a special coating on one side will perfectly reflect the ultraviolet rays of the sun
When an attic is not provided, the floor and roof are combined. This results in a common functional ventilation opening.
Installation of roof vents
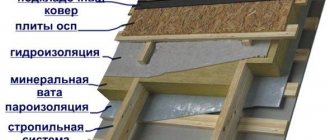
Roof insulation
The roofing pie is arranged taking into account the final coating. The cake includes insulation, vapor and waterproofing. To insulate a building, a mixture of concrete and clay, cement slag and other materials are suitable. Quite often, builders use multilayer materials, for example, mineral wool. Insulation boards are:
- slab;
- rolled
Before laying insulation, it is necessary to perform waterproofing. The material is laid out on top of the roofing components.
Before performing insulation, it is necessary to lay waterproofing
It is advisable to do this if the thickness of the heat-saving material is less than the height of the rafters. If the thickness of the insulation corresponds to the height of the supporting element, the film should be mounted on the upper parts of the bars, which are used to increase the height of the supports.
The waterproofing must be installed across the slope with an overlap of 100 mm. A ventilation gap of 50 mm or more must be left between the waterproofing and the roof. To do this, 50x50 mm bars are mounted on top of the film.
The insulation will need to be cut into separate strips and placed between the slats. The material must be mounted by surprise; for this, its width must exceed the distance between nearby supports by 30 mm. Then you need to place the vapor barrier material at the bottom of the rafters and secure it with nails with heads without a protrusion. The vapor barrier is installed with an overlap of approximately 8–10 cm. To ensure the tightness of the canvas, it is recommended to connect it with self-adhesive tape.
Step-by-step example of building a pitched roof
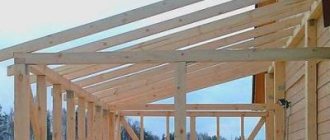
Elements of a pitched roof
Step 1. Making a Mauerlat
To level all the tops of the sides of the house, the presence of a Mauerlat is mandatory.
- When a log house is erected, the upper crown plays the role of a mauerlat.
- If the walls are brick, creating a mauerlat is variable:
- a timber frame of the appropriate size is knocked down;
- a reinforced belt is created with steel studs, onto which a timber frame is placed. In this case, we achieve maximum horizontality, which allows us to evenly distribute the load on the walls. The angle of inclination of a pitched roof will be the same on both sides.
Mawelat
Step 2. Mark the rafters and make the sheathing
With a small margin, a board is laid on the Mauerlat. The upper and lower cuts are marked, which coincide in width with the Mauerlat. Based on the results obtained, the remaining rafters are marked.
The basis for a profiled pitched roof is board sheathing and steel purlins. The sheathing is made from the bottom up, each of the bars is attached to the rafter system with a bracket or a nail.
Then, roofing material is placed under specially mounted fillets, which prevents the penetration of dampness. The resulting overhangs are sheathed with siding. The created design looks neat and fresh.
Important! The higher the roof slope, the wider the sheathing pitch.
Sheathing of a pitched roof
Step 3. Install waterproofing
- When a pitched roof is poorly ventilated, an antioxidant film is used as a building material.
- The under-roofing film is lined from bottom to top with canvas with a certain margin.
- The water vapor barrier film is attached to the rafter mechanism using a construction stapler.
It is important to know: a vapor-permeable membrane will remove excess water vapor outside. This is important because it prevents the formation of an environment in which fungal colonies actively develop
Laying waterproofing for a pitched roof made of corrugated sheets
Step 4. Raise the corrugated sheeting to the roof
Recommendations:
- we take a rope four times longer than the ladder, which is fixed on both sides from the bottom of the sheet;
- the arsenal should have a ladder resting on the ground, the length of the slope;
- the corrugation is laid from the bottom corner in a horizontal position;
- You cannot cut a steel sheet with a metal cutting machine, otherwise corrosion will appear at the cut site over time.
Step 5. Install the corrugated sheet
The corrugated sheeting on the “one-pitch” is fixed with a vertical strip. Docking is carried out at a single wavelength width. With an overlap of more than fifteen centimeters, corrugation is laid at the joint and near the wall. Self-tapping screws with a special rubber seal should only fit into the cavity.
The top sheets always overlap. For horizontal overlaps, a sealing gasket is used. We begin the final fixation when the evenness of the entire roof has been checked. Fastening the profiled sheet must be technologically advanced.
The end and ridge strip are mounted at the end. The first one does not compact; small gaps help natural air circulation.
Installation of corrugated sheeting on a pitched roof
Selection of fasteners
Fixing the panels on a wooden sheathing in most cases is done using roofing screws with thermal washers - this is the simplest and most convenient way.
In this case, it is necessary to use these types of screws, since in the absence of thermal washers, polycarbonate may crack due to thermal expansion. Rubber washers will compensate for changes in panel thickness, preventing cracks from occurring.
The second mounting option is using a metal split profile. This mounting structure consists of a base and a cover. The base is firmly fixed to the supporting base (sheathing or counter-lattice) using self-tapping screws or bolts. A cover is installed on top of it. Grooves are formed in the side parts of the profile, into which polycarbonate panels are then inserted. They are also fixed to the profile using self-tapping screws.
Construction of complex structures
The roof structure of a complex configuration has a number of distinctive features. To prevent dust and moisture from entering the under-roof space, the joints are carefully sealed. Additional roofing elements are attached differently.
A continuous sheathing is made before fixing the valley strips. The lower fragment is secured along the edge with a nail or self-tapping screw. The upper fragment of the plank is bent in the joining area to the roof ridge. A sealant must be placed between the corrugation and the strip, or a sealing compound must be applied. The final fastening of the strip is carried out together with the fixation of the metal profile.
The upper fragment of the valleys carries a decorative load. It is also attached to the seal, sealing.
Chimney system in a complex roof
How to remove a pipe through a roof from corrugated sheets, see here
Option 1
How to bring a pipe through the roof
Option 2
How to remove a pipe through the roof from corrugated steel