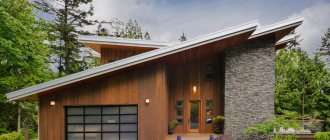
The design of a gable roof and its elements
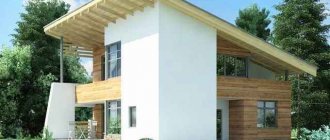
Today, gable roofs with a residential attic (attic) are very popular. Often these rooms are equipped as summer rooms. But you can also find reliably insulated roofs.
Elements of a warm gable roof:
- rafter system - includes rafter legs resting on each other (in pairs). Location: on the walls; one level;
- two pediments or sewn walls - they are formed when the rafters intersect (read: “How to make a pediment with your own hands”);
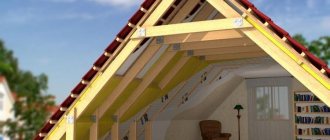
- roofing pie - consists of sheathing, waterproofing layer, roofing material, vapor barrier membrane, insulation and interior finishing elements;
- drainage system;
- other elements, for example, a viewing window in the roof. Read more: “Gable roof construction: structural elements.”
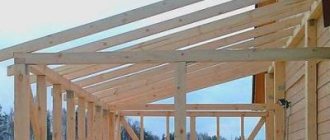
Wooden roof: 9 components of the rafter system
A wooden roof consists of different types of rafters with other elements of supporting structures and roofing. When constructing such a structure, you do not have to face many difficulties, which makes this type of roofing very popular and widespread. The rafter system can have a different structure, and the components for its creation differ in their features and prices. This article will tell you what a wood roof includes and how it is constructed. Also here you can find a large amount of information about what materials are best to use for a given design and how to optimize the costs of construction work without loss of quality.
Wooden roof Source forestaspb.ru
Natural ceramic and concrete tiles
The widest range of additional elements is available for roofing made from natural ceramic or concrete tiles. This is due to the fragility of ceramics, although its strength and durability are high. It is not recommended to drill tiles, so separate elements are produced for all possible cases: for snow retainers, ladders, antennas. Ventilation outlets and gable elements are available.
There are special side tiles for gables, they come in left and right. As for the ridge, in addition to ordinary elements, they also produce ridge parts that complete the intersections of several ridges of complex roofs.
Different types of ridge elements, including for intersections
There are many types of tiles; each type has its own range of additional elements. For various types of ceramic tiles, additional elements unique to them are used.
The basis of the supporting structure of the roof
The basis of the supporting structure of a sloped roof is the rafters. They perform a very important function, supporting the sheathing and thereby bearing the weight of the roof, snow and wind pressure. In addition, the design contains additional elements of the truss roof (mauerlat, crossbars, spacers, etc.), which serve to fasten and impart rigidity to the truss frame.
The estimated snow load for the middle strip is 180 kg/m2 in the horizontal projection of the roof. With a slight roof slope, snow accumulation can increase this figure to 400-500 kg/m2. However, with a slope greater than 60°, the snow load can be ignored. At the same time, when the roof slope is more than 30°, rafter calculations must be carried out taking into account the wind load. For the middle zone it is equal to 35 kg/m2.
An important factor is the dead weight of the roof elements and sub-roof structures, which directly depend on the roofing materials used and the size of the entire roof. When using heavy materials (for example, natural or cement-sand tiles) in the rafter system, it is necessary to use large-section timber, installing rafters with a minimum pitch. If lightweight roofing material is used when constructing the roof of a house (for example, Euro slate, bitumen tiles), then even timber with a cross-section of 50 x 150 mm can be used, and the pitch of the rafters can be significantly increased - up to 1.5 m.
Removal and replacement of the roof
When asked when a roof replacement is needed, the most convincing answer is a wet spot on the ceiling of the home. Especially when water drips from it with stubborn persistence.
It is not worth taking it to such extremes; it is better to regularly carry out an annual inspection of the roof and carry out preventive work in a timely manner. However, if the leak comes as an unfortunate surprise, you need to make a strategic decision. This requires an inspection of the roof and supporting structure.
Read about the prerequisites for roof repair in a private house in our article - When the roof needs repairs.
Roof restoration work involves three possible solutions.
- When the damage affected only the roof, cracks, chips, pockets of corrosion, violation of the tightness of joints, etc. formed on the roof surface; repairs are only needed for the roofing itself. The volume is determined by the area of the lesion. If 40% of the area or more is out of order, it is not advisable to patch such a roof. It is better and cheaper to replace the entire coating. For example, replace slate roofing with metal tiles.
Over time, cracks and through holes form on the slate, which require replacement of damaged sheets or the entire covering
- If the wooden elements of the sheathing are damaged, fungus or mold is found on the surface of the boards or panels, blackening or salt protrusion, you will have to replace the sheathing frame along with the roof. Otherwise, the renewed roof will not last long, and the money will be wasted.
- And the last, worst-case scenario - violations affected the rafter system, the geometry of the attic or attic space was changed. The rafter legs have rotted, and the load-bearing or auxiliary structural elements (crossbars, tie-rods) have sagged. In this case, rafter repairs are necessary, which means complete dismantling of the roof cannot be avoided.
If, as a result of leaks, the load-bearing elements of the roof have become wet and rotted, it is necessary to completely dismantle the roofing pie and repair the rafter system
Dismantling is carried out in the reverse order of installation. For example, dismantling slate is carried out using a hammer and a nail puller. It is more convenient to disassemble such a roof with two people - one knocks the nails from the attic side, and the other pulls them out from the outside. Next, the released sheet is lowered from a height to the ground and stored.
To remove the slate covering, it is necessary to remove all fasteners and carefully lower the released sheets to the ground.
When rebuilding the roof, for example, from slate to metal tile, it is necessary to adjust the shape of the sheathing, because slate is attached to one row, and metal tile to two. The second frame serves to enhance the natural ventilation of the under-roof space. If the covering is changed from soft tiles to corrugated sheets, there is no need to redo the sheathing. If it’s the other way around, you’ll have to cover the slopes with a continuous coating of OSB or plywood.
Under the bitumen shingles it is necessary to make a continuous sheathing on which the underlayment will be mounted
Dismantling must be carried out by a team or with an assistant. You cannot do this alone; safety precautions when performing high-altitude work prohibit being on the roof without a helmet and insurance.
If the roof was fastened with screws (corrugated sheeting, polycarbonate, etc.), then its disassembly is carried out using a screwdriver. The installer sequentially unscrews the fasteners and removes the sheets from the roof slopes.
Sheets of corrugated sheets connected to the sheathing with screws are unscrewed when dismantled with a screwdriver
The most labor-intensive is considered to be the dismantling of a flat roof covered with several layers of roofing felt (up to 5 or more) . When heated in the sun, roofing material eventually bakes into a monolithic carpet, which is very difficult to remove. In this case, a roofing ax is used, with which the roofing is cut out into small islands and disposed of. On large areas, specialized organizations use curtain cutters - a mechanized tool that cuts the roof into pieces. There are wall cutters with electric or gasoline drive. They can only be used if the layer depth is at least 30 mm.
The wall cutter is designed for flat roofs with a thickness of 30 mm or more
Replacing a roof involves carrying out certain calculations. If the weight of the new coating exceeds the weight of the old (removed) one, it is necessary to correctly assess the ability of the rafter system to withstand increased loads. Sometimes it is necessary to strengthen the rafters by adding additional supporting elements. In this matter, using old-fashioned methods is not recommended. It is advisable that the calculations be carried out by a competent engineer familiar with the specifics of the industry.
When replacing heavy types of roofing with lightweight ones, it is enough to calculate the weight of the roof per square meter. For example, when replacing slate with corrugated board, this can be done as follows.
- It is known that a sheet of eight-wave slate weighs about 30 kg and has an area of 1.5 m2. Thus, per 1 m2 there are 30/1.5 = 20 kg.
- The corrugated sheet has dimensions of 1.2x1.2 m. We calculate its area: 1.2 ∙ 1.2 = 1.44 m2.
- The weight of the sheet (depending on the thickness of the metal) is from 7 to 9 kg, so the relative load from it can vary from 4.9 (7/1.44) to 6.3 (9/1.44) kg/m2.
This means that replacement can be done without additional extension of the rafters, since the pressure will decrease by almost 4 times.
Video: dismantling and installation of the roof (slate - metal tiles)
Soft types of roofing
Roll materials. They can be used on slopes with a slope of up to 50 degrees. The thickness of this type of roof is 1-6 mm, the specific weight of the carpet does not exceed 10-12 kg. The advantages include the relatively low cost and the ability to provide waterproofing even on a zero slope. The main problem is the large number of joints. Previously, paper-based roll materials (tar paper, roofing felt) were used. Today they are gradually being replaced by more advanced bitumen-polymer products.
Roof shapes: A - pitched; B - gable gable; B - tent; G - semi-hip hipped; D - four-slope hip; E - gable half-hip; F - multi-pincer; Z - half-hip attic; I - Attic hip; K - conical forceps; L - hip with a broken slope; M - pyramidal forceps; 1 - slope; 2 — gable (pediment); 3 - hip; 4 - half-hip; 5 skate; 6 - broken slope.
Membranes. This is a polymer that has the most optimal performance characteristics among other rolled materials used for soft roofing. The main disadvantage of this type of coating is the high cost and the need to attract qualified specialists. Among the main advantages:
- durability: service life can reach up to 50 years;
- frost resistance;
- resistance to precipitation;
- immunity to ultraviolet radiation.
Bitumen shingles (shingles). This is a coating that has a wide variety of shapes, color shades and has no “contraindications” associated with the required angle of inclination of the slopes. Therefore, shingles are well used on roofs with complex configurations. Such tiles do not conduct sound well and resist the effects of precipitation and sun well.
Copper tiles
Copper is used in roofing work not only in sheets, but also in the form of finished tiles. This type of roof finishing is durable, highly aesthetic, but very expensive. There are a number of manufacturers of copper tiles and each of them has its own range and design of tiles and additional elements.
There are many types of copper roofing. In the photo - tiles, the basis of which is sheets of fiberglass impregnated with a bitumen-polymer composition
On top of this roof is a fairly thin layer of copper. This type of copper tile is quite flexible, so the additional elements are similar to those used for bitumen shingles.
Additional roofing elements are an integral part of modern roofing systems, without which the roof will not fully perform its functions. When designing a house, it is necessary to take into account that the more complex the roof, the higher its cost per square meter will be. The more complex the roof, the more “additions” will be needed, and this costs money, sometimes a lot. Additional elements for metal tiles have the lowest cost relative to the base material, and the highest cost for natural tiles. Companies supplying roofing materials help buyers calculate the consumption and cost of materials. Having a roof plan, it is worth seeking advice in advance.
Main parts of the roof
The roof is the main final covering of the roof and consists of many components. The main elements that make up the roof:
- Slopes are inclined planes that ensure the removal of precipitation from the roof. The slopes are 95% of the roof. There is only one requirement for them - the angle of the slope must be chosen in such a way as to withstand maximum loads.
- Slanted ribs are obtained at the junction of the slopes and look like protruding corners.
- Skates are horizontal ribs. These elements are designed to cover the gap at the junction of two slopes.
- Valleys, or valleys, are internal angles that are formed at the intersection of two slopes. These elements must be collected in such a way that precipitation does not leak inside.
- Drip cap is the lower part of the slope that protects the walls from water ingress. It is a strip that covers the overhangs from moisture and gives the overhang a clear edge and a complete shape.
- The horizontal part of the slope extends beyond the walls of the building and is called the “eaves overhang.”
- Front overhang is the inclined part of the slope extending beyond the walls.
- A gutter for collecting and discharging precipitation is located along the edge of the slope. The collected liquid is carried away from the house by drainpipes. A drain funnel is installed at the junction of the gutter and drainpipe.
What are the components of the rafter system?
To begin with, it is worth saying that each roof has its own rafter system with certain components. The choice of design depends on many factors. For example, this may include the number of slopes or angles of inclination, as well as the location of the chimney. But still, the composition of a wooden roof always includes the following elements
:
Mauerlat
- This is a board lying on the wall. It serves as a support for the entire roof and evenly distributes the load on the building.
Rafters
set the appearance of the roof and give it an angle of inclination. They are necessary to ensure that the structure is rigid and stable. The rafter legs also serve as support for the sheathing and roofing.
Run
. This structural element is needed to connect the rafters to each other. Depending on the location, the purlins can be ridge or side.
Puff
- this is part of the system that connects the rafter legs and does not allow them to diverge.
Components of the rafter system Source naveto.taloveis.ru.net
Racks
give stability and fix the rafter legs. The same function is performed by roof struts.
Sill
- This is a board parallel to the skate. The struts and racks rest against this structural element.
Lathing
consists of beams or boards perpendicular to the rafters. The roof covering is attached to this component.
Roof ridge
is a connection of two slopes. In this place, during construction, it is necessary to fill a continuous sheathing.
Roof overhangs
- these are roof projections needed to protect the walls of the house from getting wet.
Rafter system Source vpulf.lt
The installation of a wooden roof also requires the presence of a roof truss. This part consists of elements such as braces, racks and braces. Such a design is needed to evenly distribute the load and reduce pressure on the walls. Between each two trusses there may be a different distance, which is derived using calculations.
Features of creating a gable roof
For competent construction, they use drawings of a gable roof and design documentation, which indicates all its dimensions (for more details: “Drawings of house roofs - design stages”).
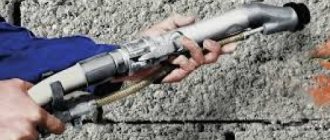
When the walls of a house are built of logs or timber, the function of the mauerlat is performed by the upper beam. But, if the walls of the building are made of brick, to attach the mauerlat to the load-bearing base before installing a gable or hipped roof, metal threaded rods of at least 10 mm are mounted into the masonry and bolts with washers are used. When installing the Mauerlat, an interval of 1-1.5 meters is maintained between adjacent fasteners. To avoid getting the walls wet, waterproofing is laid from two layers of roofing material.
Roof elements
Different designs have their advantages and disadvantages, so before erecting a building, the feasibility of using any type of roof should be clearly determined. All elements can be divided into two types: geometric and structural. The former include all kinds of slopes, ridges, ends and valleys, and the latter include rafters, beams, supports, and mauerlats. Each element plays a specific role.
The main load-bearing component of any pitched model is the rafters. They can be classified depending on the type of support, for example, rafters are equipped with a support leg, vertical or diagonal support. One end of the rafters rests against the wall of the house, and the other against the base of the roof. The upper support is often called the ridge, which performs the stabilizing functions of the entire configuration. They can be made from logs, bars or boards. In order to, are often used. They must be made of the same material as the main part.
Types of roof truss systems.
The rafter leg rests on the mauerlat, which can be made of timber or other material. In wooden houses, this is the top point of the wall or an additional wooden element that is placed on its surface.
Ties are L-shaped structures that connect the rafters at the highest points. To increase reliability, transverse beams can be used, which will significantly increase rigidity. Thus, the puffs can be made in an A-shape. The wall that comes into contact with the ridge must be equipped with a special ridge beam placed at the very top. They are made from the same material as the rafters. End beams are used only if the second floor of the building is equipped with walls.
End beams serve to connect the ridge and the wall, but, as a rule, they are placed diagonally rather than at right angles. Like rafters, they can be reinforced with various beams and posts. After the waterproofing measures have been completed, the rafter structure is supplemented with a counter-lattice - a system that acts as a gap between the surface and the waterproofing material. If this issue is not resolved in a timely manner, the moisture that forms from condensation will take a long time to dry out and thereby damage the coating and the structure as a whole.
But do not confuse the counter-lattice with the sheathing - these are different things. Sheathing is the base for the roof, which, in most cases, is made of wood. It is the wooden lathing that allows you to quickly and reliably fasten tiles, slate, ondulin and other types of roofing materials to its surface. The thickness of such boards should vary depending on the type of roofing and can range from 15 to 30 mm. If soft tiles are used for the roof, the surface of the sheathing should not have gaps and should be continuous. Then, instead of boards, plywood or boards made of wood materials can be used, since a continuous arrangement of boards is, at a minimum, uneconomical.
Rafters can form certain planes called slopes. and will be called a slope, hence the division of roofs into single-pitched, gable, hipped and so on. If the slopes have combined surface edges, then such a model will be called a tent model, the description of which was presented above. - this is an indicator that determines how much the roof will extend beyond the walls of the house.
The walls that border the slopes and extend up to the ridge are called external gables. To hide the entire system of rafter elements, a special binder is used. It allows you to improve roof ventilation, which will prevent the formation of moisture. The plane on which two fixed slopes touch is called a ridge. In some types of roofs there may be several ridges, for example, hip or hip roofs. At the bottom, the slopes are attached to the valley, but this element is used exclusively in single-pitch structures.
Roofing
All roofing work can be divided into 3 main groups:
- Procurement. This stage includes selection, sorting or cleaning, cutting of rolled materials. Roofing elements are made from sheet steel, slate is cut, and mastics are prepared.
- Preparatory. The base for the roof is completely prepared.
- Basic. Roofing materials are laid, secured to the base, and cared for after installation is completed.
Valleys and drainage system
The most vulnerable elements on the roof are the valleys, which form the recessed angle; precipitation accumulates in them at any time of the year. That is why the construction of this roofing element must be approached with all responsibility. The valley is a tray with a width of at least 300 mm, made of boards 25 mm thick. It is covered with galvanized, roofing or black painted steel so that its ends extend 200 mm under the roof on all sides.
The chimney is also surrounded by a roofing steel collar. From the ridge side, a sheet of steel needs to be placed under the roof, and from the eaves on top of the roof, the result is a kind of apron. Next to the pipe, the sheet must be placed under the brickwork. According to fire safety requirements, the roofing and sheathing must be no less than 140 mm from the pipe, and all wooden elements must be no less than 400-500 mm.
When choosing drainpipes, you should give preference to a diameter of 100-140 mm; they are located at least 120 mm from the wall. If the roof is covered with tiles or asbestos-cement sheets, then drain pipes will be needed to drain the water. Their basis is roofing steel; they are hung with a slope of 2-3 degrees relative to the corners of the structure.
Dormer windows are also covered with the same roofing material. Carefully separate the junctions between the windows and the roof slope.
Types and purpose of additional elements
The roof of a house today is not only an enclosing protective structure. New technologies and materials make it possible to implement the most seemingly crazy ideas both in roof architecture and in their use. And all thanks to additional elements, of which there are quite a lot. Let's look at the main, most common extras:
- upper and lower valley - strips to protect the junction of two adjacent surfaces;
- eaves slats - to protect roof eaves from precipitation;
- a ridge plate, sharp or flat, bent at a certain angle, protects the junction of the slopes;
- snow barrier - keeps snow and ice from falling;
- end strip - preserves the under-roof space at the ends from moisture, dirt, dust;
- window sill - protects the building from moisture penetration through window openings;
- umbrella for ventilation and stove shafts - a dome over the pipes to prevent moisture from entering the house through chimneys, ventilation ducts and pipes;
- junction strips are an important element that protects the junction of the roofing decking with pipes, chimneys, parapets;
- gutters - designed to drain water from the roof;
- parapets - protect the side flat surfaces of the roof from the penetration of water during precipitation and melting snow.
When installing the roof, you will also need plugs for gutters and ridges, gaskets and seals. All this is purchased in stores or made individually.
Additional elements allow you to implement many interesting architectural solutions
Calculation of the number of additional elements
The calculation of additions is based on the roof or facade design. You can calculate the quantity yourself, taking into account the main point - the necessary additional elements are always purchased with a reserve.
- The cornice strip runs along the entire perimeter of the cornices, so their footage will be the required size of this extension.
- Valleys (lower and upper) are calculated based on the length of all converging edges of the slopes + 10% for overlaps.
- The length of the end strip is equal to the length of all ends of the roof.
- The dimensions of the seal are calculated based on the number of additional panels under which it will be placed.
- Drainage extensions are purchased based on the perimeter of the building plus 10–15% for overlap at joints and for trimming. In addition to the gutters, you need to select funnels, brackets and drainpipes from a material similar to the ebb.
- Additional elements for covering the ridges at the junction of the ribs or longitudinal edges of the slopes are purchased taking into account the total length of the ribs and ridge plus 7–10% for overlap.
Selection of additional elements
When purchasing extras, you need to follow certain rules:
- It is advisable to purchase goods (roofing and accessories) from one seller - if you purchase large volumes, you can get a good discount. In addition, a guarantee is provided on all elements and in case of defects it is easier to replace defective products in one place. When shopping at different retail outlets, it is not always possible to guess the color scheme and texture of the roofing coverings, so purchasing the entire roofing kit at once can save time.
- Additional elements must be installed according to the rules established by the manufacturer. In case of their violation with subsequent damage to the accessories or improper transportation, the warranty does not apply.
- Don't forget to buy fasteners for the extensions. Here you will need a manager's consultation, since each accessory has its own fastening system, and sometimes even several - hardened nails with wide heads, plugs, special bolts with nuts, self-tapping screws with drill-shaped legs and silicone gaskets. You can, of course, get by with ordinary roofing nails, but a beautiful roof needs a decent frame, so today few people use nails the old fashioned way.
Skate bar
The roof ridge is the upper edge of the roof; its main function is to provide ventilation and remove air from the under-roof space and create normal conditions for the operation of the roof. It is made from a metal sheet of rectangular profile with flanged edges. To install it, you must select the following accessories:
- fastenings;
- sealing washers;
- end caps.
Roofing diagram.
The ridge is made from roofing material and practically does not stand out on it. Ridge accessories provide it with tightness. An additional function of the ridge strip is decorative. The element covers the junction of the slopes.
Skates come in several varieties (depending on the type of roof). Main varieties:
- semicircular;
- rectangular;
- narrow decorative;
- Y- and T-shaped.
Junction strip. The final stage in the construction of the roof is the installation of abutment strips. This element is installed after attaching the roofing sheets and wind strips. The abutment strip fixes the valley carpet on a vertical plane and closes the joints at the junction of the roofing sheets with the chimney and ventilation ducts.
When installing a ridge under a metal tile, use a ridge strip and a sealant under it.
The seal prevents debris and precipitation from getting under the roof. It should follow the configuration of the roof, which will ensure good sealing of the space under the roof. Seals are available in the following varieties:
- universal, made of polyurethane film;
- profile, made of foamed polyethylene;
- self-expanding, material – polyurethane foam with polymer impregnation.
The construction of the skate is carried out in stages:
- checking the evenness of the junction line of the slopes, the curvature should not exceed 20 mm;
- installation of seal;
- installation of plugs for semicircular skates;
- fastening the planks begins from the end;
- for metal tiles, the ridge is fixed at the same level with the outermost sheet of the roofing surface;
- Constant monitoring of correct installation ensures the quality of the roof;
- Correct and reliable screwing of the screws will ensure a long service life of the roof.
Cornice strip. The eaves strip is designed to protect the front eaves boards. It is an oblong product made of the same material from which the roof is made. Installation of the plank begins after securing the front board.
Sometimes they use a board with fastenings on the rafters in special grooves. The eaves overhang is hemmed with tongue and groove boards or corrugated sheets. The second support is a support beam, which is attached to the wall of the house. Before installing the cornice strip, brackets for gutters are attached to the cornice board or rafters. The plank is secured with self-tapping screws, the distance between them is 30-35 cm. The eaves elements are installed before installing the metal tiles.
There are lower and upper abutment strips
Much attention is paid to the installation of the top strip, since it covers the joint on the back side of the pipe and serves as an obstacle to precipitation. To attach the plank to the wall, make a horizontal groove into which the upper part of the plank is inserted
The upper strip is inserted under the roofing material, and the lower element is left above the surface and screwed to the pipe with self-tapping screws.
Snow barrier. Several types of snow guards for roofs are available:
- yokes;
- snow-retaining log;
- tubular;
- lattice, solid, network;
- corners with stops.
Snow guards are installed in a checkerboard pattern. The number of slats is calculated based on the average amount of snow falling in winter. Experts recommend installing one row of elements on each slope, along the entire perimeter.
Roof classification
Depending on the slope of the roof slopes, there are pitched (more than 10%) and flat (up to 2.5%). In individual housing construction, as a rule, pitched and flat roofs are used. In flat roofs, stagnant water may form on the roof and, as a result, leaks may appear in these places. The advantage of flat roofs is the ability to use them for various purposes. According to the design, roofs can be attic (separate) or without attic (combined). Attic roofs can be insulated or cold. In atticless (combined) roofs, load-bearing elements serve as the ceiling of the upper floor of the building. Attic roofs can be ventilated, partially ventilated and unventilated. Depending on operating conditions, roofs can be used or not. The type of roof is mainly determined by its geometric shape and roofing material. Depending on the shape, roofs can be single-slope, gable, three-, four-slope, multi-slope.
A pitched roof with its plane (slope) rests on load-bearing walls of different heights. This roof is most suitable for the construction of outbuildings.
A gable roof consists of two sloped planes resting on load-bearing walls of the same height. The space between the slopes, which has a triangular shape, is called gables or gables. A type of gable roof is the attic. If the roof consists of four triangular slopes converging at one upper point, then it is called a hip roof.
A roof formed by two trapezoidal slopes and two triangular end slopes is called a hip hipped roof. There are also gable hip (half-hip) ones, when the gables are cut off.
The gable roof of an industrial building with a longitudinal lantern differs from the gable roof of a residential building in the smaller slope of the slopes and greater width and length.
A vaulted roof in cross section can be outlined by a circular arc or other geometric curve.
A folded roof is formed from the connection of individual trapezoidal elements - folds.
The dome-shaped roof is half a sphere in outline, supported entirely by a cylindrical wall.
A multi-gable roof is formed by connecting the slopes of the planes. It is used on houses with a complex polygonal plan shape. Such roofs have a larger number of valleys (internal corners) and ribs (protruding corners that form the intersections of the roof slopes), which requires high qualifications when performing roofing work.
The cross vault consists of four closed arched vaults.
The outline of the spherical shell is a vault resting at several points on the base. The space between the supports is usually used to install translucent lanterns.
The spire-shaped roof consists of several steep triangles-slopes, connecting at the apex.
The roof of oblique surfaces consists of several flat planes supported by load-bearing walls standing at different levels.
A flat roof rests on load-bearing walls of the same height. Flat roofs are most widely used in both civil and industrial construction. Unlike pitched roofs, flat roofs do not use piece or sheet materials as roofing materials. Here, materials are needed that allow the construction of a continuous carpet (bitumen, bitumen-polymer and polymer materials, as well as mastics). This carpet must be elastic enough to withstand temperature and mechanical deformations of the roof base. The thermal insulation surface, load-bearing slabs, and screeds are used as the base.
Rafters
As the base of any roof, rafters made of wooden boards or beams are used. This is a load-bearing structure that takes the weight of the roof upon itself, so it is always made of high-quality wood, without cracks or rot. The material for making rafters is softwood boards or beams. They must be perfectly dried and contain a minimum number of knots. It is acceptable to use logs, but they are much heavier.
The support for the rafters is the mauerlat. This is a beam with a cross-section of at least 10x10 cm or a log, necessarily hewn from the bottom side. This element is also designed to ensure that the load on the load-bearing walls is distributed evenly. The upper crown of a log house can be used as a mauerlat for the construction of cobblestone and log buildings.
Rafter diagram for a gable roof. Mauerlat as a support is required.
The cross-section of the rafters is calculated additionally, and it depends on several indicators: the load created by the weight of the roof and snow precipitation, the pitch of the rafters, the size of the span and the slope of the roof. According to the method of installation, rafters are divided into two types: layered and hanging. The first ones are installed obliquely on supports, which serve as external walls (for a single-pitched roof) or internal and external walls (for a gable roof). Hanging rafters rest only on the walls of the building. They are installed in those buildings where there are no additional supports and internal load-bearing walls.
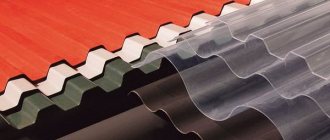
Euroslate
Euro slate (trademarks Onduline, Gutanit, Nuline, etc.) is similar to domestic asbestos-cement sheets only in shape; it is a polymer-cellulose base impregnated with bitumen components. The release program contains all the necessary elements: ridges, valleys, wind parts (gable), elements connecting to walls, ventilation outlets and cornice filler. A cornice element is not needed for a roof made of large-sized sheets. Euro slate is quite flexible, so additional elements are made to fit an average roof with a slope angle of 20°, and during installation they are given the desired shape.
The Euroslate ridge is secured with special nails through the wave
Due to the wavy section of the sheets and the straight profile of the ridge, valley and abutment to the walls, these units are ventilated. If necessary, the gaps can be closed with cornice filler, which also contains small holes closed with “plugs”. Some European slate manufacturers produce additional elements that provide the roof with, if not airtightness, then certainly airtightness.
The valley for Euro slate is shaped like an inverted ridge and effectively drains water
Given the general cheapness of Euro slate, additional elements are not that little, so developers with a limited budget can use alternative options. A ridge, valley and junction made of galvanized, polymer-coated metal will cost less and will look good. On wind overhangs, you can do without a tong altogether by simply bending the outermost wave of a fairly soft roofing sheet and nailing it to a vertical board.
The wind additional element of the tong can be omitted by bending the outermost wave of the profiled sheet. True, it won’t work out so neatly. The fasteners need to be placed more often, every 20-25 centimeters.
Vinyl siding
The front surface of the siding (form factor) imitates cladding: herringbone; ship plank; shingles; scales; clapboard; clapboard with cover; timber and log walls.
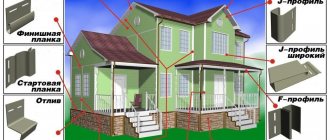
For complete cladding of building facades, additional elements are produced to ordinary siding panels. Different manufacturers usually produce a common set of elements (Fig. 95): J (ji) and starting profiles, internal and external corners, near-window strips, finishing and H-profiles. The remaining additional elements may be different, these are various chamfers, moldings, decorative overlays, etc. However, the general details of the siding elements from different manufacturers may vary slightly in size. Manufacturers use their own vinyl compositions and siding manufacturing technologies; in addition, they make different shapes of the front surfaces (form factor), due to which the thickness of the siding may not be the same. Therefore, for the installation of siding cladding, it is best to use extensions from the same manufacturing company as ordinary siding.
rice. 95. Siding cladding components
Basic additional elements of vinyl siding
The starting profile (starter strip, Fig. 96) is used to secure the bottom of the regular starting panel. This is where siding installation begins. Essentially this is the top of the row panel, cut together with the receiving part of the latch lock. Starter strips can be cut from regular siding panels that will go on top of the cladding, that is, where in most cases the panels will still be cut in height.
rice. 96. Start profile
The J-profile (J-channel, ji-profile, Fig. 97) is used to cover ordinary siding panels on the side. This is a universal profile that replaces many additional profiles. The J-profile can be obtained by trimming the bottom of a regular siding panel. However, the width of the gutter of a homemade J-profile will be two thicknesses of vinyl less than that of a factory profile.
rice. 97. J-profile
Placed back to back and made as one element, two J-profiles form the so-called H-profile (H-Trim, Fig. 98). It is used for joining ordinary siding panels along the length. Of course, during installation the H-profile can be replaced by two J-profiles, but the joint will not be airtight and the walls need to be waterproofed underneath it.
rice. 98. H-profile
An H-profile, bent 90° in one direction or another, forms an angular profile - external or internal (Fig. 99). In other words, here too we see two J-profiles connected to each other, which can replace corner profiles with a budget version of the cladding.
rice. 99. Internal and external corner profiles
Window and door openings are framed with J-profiles with increased dimensions. If the opening is made flush with the walls, then this wide J-profile is called casing. If window and door openings are made with external slopes, then a vinyl slope shelf is added to the platband and the profile is already called near-window (Fig. 100).
rice. 100. Platband and window profile
To secure the upper part of an ordinary siding panel cut along the height, as well as to secure the smooth side of the slope of the near-window profile, a modified J-profile of reduced dimensions is used - the finishing profile (Fig. 101).
rice. 101. Finish profile
The filing of cornices and ceilings is carried out with special siding panels - soffits. Essentially, these are ordinary siding panels with a special form factor pattern and a regular or modified latch lock. With a budget option for cladding, the soffits can be made from scraps of ordinary ordinary siding. However, for covering the eaves of modern insulated attic roofs with ventilation ducts, it is better to use factory soffits with perforations (ventilation holes).
Soffits are secured using J and F profiles. The F-profile, if desired, can be made from the J-profile (Figure 103).
rice. 103. F-profile
To give the siding a finished look, siding manufacturers produce various chamfers and moldings. But these elements are no longer part of the “standard set”. Each manufacturer has its own additional elements, but all of them, one way or another, are derived from the J-profile.
Composite tiles
Composite tiles can be conditionally described as improved metal tiles. It has a more expressive profile, quite reliably imitating natural material (ceramic tiles, natural slate or shingles), and is covered with colored stone chips. The ridge elements have a high figured profile and are also covered with a layer of stone dressing. The remaining elements (valley, cornice and pediment strips, abutments) are made of ordinary galvanized metal with a polymer coating. Elements from ordinary metal tiles can be used. The main thing is to get into color.
The ridge of the composite tile is also covered with stone chips. The photograph shows that the valley, unlike conventional metal tiles, is single and is located only at the bottom of the sheets
Of the entire range of basic and additional elements of a composite roof, only the ridge is processed with crumbs. The remaining elements can be made to order from flat sheets of polymer-coated galvanized steel.
End strip
End strips for metal tile roofing serve to protect its internal layers from dust, dirt and weather precipitation. Its additional function is decorative; the strip can be of any size and shape. On the outside, the end additional element has a special anti-corrosion coating.
Structure of a metal tile sheet.
The use of end strips allows you to increase the service life of the roof and protect structures from the aggressive influence of external factors. End strips protect the gables from the wind. The absence of wind bars on the roof in windy weather can lead to the destruction of the roof.
The end strip is installed after the final installation of the metal tile roof, but before installing the ridge. Secure it with wood screws with rubber seals every 45-55 cm.
The planks are mounted overlapping with a pitch of 100 mm and in such a way that the upper crest of the wave of the tile sheet is closed and rainwater does not fall on the roof.
Semicircular and flat skates are most often used. They are installed at the junction of slopes for two- and four-slope surfaces. Plugs are installed at the ends of the skates. They protect the under-roof area from moisture, debris and snow.
Soft bitumen shingles
Since this material is really soft and quite thin, rigid strips made of polymer-coated metal are used as cornice and wind elements. Moreover, they are not placed on top of the roof, but, on the contrary, from below. The plank defines a clear edge; flexible tiles are glued on top of it.
The eaves and wind strips and the lining of these planes are made of metal
From a material similar to the main sheets of bitumen shingles, only the starting (initial) strip, ridge and valley are made. Ventilation is very important for a sealed asphalt shingle roof; manufacturers offer a number of ventilation devices. They are made of plastic in the color of the roof.
Roofing made of bituminous shingles in the process of installation. The starting metal strips (poorly matched in color) are clearly visible; the ventilation aerators located closer to the ridge are covered with tiles. You don't have to do this, they are plastic.