Icer
23995 0 15
Icer November 2, 2016Specialization: master in the construction of plasterboard structures, finishing work and laying floor coverings. Installation of door and window units, finishing of facades, installation of electrical, plumbing and heating - I can give detailed advice on all types of work.
Surface priming is ideal preparation before wallpapering
Everyone knows that walls need to be prepared for finishing, but the subtleties of existing technologies are not fully understood. For example, whether it is possible to prime walls with wallpaper glue causes a lot of controversy among experts; there are supporters and opponents of this option, but no one will deny that such treatment improves the quality of wallpaper gluing. In this review, I will tell you how to prepare the composition correctly, we will also figure out how to properly organize the workflow and what is required for this.
Wallpaper glue helps strengthen the surface and reduce its absorption
How to make your own primer
To prepare your own soil, just dilute the polyvinyl acetate with water. This substance has a solid structure, colorless and odorless. At the same time, the substance is considered completely safe for human health. In its pure form it is used extremely rarely. In specialized construction stores you can find for sale an emulsion of polyvinyl acetate, which is familiar to every person under the name PVA glue.
Buyers are offered several different options, but for making their own primer material, preference should be given to construction adhesive. If wooden surfaces will be processed, then it is quite possible to use PVA wood glue.
Advantages and disadvantages of homemade soil
A huge advantage of homemade products is their low cost. At the same time, using this type of primer, you can easily increase adhesion and protect the wall surface from absorbing large amounts of moisture. Of course, it will not be possible to achieve the same level of protection that ready-made commercial primers provide, but still the result will be better than not treating the walls at all.
At the same time, we should not forget that homemade soil has many disadvantages. The main ones include the following:
How can you improve soil properties?
To make homemade soil better level the surface and be more durable, construction chalk is added to its composition. The surface treated with this mixture becomes a little rough, so it is not suitable for painting, but tiles, stone and other finishing materials will hold on more firmly.
For reference! Builders and finishers advise adding chalk to homemade primers within 6-7 percent of the volume.
Before painting walls, to ensure evenness of color, prepare a primer with the addition of water-based dyes (up to 10 percent of the volume).
In cases where it is necessary to obtain an antiseptic primer, chlorine-containing liquids such as “Belizny” are introduced into the water-adhesive solution, but not more than 50 g/liter.
To increase the depth of penetration into wood or concrete, liquid glass is added to the primer, in which case it is possible not to use chlorine for antiseptic purposes.
For priming walls - made of PVA
In order to prepare your own primer at home, you need to prepare a sufficiently deep container, a mixing tool, water and PVA glue. It is very important to purchase high quality glue. Otherwise there will be absolutely no benefit from it.
You should also be careful about mixing the material. The proportions of water and glue must be accurate so that it does not peel off from the surface in the future. It is worth noting that very liquid glue will be problematic to apply to the walls due to the fact that it spreads, and thick glue will not be evenly distributed over the surface. The ideal ratio of glue and water is 1:2. In some situations, you can use a little more liquid. In order to improve the characteristics of a homemade primer, no more than 0.2 parts of chalk in powder form can be added to the mixture. With its help, it will be possible to reduce the risk of yellowing of the mixture in the future.
Pour PVA glue into a deep container and start pouring water into it in a thin stream. In order to make the mixing process faster and better, you can use a construction mixer. This will be an excellent guarantee that lumps will not form in the homemade soil.
If not PVA, then what?
When choosing a primer for treating walls, it is worth considering all the disadvantages and advantages of a homemade material. The use of a PVA glue composition is suitable if budgetary cosmetic repairs are being carried out or the work is being carried out in some kind of utility room. In all other situations, it is advisable not to save money and purchase a high-quality professional primer. This will improve the quality of the repairs made and increase its service life several times. In addition, this is a great opportunity to avoid many of the problems that can arise when using homemade mixtures.
The process of preparing a mixture using improvised means
If the decision was made in favor of PVA essence, you can begin preparing it. All actions must be careful and verified
Carelessness when mixing, incorrect proportions will lead to a deterioration in the quality of the finished composition and, as a consequence, the entire repair as a whole.
First, all available materials and components of the future primer are prepared. You need to purchase construction PVA, clean water and a container of the appropriate size. You can add various dyes and auxiliary substances, for example, colorless varnish, resin or chalk crushed to a powder. This will improve the characteristics of the solution. If you plan to treat wood surfaces, then wood glue is perfect.
Next, the entire volume of glue is poured into the container, to which clean water is gradually added. The sequence should be exactly this, since pouring the adhesive into water is not allowed. While adding liquid, the essence must be constantly stirred, for which a wooden spatula is perfect, because the solution will not stick to materials made of wood at this stage of the process.
The correct recipe for preparing the solution is of great importance. The optimal proportions are those in which two parts of clean water are taken for one part of PVA glue. If you add more polyvinyl acetate, the composition will be too viscous and thick, and more water will reduce the technical characteristics of the primer and its adhesive properties.
After obtaining the mixture of the required quality and fluidity, it is recommended to test it on a small area of the surface. After treating the wall, you need to wait for it to dry. If a film visible to the eye does not form on the painted area, it means that the ratio of the components was observed correctly. Otherwise, you should add a little water to the container with the prepared composition and continue to mix everything thoroughly.
A primer mixture made with glue loses its performance characteristics quite quickly. But this solution dries on the walls in just a couple of minutes. Therefore, there is no point in preparing too large volumes, since after a few hours it is not possible to use the soil. Work is carried out away from open flame sources at room temperature in rooms with normal humidity levels.
For primer under wallpaper - from wallpaper glue
Although there are a huge number of different types of primers available on the market, some users may use adhesive to treat surfaces. A completely suitable option would be the simplest glue, which must first be diluted with water. At the same time, there are several recommendations that must be taken into account when choosing glue for preparing a homemade primer.
You should only buy high quality glue. This will allow you to achieve the desired result and not risk the wallpaper starting to fall off after a few days.
Application technology
First you need to check the degree of adhesion of the homemade primer to the base. To do this, you should apply a little mixture to a separate area and wait a little. The composition should lie on the base as easily as possible, leaving a characteristic white or pink mark. If the primer adheres well to the surface, no visible film should appear after it has completely dried. If a film appears, then you need to add a little more water to the mixture.
The composition must be applied in several layers. At the same time, it is best to prepare the soil in small batches so that it does not have time to lose its positive properties. It is worth paying attention to the fact that before starting work, the walls must be thoroughly cleaned of dirt, dust and various types of foreign objects. You also need to remove all existing defects on the surface. You can apply the material with a regular paint brush, but a roller will help make the process faster and easier. This will allow you to cover a fairly large area in a short period of time without much effort. After each layer of homemade primer has completely dried, you can proceed directly to wallpapering.
Advice from professionals
In order to avoid any problems with repairs, you need to listen to some recommendations given by professionals.
You can begin to apply finishing materials only after the primed surface is completely dry.
Priming the walls with glue will slightly strengthen the base and also increase the adhesion rate.
It is advisable to use this method exclusively before gluing wallpaper, because in other cases it may not be of any use.
Source
Useful tips
- Lumps may form during cooking; you can get rid of them by whisking the solution using a mixer or blender. Please note that safety precautions must be observed when using electrical appliances. Since the electrical appliance is expected to come into contact with liquid, it is recommended that all manipulations be carried out using thick rubber gloves.
- Do not make large quantities of homemade primer. Prepare only as much mixture as you will use at a time. What remains, in most cases, will be unusable the next day, and this is a waste of money and ingredients.
- To reduce the consumption of primer mixture, use brushes with short bristles (around 8 millimeters). You can also use rollers with a thin layer of foam. If this condition is met, you can save up to 30% of the mixture.
- The primer solution is applied only to the prepared wall surface: leveled with putty, cleaned of dust, degreased if necessary. Hard-to-reach places can be cleaned with a vacuum cleaner.
- PVA turns yellow over time, so stains may appear on glued wallpaper. To avoid this, PVA can be replaced with wallpaper glue; it is not much more expensive, but it does not turn yellow and does not create a film on the surface of the layer that prevents the wall from “breathing.”
- When painting walls with acrylic-based paint, there is no need to make a primer. Just dilute some of the paint with water in a ratio of 1 to 1 and prime with this solution.
- When using a homemade PVA-based primer mixture, it is recommended to do a test application on a small area. This will make it possible to evaluate the quality of the primer and, if necessary, increase or decrease the concentration of glue, as well as track the reaction of the surface to this composition.
How to make a primer with your own hands, see the video below.
How to prime walls with glue, preparing them for wallpapering
Primer is a unique solution that is actively used before wallpapering. If this is not done, then all the glued canvases will come off over time, as a result of which you will have to do all the work again.
A good primer will allow you to quickly and efficiently hang wallpaper.
It doesn’t matter at all what kind of glue you used when gluing the wallpaper. Sometimes even the best quality products fail to achieve effective coupling. But when choosing a primer adhesive, you need to take into account such criteria as the composition of the product, its adhesive properties
Preparatory activities
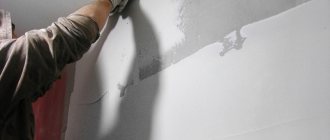
Priming the wall with glue should be done only after the preparation steps have been completed, that is, the surface must already be perfectly clean and smooth. Only this will allow you to glue the wallpaper efficiently and not have to carry out all the finishing activities all over again.
Before installing wallpaper and applying primer, you must carefully inspect the surface for damage. If they are present, then everything must be eliminated using putty. After this, remove all old material from the surface of the walls.
Most often, the primer composition has this color and consistency
When the surface of the walls is prepared, you need to take the necessary equipment. Here you cannot do without a wide roller, a special container for the solution and the primer itself.
Before priming the walls with glue, you need to dress appropriately. Be sure to take care to protect the skin so that the primer does not harm it.
To prevent harmful components of the primer from entering the respiratory tract, it is worth protecting them with a respirator. The reason for concern lies in the fact that the primer adhesive can cause allergies.
Which composition is best?
Upon arrival at the hardware store, you will see a wide range of these products. What to choose in such a situation, and which solution is best? Here you need to take into account the type of wallpaper used and operating conditions. Primer compositions used before wallpapering can come in different variations. They are classified taking into account the surface on which it will be used, as well as the type of binding component.
Primers are available in hardware stores from various manufacturers. The choice of the appropriate one should be determined only by you, taking into account the quality characteristics of a certain composition. If you decide to pay attention to well-known brands, then their cost will be much higher.
Primer composition from a famous German manufacturer
Very often they sell such a cheap option as PVA glue under the guise of a primer solution. But this option does not always allow you to obtain high-quality adhesion, although many people choose this glue and are very satisfied with this composition. If you decide to treat the surface of the walls with this product before gluing the wallpaper, then you need to dilute it with water.
But the primer compositions don’t end there. Many manufacturers produce effective products that, according to many criteria, can occupy a leading position compared to PVA.
The primer can be of the following types:
Alkyd composition is perfectly applied to wood surfaces. Thanks to the unique composition, it is possible to qualitatively prepare the wood for further wallpapering. But such a primer cannot always be used. It cannot be applied to the surface of plaster walls. When the surface is treated, it dries completely within 15 hours.
The next type of primer is glyphthalic. They are in great demand before gluing wallpaper on metal and wooden surfaces. You can also carry out the treatment on a wall coated with a primer, the only condition is that there is low humidity in the room. The disadvantage of the primer is that it takes a long time to dry; for this you need to wait a day.
Universal acrylic primer
Acrylic primer today is one of the most popular means when it is necessary to treat walls before gluing canvases. It is odorless and can be used for walls made of various materials, except metal. It dries very quickly, so you can glue the wallpaper after 5 hours. This primer can have a regular or deep action. The second option should be used in cases where wallpapering will occur on an unprepared surface.
If you do not want to use a special primer, you can prime the walls using any wallpaper glue. To do this, dilute the glue in a liquid consistency and apply it to the wall. The consistency of wallpaper glue that must be maintained for priming the walls is indicated on the pack.
Inexpensive wallpaper glue is best for priming.
What solution to use
The best option for coatings made of concrete, plasterboard and plaster is an acrylic primer. It does not have a specific smell, it is easy to work with, and the drying time is about 5 hours, which is much less than other compounds. For wood it is better to use alkyd solutions. This primer must dry for at least 10 hours.
Previously, diluted PVA or glue for gluing were used for priming. This is not to say that this is a completely wrong move. This ensures good adhesion, but the surface will not be strengthened, as is the case with the use of acrylic solutions. Some craftsmen coat the wall alternately with a special compound and glue; with this option, the finish is best maintained. This method is also used for non-woven wallpaper. That is, the surface is primed, then covered with a layer of diluted glue, and only after this layer has dried do they begin to glue the sheets.
In stores you can find special primers “for wallpaper”. Often their main component is the same PVA. You can prepare this composition yourself by diluting regular PVA to the desired consistency. The only advantage of a purchased solution is ease of use; you won’t have to worry about whether you prepared everything correctly thanks to the presence of clear instructions.
Alkyd primer is in demand due to its versatility
How to apply correctly
If you have decided on the type of composition to be used, then you can begin to apply it directly. However, in order to carry out thorough processing, you need to know in which areas of the surface the composition is distributed in smaller and larger volumes.
This suggests that the surface of the wall has a heterogeneous structure; in some places there are more pores, and in others there are fewer. In order to recognize this, it is worth treating the wall with water and then carefully inspecting it. In the place where the water evaporates quickly, it is worth applying the primer thoroughly and carefully.
After this, it is worth making a calculation and understanding the primer consumption for a certain area. To do this, you need to take the area of the surface to be pasted and multiply it by 1.5. The resulting value is the approximate amount of primer that will be used for one layer, measured in liters. For high-quality processing, it is worth applying the composition in two layers.
Do not leave dry areas; it is necessary to control the process of applying the composition
Pour the selected solution into any container, dip the roller into the liquid, squeeze out the excess and begin applying the primer solution to the surface. During the work process, you need to thoroughly wet each area of the wall. It is important to ensure that there is no dry area anywhere. If there are hard-to-reach areas, they are treated with a paint brush.
When the first layer has been applied and thoroughly dried, the primer can be applied further. Before doing this, you should run your palm over the surface of the wall where the first composition was applied and see if there is a white coating. If it is present, a primer with deep penetration properties must be used for the subsequent layer.
When the last layer has dried, you need to evaluate the work done. If the surface becomes smooth and slightly sticks to your hands, then everything is done correctly.
Primer is a very important process before wallpapering. Only a suitable composition and correct application will guarantee you a high-quality wallpaper finish. Choose a primer solution taking into account the material that is applied to the wall surface (concrete, wood, drywall, plaster).
Source
Priming with glue is a simple option for strengthening walls before wallpapering
Surface priming is ideal preparation before wallpapering
Everyone knows that walls need to be prepared for finishing, but the subtleties of existing technologies are not fully understood. For example, whether it is possible to prime walls with wallpaper glue causes a lot of controversy among experts; there are supporters and opponents of this option, but no one will deny that such treatment improves the quality of wallpaper gluing. In this review, I will tell you how to prepare the composition correctly, we will also figure out how to properly organize the workflow and what is required for this.
Wallpaper glue helps strengthen the surface and reduce its absorption
Save on primer
Surely, every person understands that before finishing it is necessary to properly prepare the surfaces for further processing.
In order not to spend a lot of money on buying a special primer and then taking the time to apply it. An excellent alternative would be to use regular glue, which is used for wallpapering. With its help, you can make a good and cheap primer yourself, which will help improve the characteristics of the surface being treated.
Workflow Description
We will look at three main aspects:
If the wallpaper is glued to the ceiling, then it is primed in the same way as the walls
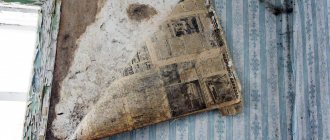
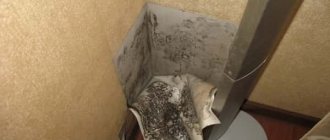
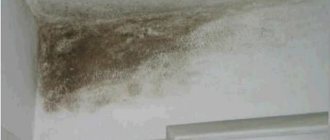
Each aspect is important in its own way, so please read the information below carefully. Everything is quite simple, but you need to know a few nuances that affect the quality of work. Any violations lead to unpredictable consequences, and if you do not want to get the result as in the photo below, then take the preparation of the walls responsibly.
This is what mistakes when preparing walls lead to
Glue selection
Since the same composition is used for both primer and gluing, the process is simplified. As for recommendations for choosing, there are several of them:
If there is a recommended brand of glue on the wallpaper packaging, then it is better to choose it, since the manufacturer guarantees that the quality of the work will be at the highest level.
There is always an indication on the packaging for which coatings the composition is intended.
The presence of antiseptic additives is important when used in rooms with high humidity
Sometimes manufacturers distort information and indicate a larger coverage area than it actually is. For example, if the package says “8-10” rolls, but the instructions indicate that the contents need to be diluted with five liters of water, then with a standard consumption of one liter per 10 square meters it is easy to calculate that the composition will be enough for only 5, maximum 6 rolls . This little trick allows manufacturers to mislead buyers; no one knows which rolls they mean.
The presence of an indicator allows you to better control the application of the composition
Now I will tell you about the most popular and sought-after brands today. This is not a complete list; the table contains only the compositions with which I am well acquainted and which I can recommend to you.
Methylane is the undisputed market leader
| Manufacturer | Peculiarities |
| "Methylane" | Without a doubt, the market leader today. The products are manufactured in Germany and are distinguished by consistently high quality and a wide range of compositions; you can find the optimal solution for any type of wallpaper. The price is quite high - from 270 rubles, but they are worth it; there are practically no complaints about products from Methylan. |
| "Kelid" | A French brand that also produces many formulation options, although the line is noticeably smaller than that of the option described above. The glue is of good quality, although from time to time I hear complaints, especially from inexperienced craftsmen. As for the cost, it is lower than the first option, but not significantly. |
| "Cleo" | Another French company specializing in the production of wallpaper adhesives. The products of this brand are distinguished by affordable prices (up to 200 rubles), fairly high quality and environmentally friendly compositions. The product line is quite wide to find the optimal solution for almost all types of coatings |
The Cleo line even has a special composition for children's rooms
Priming walls with wallpaper glue requires the presence of certain devices:
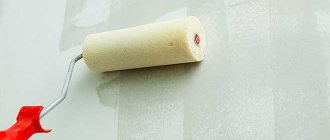
It is most convenient to apply the primer composition to the walls using a roller.
Bath - a convenient device for work
Preparation of the primer composition
If you have everything you need at hand, you can begin preparing the solution. The instructions for carrying out the work are quite simple and consist of just a few steps:
Do not pour everything into the water at once, add glue gradually
We don't need thick glue, so if it turns out like in the photo, the composition will have to be diluted
When the composition is similar in consistency to kefir, you can use it for work
Applying primer to walls
Do-it-yourself priming of walls with glue is a simple process, so even a person with minimal experience in the construction industry can handle it:
The scheme of work is very simple
Old wallpaper must be removed
Using a bath, the composition is distributed throughout the entire roller
For convenience, you can purchase a roller handle extension or adapt a suitable object for it.
The finished surface must be dry and smooth
After such preparation, it will not be difficult to perfectly paste wallpaper even without experience.
In order for the wallpaper to stick securely, the wall must be prepared
Sometimes I come across situations where a person does not understand the topic and, after the usual primer, also primes it with wallpaper glue. There is, of course, nothing wrong with this, but there is no point in applying two layers of primer; if you used a ready-made composition, then treatment with wallpaper glue is not necessary.
In the photo: if the walls are properly treated, then even after 10 years the wallpaper will hold up perfectly
Types of adhesive primers
Industrially produced adhesive mixtures for surface preparation are the easiest to use. The compositions are ready for use or sometimes only require dilution to the desired consistency.
Adhesive primers do not contain organic solvents and oils, which can leave stains on the wallpaper during or after gluing.
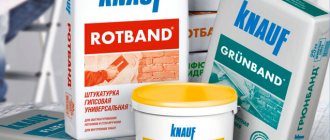
In the segment of adhesive mixtures, Vetonit, Knauf, Starateli, and Glims stand out.
You can divide the compositions based on the basis:
The choice depends on the condition of the surface, material and type of wallpaper used.
Application technology
Priming the walls with glue before wallpapering consists of preparatory activities starting with the actual application.
H3 - Preparatory activities
At this stage, the base is prepared.
After drying, you can proceed to the next stage.
Preparation of the primer composition
How to prepare glue for use as a primer is usually indicated on the packaging; if such information is not available, then you should proceed in the sequence indicated below.
How to dilute glue and prime walls
For priming, the glue/water ratio should be reduced by one and a half times. For example, if the manufacturer indicated that a pack of glue should be diluted in 4 liters of water, then 6 liters should be taken to treat the surface.
The water should be heated to 35 - 40 o C, this is better for the glue to dissolve. In cold water the process will take longer.
The consistency of the primer composition should be liquid - a thick composition cannot be evenly distributed over the surface, the consumption will increase, the drying time will increase, which means you will have to wait a long time before directly gluing it.
Workflow Description
Before dilution, measure out the required amount of water and pour it into a container of suitable volume.
The glue is poured in gradually, continuously mixing the contents. After one portion is completely dissolved, add the next one.
After infusing for 10 - 15 minutes, add water if necessary. The thoroughly mixed composition is ready for use.
Applying primer to walls
The tool used is a paint roller with a pile of up to 20 mm or a wide brush, which is called a fly brush. (for example, this https://uspehidelo.ru/upload/iblock/d4f/d4fb6c257ee3daf9e1fbcf9d59c56289.jpg)
To use a roller, purchase a special tray. It is needed to distribute the glue over the surface of the “coat” of the instrument.
Priming begins from the ceiling, moving downwards - this way it will be possible to distribute the flowing composition.
You can apply the primer in narrow strips horizontally or vertically - it doesn’t matter, the main thing is to overlap the edge of the previous strip.
Immediately after use, the working tool is washed in clean warm water, and it can be used repeatedly.
Necessary components for soil
The use of emulsion adhesive as the only component is not allowed, otherwise the result will be a very thick layer of primer that will not adhere tightly to the base (walls or self-leveling floor) and will quickly fall off. In addition, a large amount of glue will be consumed, and applying such a mixture due to its thick consistency will require a lot of extra effort.
Construction polyvinyl acetate adhesive is usually packaged in packages from half a liter to 10, with a consumption of 1 liter per 15 square meters. meters of treated surface. To ensure better adhesion of the homemade mixture to the base, the adhesive should not be released for more than 4 months.
Note! If the primer solution will be laid in two layers, 2 times more glue will be required.
A clean bucket of sufficient depth is suitable as a container for preparing the primer mixture with your own hands, and it is most convenient to mix with a construction mixer.
Choosing a base for priming
Usually, the main component for the adhesive primer is a universal version (emulsion “PVA-MB”), as well as a construction and household version (more often used for wallpapering and laying linoleum).
Additional Information! Any selected base for the primer must be used strictly according to the manufacturer’s instructions in order to avoid deterioration in technological qualities.
Proportions and technology for preparing the solution
To make a PVA-based primer, you need to take the main components in the following proportions:
There is no difficulty in making your own primer from PVA glue. First, the adhesive base must be diluted with the required volume of water. It is necessary to stir constantly both clockwise and counterclockwise until the mixture becomes homogeneous, making sure that all undissolved lumps are removed.
For priming, you need to prepare a construction roller for smooth surfaces and a wide brush for difficult places (for ceilings you will need a long stick for the roller).
The work is carried out in a warm room, and the solution is prepared for one use - it cannot be stored for a long time. After a test application of the first layer of primer on a small area, allow the composition to dry and see if the film adheres well or if a little more water needs to be added.
Questions and answers
On forums and in specialized chats, the same type of questions are often asked about the use of primers when gluing wallpaper.
How long does it take for wallpaper glue primer to dry?
If the glue manufacturer has not specified conditions for immediate gluing after priming, then you can start working immediately after complete drying.
The approximate time is indicated on the packaging in the instructions for use.
Porous substrates will absorb moisture from the primer faster and dry faster. Dry air and high temperature accelerate the process.
In damp and cold rooms, drying can take up to a day.
The average readiness time at a temperature of 18 - 25 o C and a humidity of 40% is from 6 to 12 hours.
Is it possible to prime walls with wallpaper glue before painting?
It is recommended to prime the wallpaper before painting based on the following considerations:
When starting to prime with glue, you should take into account that work can only begin after the wallpaper is completely dry. This will happen no earlier than the next day after gluing. It is better to test tinted glue on an inconspicuous area, for example, in a place that will be hidden by furniture. If an unplanned tint is noticeable on the wallpaper, you should discard the glue as a primer.
When diluting the composition, add one and a half to two times more water than for glue.
The best results are achieved by two or three thin layers of soil rather than one thick one.
Is it possible to putty a wall using wallpaper glue?
Most often, this question arises after removing old wallpaper. You can putty if the glue is completely dry. It is unlikely to be possible to apply putty on wet, slippery glue.
The problem can be eliminated by covering the wall with concrete contact primer.
Is it possible to use adhesive primer for glass wallpaper?
Fiberglass wallpaper is subject to mandatory preparation before painting. Prime two or three times with a break for the previous layer to dry.
When starting to prime with glue, check its compatibility with the purchased paint.
Priming the interior wall of a house
When painting blocks, one rule must be followed, which the following instructions will help you learn about:
- The block processing element is mainly applied to plaster or adhesive dye. The base must be stronger than the oil coating applied to it. The primer binds every particle of dried paint or plaster. The adhesion of paints increases several times. Absorbency is also reduced, which saves paint. In buildings where humidity is high, a waterproof coating is created. If necessary, the primer can be applied to the plasterboard board yourself.
The front side of the fence is primed just like any other fence. It is strictly forbidden to perform work in wet areas. If you follow all the instructions, the job will be done quickly and of course correctly.