The idea of making a ceiling out of plywood does not seem entirely rational. Not only have plywood sheets been criticized a lot lately for real and imaginary shortcomings, but also the cost of finishing is quite high. But upon closer examination, all the advantages of such a solution can be appreciated.
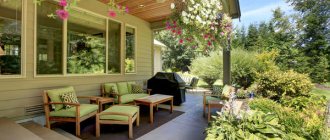
Kitchen under plywood
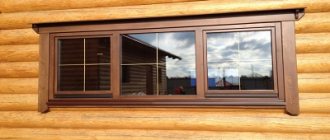
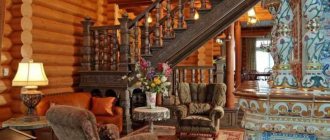
Plywood ceiling in a wooden house and apartment
The use of plywood sheets for lining the ceiling surface in a country house or in a wooden frame house can still be understood. The material is very durable and reliable, it can be used as a rough filing for the ceiling:
- Finishing the ceiling with plywood is done quite quickly, about half as fast as with popular plasterboard;
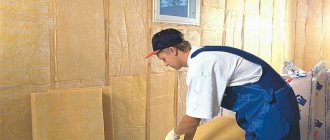
- The strength of plywood is enough to hold the insulation and vapor barrier of the ceiling.
The most important thing is the high quality of plywood veneer, unlike boards or lining, this is an almost finished semi-finished lining. After finishing the ceiling in a wooden house with plywood, you only need to make a little effort to apply decorative cladding, and you can forget about the problems of the ceiling for twenty years.
Pros and cons of plywood ceilings
Another thing is an apartment in which the ceiling has already been formed from slabs. There is a completely different logic and technology for forming the cladding. But even in an apartment version, it makes sense to use plywood sheets for cladding the ceiling in new multi-story “candles”.
Anyone who has ever dealt with renovations in new apartments knows how ceilings lined with plasterboard crack after shrinking, then cracks appear and material comes away from the frame. If you use fiberboard or a fairly thin plywood sheet, then the plywood ceiling, photo, turns out to be much more resistant to shrinkage load.
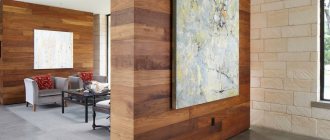
Plywood cladding can be pretty
A pleasant bonus will be the fact that applying decorative finishing to sanded birch or pine veneer is no more difficult than to apply a decorative finish to a plasterboard ceiling.
Of the negative aspects of using plywood for ceiling cladding, the two most important can be identified or noted:
- Firstly, plywood is very afraid of moisture; if water vapor accumulates in the ceiling space, then quite quickly the surface of the ceiling will swell in waves;
- Secondly, in its structure, the plywood sheet is a glued material, in the manufacture of which a variety of organic substances were actively used, including those containing phenol and toluene.
During operation, all these chemicals can be released into the atmosphere of an apartment or house, even through the decorative finishing of the ceiling.
Important! The environmental friendliness of plywood is determined by its phenolic number.
Some plywood models are additionally impregnated with bakelite varnishes to make it more water-resistant; such material can also be used as floor lining, but is not always suitable for ceilings.
Installation of plywood on the ceiling
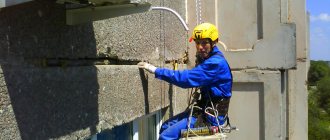
High-quality plywood sheets that have been stored in a dry warehouse have very good flat surface geometry in a horizontal position, so, as a rule, there are no special problems with sheathing the ceiling in a wooden house. Lathing or leveling bars are pre-stuffed onto the ceiling. The plywood sheet itself is quite plastic, so it can be sewn directly onto the floor beams; in this case, the ideal ceiling geometry will not work.
It is very difficult to lay sheets of plywood on the ceiling alone
The sheathing slats have to be manually adjusted in thickness so that the supporting surface is in the same plane.
Advice! Most experts recommend stretching a film vapor barrier over a wooden lattice before laying plywood. In this case, the membrane cannot be secured with nails or staples; if possible, it is better to glue the material to the sheathing or secure it with double tape.
In a wooden house, sheets are laid on the ceiling with mandatory seam spacing, this allows you to compensate for unevenness and make the ceiling cladding more or less flat.
Lathing over vapor barrier
It is necessary to fasten plywood with self-tapping screws and pre-drill the hole. You can, of course, try to tighten the screw without drilling a hole, but in this case there is a risk of delamination and tearing off the last layer of veneer.
Of course, the level of plywood filing must be controlled, for example, using stretched paint cords or a laser device. In any case, after the material has been laid on the ceiling sheathing, individual joints and corners protruding from the general plane of the surface must be cleaned with a grinding machine. Depending on the chosen decorative finish, the seams can be left open or rubbed with a mixture of glue and wood dust.
How to finish a plywood ceiling
Once the plywood sheets have been laid on the sheathing, the seams caulked and cleaned, you can think about the appearance. There are quite a lot of finishing options. We must warn you right away that the most popular option, namely, painting with acrylic, water-based, or latex alkyd paint in its pure form is not suitable.
No matter how carefully the plywood is prepared, there will still be seams through a fairly thin layer of paint and varnish, sometimes even at the places where the material is attached. If you want to use paint and varnish, it is best to treat the plywood with tinted oil or polyurethane varnish.
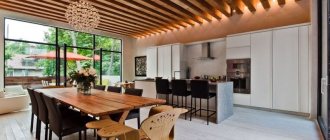
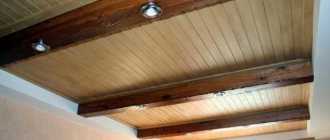
Coffered ceiling
The most successful finishing option is to stick paper lining wallpaper. This coating perfectly masks all the unevenness and roughness of the plywood ceiling, so it can be painted, covered with vinyl trellises, or glued with polystyrene or polyurethane tiles.
One of the most interesting finishing options is the coffered ceiling. If you lay sheets of plywood not in a staggered pattern, but in a checkered pattern, and then cover the joint lines with decorative beams, you will get a very nice design option, reminiscent of Provence or Country style.
Carved plywood ceiling
A relatively new method of decorative finishing of a plywood ceiling is the use of sheets with a carved pattern applied using a machine. Thanks to the high precision of milling, you can create drawings and entire compositions.
In addition to carving, a similar processing method is used for more complex mosaic sets, intarsia and marquetry, which were previously used in ceiling decoration only in very expensive interiors.
Stacked mosaic finishing option
Ceiling in a wooden house made of plywood: photo
It is clear that the quality of decorative finishing depends entirely on the capabilities of the customer and the imagination of the artist. Handmade work has always been very time-consuming and expensive, so most customers limit themselves to only small fragments of decoration using mosaic inserts and painting.
Preparing for finishing
Fiber boards are sometimes used as a finishing coating, but most often their surface is prepared for subsequent wallpapering, painting, varnishing and other processing methods.
- Moisture Protection – Even waterproof brands like TVs need extra protection. When using the material as a floor covering, a protective layer can be created by PVA glue, and after installation, the surface is covered with drying oil.
- Final processing of seams - seams between sheets should be 2 - 3 mm. The joints are covered with reinforcing tape, which is held together with putty. The glue sometimes protrudes through the seams, in which case it is necessary to remove the excess.
- Masking of fasteners - when attaching sheets to screws and self-tapping screws, it is necessary to mask the protruding caps using putty. To avoid this procedure, it is better to carry out finishing work using nails with small heads.
- Primer is a mandatory procedure before finishing. In most cases, acrylic or alkyd compounds are used. The primer improves adhesion with other finishing materials (putty, varnish, paint).
Primer the fiberboard surface using a roller
Sources
- https://bildsnab-yug.ru/pol-i-potolok/iz-dvp-svoimi-rukami.html
- https://saunavatlante.ru/chem-krepit-dvp-k-potolku/
- https://stroudom72.ru/kak-pribit-dvp-k-potolku/
Did you manage to solve your problem using the recommendations from the article?
Yes!
46.83%
No. More answers required. I'll ask in the comments now.
37.24%
Partially. There are still questions. I'll write in the comments now.
15.94%
Voted: 709
Fiberboard on the ceiling in a wooden house
To all the disadvantages of plywood, you can also add the large weight of the sheet, glued together from 6-8 layers of birch veneer. Laying and holding it above your head until the installation of the fasteners is completed is quite difficult physically, especially if you try to complete the finishing alone, on your own.
Fiberboard is a very light and easy-to-work material
To simplify the work and reduce the load, many craftsmen suggest sheathing the ceiling in a wooden house with fiberboard or fiberboard. Sheets made of pressed cellulose fiber are several times lighter, can be easily cut, sanded, and adjusted to size.
If you choose the right type of sheet or use hardboard, then it is quite possible to make a full-fledged fiberboard ceiling with your own hands, photo.
The fiberboard surface is ideal for painting
How to attach fiberboard to the ceiling
Fiberboards are much thinner than plywood, so when planning the installation of the material, you must immediately decide on the best method and means of securing the slab to the sheathing.
Options for attaching fiberboard to the ceiling
To install a ceiling made of wood-fiber boards, you will need to assemble a lathing with higher rigidity and surface precision. Simply sheathing a fiberboard ceiling in a wooden house by laying sheets on cross-beams lined with a plywood-type lattice obviously won’t work. Fiberboard has very little rigidity, so the surface will be wavy.
In order to lay fiberboard on the ceiling surface, you can use three mounting options:
- Make a special sheathing or shingles;
- Use a metal frame under the fiberboard, as is the case with drywall;
- Completely sew the rough ceiling from an unedged board or slab.
Any of the listed designs of rough hems will make the fiberboard finish rigid, and most importantly, flat. The sheets themselves can be fastened with wallpaper nails, you can glue them, or, in extreme cases, use a furniture stapler.
DIY fiberboard ceiling
It is known from practice that the best option for laying fiberboard is slatted shingles. Thin strips, no more than 2.5 m long, are placed on the ceiling beams in increments of 5-10 cm. The result is a more rigid grid than in the case of plywood, and at the same time quite strong, capable of holding a relatively light fiberboard sheet.
It is best to cut wood-fiber boards in advance into strips or blanks no more than 1.2 m wide. It is quite possible to hold such fiberboard on the ceiling with your own hands, in order to first grab it along the sides, and then you could straighten, align and sew it to the slats on the ceiling.
Advice! If fiberboard is glued to the sheathing, then a sheet of plywood can be used as a support, with which the material is pressed against the slats and fixed with the help of several vertical supports.
It is easy to glue boxes and cladding from fiberboard
Seams and joints are sealed with a mixture of wood glue and cellulose fiber obtained by unraveling scraps of fiberboard or plywood on an emery wheel. To prevent the putty from falling out of the seams, it is sealed with tape.
Materials and tools required for work
I used the following set of materials:
| Materials | Description |
| Fiberboard | This material allows you to prepare the ceiling for further finishing, and in country and country houses, fiberboard is often used as a finishing coating. After attaching it, you just need to paint it, and the work is finished, which is very quick and easy |
| Galvanized nails | With their help, sheets are attached; I use the 3x25 or 3x30 option, this is quite enough to securely fix the material. The nails have a larger head, which is also important, as this allows you to more reliably press the fiberboard to the surface |
| Several boards | These can be unedged options, which you will find at home with a thickness of 25 mm or more. The boards will be used to construct the lift, so there are no special requirements for them |
| Wood screws | Ordinary black self-tapping screws with a large pitch of 41 or 45 mm long; if the boards are thicker than 25 mm, then you can take longer options. These hardware will be used to assemble the lift and to attach it to the wall. |
We will need a few simple tools:
- Screwdriver - I have said, I say and will continue to say that this power tool should be available to any person who, at least occasionally, does minor repairs at home. If you like to tinker, make repairs or build a house from scratch, then you simply cannot do without a screwdriver;
- A hacksaw with a fine tooth is perfect for cutting fiberboard ; with its help, the cutting quality will be excellent. And don’t worry about getting too tired – the material is not very hard and cuts well. If you have a jigsaw on hand, you can use that too, just use a blade for clean cutting (T101B);
- Nails are driven in with a hammer , an option weighing 400-500 grams is suitable for the job; swinging a kilogram striker is not the best idea;
- For measurements, we cannot do without a tape measure , the minimum length of which must be no less than the size of the fiberboard. The markings are made using a pencil; any pencil will do, as long as it is sharp and draws well on the material.
Hardboard ceiling
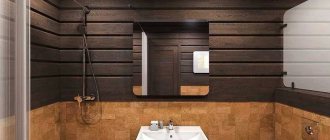
For wooden houses, a special material based on fibreboard - hardboard - is best suited. Essentially, this is the same fiberboard, but with a laminated surface on one side. It can be just a smooth surface, or a glued PVC film with the pattern and texture of stone, wood, or even imitation tiles.
Hardboard
The principle of laying hardboard is no different from finishing the ceiling using fiberboard. The only significant difference is that most customers perceive the fiberboard as a rough base, and prefer to cover the fiberboard ceiling in a wooden house only as a preparation for further finishing, for example, gluing wallpaper or film.
Mounting methods
To fix it to the sheathing, you can use construction staples (if mounted on a wooden beam and using a construction stapler), nails or self-tapping screws. Please note that in the latter case, you need to countersink each “breakdown” (make a recess for the head). Methods of fastening to the ceiling depend on the density of the sheet. We remember that the denser the fiberboard sheet, the heavier it is, and, accordingly, the stronger the materials for fastening. Protruding iron from staples or nails must be carefully puttied, because over time these iron parts will rust and show through the paint or wallpaper.
Features of chipboard ceilings
Using particle boards to finish the ceiling surface is not the best idea, but given the low cost of the material and the availability of chipboard, it can be used as a rough ceiling.
Like plywood, particle board is very sensitive to moisture, so before laying it on the ceiling it must be treated with drying oil or oil-based paints and varnishes. For cladding, it is better not to use slabs with a laminated coating or PVC film. Such finishing significantly impairs the release of water vapor, and in addition, glue adheres very poorly to such a surface, so you have to sand the ceiling before you can put it in order.
Although chipboard is more economical in price than plywood, it is significantly inferior to glued material in strength and durability. In addition, the phenolic index of chipboard is much higher than that of plywood sheets and, especially, fiberboard.
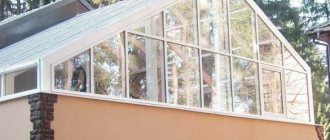
Types of decorative wall panels
Wood always remains a relevant material because it can store the energy and warmth of nature. Over time, it does not lose its attractive appearance, but absorbs time and ages gracefully. Wood is a malleable and easy-to-work material. Using wood, you can realize any fantasy and transform it into reality. This requires an idea, desire, time and basic specialist skills.
Important! Facing fiberboard panels allows you to solve many problems:
- To carry out installation work, no preliminary preparation of the wall surface is required, which means there is no need to work with cement and glue.
- Such panels are very easy to transport, disassemble and install. It's like a construction kit that even a non-professional specialist can easily assemble.
- Thanks to the finishing of walls with such panels, it is possible to hide all errors in the wall surface and communications. And the presence of a wide range of colors allows you to choose panels for any room.
On the modern market there is a huge assortment of different materials, with different sizes and shapes, representing an expanded range of colors and shades, decorated with a pattern or print. Each variety has its own individual performance characteristics and properties. Let's look at the main differences between vertical wall panels.
Slatted panels
They are long, fastened together with strips. The width of each panel varies between 10–30 cm, the length corresponds to 2.5 to 6 m, and the thickness ranges from 8 to 25 mm. Modern apartments have a ceiling height of 2.5 m, so the length of the product is enough to install vertical panels.
Such panels are characterized by a tongue-and-groove system, which allows for more convenient and easy installation, in which special brackets and clamps are used for fastening.
Sheet panels
They represent the largest modules in size. They are characterized by a uniform color or the presence of a pattern on the surface. In appearance, the panels are similar to hardboard sheets.
The most common sizes are 130x49 cm, 130x100 cm, 122x244 cm, 260x100 cm, 128x98 cm, 200x100 cm, 260x490 cm, 260x98 cm, thickness can vary from 3 to 6 mm. With a perfectly flat surface of the walls, the panels are perfectly glued directly to the wall. The positive aspect of this material is the high speed of installation.
Important! If there are errors in the wall, it is preferable to fasten sheet panels to the sheathing using nails.
Tile panels
They have a square shape. Thanks to them, designers have the opportunity to implement interesting decorative solutions. For square panels, or so-called tile panels, the installation principle is exactly the same as for typesetting panels. In this case, you can form a pattern by combining panels of different patterns or tiles of different colors.
Standard sizes of tile panels: 15x60 cm, 30x30 cm, 30x60 cm, 98x49 cm, 98x98 cm.
Additional nuances
Based on the base material and the applied top layer, wall panels are characterized by both resistance to high humidity and a negative reaction to it. That is why, when choosing a material for finishing fiberboard walls, it is necessary to study the properties of the material in detail.
Moisture-resistant wall panels are characterized by the presence of the following types:
- panels made of natural wood, which are coated with wax or some other special material;
- the base is made up of other materials, but on the front side there is a laminated film, which is painted in some color, although sometimes there are products laminated on both sides;
- plastic panels or panels that are covered with plastic.
Non-moisture resistant panels include:
- chipboard panels;
- MDF and fiberboard panels, not laminated models.
Photo gallery: ceilings made of plywood, fiberboard, chipboard
For a wooden house, the use of plywood in combination with solid timber and sawn veneer gives a very good result.
Carved patterns on fiberboard
Paint selection
Despite some features of surface preparation, you can use almost any paint - acrylic, water-based or alkyd. The thing is that with a correctly selected primer mixture, the absorbency of the material is significantly reduced and almost any type of paintwork material is suitable.
Important: in order for the paint composition to “adhere” better and the quality of painting to be at its best, it is best to use solutions on the same basis as the primer mixture applied at the surface preparation stage.
It is also important to choose the right tool for applying a layer of paintwork. The main area of the ceiling can be painted with a standard roller with a velor nozzle, but for better painting of the junctions of individual fragments of the coating finished with putty and reinforcing tape, it is better to use a brush - a brush or another similar one. The same brush is convenient for painting corners.
Otherwise, the choice of paint and varnish depends on your preferences regarding the resulting surface. Alkyd enamels will give the ceiling shine and smoothness, and water-soluble compounds create a matte finish that gives the structure maximum resemblance to a regular whitewashed ceiling.
The color scheme can be varied and selected according to your wishes. If you use color, it is better to immediately dilute the amount of mixture required for work. This will allow you to obtain a homogeneous composition of the same color. If you tint in several stages, there is a high probability of not matching the color of the previous composition.
Important: if a moisture-resistant type of fiberboard is used for the ceiling covering, water-based solutions will not be suitable - the paraffin impregnation used to treat slabs of this type will not allow the composition to adhere properly and it will “slide” like water from greasy surfaces.
The use of special devices together with correctly selected paints or varnishes gives interesting visual effects. For example, alkyd varnish, which has been “walked over” with a special applicator, will create a coating similar to natural wood.
Source
Types of primer
Before painting the fiberboard, it is primed. The paint adheres better to the treated sheet and its consumption is reduced. Since wood boards have different surfaces, different compositions are selected for the front and back sides.
- Alkyd primer forms a protective layer on the surface of the slab in the form of a matte film, onto which paint adheres well. The solution increases the service life of the material and does not contain toxic substances. It dries for 24 hours at a temperature of +20 C. The solution is used to treat the front and inner parts of the sheet.
- Drying oil is a natural product that penetrates deeply into the material and forms a dense glossy layer. The treated surface interacts well with oil paint. Drying oil protects the material from moisture penetration. The disadvantages of drying oil are that it takes a long time to dry, has a specific smell, and the room must be well ventilated when working. Used for processing fiberboard on both sides.
- Water-based acrylic primer is odorless as it does not contain toxic elements. It is easily applied to the surface with a roller and dries for three hours at room temperature. However, the product has an important drawback: the material strongly absorbs the water base. Apply acrylic solution to the front side of the slab.
- Acrylic latex based primer. The product contains fungicides and insecticides, substances that prevent the formation of fungus. Odorless acrylic latex primer, apply it to the sheet in one layer. The product is used for priming on both sides of the panel.